Phát triển ứng dụng cho thiết bị di động| Tài liệu ôn tập Phát triển ứng dụng cho thiết bị di động| Trường Đại học Bách Khoa Hà Nội
An Android App
- Một hoặc nhiều màn hình tương tác
- Viết mã bởi Java hoặc XML
- Sử dụng Android SDK
- Sử dụng thư viện Android và Android App Famework
- Thực thi bởi Android Runtime Virtual machine (ART)
Môn: Phát triển ứng dụng cho thiết bị di động 23 tài liệu
Trường: Đại học Bách Khoa Hà Nội 5.8 K tài liệu
Tác giả:


Preview text:
MOBILE APP DEV
Phần I: Hệ thống cấu trúc Slides
01.0: Introduction to Android
+ Android Ecosystem (Hệ sinh thái Android)
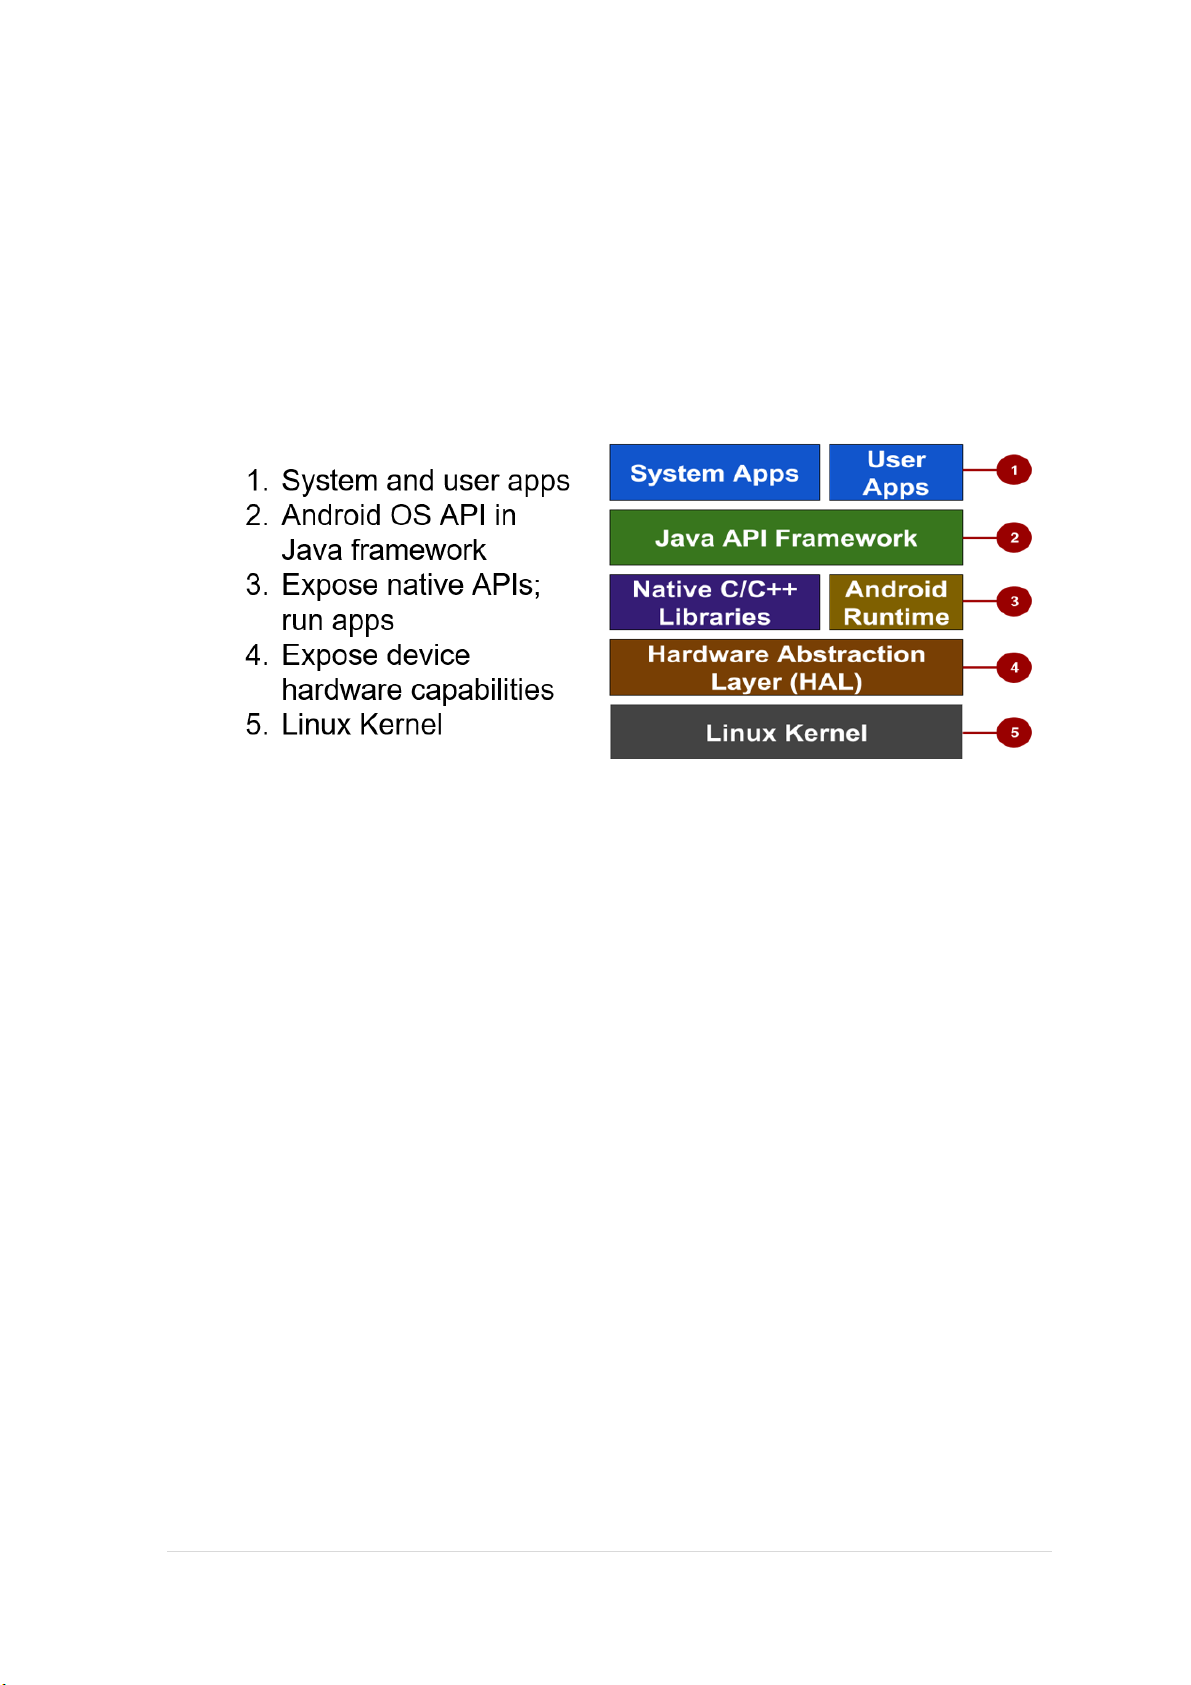
+ Android Platform Architecture (Kiến trúc nền tảng Android) - Android stack - Android Version
+ Android App Development - An Android App
Một hoặc nhiều màn hình tương tác
Viết mã bởi Java hoặc XML
Sư dụng Android SDK
Sử dụng thư viện Android và Android App Famework
Thực thi bởi Android Runtime Virtual machine (ART) - App building blocks
Resources (Tài nguyên): layouts, images, strings, colors as XML và media files.
Components (Thành phần): activities, services, and helper classes (lớp
phụ trợ) as Java code.
Manifest (Khai báo rõ ràng): thông tin về app để sử dụng khi chạy
Build configuration (Xây dựng cấu hình): APK versions in Gradle config files.
01.1: Build first Android App + First Android app
- Prerequisites (Điều kiện tiên quyết) 1 | P a g e Java Programming Language
Object-oriented programming
XML – properties / attributes
Using an IDE for development and debugging - Android Studio (IDE)
- Creating first Android app
Name main activity: MainActivity
Name layout: activity_main - Project folders
Manifests – Mô tả app được đọc bởi Android runtime
Java – Java source code packages
Res – resources (XML) – layouts, strings, images, dimensions, colors,..
Build.gradle – xây dựng cấu hình trong các file Gradle
- Gradle build system (những thứ chứa trong Gradle Scripts)
project: build.gradle (Project: android - Runtime)
module: build.gradle (Module: Application)
settings: setting.gradle (Project Settings) - Logging statement import android.util.Log; // Use class name as tag
private static final String TAG = MainActivity.class.getSimpleName();
// Show message in Android Monitor, logcat pane // Log.(TAG, "Message");
Log.d(TAG, “Creating the URI…”);
01.1: Build first Android App: Layouts and resources for the UI + Views
- Các lớp con của Views là khối giao diện cơ bản
● Display text (TextView class), edit text (EditText class)
● Buttons (Button class), menus, other controls
● Scrollable (ScrollView, RecyclerView) ● Show images (ImageView)
● Group views (ConstraintLayout and LinearLayout)
- Tạo views và layouts 2 | P a g e ● XML Editor android:id="@+id/show_count"
android:layout_width="match_parent"
android:layout_height="wrap_content"
android:background="@color/myBackgroundColor"
android:text="@string/count_initial_value"
android:textColor="@color/colorPrimary"
android:textSize="@dimen/count_text_size" android:textStyle="bold" /> android:=""
Example: android:layout_width="match_parent"
android:="@/resource_id"
Example: android:text="@string/button_label_next"
android:="@+id/view_id"
Example: android:id="@+id/show_count" ● Java code In an Activity:
TextView myText = new TextView(this);
myText.setText("Display this text!"); ● Context
Get the context:
Context context = getApplicationContext();
An Activity is its own context:
TextView myText = new TextView(this);
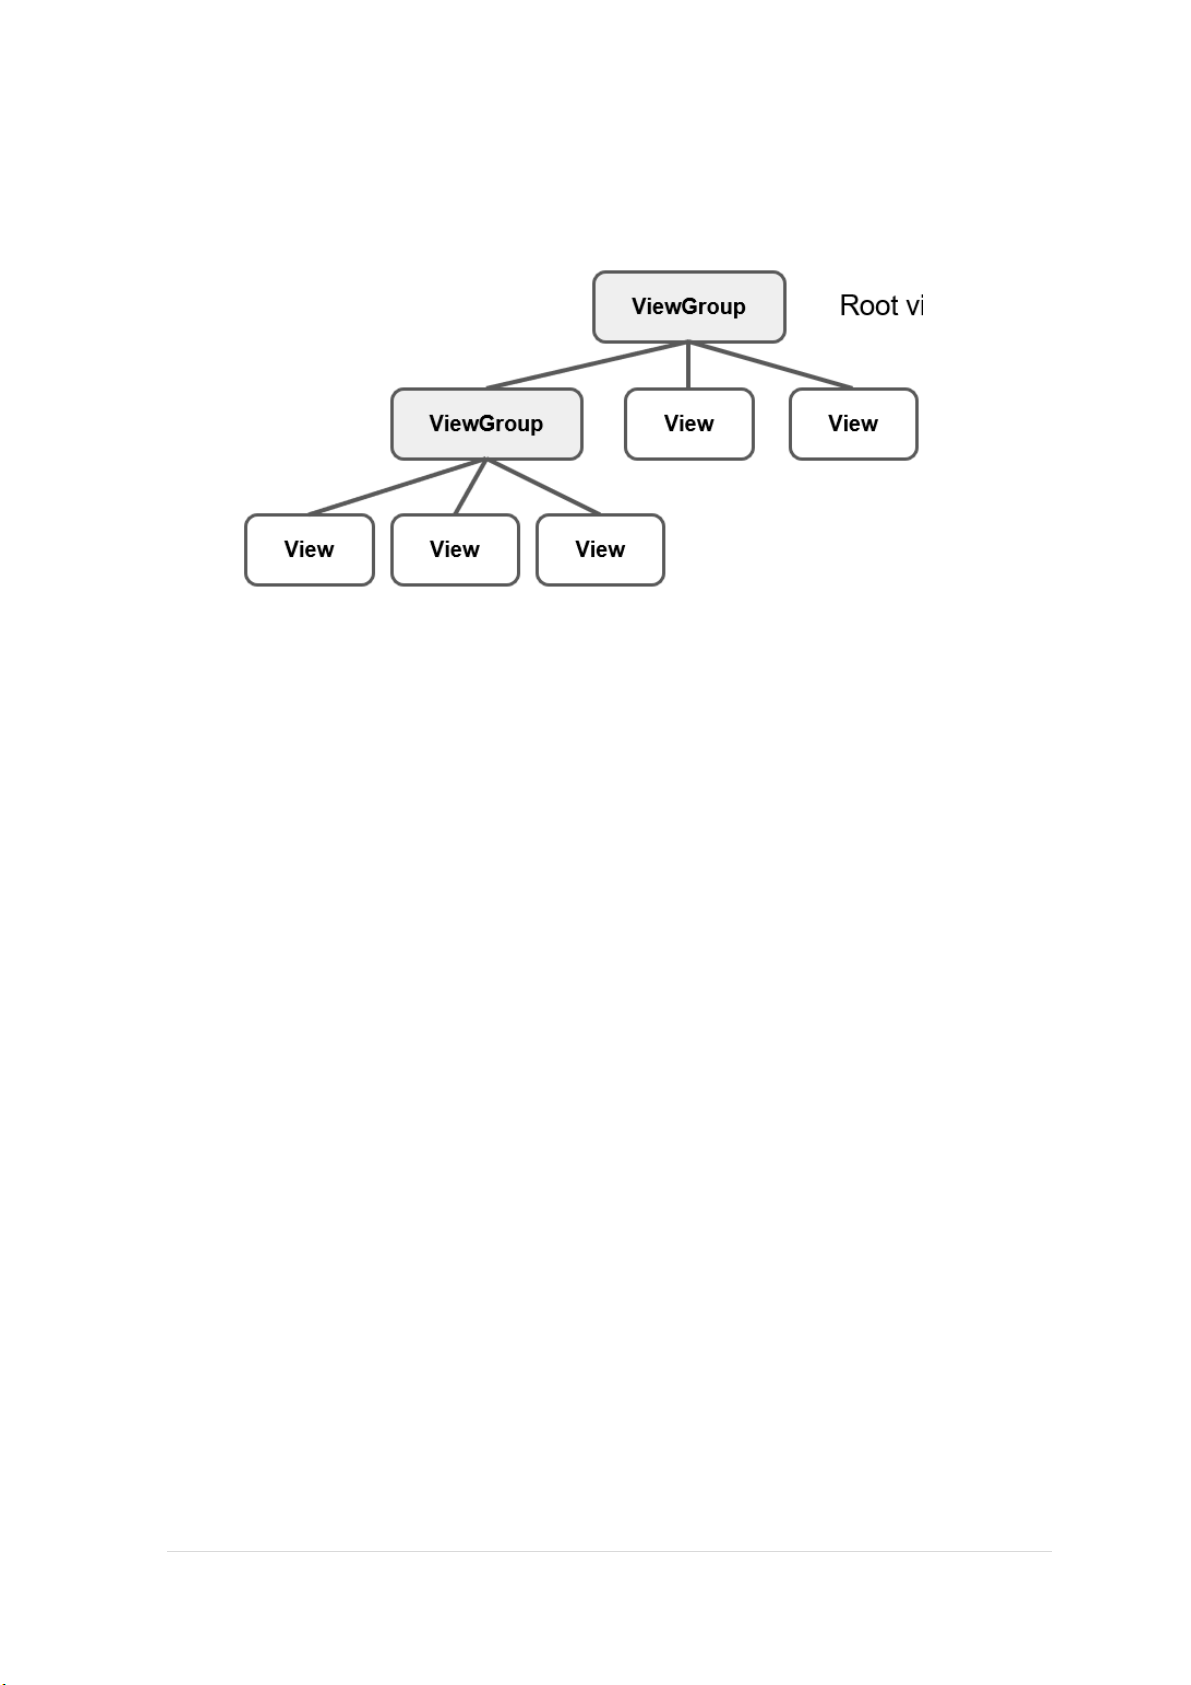
+ ViewGroup and ViewHierarchy
- Các lớp con của ViewGroup
● ConstraintLayout: Định vị trí các phần tử UI sử dụng những kết nối
ràng buộc với những phần tử khác và các cạnh layout.
● ScrollView: Chứa một phần tử và cho phép cuộn.
● RecyclerView: Chứa danh sách các phần tử và cho phép cuộn bằng
cách thêm và xóa phần tử động. 3 | P a g e
● LinearLayout, ConstraintLayout, GridLayout, TableLayout,
RelativeLaout, FrameLayout, …
- Phân cấp viewgroups, views - LinearLayout XML
android:orientation="vertical"
android:layout_width="match_parent"
android:layout_height="match_parent"> ... /> ... /> ... /> Java code
LinearLayout linearL = new LinearLayout(this);
linearL.setOrientation(LinearLayout.VERTICAL);
TextView myText = new TextView(this);
myText.setText("Display this text!"); linearL.addView(myText); setContentView(linearL);
// Set the width and height of a view:
LinearLayout.LayoutParams layoutParams = new Linear.LayoutParams( LayoutParams.MATCH_PARENT, LayoutParams.MATCH_CONTENT);
myView.setLayoutParams(layoutParams); 4 | P a g e + Event Handling
- Events là thứ gì đó xảy ra ● In UI: Click, tap, drag
● Device: DetectedActivity such as walking, driving, tilting
● Events are "noticed" by the Android system - Event Handlers
● Trong một Method, Event Handler giúp kích hoạt sự kiện cụ thể để làm
việc gì đó đáp ứng lại sự kiện đã xảy ra. ● Attach in XML android:onClick="showToast" ● Implement in Java
public void showToast(View view) { String msg = "Hello Toast!";
Toast toast = Toast.makeText(this, msg, duration); toast.show(); } }
● Alternative: Set click handler in Java
final Button button = (Button) findViewById(R.id.button_id);
button.setOnClickListener(new View.OnClickListener() {
public void onClick(View v) { String msg = "Hello Toast!";
Toast toast = Toast.makeText(this, msg, duration); toast.show(); } });
- Resources and measurements ● Layout: R.layout.activity_main
setContentView(R.layout.activity_main); ● View: R.id.recyclerview
rv = (RecyclerView) findViewById(R.id.recyclerview); ● String: In Java: R.string.title
In XML: android:text="@string/title"
● Density-independent Pixels (dp): for Views
● Scale-independent Pixels (sp): for text 5 | P a g e
01.3: Text và scrolling views + TextView
- TextView là lớp con của lớp View cho 1 hoặc nhiều dòng text. ● XML android:id="@+id/article"
android:layout_width="wrap_content"
android:layout_height="wrap_content"
android:autoLink="web"
android:text="@string/article_text"/>
android:text - text to display
android:textColor - color of text
android:textAppearance - predefined style or theme
android:textSize - text size in sp
android:textStyle - normal, bold, italic, or bold|italic
android:typeface - normal, sans, serif, or monospace
android:lineSpacingExtra - extra space between lines in sp ● Java code
TextView myTextview = new TextView(this);
myTextView.setWidth(LayoutParams.MATCH_PARENT);
myTextView.setHeight(LayoutParams.WRAP_CONTENT); myTextView.setMinLines(3);
myTextView.setText(R.string.my_story);
myTextView.append(userComment);
- EditView là lớp con của TextView với text có thể sửa. + ScrollView
- ScrollView là một lớp con của FrameLayout
● Sử dụng HorizontalScrollView cho cuộn ngang
● Sử dụng một RecyclerView cho các danh sách (lists) R.layout.activity_main ● XML: one TextView
android:layout_width="wrap_content"
android:layout_height="wrap_content"
android:layout_below="@id/article_subheading">
android:layout_width="wrap_content"
android:layout_height="wrap_content" 6 | P a g e .../> ● XML: view group
android:layout_width="match_parent"
android:layout_height="wrap_content"
android:orientation="vertical">
android:id="@+id/article_subheading" .../>
android:id="@+id/article" ... />
● XML: image and button
02.1: Activities and Intents
+ Activities (high-level view)
- Activity là một thành phần ứng dụng
- Implementing Activities
● 1. Define layout in XML
<?xml version="1.0" encoding="utf-8"?> <RelativeLayout
xmlns:android="http://schemas.android.com/apk/res/android"
android:layout_width="match_parent"
android:layout_height="match_parent"> <TextView
android:layout_width="wrap_content"
android:layout_height="wrap_content"
android:text="Let's Shop for Food!" /> RelativeLayout>
● 2. Define Activity Java class 7 | P a g e
public class MainActivity extends AppCompatActivity { @Override
protected void onCreate(Bundle savedInstanceState) {
super.onCreate(savedInstanceState); } }
● 3. Connect activity with layout
public class MainActivity extends AppCompatActivity { @Override
protected void onCreate(Bundle savedInstanceState) {
super.onCreate(savedInstanceState);
setContentView(R.layout.activity_main); } }
● 4. Declare activity in Android Manifest
android:name="android.intent.category.LAUNCHER" /> + Intents
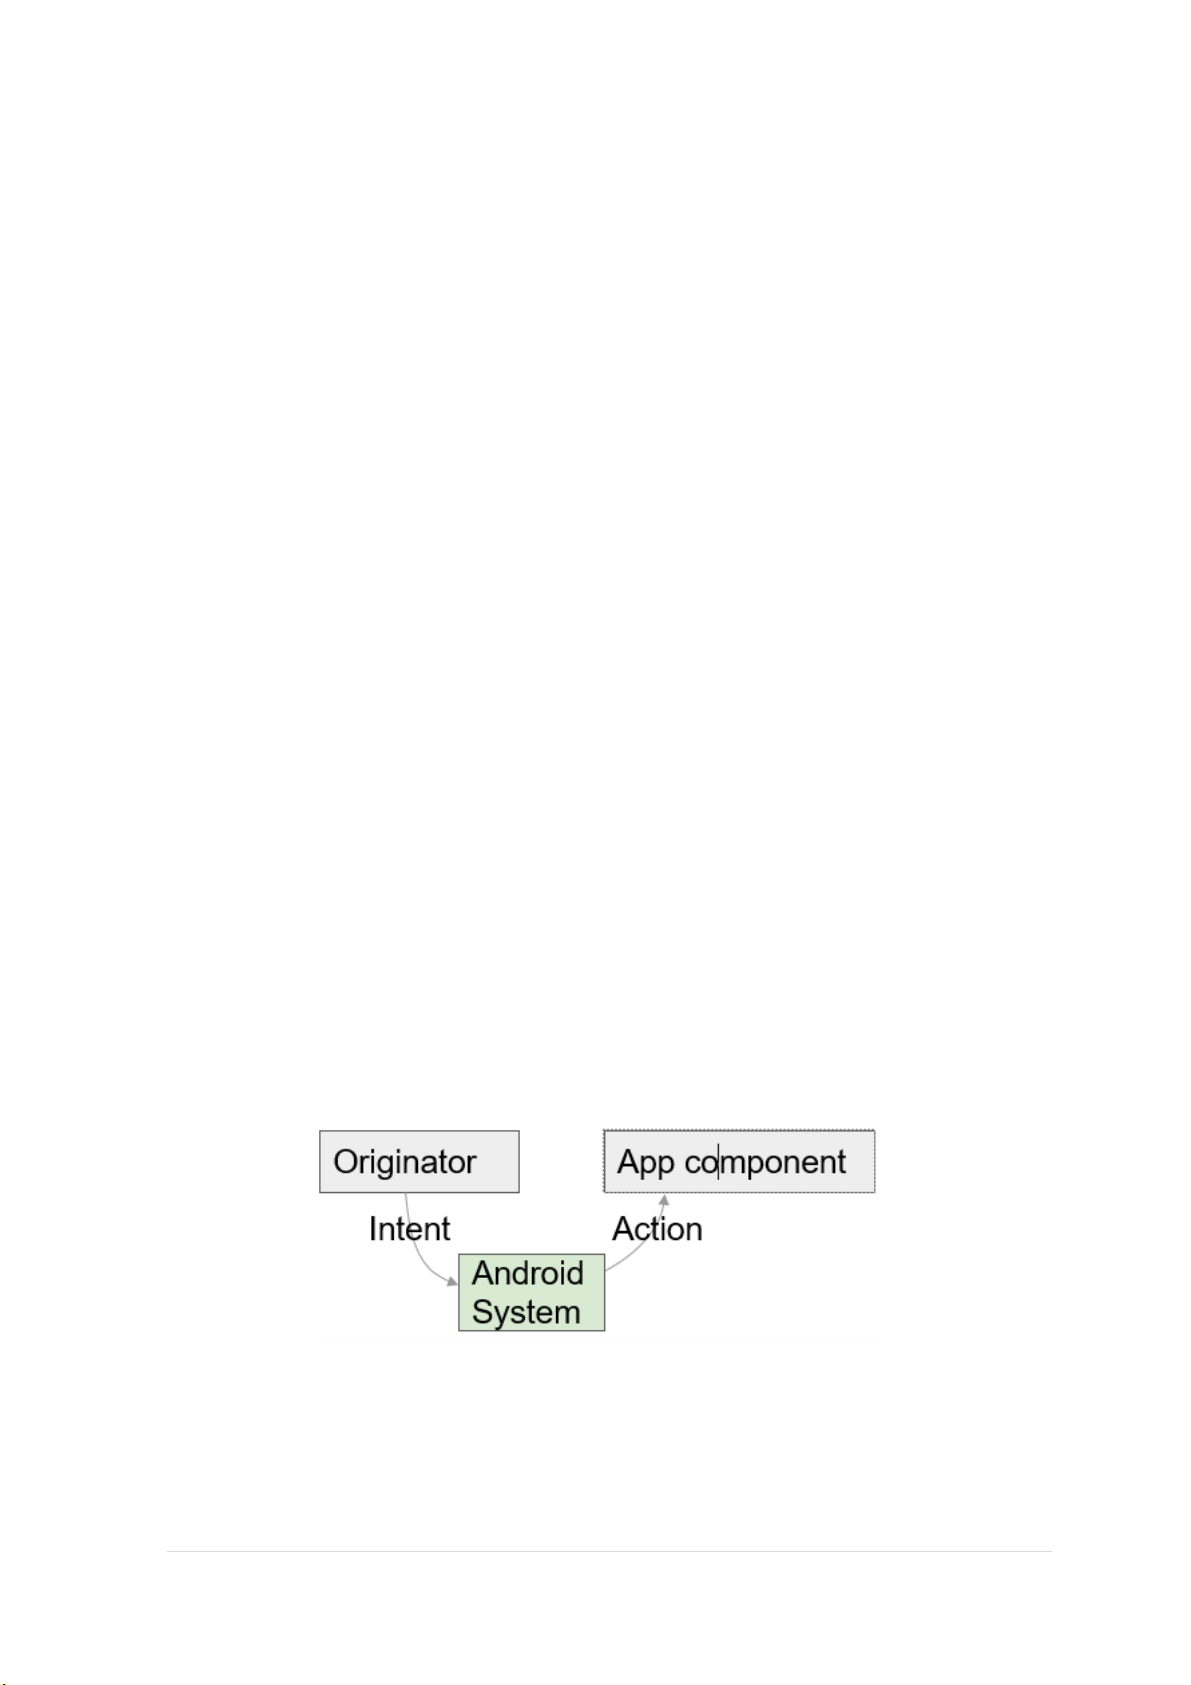
- Intent là mô tả cho một hoạt động được diễn ra
- Intent là một đối tượng được dùng để yêu cầu một hành động từ app
component khác thông qua hệ thống Android.
- Intents có thể làm gì? ● Start an Activity
○ Click Butons khởi động một Activity mới cho nhập text
○ Click Share mở ra một app cho phép đăng bức ảnh ● Start an Service 8 | P a g e
○ Khởi tạo tải xuống file ở nền ứng dụng (background) ● Deliver Broadcast
○ Hệ thống thống báo cho mọi người là điện thoại đang được sạc - Hai loại intents ● Explicit Intent
○ Bắt đầu một Activity cụ thể
- Yêu cầu trà với sữa được giao bởi Nikita
- Main activity bắt đầu ViewShoppingCart Activity ● Implicit Intent
○ Hỏi hệ thống để tìm Activity có thể xử lý yêu cầu (request)
- Tìm một quán đang mở bán trà xanh
- Click Share mở một bộ lựa chọn với danh sách cac ứng dụng + Starting Activities - An explicit intent
● Khởi tạo Intent
○ Intent intent = new Intent(this, ActivityName.class);
● Sử dụng Intent để bắt đầu Activity ○ startActivity(intent); - An implicit intent
● Khởi tạo Intent
○ Intent intent = new Intent(action, uri);
● Sử dụng Intent để bắt đầu Activity ○ startActivity(intent); ● Show a web page
Uri uri = Uri.parse("http://www.google.com");
Intent it = new Intent(Intent.ACTION_VIEW,uri); startActivity(it);
● Dial a phone number
Uri uri = Uri.parse("tel:8005551234");
Intent it = new Intent(Intent.ACTION_DIAL, uri); startActivity(it);
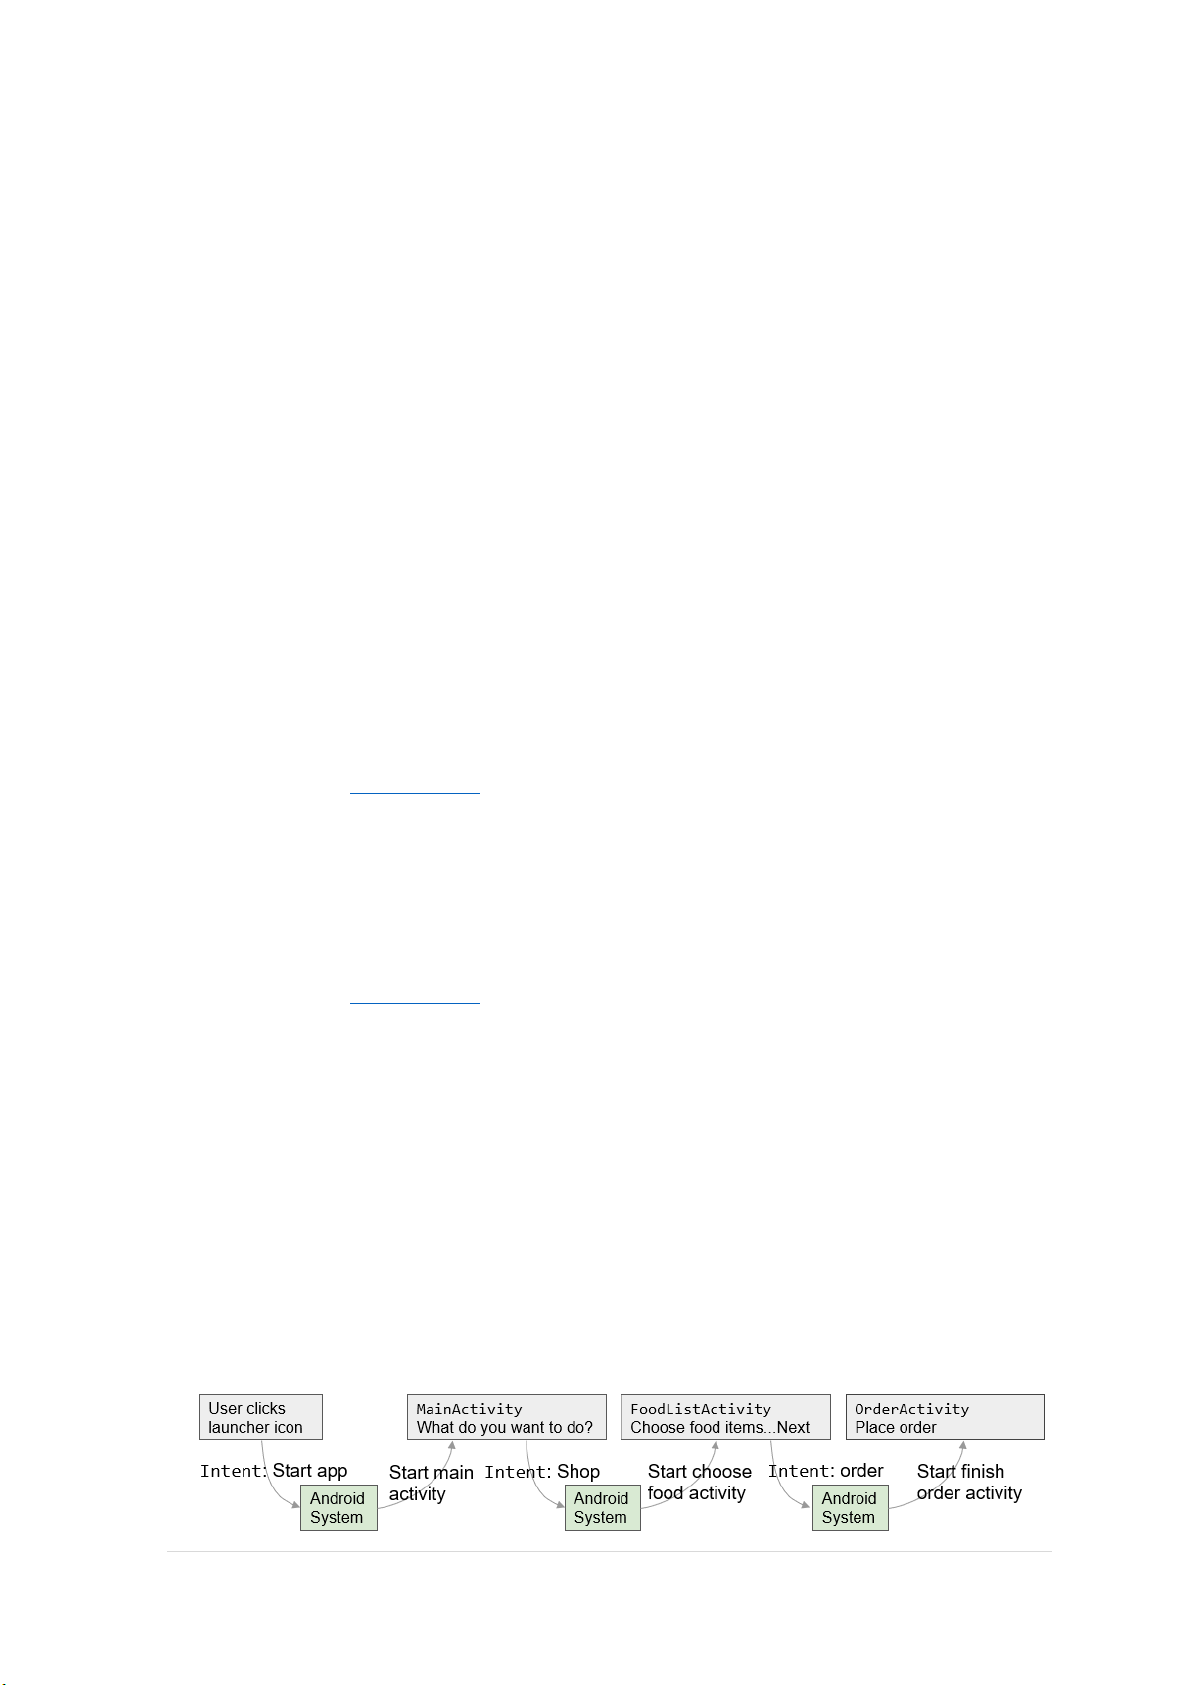
- Cách mà Activities run
● Tất cả Activity instances được quản lý bởi Android runtime
● Được bắt đầu với “Intent”, một thông điệp tới Android runtime để chạy 9 | P a g e
+ Sending and Reveiving data
- Hai cách send data với intents
● Data – một đoạn thông tin chứa địa chỉ dữ liệu có thể được đại diện bởi một URI
● Extras – một hoặc nhiều đoạn thông tin như một lựa chọn của những
cặp key-value trong một Bundle
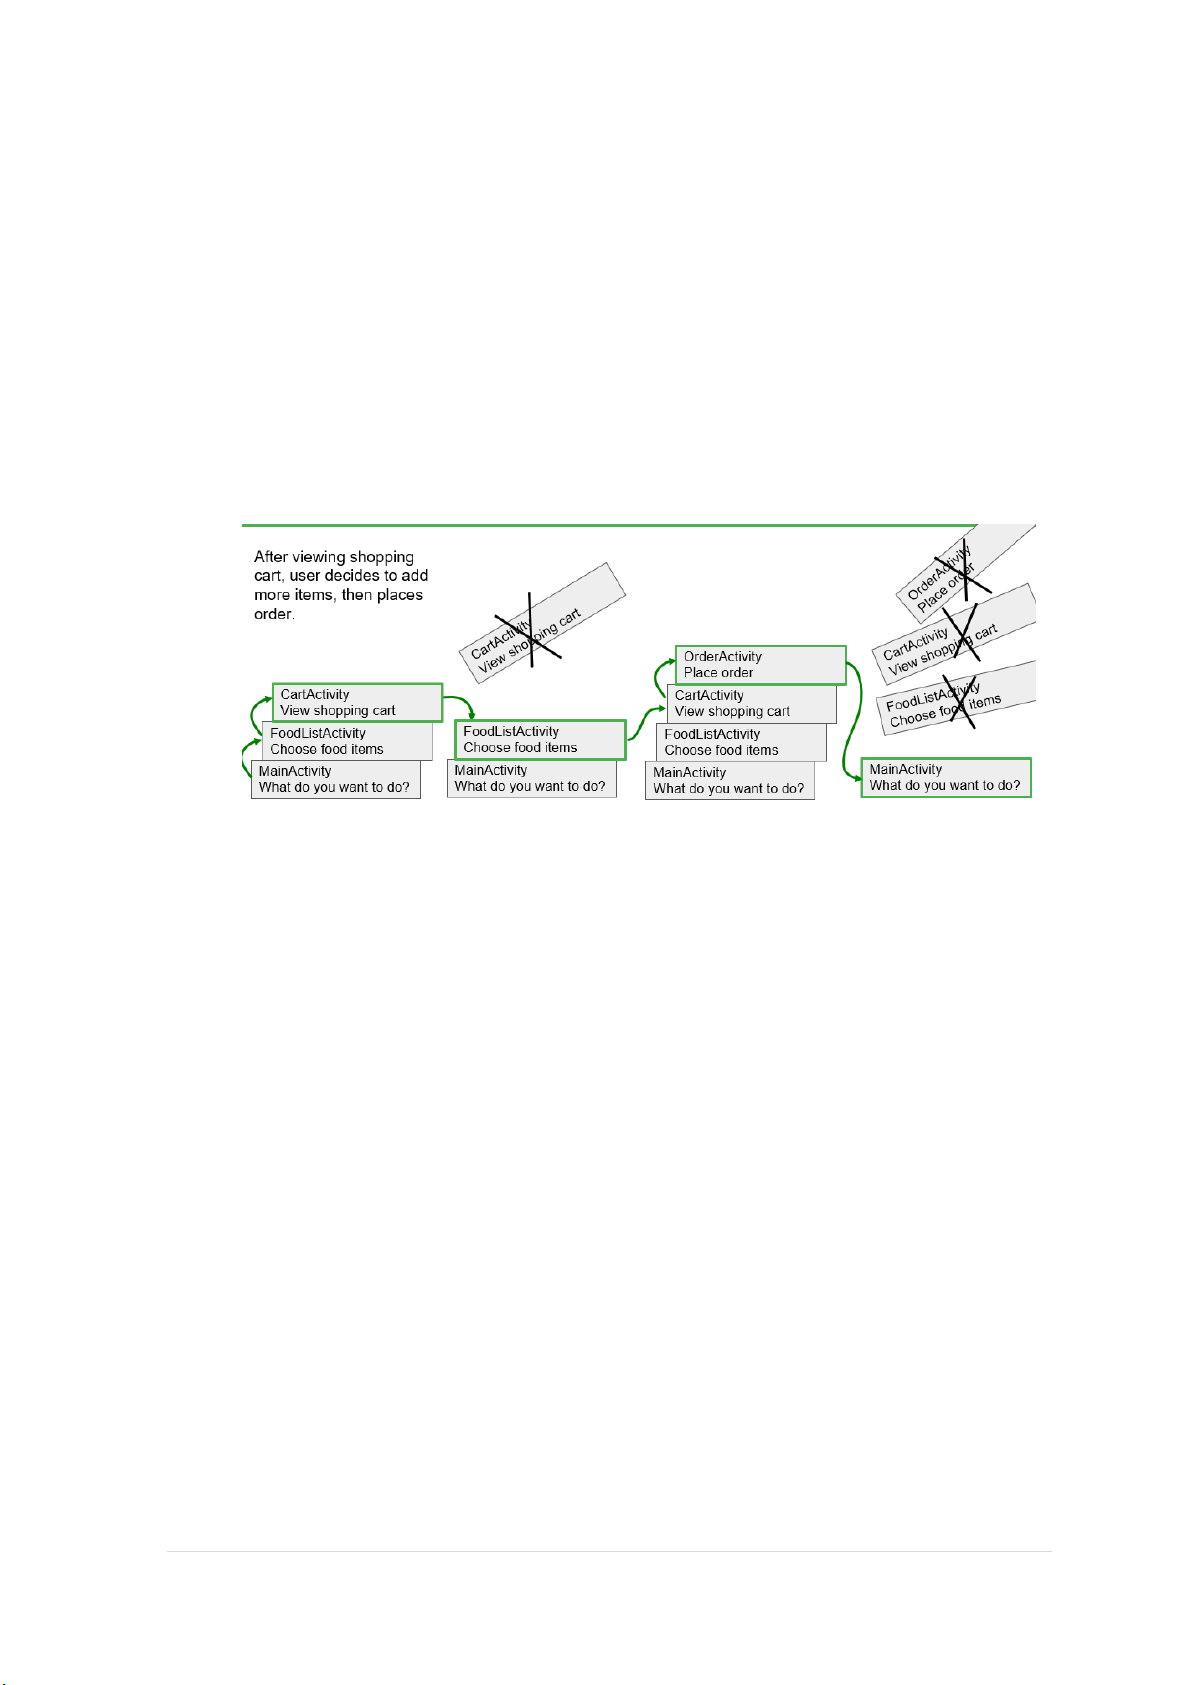
- Gửi và nhận Dữ liệu: slides 26-37 trong PP 02.1 + Navigation - Activity stack
- Set pareantACtivityName
android:name=".ShowDinnerActivity"
android:parentActivityName=".MainActivity" >
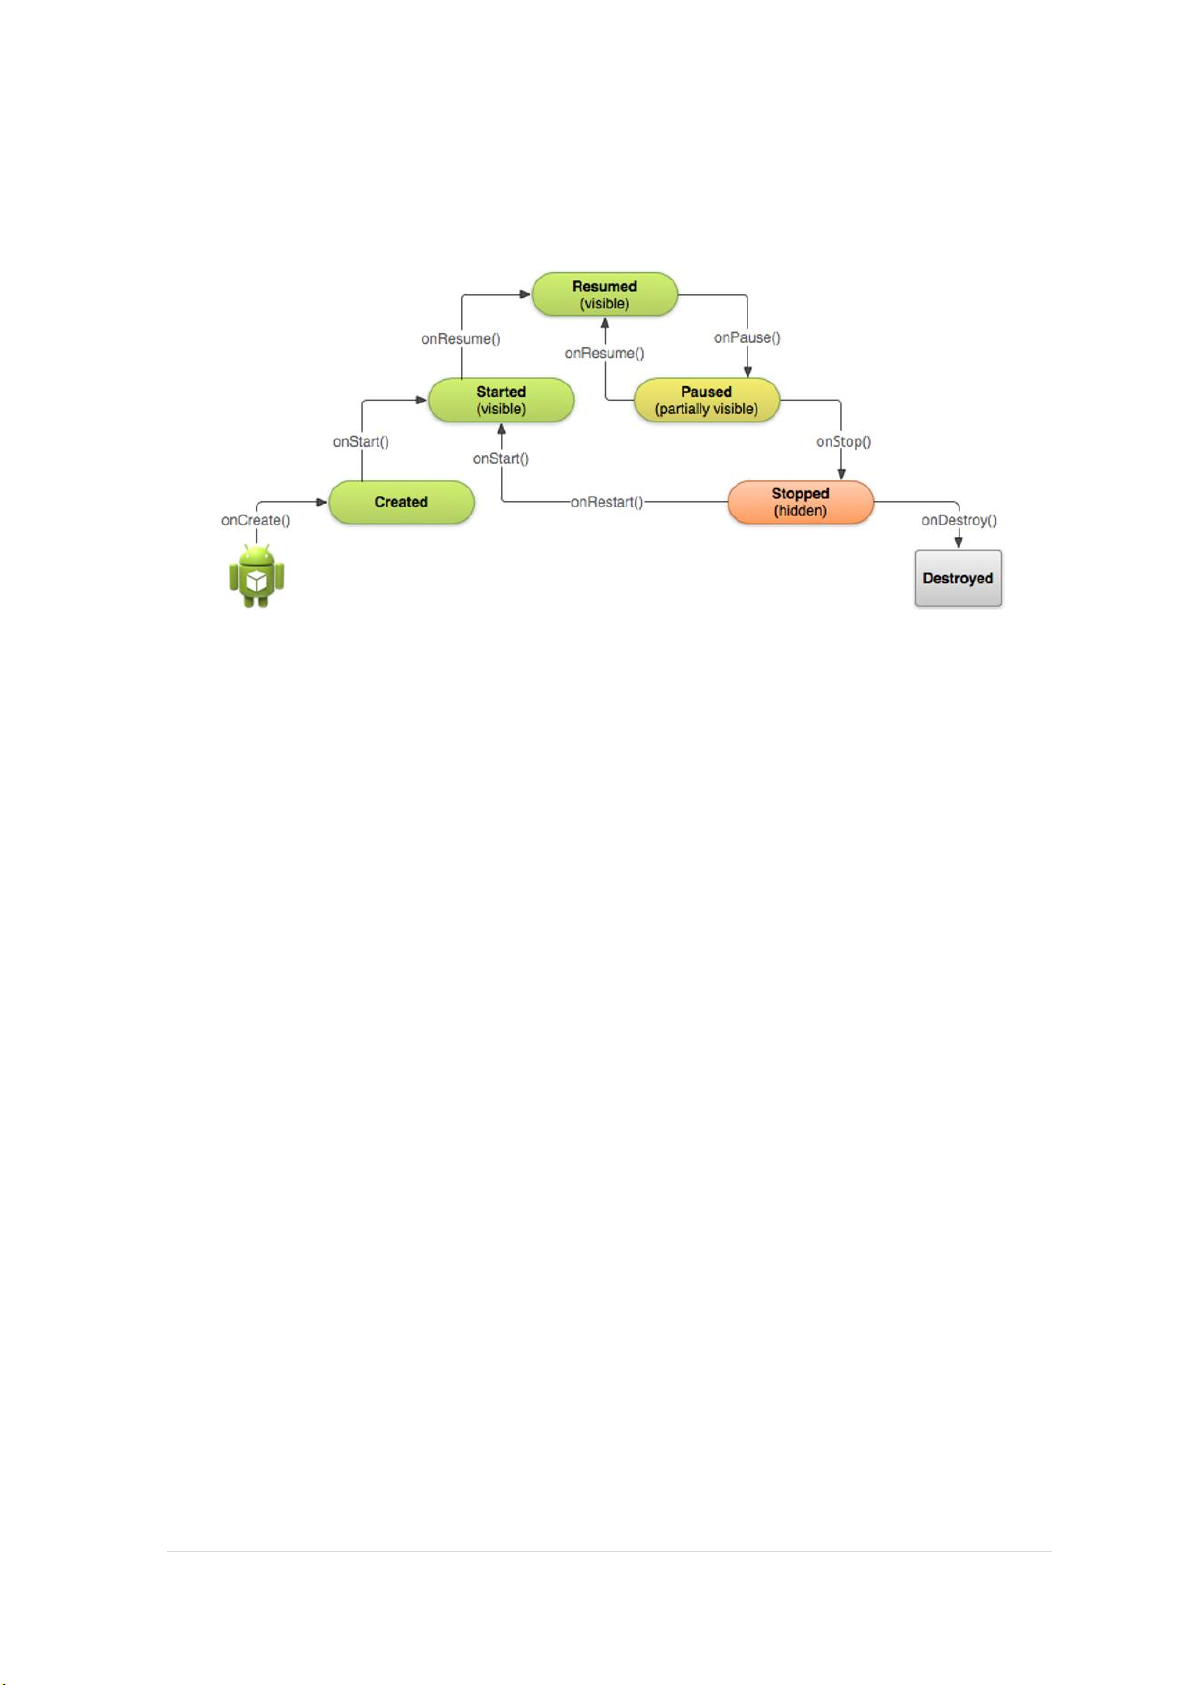
02.2: Activity lifecycle and state + Activities lifecycle
- Một vòng đời của Activity ● Created (not visible yet) ● Started (visible) ● Resume (visible)
● Paused(partially invisible) ● Stopped (hidden)
● Destroyed (gone from memory)
+ Activities lifecycle callbacks
onCreate(Bundle savedInstanceState) - static initialization
onStart() - when Activity (screen) is becoming visible
onRestart() - called if Activity was stopped (calls onStart()) 10 | P a g e
onResume() - start to interact with user
onPause() - about to resume PREVIOUS Activity
onStop() - no longer visible, but still exists and all state info preserved
onDestroy() - final call before Android system destroys Activity
+ Activities instance state
- Thông tin State được tạo ra trong khi Activity đang run, như là một counter,
user text, animation progression.
- State bị mất đi khi thiết bị bị xoay, thay đổi ngôn ngữ, ấn vào nút Back hoặc
hệ thống clear bộ nhớ.
+ Saving and restoring Activity state
- Hệ thống chỉ lưu lại:
Trạng thái của views với ID duy nhất (android:id) như là text được nhập trong EditText
Intent đã khởi động activity và dữ liệu ở dạng Extras
- Saving instance state
Thực thi onSaveInstanceState() trong Activity @Override
public void onSaveInstanceState(Bundle outState) {
super.onSaveInstanceState(outState);
// Add information for saving HelloToast counter
// to the to the outState bundle outState.putString("count",
String.valueOf(mShowCount.getText())); }
- Restoring in onCreate() @Override
protected void onCreate(Bundle savedInstanceState) {
super.onCreate(savedInstanceState);
setContentView(R.layout.activity_main);
mShowCount = findViewById(R.id.show_count);
if (savedInstanceState != null) { 11 | P a g e
String count = savedInstanceState.getString("count");
if (mShowCount != null)
mShowCount.setText(count); } } @Override
public void onRestoreInstanceState (Bundle mySavedState) {
super.onRestoreInstanceState(mySavedState);
if (mySavedState != null) {
String count = mySavedState.getString("count"); if (count != null)
mShowCount.setText(count); } } 02.3: Implicit Intents + Overview
- Android Runtime giữ một danh sách Apps đã đăng ký
- App Chooser cho phép người dùng chọn Handler
+ Sending an implicit Intent
- Tạo một Intent cho một hoạt động
Intent intent = new Intent(Intent.ACTION_CALL_BUTTON);
- Khởi động một Activity
if (intent.resolveActivity(getPackageManager()) != null) { startActivity(intent); }
- Ví dụ Gửi một implicit intent với data URI
Intent intent = new Intent(Intent.ACTION_DIAL);
intent.setData(Uri.parse("tel:8005551234"));
if (intent.resolveActivity(getPackageManager()) != null) { startActivity(intent); }
- Hiển thị một web page
Uri uri = Uri.parse("http://www.google.com");
Intent it = new Intent(Intent.ACTION_VIEW,uri); startActivity(it);
- Quay một số điện thoại
Uri uri = Uri.parse("tel:8005551234");
Intent it = new Intent(Intent.ACTION_DIAL, uri); 12 | P a g e startActivity(it);
- Gửi một imlplicit intent với extras
Intent intent = new Intent(Intent.ACTION_WEB_SEARCH);
String query = edittext.getText().toString();
intent.putExtra(SearchManager.QUERY, query));
if (intent.resolveActivity(getPackageManager()) != null) { startActivity(intent); }
- Tạo một Intent cho một hoạt động
Intent intent = new Intent(Intent.ACTION_CREATE_DOCUMENT);
- Đặt mime type và phân loại cho thông tin được thêm
intent.setType("application/pdf"); // set MIME type
intent.addCategory(Intent.CATEGORY_OPENABLE);
if (intent.resolveActivity(getPackageManager()) != null) {
startActivityForResult(myIntent,
ACTIVITY_REQUEST_CREATE_FILE); }
+ Receiving an implicit Intent
- Đăng ký App để nhận Intent
Khai báo một hoặc nhiều Intent filters choActivity trong Manifest.xml
Filter thông báo khả năng của Activity để chấp nhận implicit Intent
Filter đặt điều kiện trên Intent mà Activity chấp nhận
- Intent filter trong AndroidManifest.xml <intent-filter>
</intent-filter> - Intent filters
● action – khớp với một hoặc nhiều hành động cố định
○ android.intent.action.VIEW - matches any Intent with ACTION_VIEW
○ android.intent.action.SEND - matches any Intent with ACTION_SEND
● category – thông tin thêm vào (list of categories)
○ android.intent.category.BROWSABLE - can be started by web browser 13 | P a g e
○ android.intent.category.LAUNCHER - Show activity as launcher icon
● data - Filter on data URIs, MIME type
○ android:scheme="https" - require URIs to be https protocol
○ android:host="developer.android.com" - only accept an Intent from specified hosts
○ android:mimeType="text/plain" - limit the acceptable types of documents + Note
- Một Activity có thể có nhiều Filters
- Một filter có thể có nhiều actions và data 04.2: Input control + Overview
- Ví dụ của input controls
Freedom text and numbers: EditText (using keyboard)
Providung choices: CheckBox, RadioButton, Spinner
Swiching on/off: Toggle, Switch
Choosing value in range of value: SeekBar + View focus
- Focus được chỉ định bởi User tapping a View
App hướng dẫn người dùng từ một text input control đến sử dụng tiếp
Return, Tab, or arrow keys
Calling requestFocus() trên bất kì View được focusable
- Clickable so với focusable
Clickable – View có thể phản hồi khi được click hoặc tap
Focusable – View có thể thu lấy focus để chấp nhận input - Guiding focus
Specify ordering in XML android:id="@+id/top" android:focusable="true"
android:nextFocusDown="@+id/bottom"
- Cài đặt focus rõ ràng
Use methods of the View class to set focus 14 | P a g e
● setFocusable() sets whether a view can have focus
● requestFocus() gives focus to a specific view
● setOnFocusChangeListeners() sets listener for when view gains or loses focus
● onFocusChanged() called when focus on a view changes
+ Freedom text and numbers Slide 17-24 PP 02.1 + Providung choices Slide 25-31 PP 02.1 04.3: Menu and pickers + Overview - Types of Menus App bar with options menu Context menu Contextual action bar Popup menu - Dialogs and pickers
Alert dialog (Hội thoại cảnh báo)
Date picker (Bảng chọn ngày)
Time picker (Bảng chọn giờ)
+ App Bar with Options Menu + Adding Options Menu
- Thêm Menu item attributes
android:id="@+id/action_favorites"
android:icon="@drawable/ic_favorite" android:orderInCategory="30"
android:title="@string/action_favorites"
app:showAsAction="ifRoom" /> @Override
public boolean onOptionsItemSelected(MenuItem item) {
switch (item.getItemId()) { case R.id.action_settings: showSettings(); return true; 15 | P a g e case R.id.action_favorites: showFavorites(); return true; default:
return super.onOptionsItemSelected(item); } } + Contextual menus
● Floating context menu – long-press on a View
○ User can modify View or use it in some fashion
○ User performs action on one View at a time
● Contextual action mode – temporary action bar in place of or underneath app bar
○ Action items affect the selected View element(s)
○ User can perform action on multiple View elements at once
+ Floating context menu
1. Create XML menu resource file and assign appearance and position attributes
2. Register View using registerForContextMenu()
3. Implement onCreateContextMenu() in Activity to inflate menu
4. Implement onContextItemSelected() to handle menu item clicks
5. Create method to perform action for each context menu item
+ Contextual Action Bar
- Action mode có một lifecycle
● Start it with startActionMode(), for example, in the listener
● ActionMode.Callback interface provides lifecycle methods you override:
○ onCreateActionMode(ActionMode, Menu) once on initial creation
○ onPrepareActionMode(ActionMode, Menu) after creation and any
time ActionMode is invalidated
○ onActionItemClicked(ActionMode, MenuItem) any time contextual action button is clicked
○ onDestroyActionMode(ActionMode) when action mode is closed - Tạo Action mode Slide 30-36 PP 04.3 + Popup Menu + Dialogs + Pickers 16 | P a g e 04.4: User navigation + Back Naviagtion
+ Hierarchical Navigation
● Parent screen - Screen that enables navigation down to child screens, such
as home screen and main Activity
● Collection sibling - Screen enabling navigation to a collection of child
screens, such as a list of headlines
● Section sibling - Screen with content, such as a story
+ Descendant Navigation + Navigation Drawer 1. Icon in app bar 2. Header 3. Menu items
- Implement navigation drawer
1. Implement com.android.support:design:28.0.0
2. Implement com.android.support:support-core-utils:28.0.0
3. Use DrawerLayout for the MainActivity
4. setDisplayHomeAsUpEnable and setHomeButtonEnable for the support action bar
5. Create an ActionBarDrawerToggle object and link it with the DrawerLayout
a. onPostCreate(Bundle) -> sync the toggle state b. onConfigurationChanged c. onOptionsItemSelected + Ancestral Navigation
- Khai báo AndroidManifest
android:label="@string/title_activity_order"
android:parentActivityName="com.example.android.
optionsmenuorderactivity.MainActivity">
android:name="android.support.PARENT_ACTIVITY" 17 | P a g e
android:value=".MainActivity"/>
+ Lateral Navigation (Điều hướng các bên)
1. Define the tab layout using TabLayout
2. Implement a Fragment and its layout for each tab
3. Implement a PagerAdapter from FragmentPagerAdapter or
FragmentStatePagerAdapter
4. Create an instance of the tab layout
5. Use PagerAdapter to manage screens (each screen is a Fragment)
6. Set a listener to determine which tab is tapped 04.5: RecyclerView + Overview
- RecyclerView là một vùng chứa có thể cuộn cho lượng dữ liệu lớn - Lợi ích:
● Sử dụng và tái sử dụng số lượng giới hạn của View elements
● Cập nhật dữ liệu thay đổi nhanh chóng
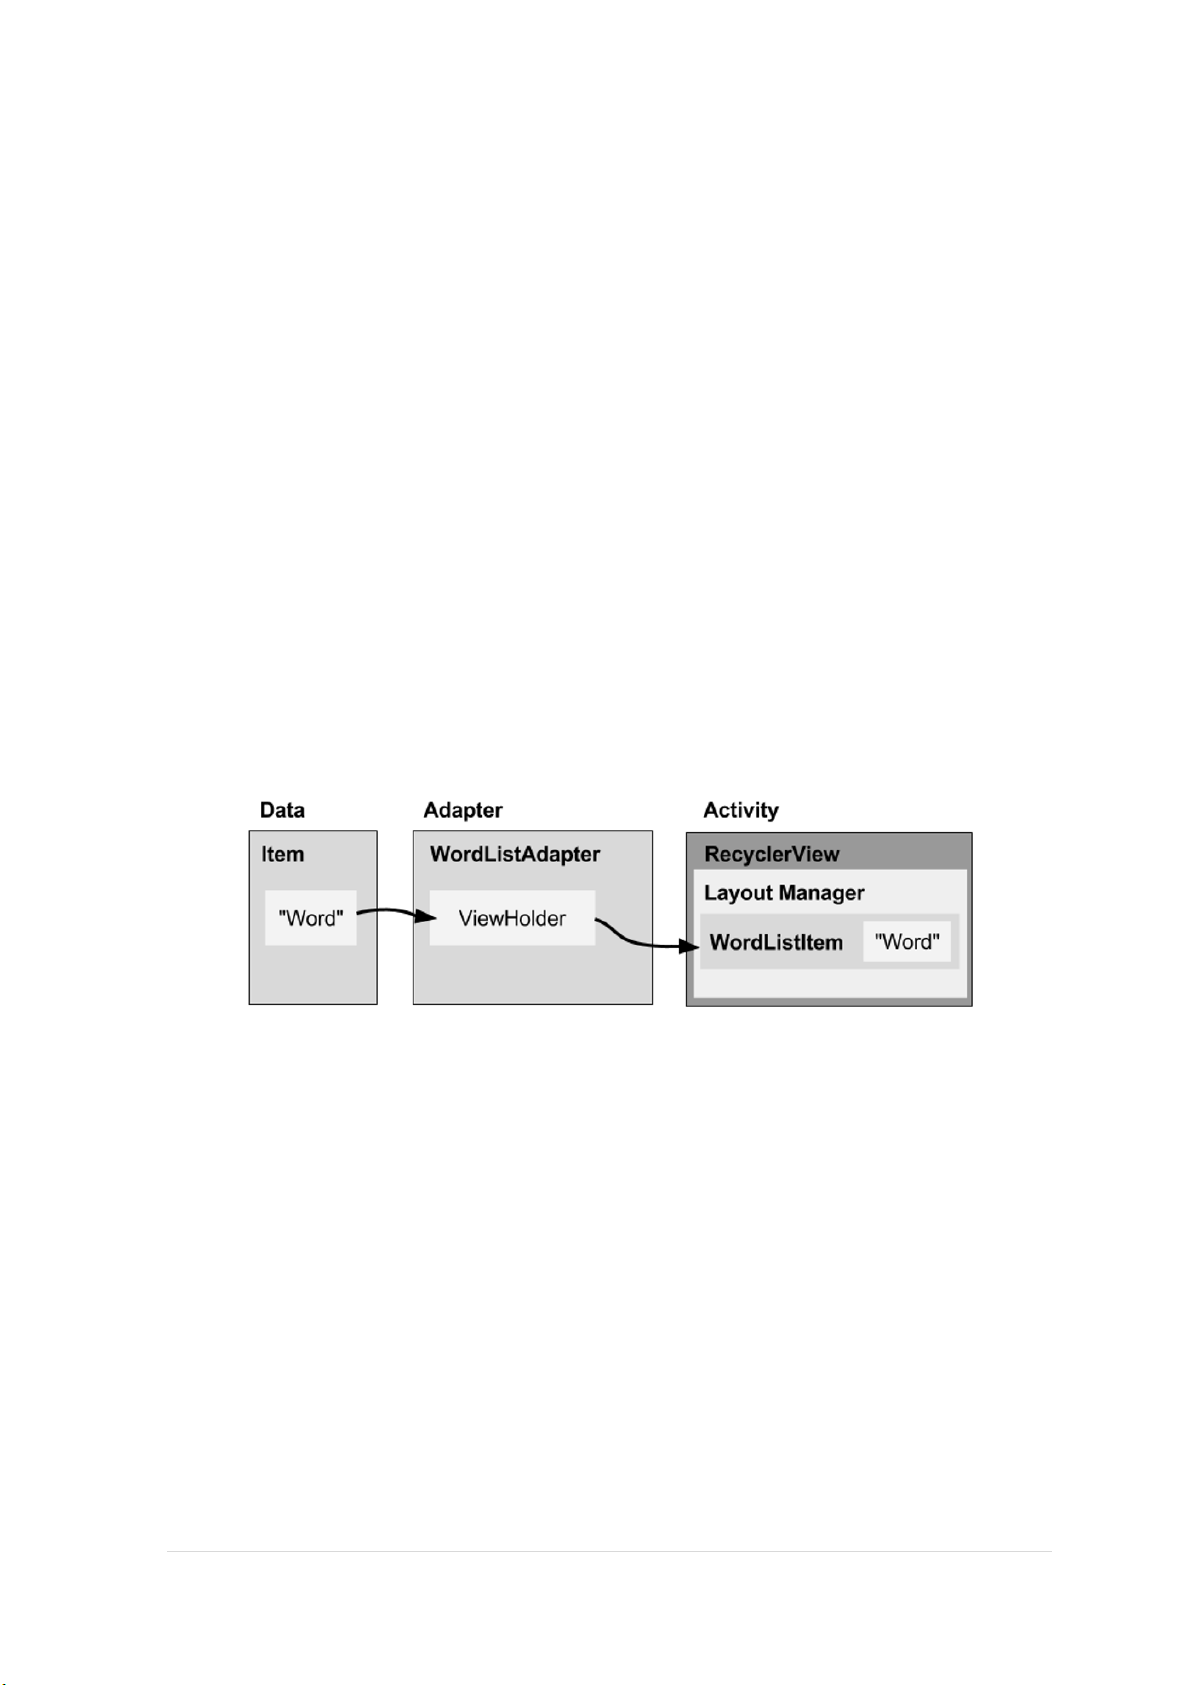
+ RecyclerView Components ● Data
● RecyclerView scrolling list for list items—RecyclerView
● Layout for one item of data—XML file
● Layout manager handles the organization of UI components in a View -
Recyclerview.LayoutManager
● Adapter connects data to the RecyclerView - RecyclerView.Adapter
● ViewHolder has view information for displaying one item -
RecyclerView.ViewHolder
+ Implementing RecyclerView
1. Add RecyclerView dependency to build.gradle if needed dependencies { ...
compile 'com.android.support:recyclerview-v7:26.1.0' ... }
2. Add RecyclerView to layout 18 | P a g e
<android.support.v7.widget.RecyclerView
android:id="@+id/recyclerview"
android:layout_width="match_parent"
android:layout_height="match_parent">
3. Create XML layout for item android:id="@+id/word"
style="@style/word_title" />
4. Extend RecyclerView.Adapter
5. Extend RecyclerView.ViewHolder
6. In Activity onCreate(), create RecyclerView with adapter and layout manager
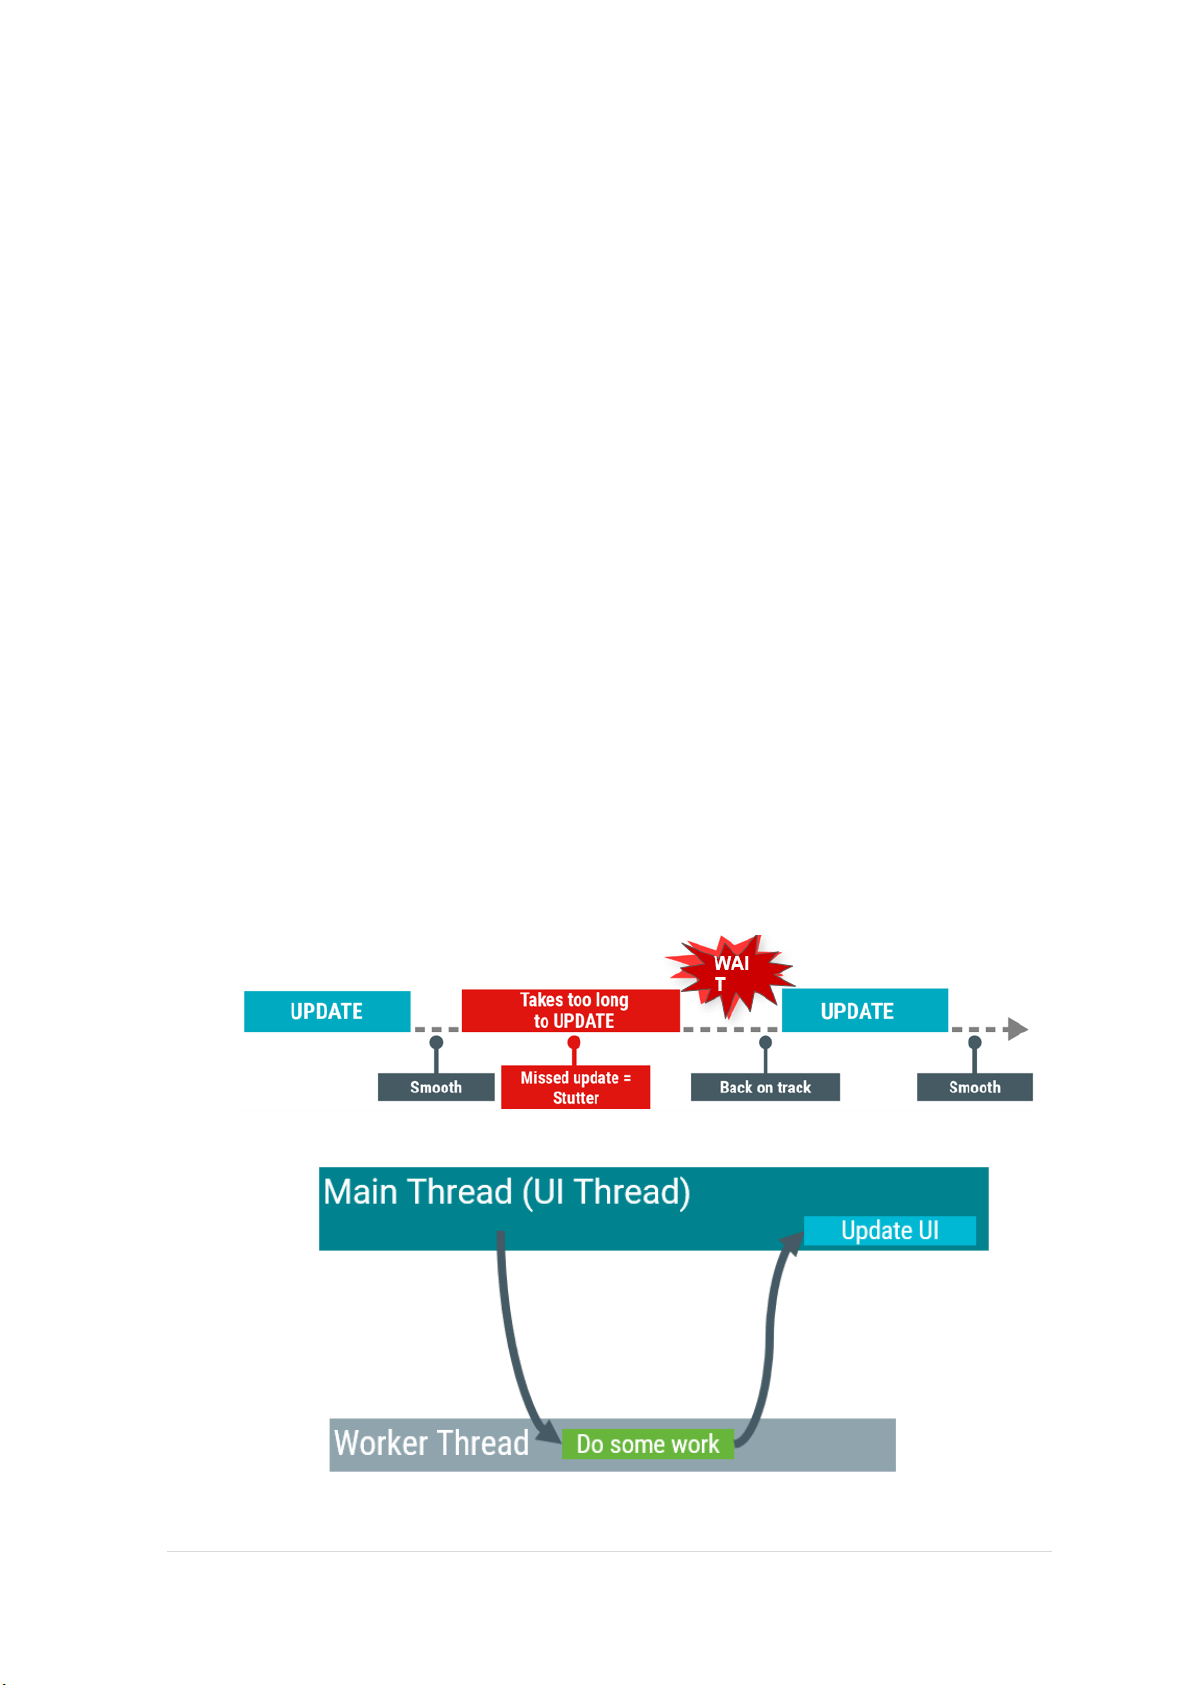
07.1: AsyncTask và AsyncTaskLoader + Threads - Background threads
- Two rules for Android threads 19 | P a g e
● Do not block the UI thread
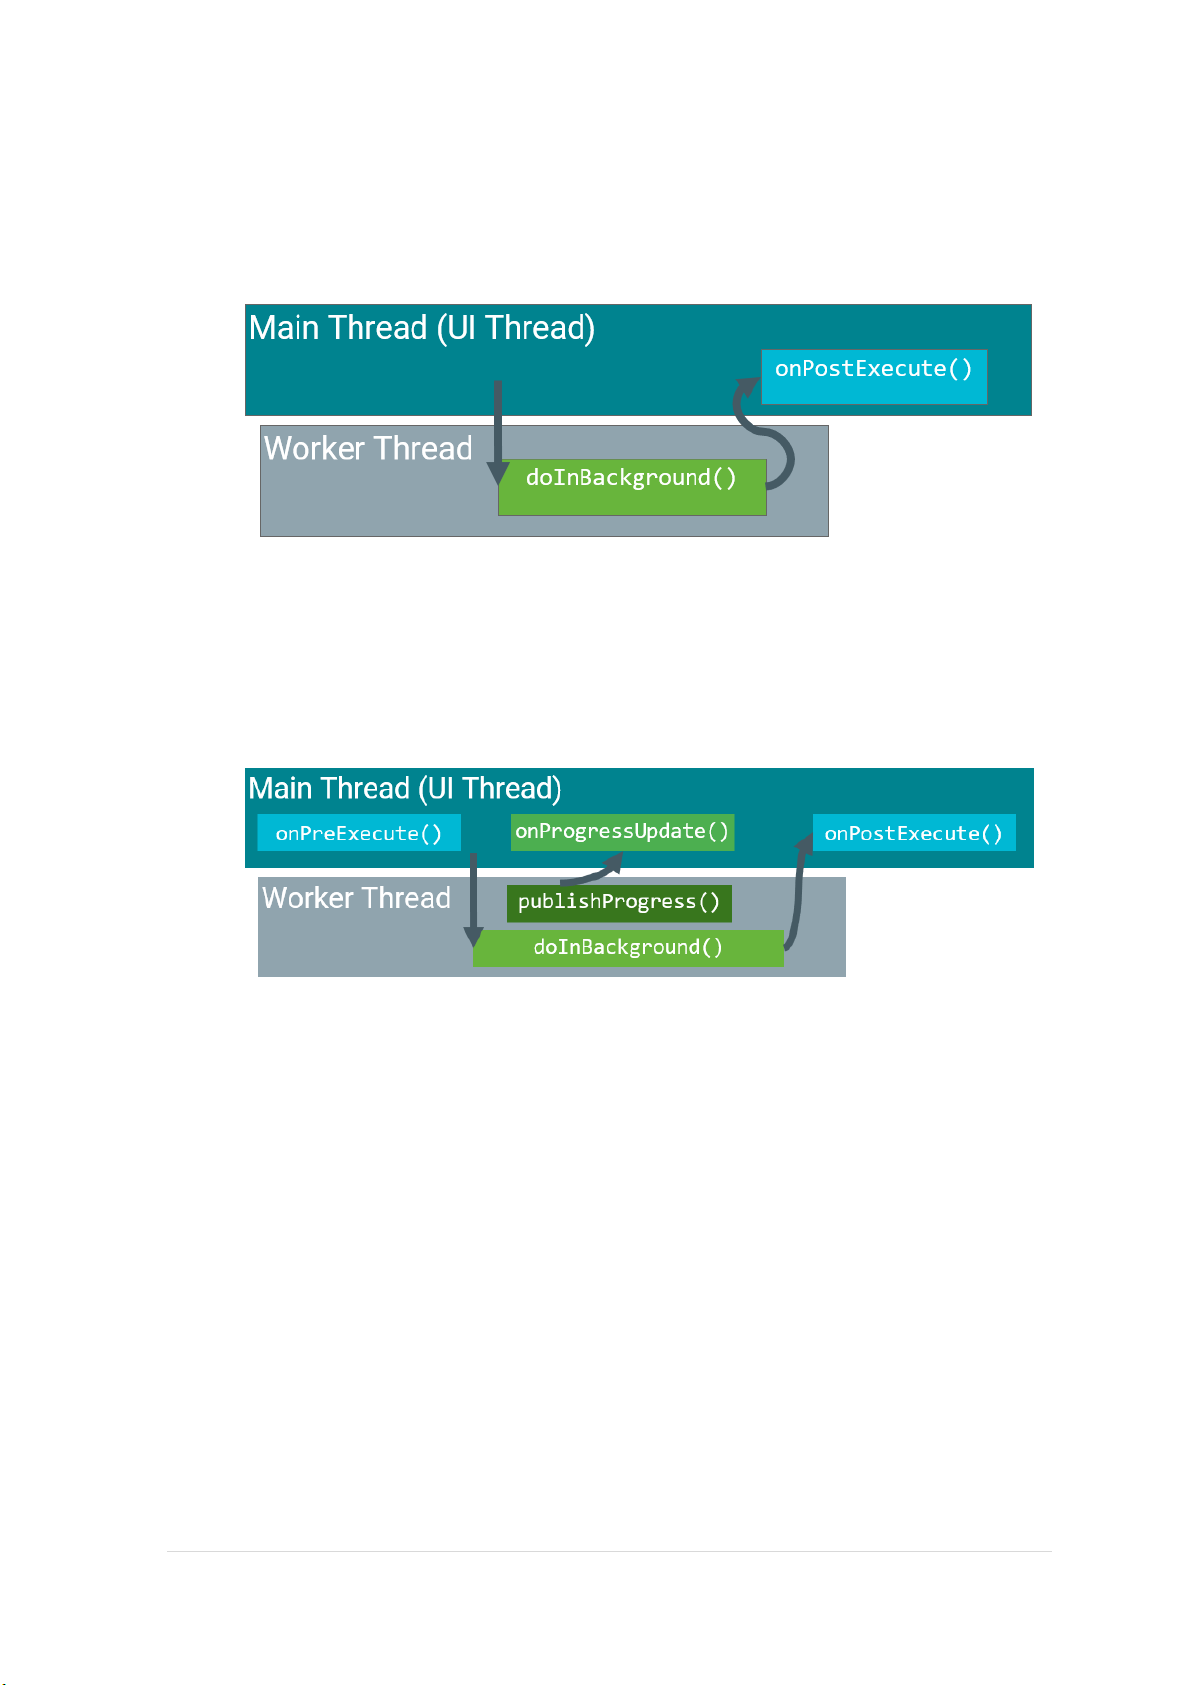
● Do not access the Android UI toolkit from outside the UI thread + AsyncTask - Override two methods
● doInBackground()—runs on a background thread
○ All the work to happen in the background
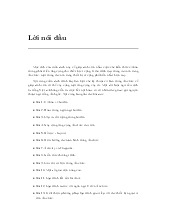
● onPostExecute()—runs on main thread when work done ○ Process results ○ Publish results to the UI - Helper methods ● onPreExecute() ○ Runs on the main thread ○ Sets up the task ● onProgressUpdate() ○ Runs on the main thread
○ receives calls from publishProgress() from background thread - Override two methods 1. Subclass AsyncTask
2. Provide data type sent to doInBackground()
3. Provide data type of progress units for onProgressUpdate()
4. Provide data type of result for onPostExecute() 20 | P a g e
Tài liệu liên quan:
-
Lecture note chính thức môn android hust
22 11 -
Lecture note môn android đại học bách khoa hà nôi
23 12 -

Báo cáo Lession 5 Môn Phát triển ứng dụng cho thiết bị di động | Đại học Bách Khoa Hà Nội
70 35 -

Báo cáo bài 2 Môn Phát triển ứng dụng cho thiết bị di động | Đại học Bách Khoa Hà Nội
78 39 -

Báo cáo Môn Phát triển ứng dụng cho thiết bị di động | Đại học Bách Khoa Hà Nội
90 45