CAM Module Datasheet: Features, Specs, and Setup Guide | Môn Embedded System - Đại học Khoa học và Công nghệ Hà Nội
CAM Module Datasheet: Features, Specs, and Setup Guide Môn Embedded System. Tài liệu được sưu tầm gồm 11 trang, giúp bạn ôn tập tốt hơn. Mời các bạn đón xem.
Môn: Embedded System 4 tài liệu
Trường: Trường Đại học Khoa học và Công nghệ Hà Nội 83 tài liệu
Tác giả:


Preview text:
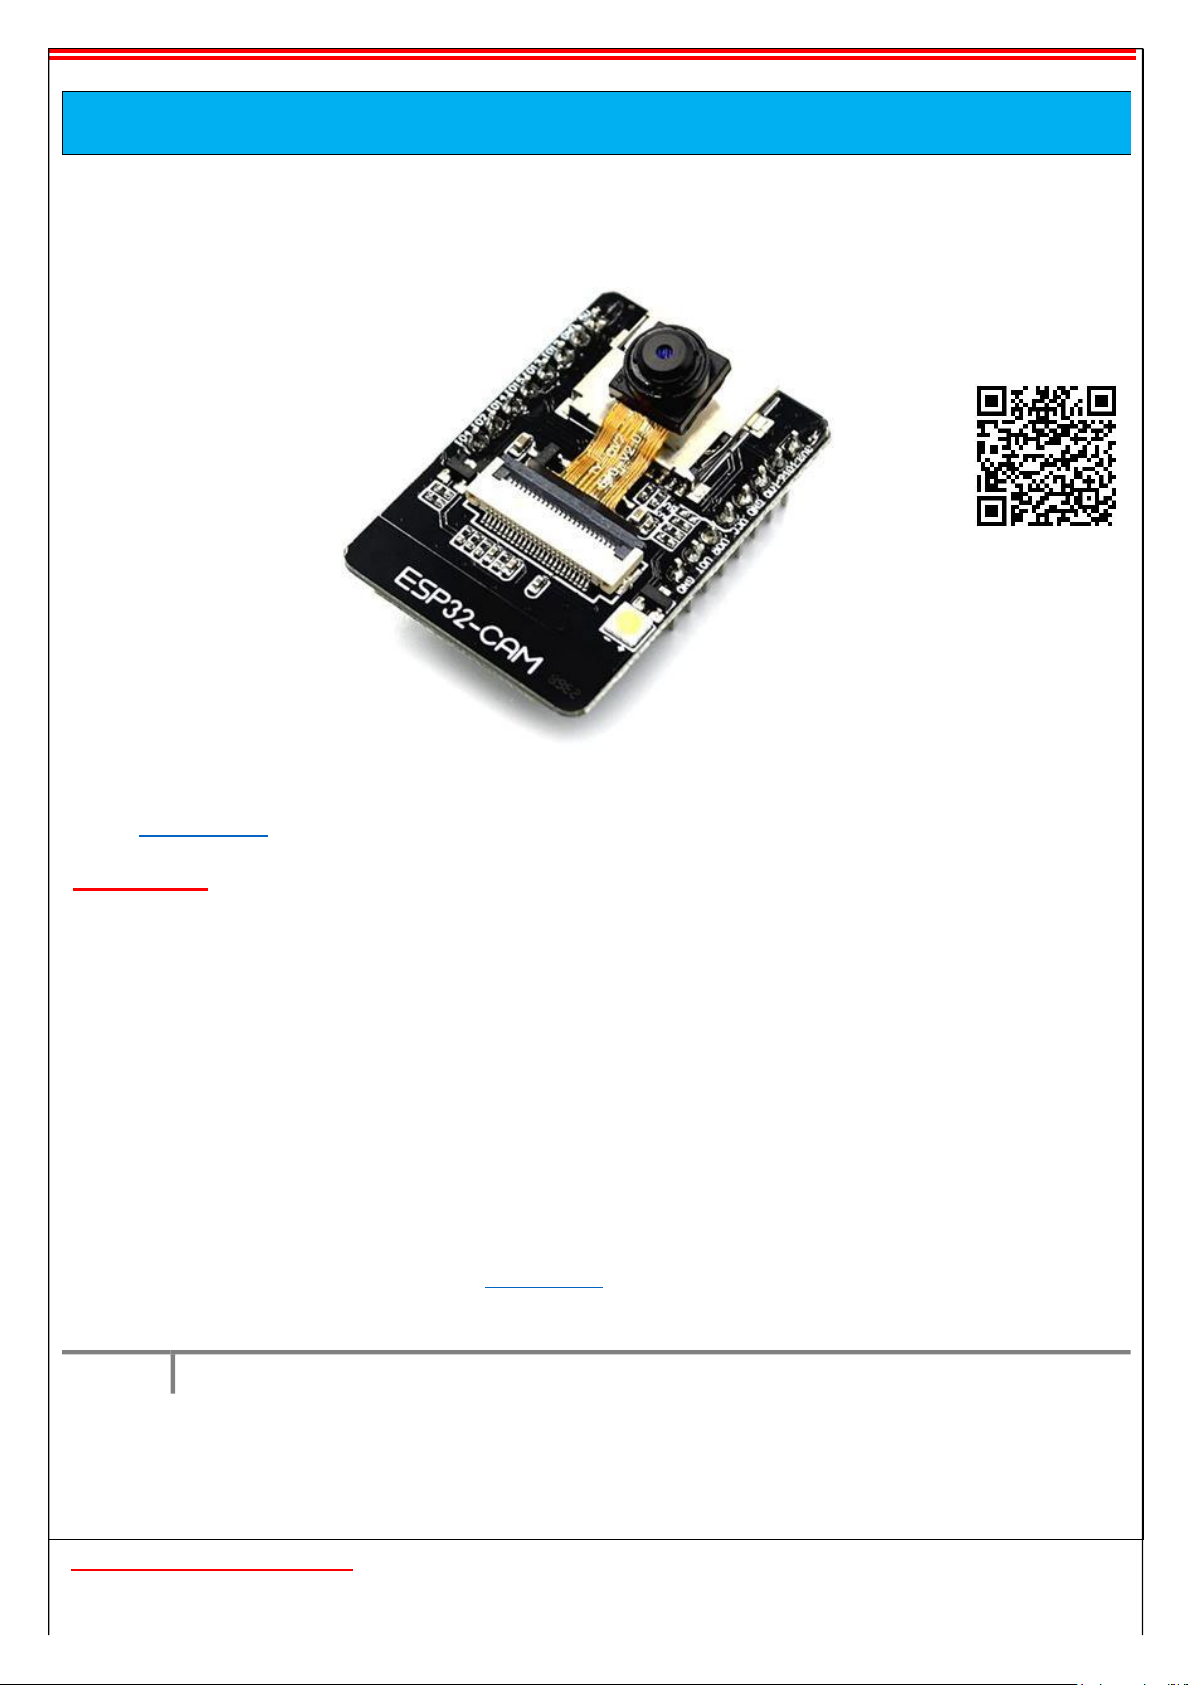
lOMoAR cPSD| 60776878 Handson Technology lOMoAR cPSD| 60776878 Datasheet
ESP32-CAM WiFi+Bluetooth+Camera Module
The ESP32-CAM is a development board with an ESP32-S chip, an OV2640 camera, microSD card slot and
several GPIOs to connect peripherals. It allows you to set up a video streaming web server, build a surveillance
camera, take photos, face recognition and detection, and much more. SKU: MDU1112 Brief Data: • Product Name: ESP32-CAM.
• WiFi+Bluetooth module: ESP-32S.
• Camera Module: OV2640 2MP.
• Flash Light: LED Built-in on Board.
• Operating Voltage: 3.3/5 Vdc.
• Onboard TF card slot, supports up to 4G TF card for data storage .
• RAM: Internal 512KB + External 4MB PSRAM. • Power consumption: o
Flash off: 180mA@5V. o Flash on and brightness max:
310mA@5V. o Deep-Sleep: as low as 6mA@5V. o Modern-Sleep: as low as 20mA@5V. o
Light-Sleep: as low as 6.7mA@5V
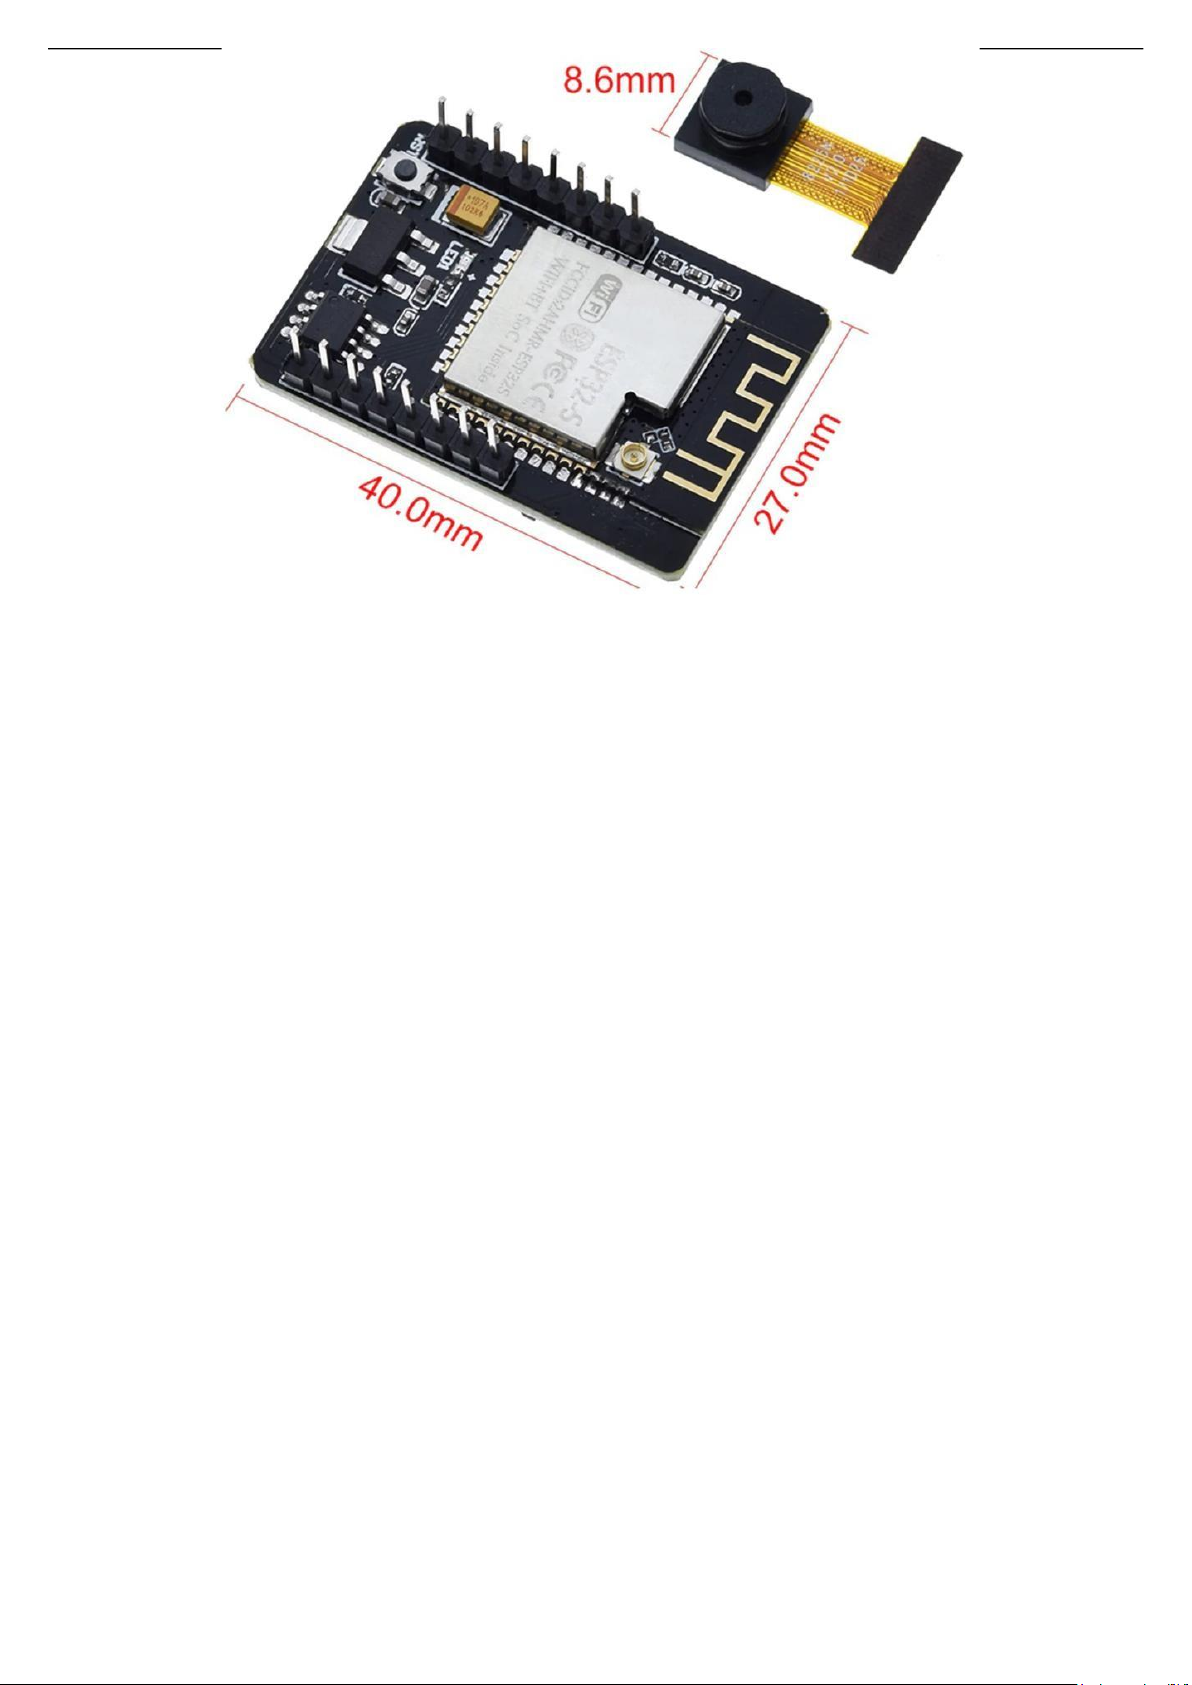
• Dimensions: 40.5mm x 27mm x 4.5mm 1
www.handsontec.com Mechanical Dimension: Unit: mm lOMoAR cPSD| 60776878 lOMoAR cPSD| 60776878
To upload the code, follow the next steps:
3) Then, click the upload button to upload the code. /********* https://handsontec.com *********/ #include "esp_camera.h" #include "Arduino.h" #define EEPROM_SIZE 1 #define XCLK_GPIO_NUM 0 #define SIOD_GPIO_NUM 26 #define SIOC_GPIO_NUM 27 #define Y9_GPIO_NUM 35
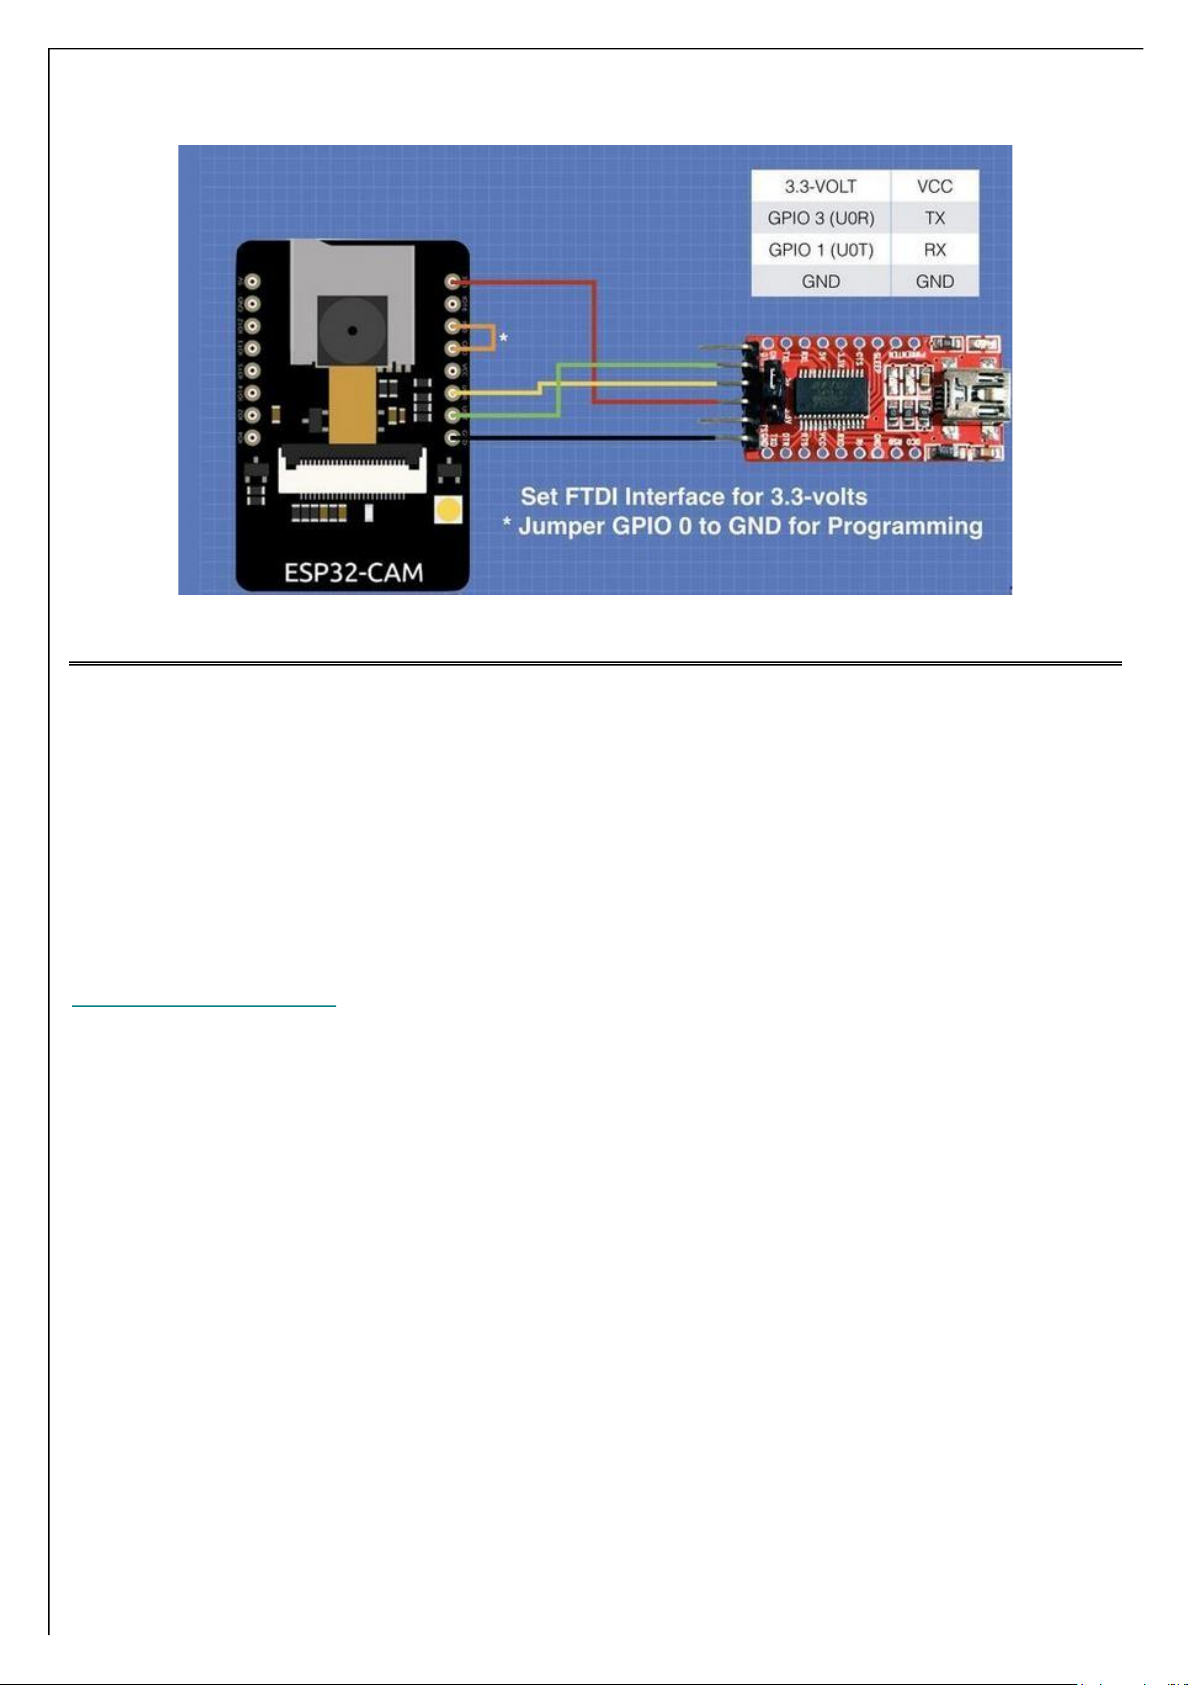
Here is the hookup diagram for connecting the FTDI adapter to the ESP32-CAM module: lOMoAR cPSD| 60776878
Upload the below Sketch to ESP32-CAM Module:
1) Go to Tools > Board and select AI-Thinker ESP32-CAM.
2) Go to Tools > Port and select the COM port the ESP32 is connected to.
#include "FS.h" // SD Card ESP32
#include "SD_MMC.h" // SD Card ESP32
#include "soc/soc.h" // Disable brownour problems
#include "soc/rtc_cntl_reg.h" // Disable brownour problems #include "driver/rtc_io.h"
#include // read and write from flash memory
// define the number of bytes you want to access
// Pin definition for CAMERA_MODEL_AI_THINKER #define PWDN_GPIO_NUM 32 #define RESET_GPIO_NUM -1 #define Y8_GPIO_NUM 34 #define Y7_GPIO_NUM 39 #define Y6_GPIO_NUM 36 #define Y5_GPIO_NUM 21 #define Y4_GPIO_NUM 19 #define Y3_GPIO_NUM 18 #define Y2_GPIO_NUM 5 #define VSYNC_GPIO_NUM 25 #define HREF_GPIO_NUM 23 #define PCLK_GPIO_NUM 22
int pictureNumber = 0; void setup() {
WRITE_PERI_REG(RTC_CNTL_BROWN_OUT_REG, 0); //disable brownout detector
Serial.begin(115200);
//Serial.setDebugOutput(true); //Serial.println();
camera_config_t config;
config.ledc_channel = LEDC_CHANNEL_0;
config.ledc_timer = LEDC_TIMER_0;
config.pin_d0 = Y2_GPIO_NUM;
config.pin_d1 = Y3_GPIO_NUM;
config.pin_d2 = Y4_GPIO_NUM;
config.pin_d3 = Y5_GPIO_NUM;
config.pin_d4 = Y6_GPIO_NUM;
config.pin_d5 = Y7_GPIO_NUM;
config.pin_d6 = Y8_GPIO_NUM; lOMoAR cPSD| 60776878
config.pin_d7 = Y9_GPIO_NUM;
config.pin_xclk = XCLK_GPIO_NUM;
config.pin_pclk = PCLK_GPIO_NUM;
config.pin_vsync = VSYNC_GPIO_NUM;
config.pin_href = HREF_GPIO_NUM;
config.pin_sscb_sda = SIOD_GPIO_NUM;
config.pin_sscb_scl = SIOC_GPIO_NUM;
config.pin_pwdn = PWDN_GPIO_NUM;
config.pin_reset = RESET_GPIO_NUM;
config.xclk_freq_hz = 20000000;
config.pixel_format = PIXFORMAT_JPEG;
if(psramFound()){
config.frame_size = FRAMESIZE_UXGA; // FRAMESIZE_ + QVGA|CIF|VGA|SVGA|XGA|SXGA|UXGA
config.jpeg_quality = 10; config.fb_count = 2;
} else {
config.frame_size = FRAMESIZE_SVGA;
config.jpeg_quality = 12;
config.fb_count = 1; } // Init Camera
esp_err_t err = esp_camera_init(&config);
if (err != ESP_OK) {
Serial.printf("Camera init failed with error 0x%x", err); return; }
//Serial.println("Starting SD Card");
if(!SD_MMC.begin()){
Serial.println("SD Card Mount Failed"); return; }
uint8_t cardType = SD_MMC.cardType();
if(cardType == CARD_NONE){
Serial.println("No SD Card attached"); return; }
camera_fb_t * fb = NULL; // Take Picture with Camera
fb = esp_camera_fb_get();
if(!fb) {
Serial.println("Camera capture failed"); return; }
// initialize EEPROM with predefined size
EEPROM.begin(EEPROM_SIZE); pictureNumber
= EEPROM.read(0) + 1;
// Path where new picture will be saved in SD Card
String path = "/picture" + String(pictureNumber) +".jpg";
fs::FS &fs = SD_MMC;
Serial.printf("Picture file name: %s\n", path.c_str());
File file = fs.open(path.c_str(), FILE_WRITE); if(!file){
Serial.println("Failed to open file in writing mode"); } else {
file.write(fb->buf, fb->len); // payload (image), payload length
Serial.printf("Saved file to path: %s\n", path.c_str()); lOMoAR cPSD| 60776878
EEPROM.write(0, pictureNumber);
EEPROM.commit(); } file.close();
esp_camera_fb_return(fb);
// Turns off the ESP32-CAM white on-board LED (flash) connected to GPIO 4
pinMode(4, OUTPUT); digitalWrite(4, LOW); rtc_gpio_hold_en(GPIO_NUM_4); delay(2000);
Serial.println("Going to sleep now"); delay(2000);
esp_deep_sleep_start();
Serial.println("This will never be printed");
} void loop() { } Demonstration:
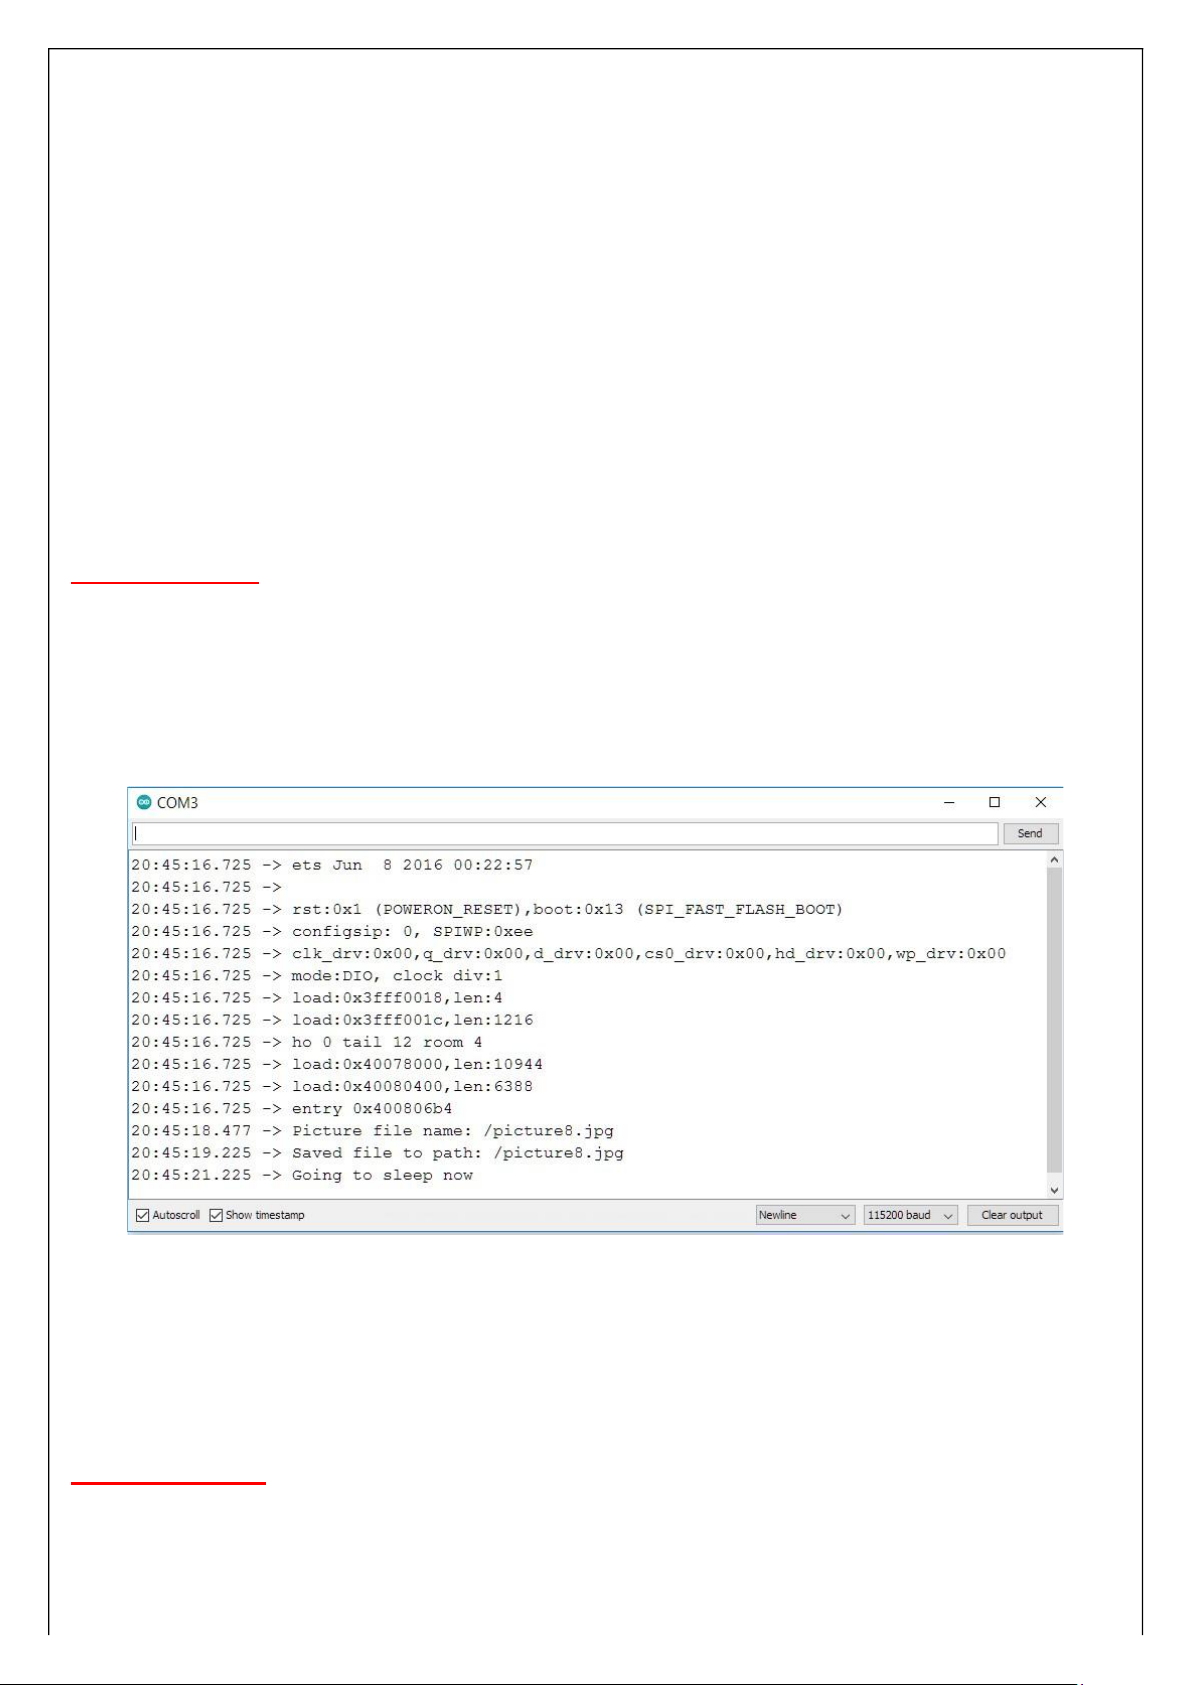
After uploading the code, remove the jumper that connects GPIO 0 from GND.
Open the Serial Monitor at a baud rate of 115200. Press the ESP32-CAM reset button. It should initialize and take a
photo. When it takes a photo it turns on the flash (GPIO 4).
Check the Arduino IDE Serial Monitor window to see if everything is working as expected. As you can see, the picture
was successfully saved in the microSD card.
To see the photos taken, remove the microSD card from the microSD card slot and insert it into your
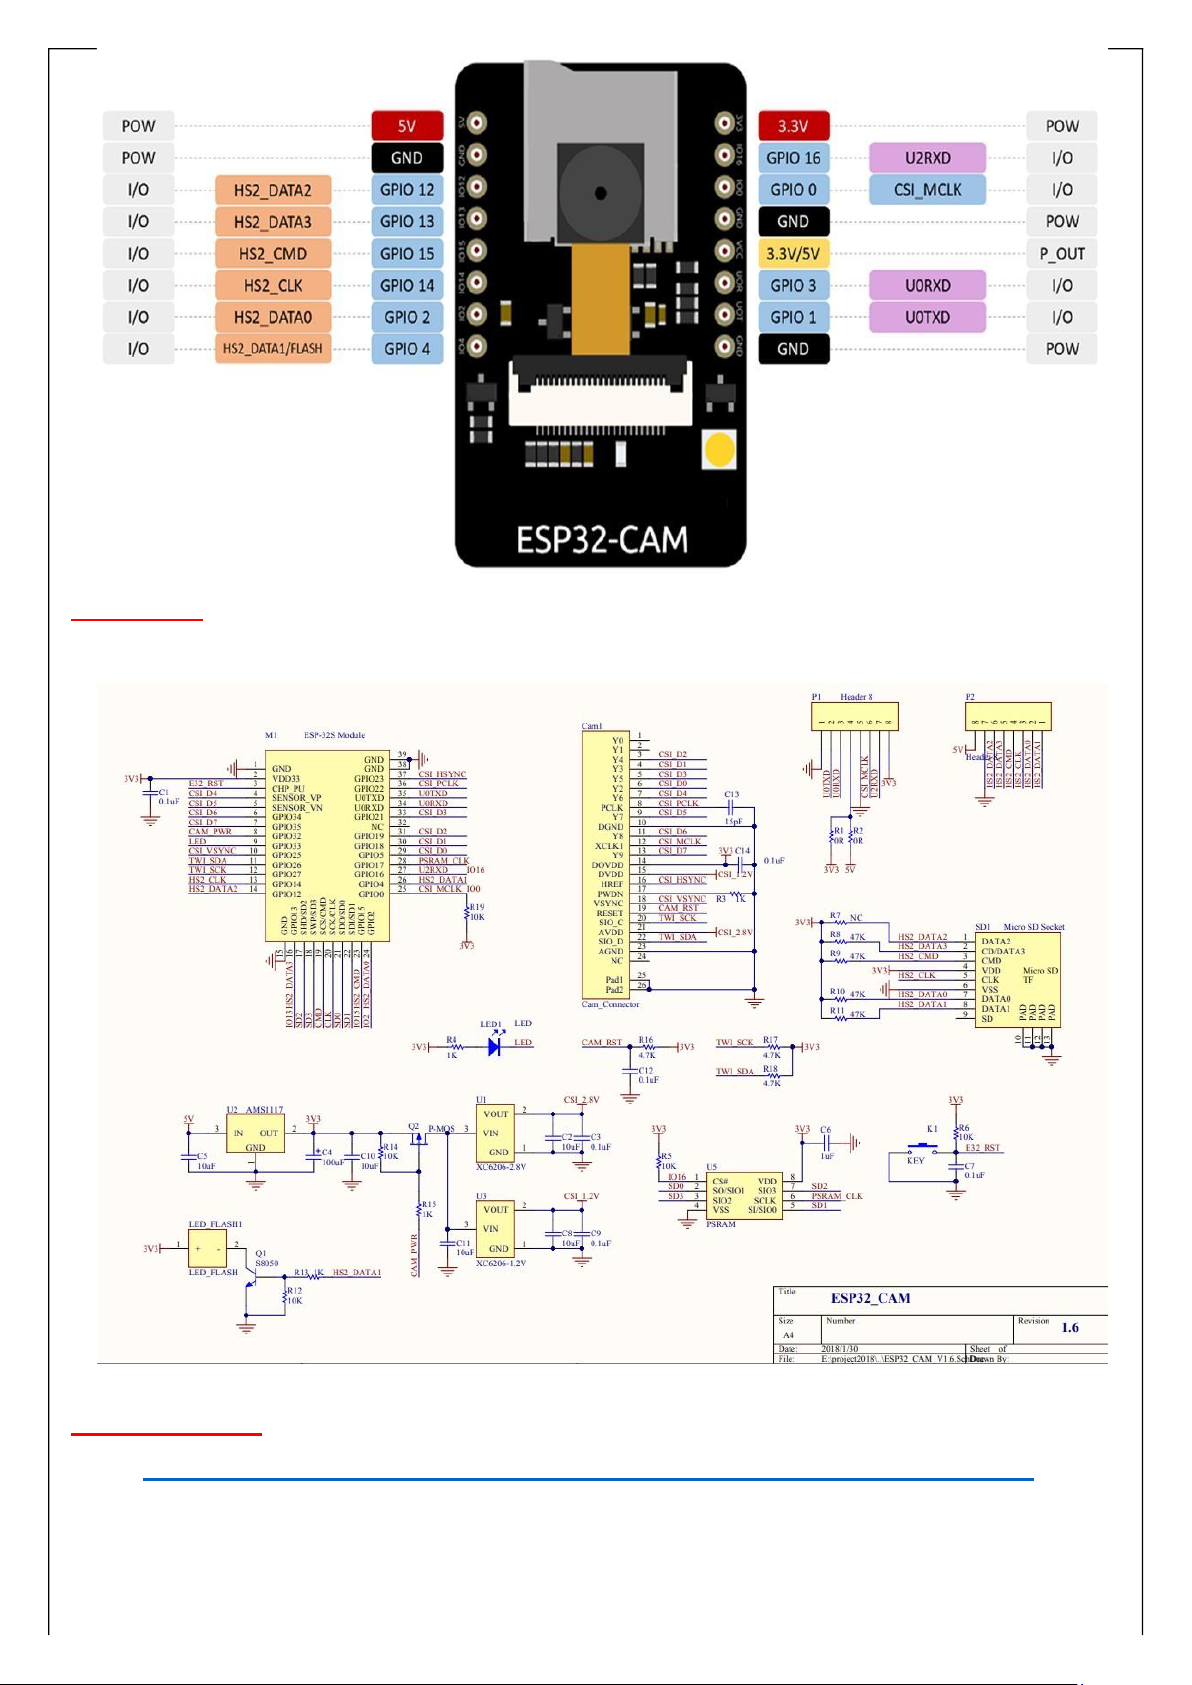
computer. You should have all the photos saved. Pin Assignment: lOMoAR cPSD| 60776878 Schematic: Web Resources:
• https://github.com/SeeedDocument/forum_doc/blob/master/reg/ESP32_CAM_V1.6.pdf
Setting Up Arduino IDE for ESP32 Development board: lOMoAR cPSD| 60776878
• https://randomnerdtutorials.com/installing-the-esp32-board-in-arduino-ide- windowsinstructions/
• https://dronebotworkshop.com/esp32-intro/
• https://randomnerdtutorials.com/esp32-cam-take-photo-save-microsd-card/ lOMoAR cPSD| 60776878 Handsontec. co m
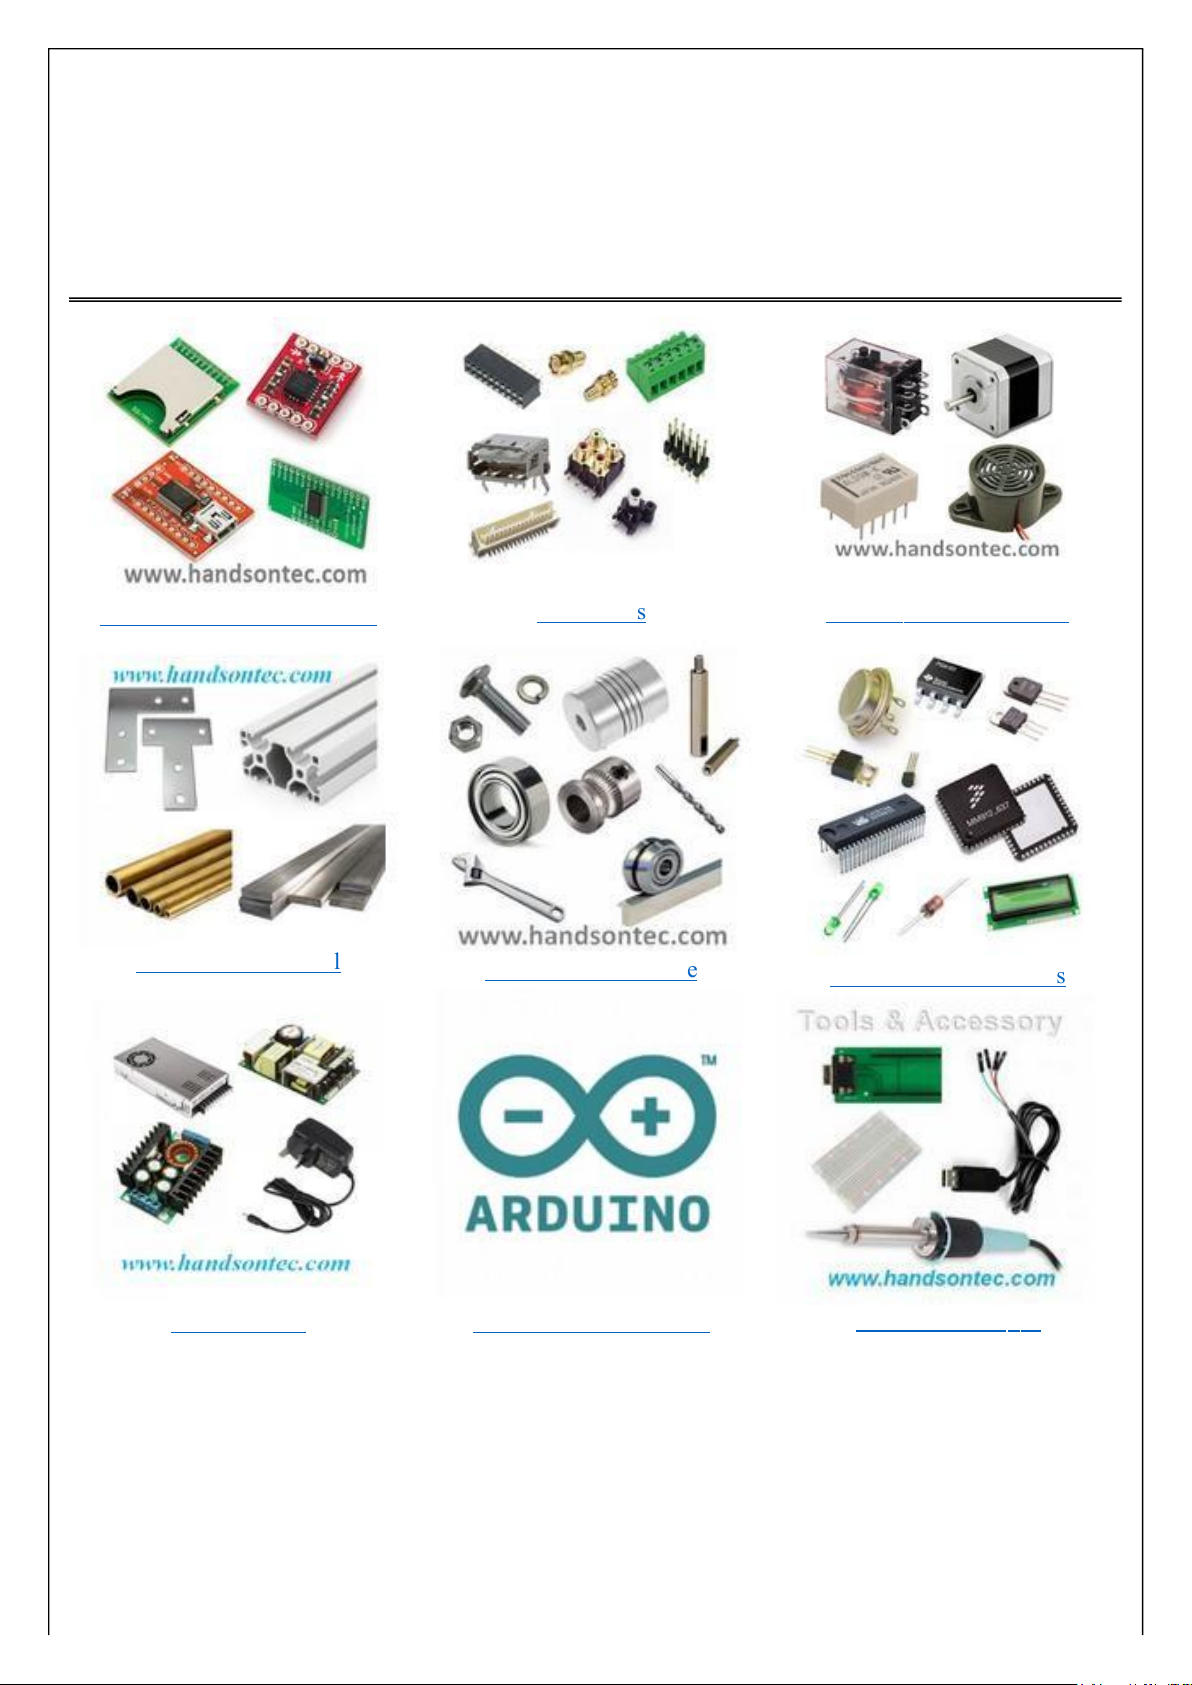
We have the parts for your ideas
HandsOn Technology provides a multimedia and interactive platform for
everyone interested in electronics. From beginner to diehard, from student
to lecturer. Information, education, inspiration and entertainment. Analog
and digital, practical and
theoretical; software and hardware.
Hands On Technology support Open Source Hardware ( OSHW)
Development Platform.
Learn : Design : Share handsontec.com lOMoAR cPSD| 60776878
The Face behind o u r product quality…
In a world of constant change and continuous technological development, a new or replacement
product is never far away – and they all need to be tested.
Many vendors simply import and sell wihtout checks and this cannot be the ultimate interests of
anyone, part icularly the customer. Every part sell on Handsotec is fully tested. So when buying from
Handsontec products range, you can be confident you’re getting outstanding quality and value.
We keep adding the new parts so that you can get rolling on your next pr oject.
Breakout Boards & Module s Connectors Electr o - Mechanical Part s Engineering Mate l ria P Mechanical Hardware Electronics Components Power Suppl y Arduino Board & Shiel d Tools & Access o r y