Bài 11: Lập trình giao diện GUI với JavaFX môn Lập trình Java | Trường Đại học Bách Khoa Hà Nội
Giao diện đồ họa người dùng: Graphical user interface - GUI (pronounced "GOO-ee"): Là một loại giao diện người dùng. Cho phép người dùng tương tác với các thiết bị điện tử, sử dụng hình ảnh thay vì nhập vào các lệnh. Tài liệu được sưu tầm gồm 52 trang, giúp các bạn ôn luyện và phục vụ cho việc học tập, đạt kết quả tốt. Mời các bạn đón xem!
Môn: Lập trình Java 12 tài liệu
Trường: Đại học Bách Khoa Hà Nội 5.8 K tài liệu
Tác giả:


Preview text:
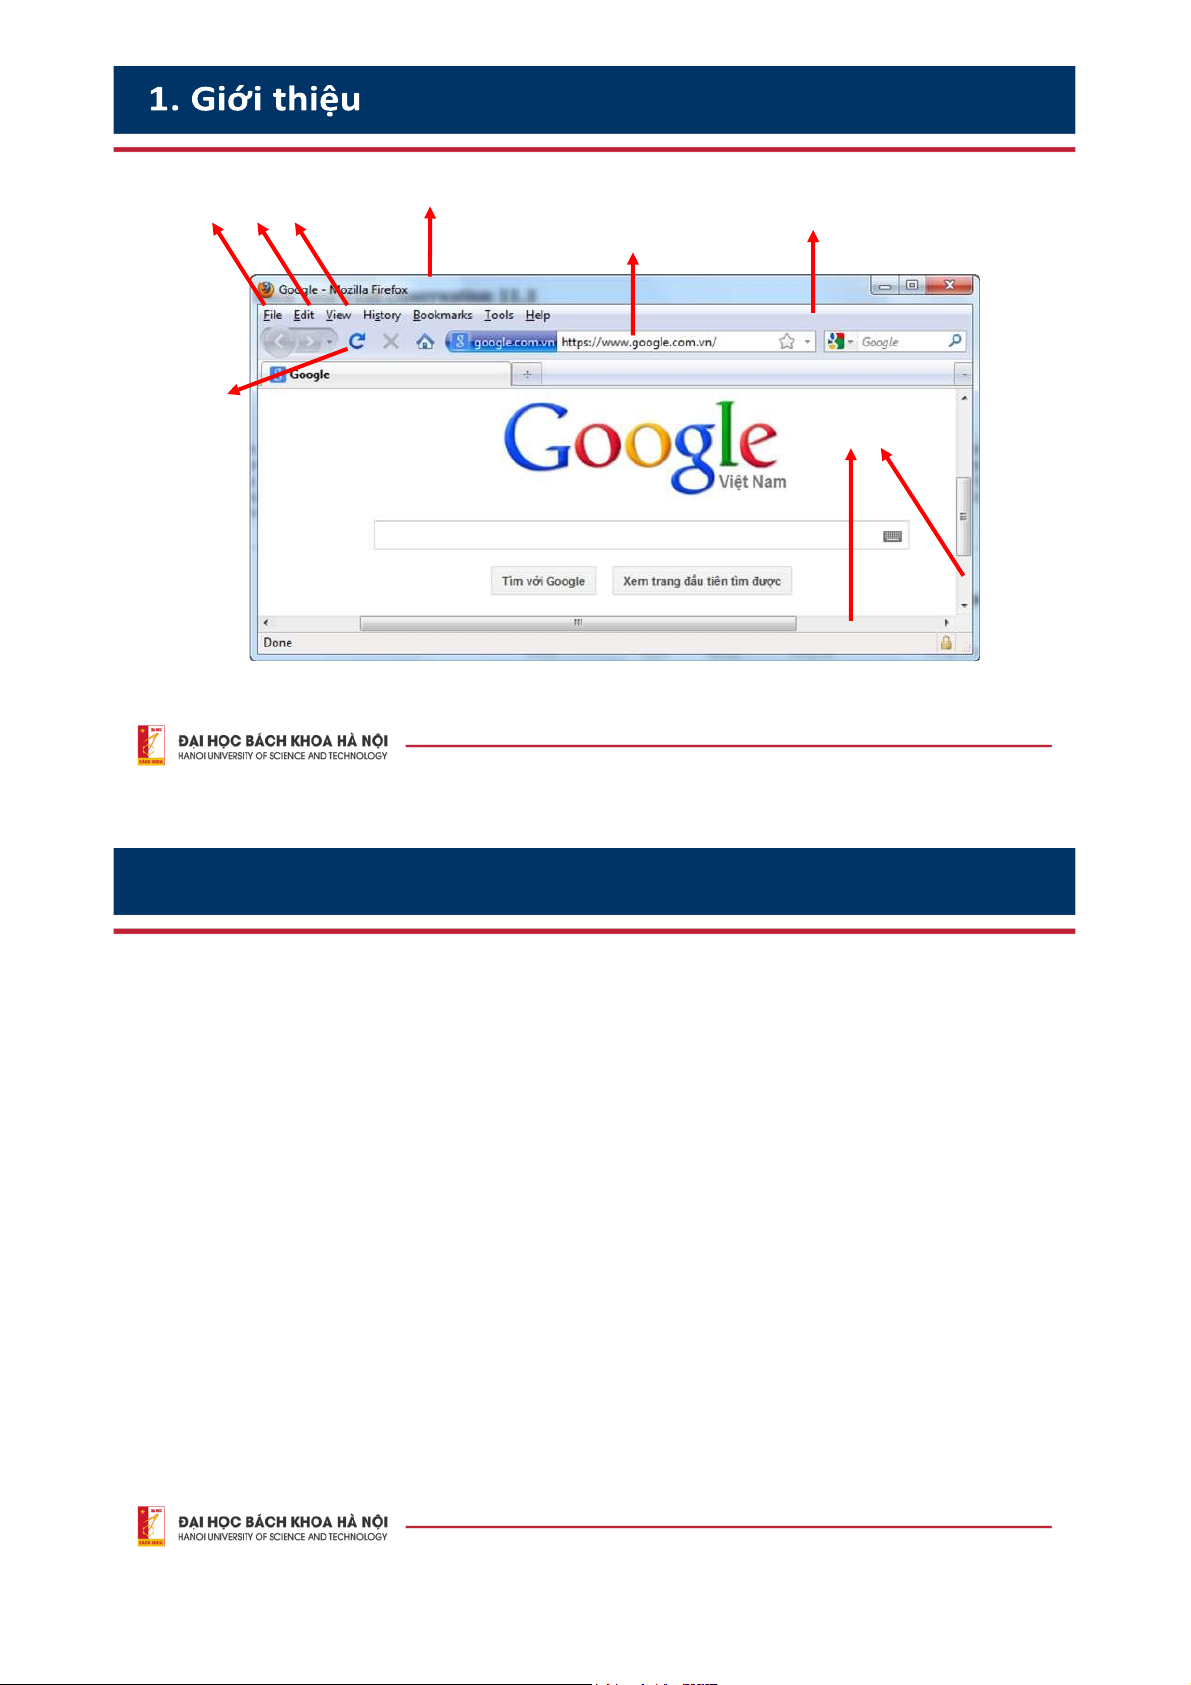
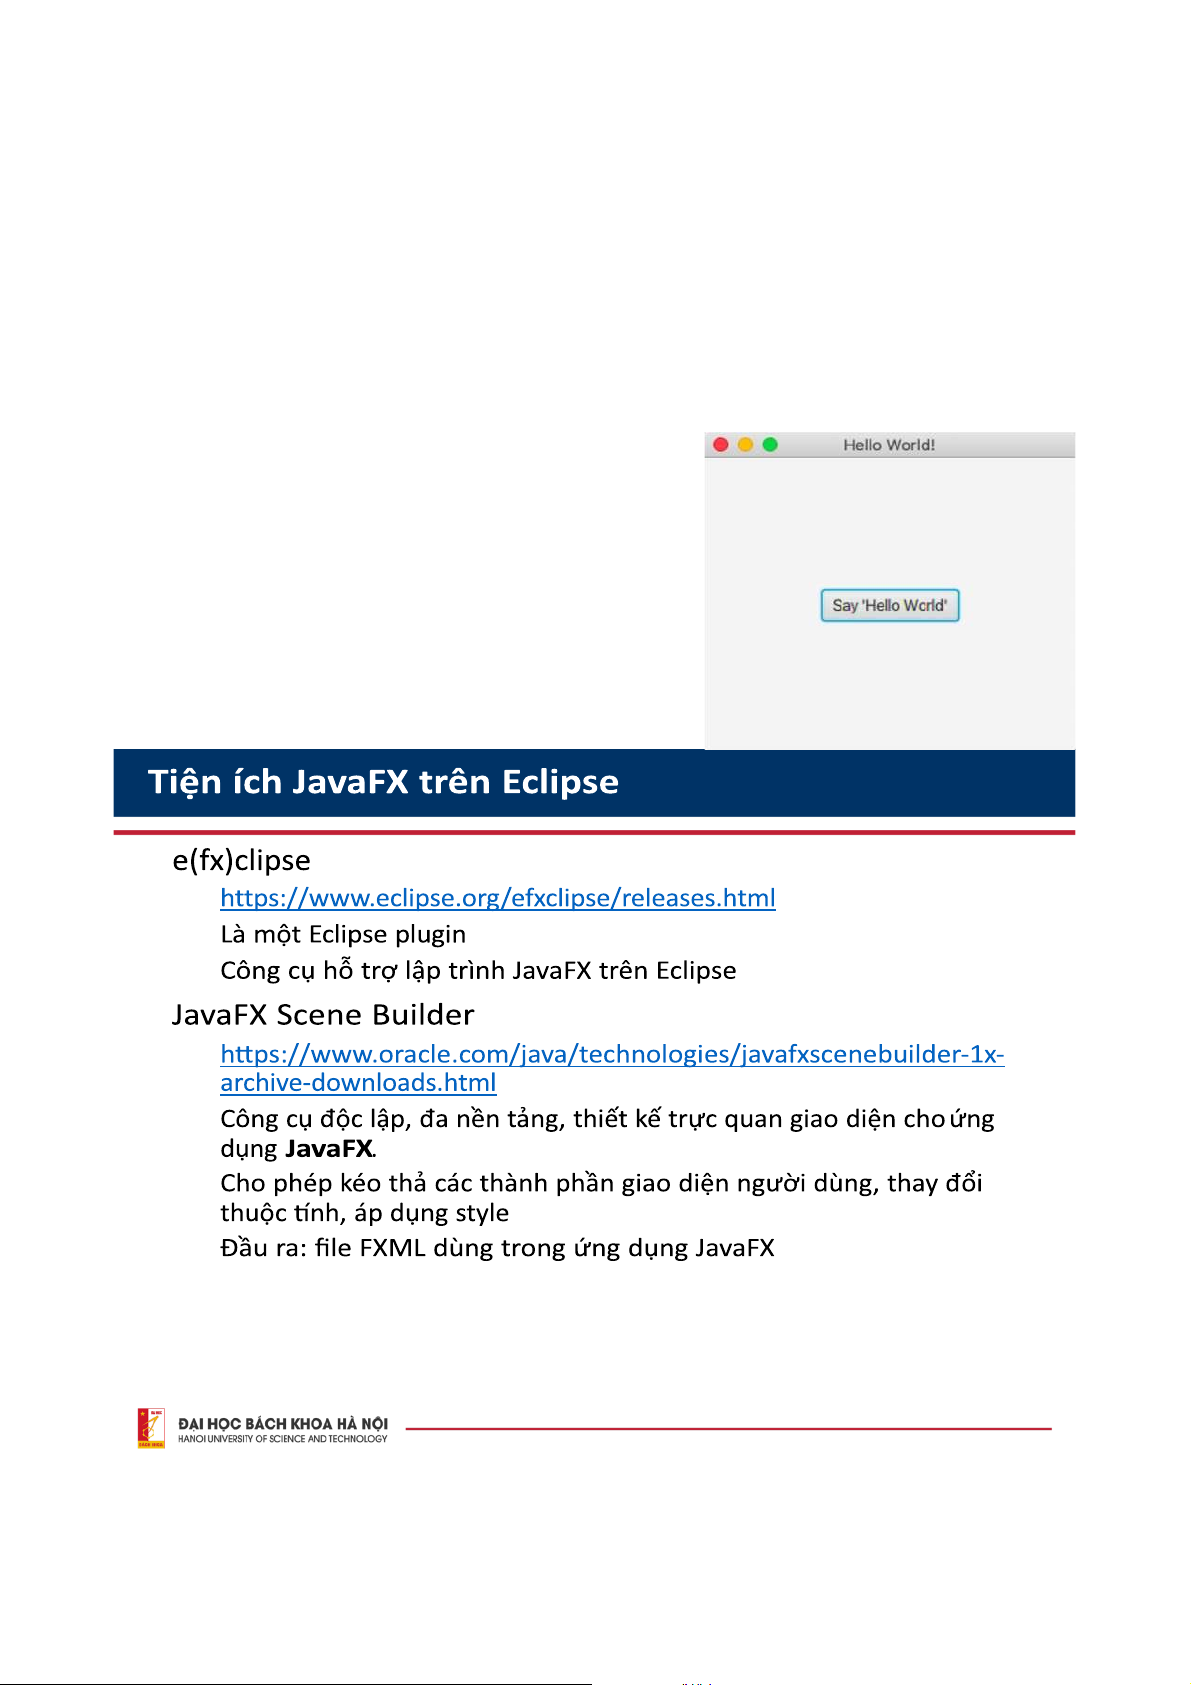
• • 4 5 • • • • • 6 Title bar Menus Menu bar Combo box Button Scroll bar 7
Java APIs cho lập trình đồ họa
• AWT (Abstract Windowing Toolkit)
• Được giới thiệu trong JDK 1.0 • Không nên dùng, dùng Swing thay thế • Swing: • Mở rộng AWT
• Tích hợp vào Java từ JDK 1.2 • JavaFX:
• Thư viện Java, phát triển ứng dụng đa nền tảng (Desktop, mobile, TV, tablet) • Các thư viện khác:
• Eclipse's Standard Widget Toolkit (SWT) • Google Web Toolkit (GWT)
• 3D Graphics API: Java OpenGL (JOGL), Java3D. 8
JavaFX – Tính năng (Features)
• Viết bằng Java, dùng được trong các ngôn ngữ thực thi trên
máy ảo Java (Java, Groovy và JRuby)
• Hỗ trợ FXML (tương tự HTML), giúp dễ dàng định nghĩa giao diện người dùng
• Scene Builder: JavaFX cung cấp ứng dụng Scene Builder trên
các nền tảng khác nhau, cho phép LTV kéo thả khi thiết kế giao diện
• Tương thích với Swing: trong ứng dụng JavaFX có thể nhúng các thành phần Swing
• Built-in UI controls: JavaFX cung cấp các control đa dạng để phát triển ứng dụng
• CSS like Styling: thiết kế giao diện với các tính năng giống như trong CSS • … 9 Lịch sử JavaFX
• JavaFX được phát triển bởi Chris Oliver khi ông làm trong
tập đoàn See Beyond Technology Corporation
(Được Sun Microsystems mua lại vào 2005)
• 2007: Được giới thiệu chính thức ở hội nghị Java One
• 2008: Được tích hợp vào NetBean. JavaFX 1.0 được ban hành
• 2014: JavaFX được tích hợp vào Java SDK 8
• 2018: JavaFX được tách ra khỏi Java SDK 11 10 11 2. Cài đặt JavaFX
• Trang chủ JavaFX: https://openjfx.io/
• Trang download thư viện JavaFX:
https://gluonhq.com/products/javafx/
• Download, giải nén, copy các file trong thư mục lib, add vào build path của project
• Lưu ý khi chạy chương trình trên IDE Eclipse
• Vào runtime configuration, cấu hình VM arguments: • --module-path
${project_classpath:REPLACE_ME_WITH_YOUR_PROJECT_NAME} --addmodules javafx.controls,javafx.fxml
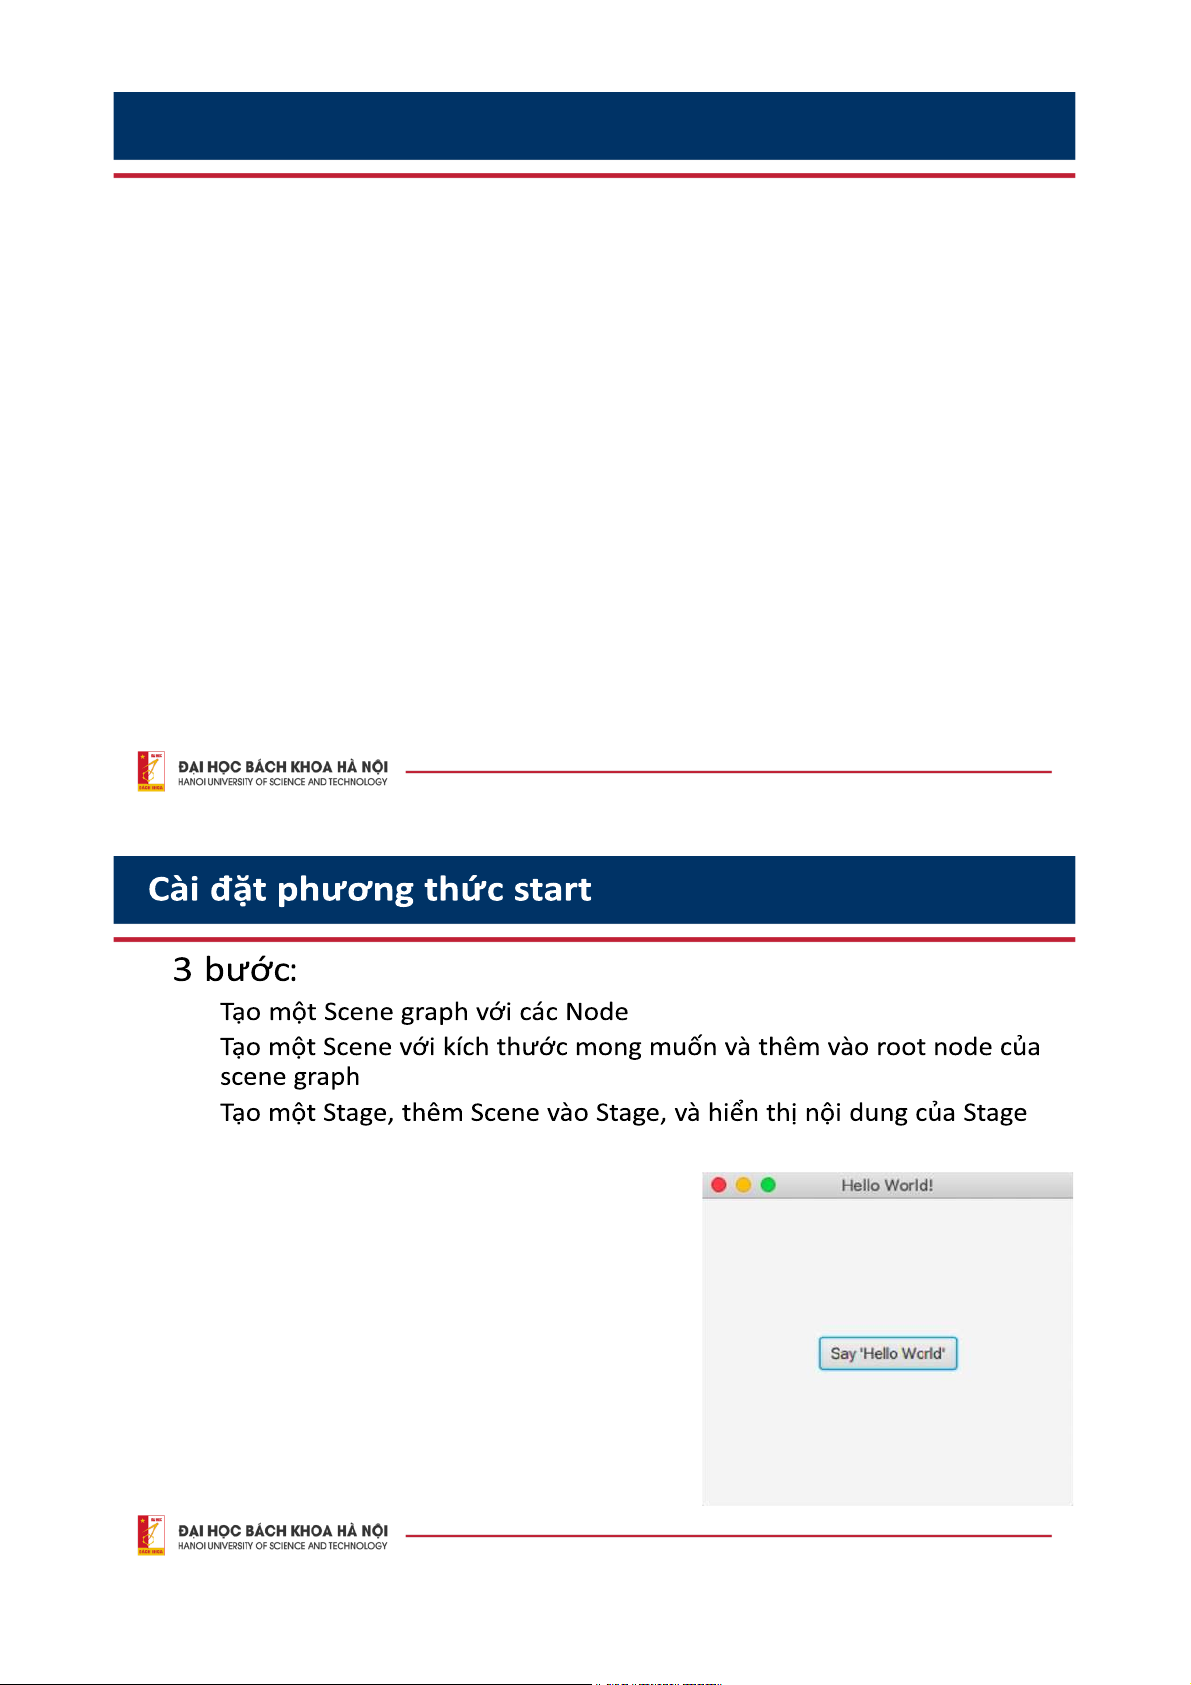
• Bỏ chọn: “Use the -XstartOnFirstThread argument when launching with SWT” 12 JavaFX Hello World
import javafx.application.Application;
import javafx.event.ActionEvent; import
javafx.event.EventHandler; import
javafx.scene.Scene; import
javafx.scene.control.Button; import
javafx.scene.layout.StackPane; import javafx.stage.Stage;
public class HelloWorld extends Application { @Override
public void start(Stage primaryStage) { Button
btn = new Button(); btn.setText("Say ’Hello World’");
btn.setOnAction(new EventHandler() { @Override
public void handle(ActionEvent event) { System.out.println("Hello World!"); } });
StackPane root = new StackPane(); root.getChildren().add(btn);
Scene scene = new Scene(root, 300, 250);
primaryStage.setTitle("Hello World!"); primaryStage.setScene(scene); primaryStage.show(); }
public static void main(String[] args) { launch(args); } } 13 • • • • • • • • • 14 15 Nh ậ pvo:
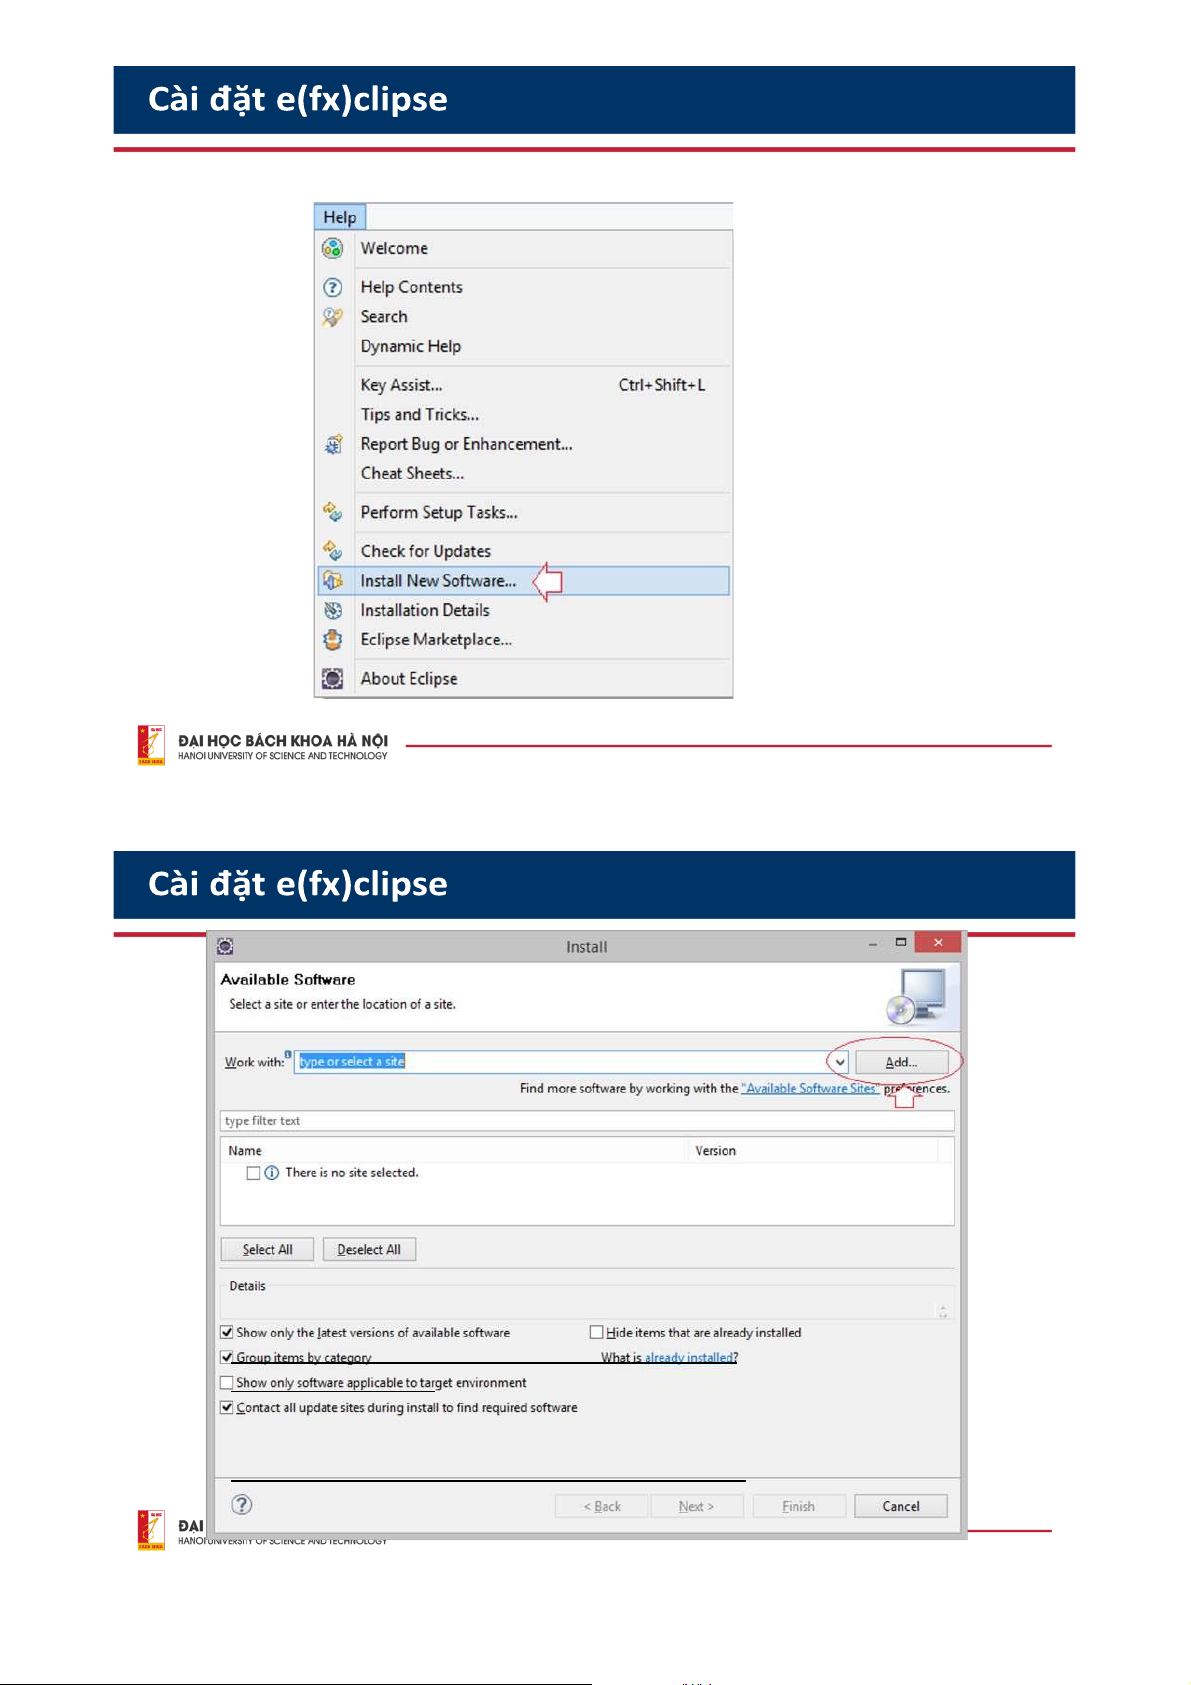
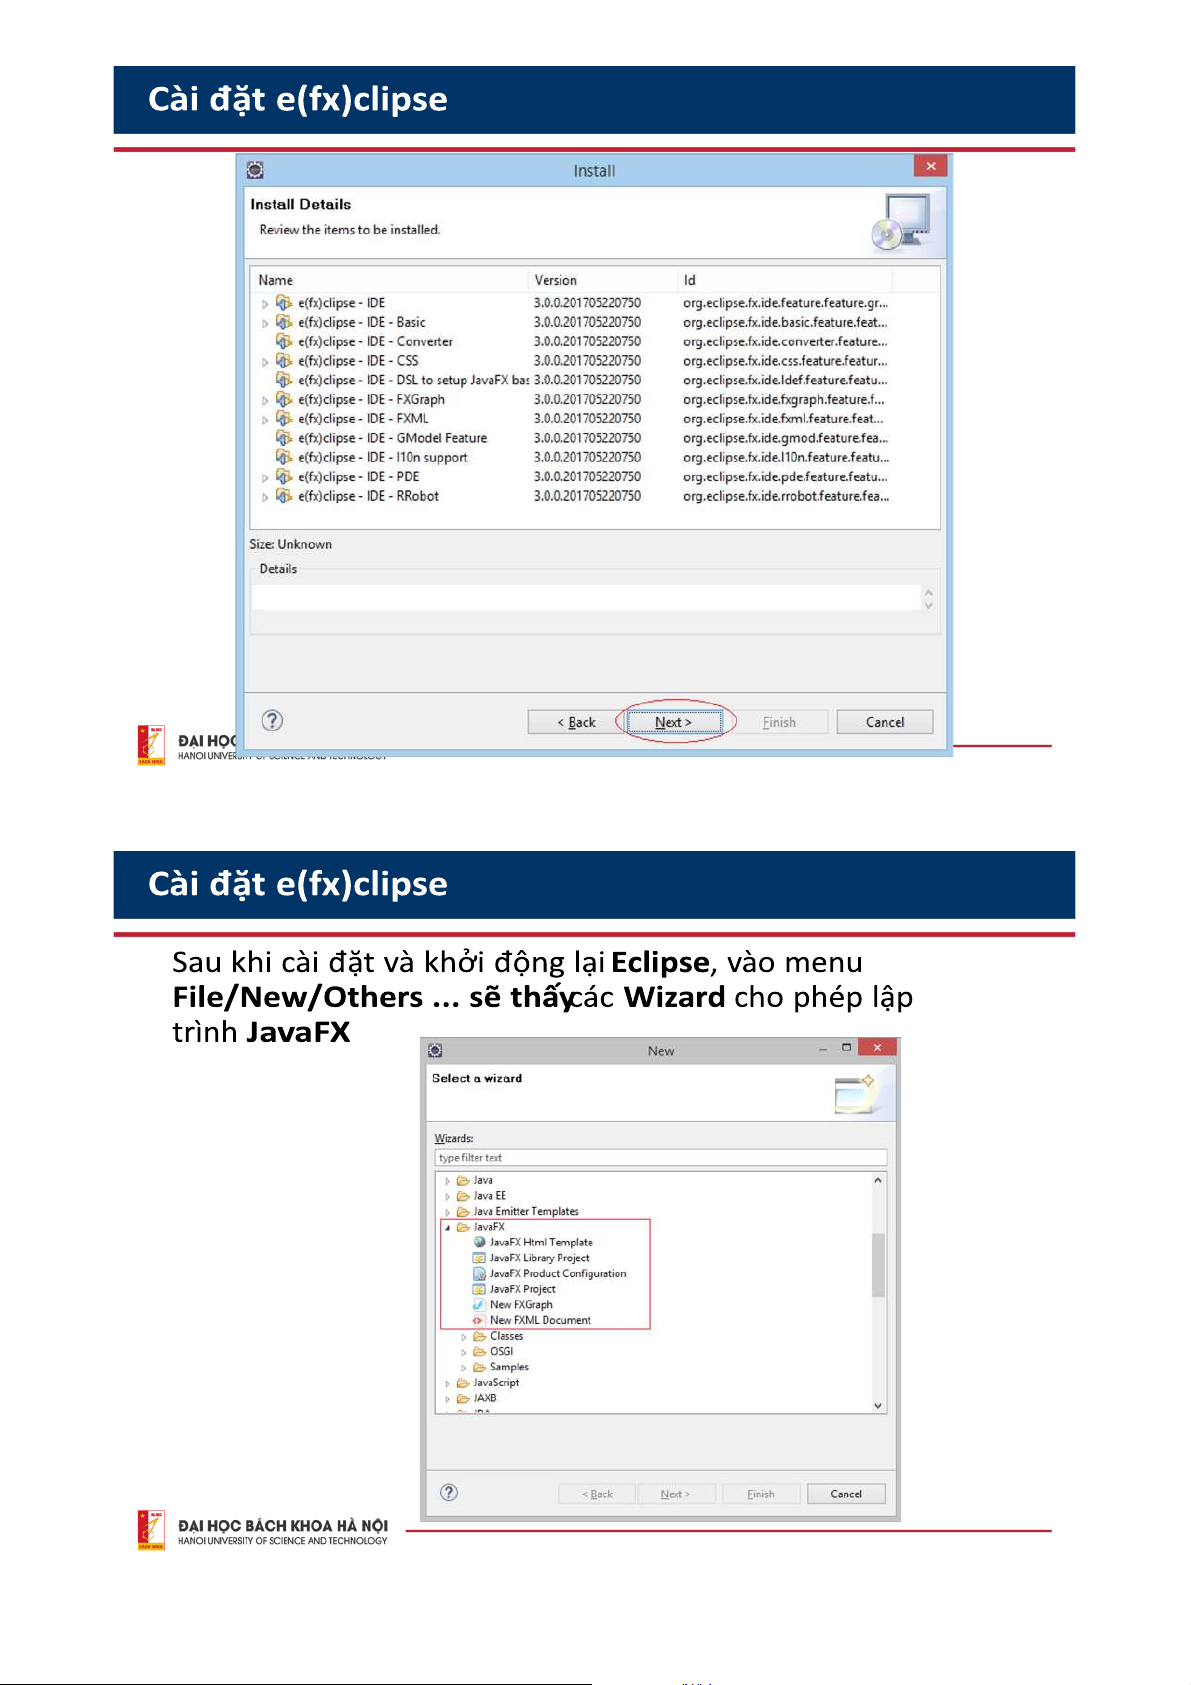
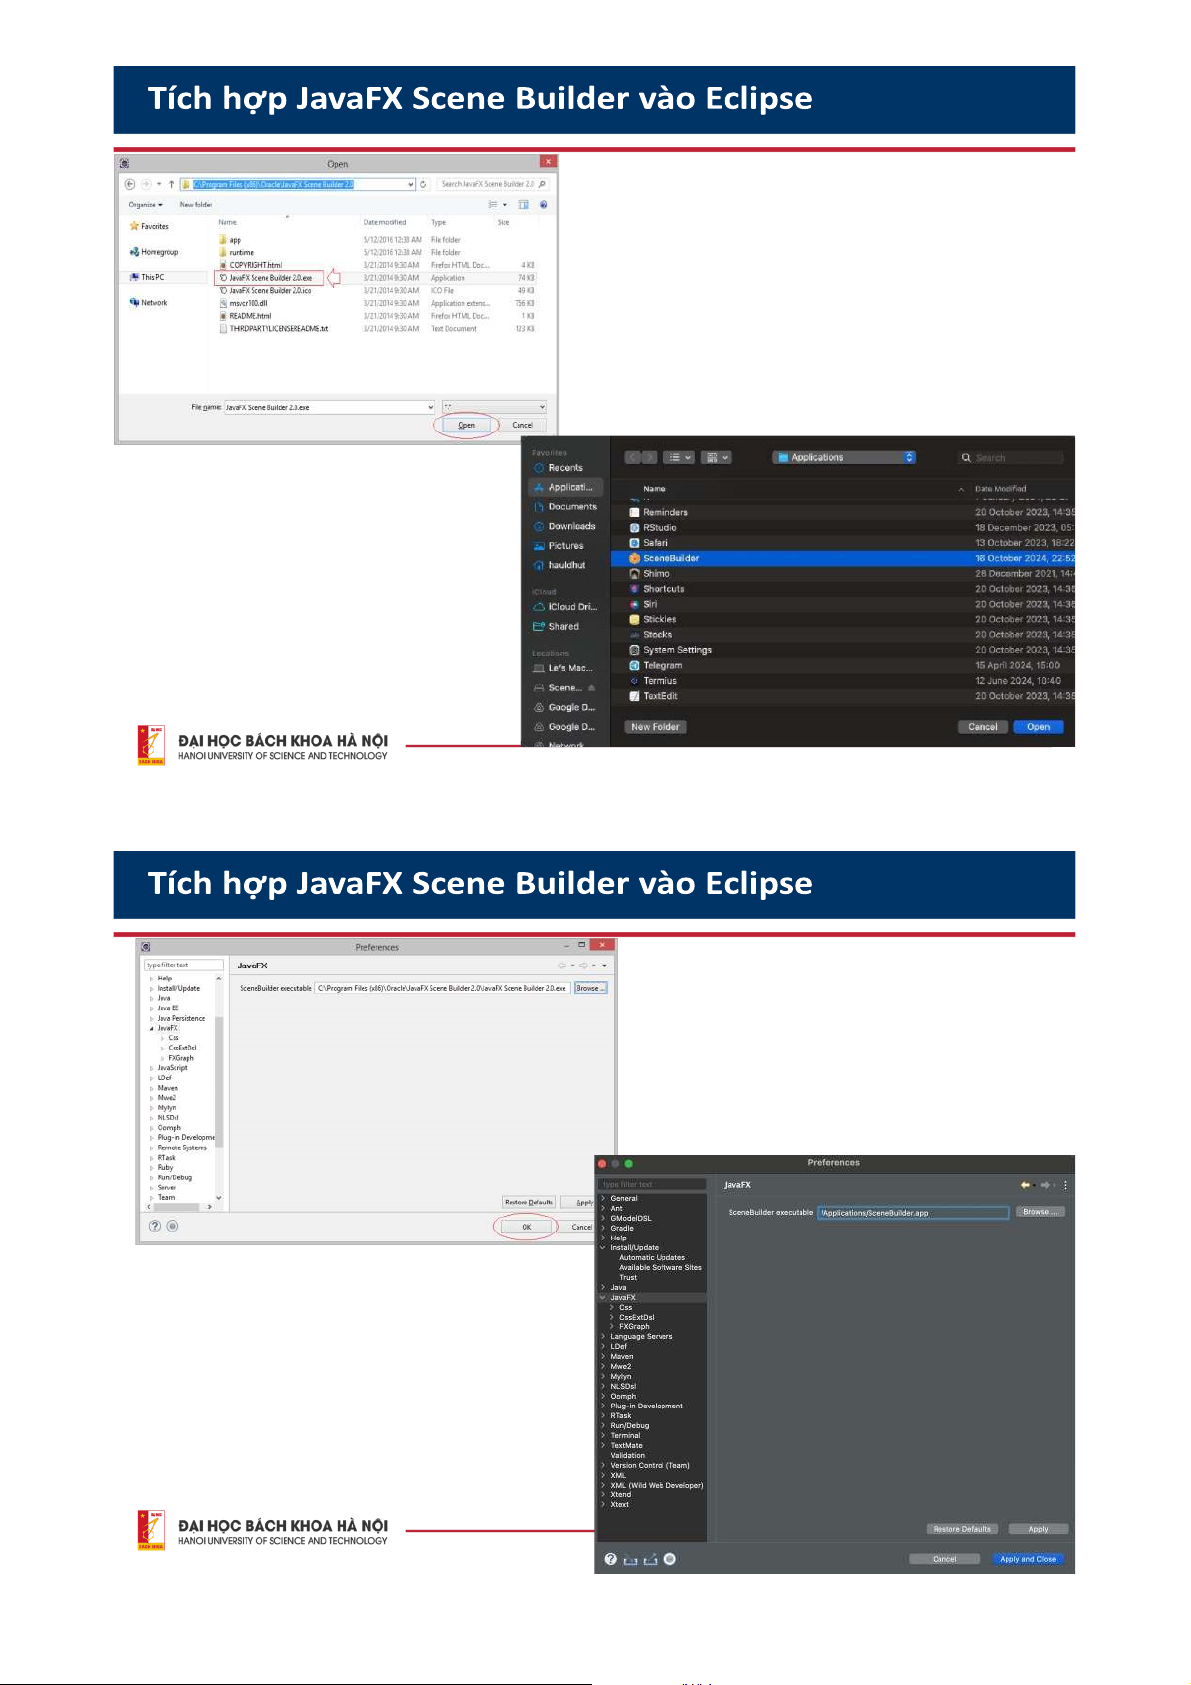
http://download.eclipse.org/efxclipse/updates- released/3.0.0/site XemccPhinb ả nm ớ inh ấ tt ạ i:
https://www.eclipse.org/efxclipse/releases.html 16 17 18 19 • 20 • • • • 21 25 • 26 Stage
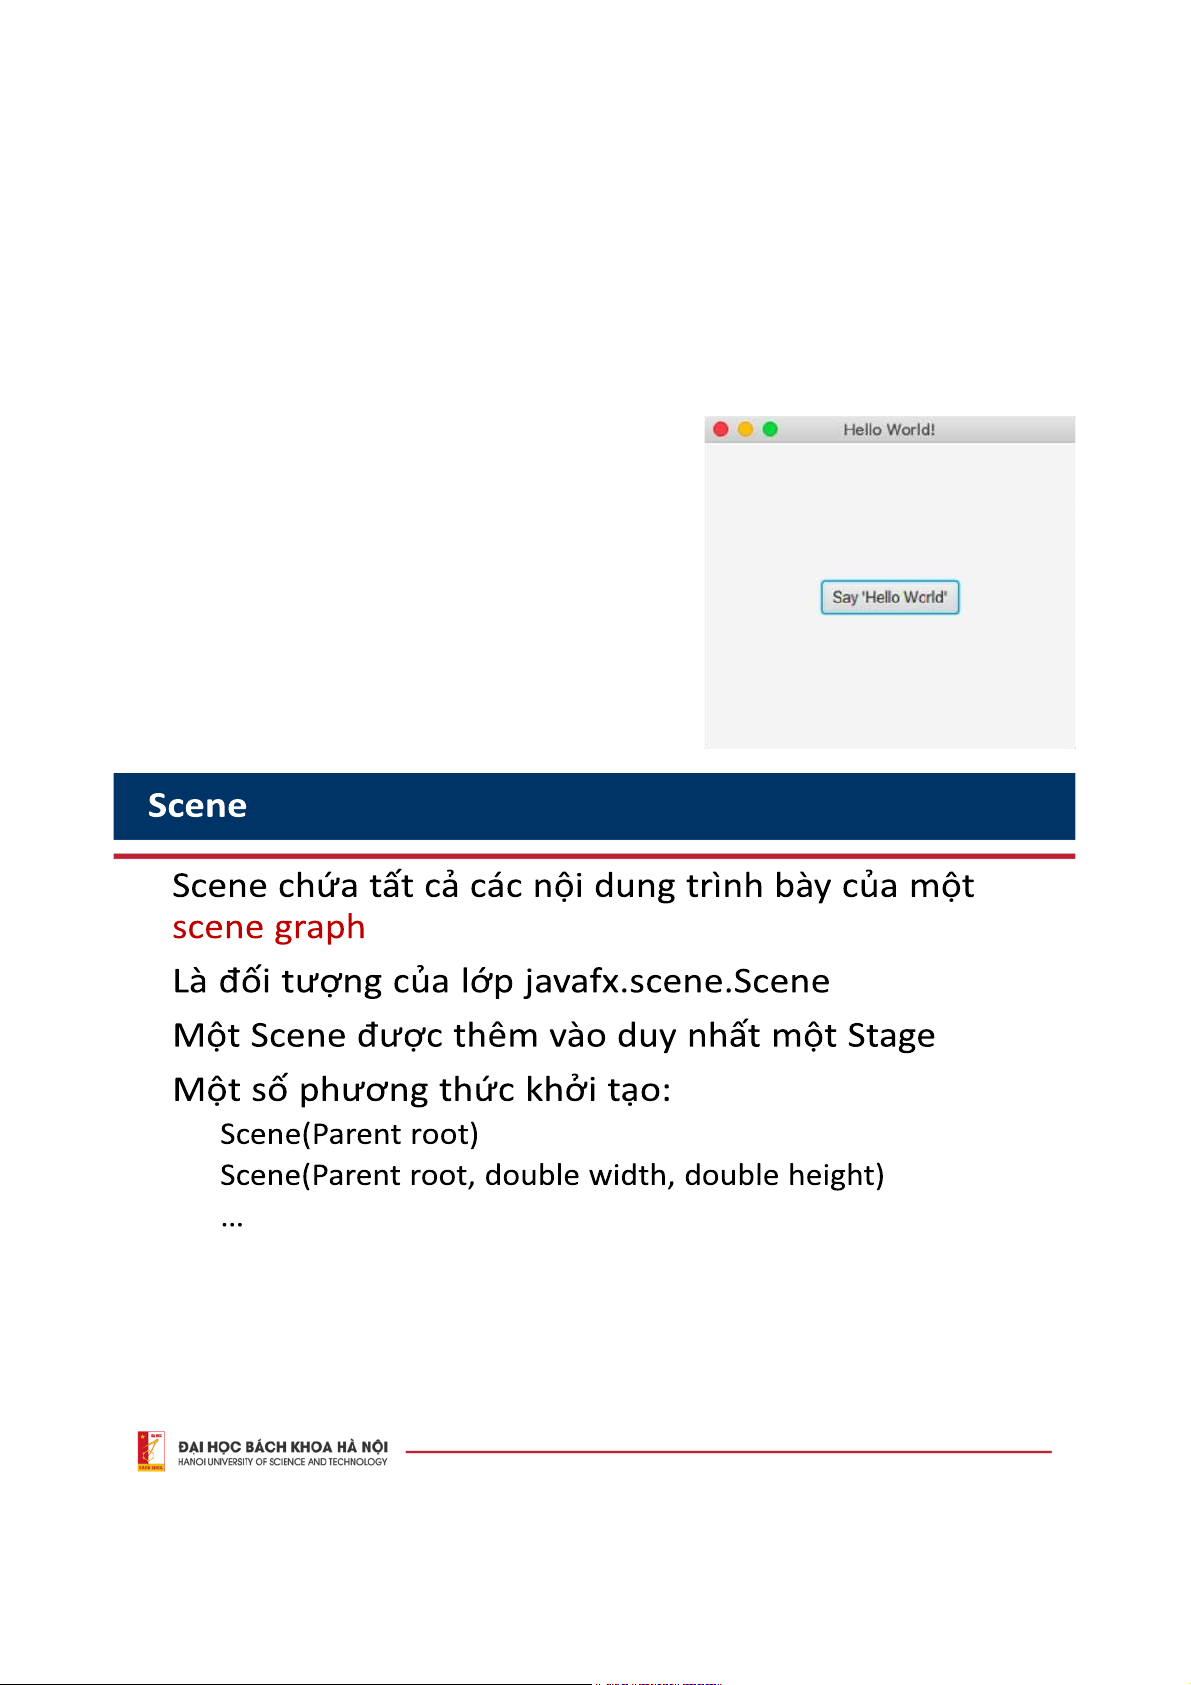
• Đối tượng Stage (Window) chứa tất cả các đối tượng khác trong ứng dụng JavaFX
• Là đối tượng của lớp javafx.stage.Stage
• Đối tượng Stage sẽ truyền làm tham số cho phương thức start()
của lớp Application (Xem lại ví dụ HelloWorld JavaFX)
• Có 2 tham số width và height
• Được chia làm 2 phần: public void start(Stage primaryStage) • Content Area và
• Decorations (Title bar và Borders)
• Để hiển thị Stage, gọi phương thức show()
• Có 5 style cho Stage: Decorated, Undecorated, Transparent, Unified, Utility 27
stage.initStyle(StageStyle.DECORATED);
//stage.initStyle(StageStyle.UNDECORATED);
//stage.initStyle(StageStyle.TRANSPARENT);
//stage.initStyle(StageStyle.UNIFIED);
//stage.initStyle(StageStyle.UTILITY); JavaFX Hello World
import javafx.application.Application;
import javafx.event.ActionEvent; import
javafx.event.EventHandler; import
javafx.scene.Scene; import
javafx.scene.control.Button; import
javafx.scene.layout.StackPane; import javafx.stage.Stage;
public class HelloWorld extends Application { @Override
public void start(Stage primaryStage) { Button
btn = new Button(); btn.setText("Say ’Hello World’");
btn.setOnAction(new EventHandler() { @Override
public void handle(ActionEvent event) { System.out.println("Hello World!"); } });
StackPane root = new StackPane(); root.getChildren().add(btn);
Scene scene = new Scene(root, 300, 250);
primaryStage.setTitle("Hello World!"); primaryStage.setScene(scene); primaryStage.show(); }
public static void main(String[] args) { launch(args); } } 29 • • • • • • • 30 Scene Graph và Nodes
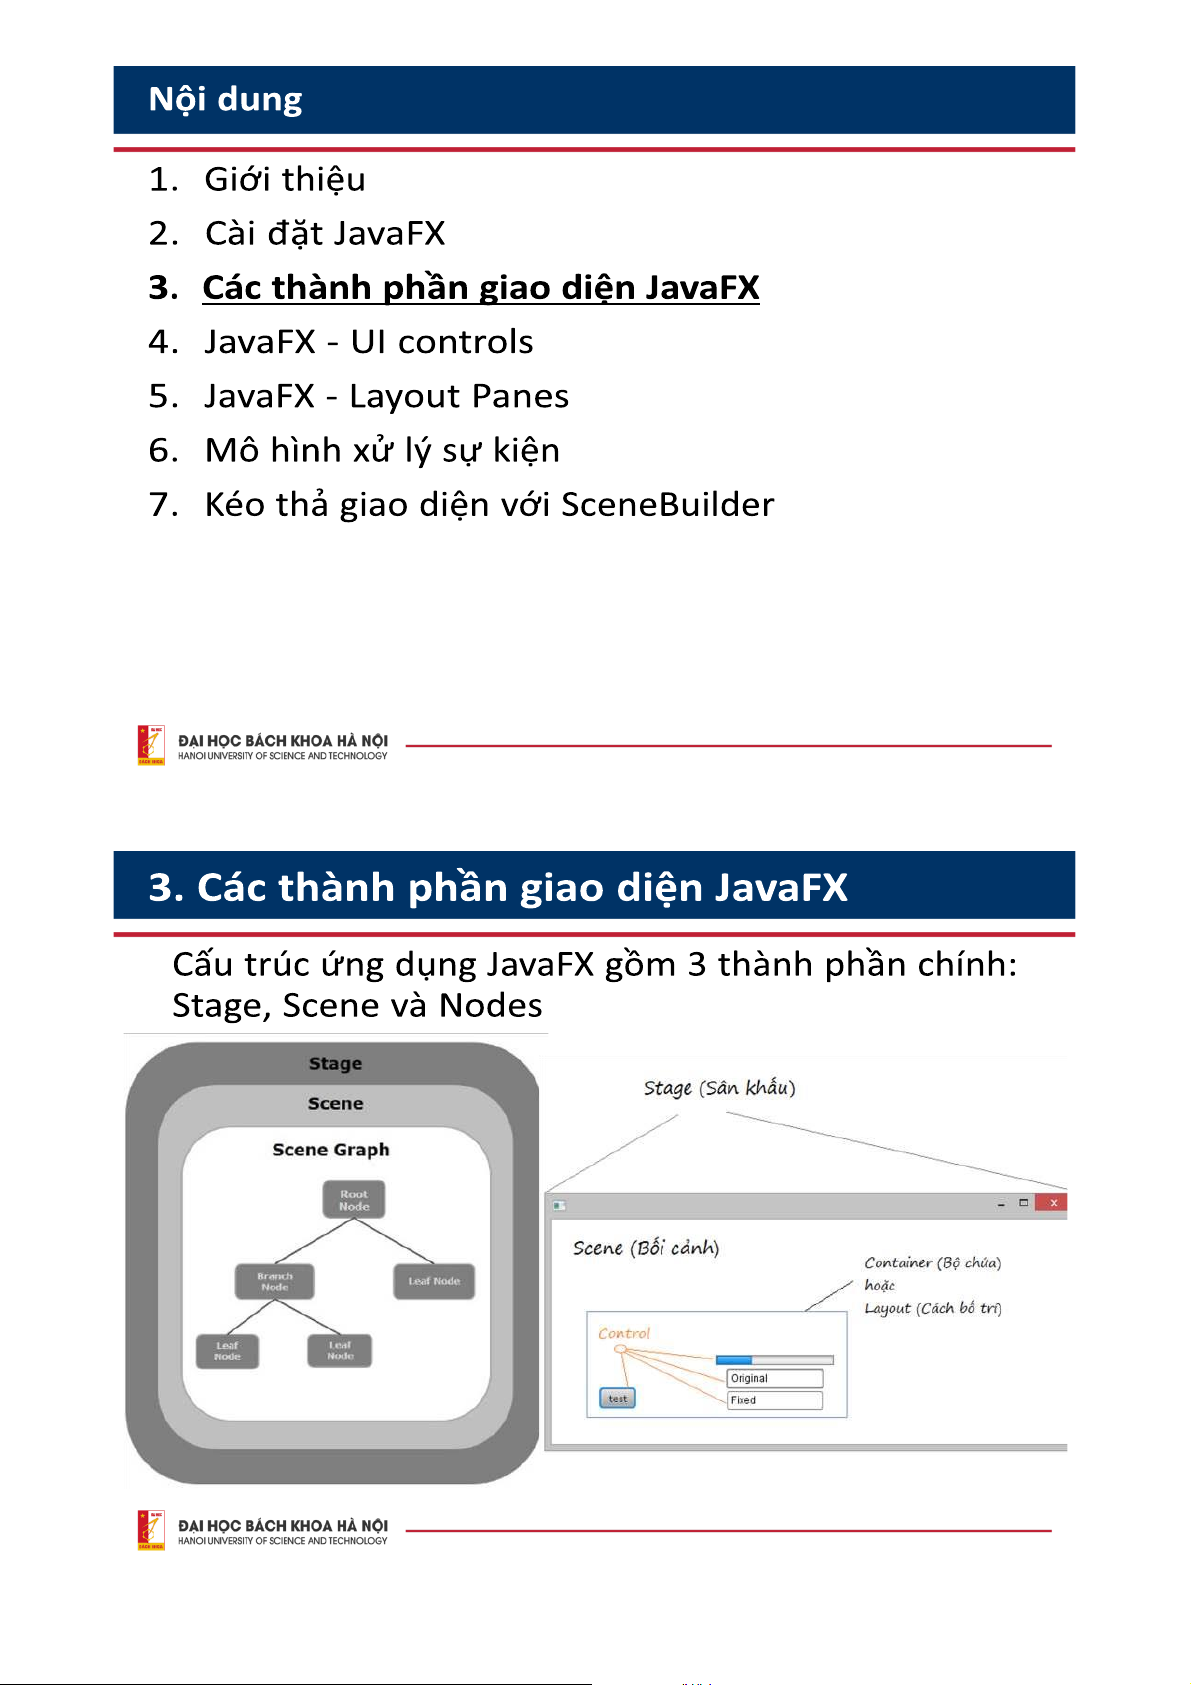
• Scene graph: là cấu trúc dữ liệu phân cấp dạng tree biểu diễn nội
dung một Scene, bao gồm tất cả các controls, layout
• Node: là một đối tượng đồ họa của một Scene graph, bao gồm
• Đối tượng hình học (2D và 3D) như: Circle, Rectangle, Polygon, …
• Đối tượng điều khiển UI như: Button, Checkbox, TextArea, …
• Phần tử đa phương tiện Media như: Audio, Video, Image
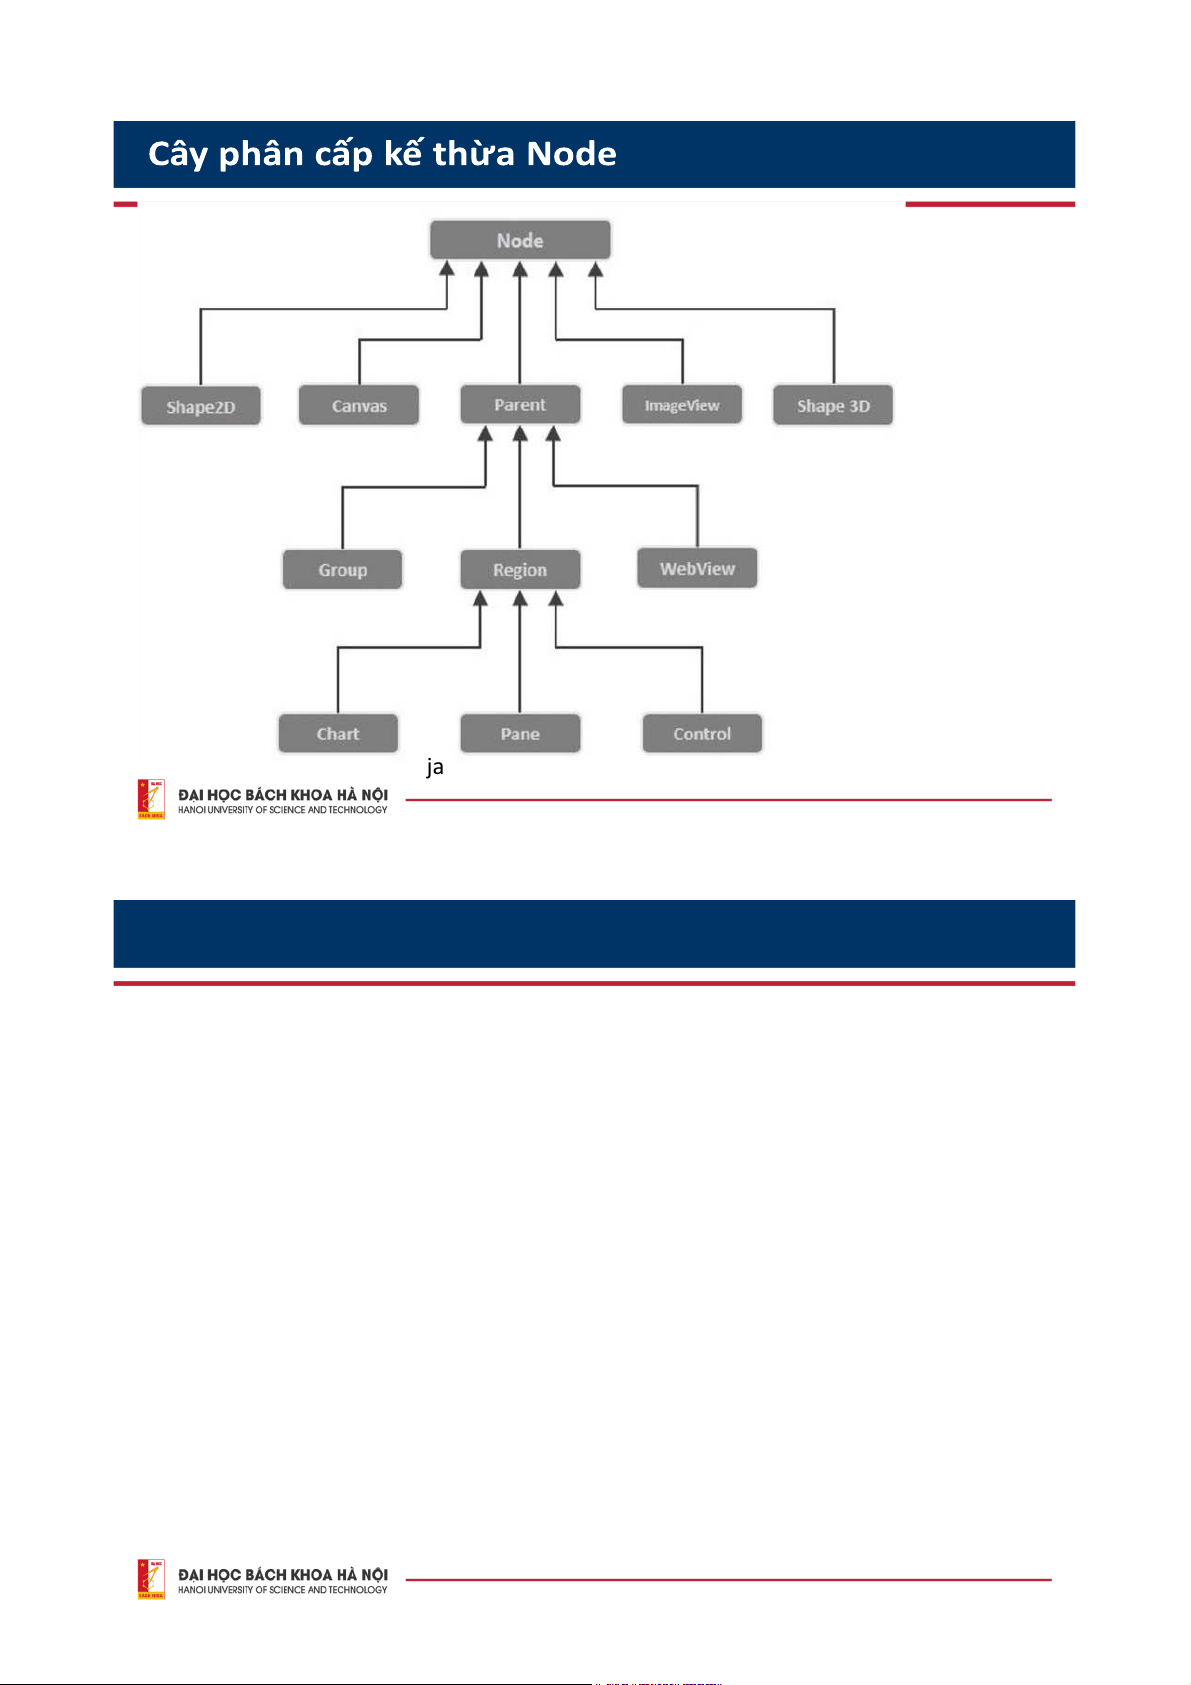
• Lớp cơ sở cho tất cả các loại Node: javafx.scene.Node 31 Scene Graph và Nodes • Có 2 loại Node: • Branch Node/Parent Node:
• Là các node có các node con,
• Lớp cơ sở là lớp javafx.scene.Parent (lớp trừu tượng). • Có 3 loại:
• Group: là một node tổng hợp, chứa một list các node con. Khi render node Group, tất
cả các node con sẽ lần lượt được render. Các chuyển đổi hiệu ứng áp dụng cho một
Group được áp dụng cho tất cả node con
• Region: là lớp cơ sở cho các UI Controls, bao gồm Chart (AreaChart,
BarChart, BubbleChart, …), Pane (AnchorPane, BorderPane, DialogPane,
FlowPane, HBox, VBox …), Control (Accordion, ButtonBar, ChoiceBox,
ComboBoxBase, HTMLEditor, …)
• WebView: tương tự như Browser
• Leaf Node: là node không có node con. Ví dụ: Rectangle, Ellipse, Box, ImageView, MediaView
• Lưu ý: Root node là một branch/parent node, nhưng root node không có node cha. 32 javafx.scene.Node javafx.scene.Parent javafx.scene.Group javafx.scene.layout.Region javafx.scene.chart.Chart javafx.scene.layout.Pane javafx.scene.control.Control 33
Cách tạo ứng dụng JavaFX
• Viết lớp kế thừa lớp javafx.application.Application, thực thi
phương thức trừu tượng start
• Trong phương thức main, gọi phương thức static launch(). Phương
thức launch đã tự động gọi phương thức start()
public class JavafxSample extends Application{ @Override
public void start(Stage primaryStage) throws Exception{ /*
Code for JavaFX application.
(Stage, scene, scene graph) */ }
public static void main(String args[]){ launch(args); } } 34
Vòng đời ứng dụng JavaFX
• Có 3 phương thức trong vòng đời ứng dụng JavaFX: init(), start(), stop()
• Cài đặt mặc định là phương thức rỗng, có thể override khi muốn làm gì đó • Thứ tự hành động
• Tạo thể hiện của lớp application
• Gọi phương thức init (không tạo stage hoặc scene trong phương thức này)
• Gọi phương thức start
• Khi ứng dụng kết thúc, gọi phương thức stop
• Khi cửa sổ (window) cuối cùng của ứng dụng JavaFX được đóng,
ứng dụng tự động kết thúc. Có thể gọi tường minh với phương
thức Platform.exit() hoặc System.exit(int) 35 • • • •
publicvoid start(Stage primaryStage ) {
Button btn = new Button();
btn .setText( "Say ’Hello World’" ) ;
btn .setOnAction( new EventHandler() { @Override
publicvoid handle(ActionEvent event ) {
System. out .println( "Hello World!" ;) } }) ;
StackPane root = new StackPane(); //scene graph
root .getChildren().add( btn ) ;//add node btn
Scene scene = new Scene( root , 300, 250);/ /scene with desired size
primaryStage .setTitle( "Hello World!" ) ;
primaryStage .setScene( scene ) ;//add scene to Stage (primaryStage)
primaryStage .show(); //show the stage } 36 Tạo scene graph
• Cần tạo root node, có thể là Group, Region hoặc WebView
• VD: Group root = new Group();
• Thêm các node vào root node theo 2 cách • Cách 1: thêm
1 node object vào một root node đã có
//Retrieving the observable list object
ObservableList list = root.getChildren();
//Setting a node object as a node list.add(NodeObject);
• Cách 2: Khởi tạo root node với 1 node object
Group root = new Group(NodeObject); 37 •
Scene scene = new Scene(root); •
Scene scene = new Scene(root, 600, 300); • → • //Setting the title to Stage.
primaryStage.setTitle("Sample application"); //Setting the scene to Stage primaryStage.setScene(scene); //Displaying the stage primaryStage.show();
Ví dụ: tạo ứng dụng với cửa sổ JavaFX rỗng
public class JavafxSample extends Application { @Override
public void start(Stage primaryStage) throws Exception {
//creating a Group object
Group group = new Group(); //Creating a Scene
Scene scene = new Scene(group ,600, 300);
//setting color to the scene
scene.setFill(Color.BROWN);
//Setting the title to Stage.
primaryStage.setTitle("Sample Application");
//Adding the scene to Stage
primaryStage.setScene(scene);
//Displaying the contents of the stage primaryStage.show(); }
public static void main(String args[]){ launch(args); } } 40
Tài liệu liên quan:
-

Báo cáo chuyên đề Lập trình Java | Lập trình Java | Trường Đại học Bách Khoa Hà Nội
31 16 -
Bài tập lập trình java | Đại học Bách khoa Hà Nội
65 33 -

Lập trình mạng trong Java môn Lập trình Java | Trường Đại học Bách Khoa Hà Nội
107 54 -

Bài 3: Trừu tượng hóa và đóng gói môn Lập trình Java | Trường Đại học Bách Khoa Hà Nội
76 38