Get Started IOS - Công nghệ Website | Đại học Bách Khoa, Đại học Đà Nẵng
Get Started IOS - Công nghệ Website | Đại học Bách Khoa, Đại học Đà Nẵng iúp sinh viên tham khảo, ôn luyện và phục vụ nhu cầu học tập của mình cụ thể là có định hướng, ôn tập, nắm vững kiến thức môn học và làm bài tốt trong những bài kiểm tra, bài tiểu luận, bài tập kết thúc học phần, từ đó học tập tốt và có kết quả cao cũng như có thể vận dụng tốt những kiến thức mình đã học
Môn: Công nghệ Web (CNWEB1) 29 tài liệu
Trường: Trường Đại học Bách khoa, Đại học Đà Nẵng 1.7 K tài liệu
Tác giả:


Preview text:
1/11/24, 10:07 AM Get Started Get Started Get Started
This SDK supports Android and iOS mobile operating platforms. Additional materials are bundled with this SDK to help you with development and
testing. Use this information to start implementing on either Android or iOS quickly.
What's in the Cardless Connect SDK? Get Started with Android Get Started with iOS
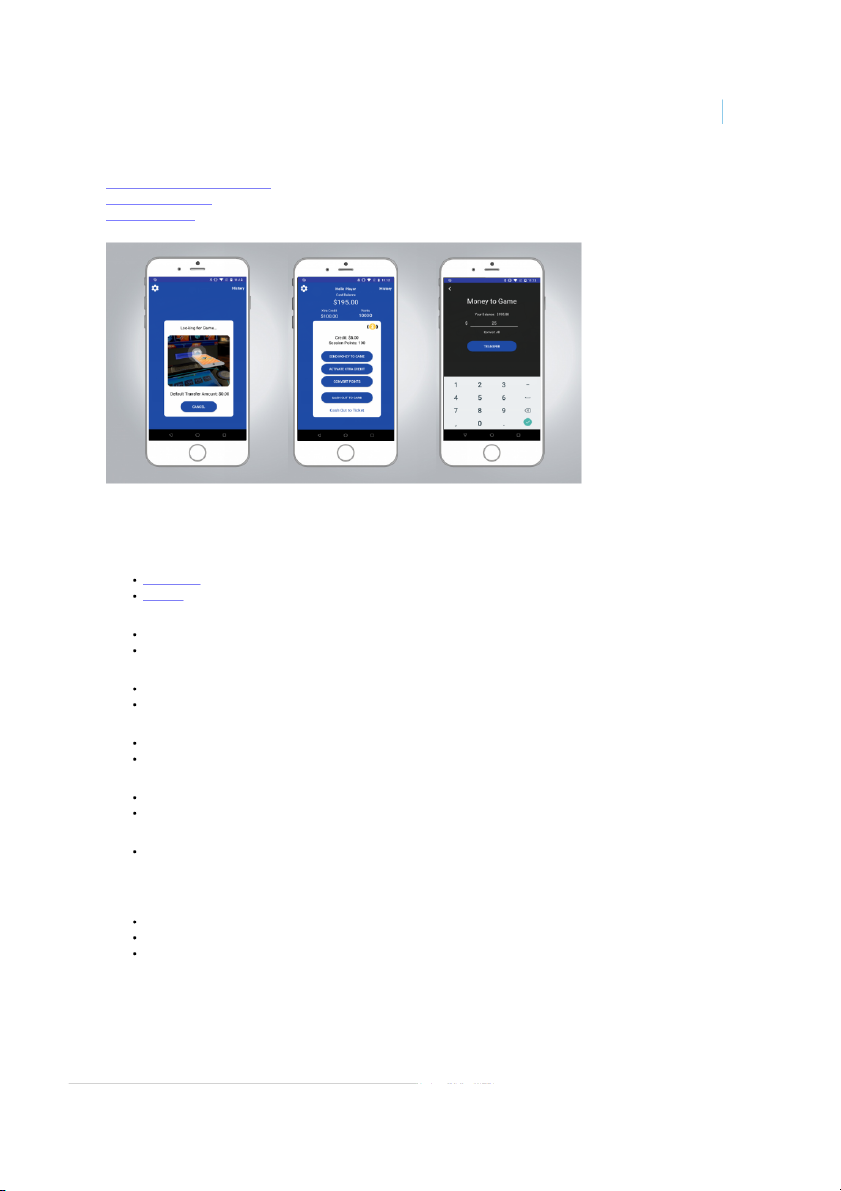
Figure 1-6 Sample app running on a mobile device.
What’s in the Cardless Connect SDK?
API documentation can be accessed through the links below. All other artifacts are available in the root directory of the SDK bundle. API Documentation API - Android API - iOS SDK Binaries Android iOS
Sample Application - Source Android Reference App iOS Reference App
Sample Application - Binary Android Reference App iOS Reference App Sample Application Android iOS Emulator Host Emulator
Get Started with Android Packages
com.igt.systems.cardlessconnect.sdk
com.igt.systems.cardlessconnect.sdk.events
com.igt.systems.cardlessconnect.sdk.services.ble Quick Start To use this SDK:
1. Create a new Android Studio project, using Android Studio version 2.2 or higher.
2. Copy the cardlessconnect-{version}.aar file into the libs directory in the project.
https://gtechcorp.sharepoint.com/sites/SystemsPortal/ccsdk2-3/content/STCS/SDK/SdkTopics/GetStarted.aspx#Get2 1/3 1/11/24, 10:07 AM Get Started
3. Edit the build.gradle file for the app.
a. Change the minSdkVersion to 19.
b. Add the following section before the dependencies section: repositories { flatDir { dirs 'libs' } }
c. Add the following to the dependencies section:
compile(name:'cardlessconnect-{version}', ext:'aar')
compile 'org.apache.commons:commons-lang3:3.0'
compile 'com.madgag.spongycastle:core:1.53.0.0'
compile 'com.madgag.spongycastle:prov:1.53.0.0'
compile 'com.madgag.spongycastle:pkix:1.53.0.0'
compile 'com.madgag.spongycastle:pg:1.53.0.0'
compile 'com.koushikdutta.async:androidasync:2.1.6'
compile 'com.google.code.gson:gson:2.5'
4. Rebuild the project to make sure the configuration is successful. An Internet connection is required to resolve the library dependencies.
5. In your application, get an instance of the CardlessConnectProcessor by calling: CardlessConnectProcessor.get()
6. Implement the ICommandListener interface, then pass an instance of that implementation to setCommandListener.
7. If your app is going to use Bluetooth Low Energy (BLE) to connect to the Cardless Connect system:
a. Use the checkBLEStatus method to make sure BLE is enabled.
b. Call startBluetooth for the app to start scanning for a Cardless Connect BLE endpoint.
c. It is up to the application to start and stop the BLE scan when the application is paused and resumed.
d. Once the BLE connection has been disconnected, it is up to the application to call startBluetooth again to look for another endpoint.
8. If your app is going to use Wifi in conjunction with QR Code scanning:
a. Implement a QR Code scanner into your application.
b. When a QR Code is successfully scanned, pass the scanned code in startWifi.
c. If the Cardless Connect server is using SSL along with a certificate signed by a custom CA, you will need to set up the CA cert in
the Android project to complete the trust chain. To do this:
i. Copy the custom CA certificate in PEM format into the raw directory in your Android project. Note: this is NOT the
certificate used by the SSL server. This should be the certificate that was used to sign the SSL certificate, as part of the trust chain.
ii. Call startWifi, passing in your Android activity, as well as the Android resource ID for the custom CA cert. For example:
CardlessConnectProcessor.get().startWifi(scannedQRCode, this, R.raw.trusted_ca_cert);
d. If the code is valid, the SDK will immediately try to connect to the specified endpoint over the network.
9. Once connected, to trigger an event such as transfer or card out, call trigger with the appropriate IEvent
The Cardless Connect Service will automatically disconnect from the mobile application if it doesn't receive a trigger in 20
seconds or more. To avoid this, the application should send an Empty Event or Account Inquiry Event to the service every 5-10
seconds when there is no other activity. Get Started with iOS
1. Create a new Xcode project, using Xcode 10.2.1.
2. Install cocoapods by following the instructions at .
https://guides.cocoapods.org/using/getting-started.aspx
3. Create a Podfile for your project by running . pod init
4. Edit the Podfile and add the following dependencies: pod 'SwiftyJSON', '5.0.0' pod 'SwiftyBeaver', '1.9.2' 5. Verify platform
appears at the top of the Podfile and, if you are using Swift in your project, :ios, '12.0' is uncommented. use_frameworks!
6. Set BUILD_LIBRARY_FOR_DISTRIBUTION to Yes in the application’s PodFile.
7. Run pod install from the source folder of your project.
8. Under General Settings for the project, set the deployment target to . iOS 12 or higher
9. Under Build Settings for the project, set to Enable Bitcode No.
10. Verify build target is either
or an actual attached device. The SDK will not compile for use in the simulator since it Generic iOS Device does not support Bluetooth.
11. Using the Finder, drag the
folder into the Framework group in the Xcode project.
CardlessConnectSDK framework
12. When the options dialog appears, enable Copy items if needed, and click Finish.
13. Under General Settings for the project, click the plus icon (+) under Embedded Binaries, choose CardlessConnectSDK.framework, and click Add.
14. Add your Cardless Connect public signing key PEM file to the application project.
15. Import the CardlessConnectSDK module into your application project.
16. Create a CardlessConnectConfig XML file, setting any non-default values appropriate to your application.
https://gtechcorp.sharepoint.com/sites/SystemsPortal/ccsdk2-3/content/STCS/SDK/SdkTopics/GetStarted.aspx#Get2 2/3 1/11/24, 10:07 AM Get Started
A Public Singing Key PEM Filename must be set in the configuration file or the processor will throw an error.
17. Implement the CommandProcessorDelegate protocol in either the application View Controller or another custom class.
18. Get an instance of the CardlessConnectProcessor by calling CardlessConnectProcessor(...), passing in the CardlessConnectConfig
and the CommandProcessorDelegate.
If your app is going to use Bluetooth Low Energy (BLE) to connect to the Cardless Connect system:
1. Call CardlessConnectProcessor.startBluetooth() for the app to start scanning for a Cardless Connect BLE endpoint.
It is up to the application to start and stop the BLE scan when the application is paused and resumed.
2. Once the BLE connection has been disconnected, it is up to the application to call startBluetooth again to look for another endpoint.
If your app is going to use Wifi in conjunction with QR Code scanning:
1. Implement a QR Code scanner into your application.
2. When a QR Code is successfully scanned, pass the scanned code into CardlessConnectProcessor.startWifi().
3. If the Cardless Connect server is using SSL along with a certificate signed by a custom CA, you will need to set up the CA cert in the
Xcode project to complete the trust chain. To do this:
a. Copy the custom CA certificate in DER format into the resources directory of your Xcode project.
This is NOT the certificate used by the SSL server. This should be the certificate that was used to sign the SSL certificate, as part of the trust chain.
b. Add the certificate to the Xcode project.
c. Set the custom CA certificate filename in the CardlessConnectConfig, without the DER extension.
d. If the QR code is valid, the SDK will immediately try to connect to the specified endpoint over the network.
Once connected, to trigger an action such as a transfer or card out, call CardlessConnectProcessor.trigger with the appropriate Event.
The Cardless Connect Service will automatically disconnect from the mobile application if it doesn’t receive a trigger in 20
seconds or more. To avoid this, the application should send an EmptyEvent or AccountInquiryEvent to the service every 5-10
seconds when there is no other activity.
© 2023 IGT. All rights reserved.
IGT Confidential Information – Use and distribution subject to the appropriate Customer Agreement and/or NDA. Under no
circumstances can the content on this page be copied, distributed, or used except by the recipient.
https://gtechcorp.sharepoint.com/sites/SystemsPortal/ccsdk2-3/content/STCS/SDK/SdkTopics/GetStarted.aspx#Get2 3/3
Tài liệu liên quan:
-

Lab 2 - Command Line Skills - Công nghệ Website | Đại học Bách Khoa, Đại học Đà Nẵng
419 210 -
Chương 3 - Java Script JavaScript - Công nghệ Website | Đại học Bách Khoa, Đại học Đà Nẵng
239 120 -
Chương 3 : Xử lý biệt lệ - Công nghệ Website | Đại học Bách Khoa, Đại học Đà Nẵng
259 130 -
Đề thi cuối kì hệ thống máy tính và ngôn ngữ lập trình - Công nghệ Website | Đại học Bách Khoa, Đại học Đà Nẵng
663 332