IoT Dashboard for A.Y. Master in Computer Engineering | Iot và ứng dụng | Học viện Công nghệ Bưu chính Viễn thông
Nowadays, the number of internet-connected devices is estimated to be around 25 billion and by 2030, this figure is expected to jump to 125 billion. A growing number of IoT devices are being deployed to enable the collection of a vast amount of digital data. We impersonate a company selling different IoT sensors. The main purport. Tài liệu được sưu tầm và soạn thảo dưới dạng file PDF để gửi tới các bạn cùng tham khảo, ôn tập đầy đủ kiến thức, chuẩn bị cho các buổi học thật tốt. Mời bạn đọc đón xem!
Môn: IoT và ứng dụng 143 tài liệu
Trường: Học viện Công Nghệ Bưu Chính Viễn Thông 1.8 K tài liệu
Tác giả:


Preview text:
Web Applications, A.Y. 2020/2021
Master Degree in Computer Engineering
Master Degree in ICT for Internet and Multimedia
Homework 1 Ð Server-side Design and Development
Submission date: 23 April 2021 Last Name First Name Badge Number Deronjic Denis 1231829 Ivancich Stefano 1227846 Maino Nicola 1239112 Moroldo Luca 1234011 Pham Francesco 1234004 Vaccaro Fabio 1231830 Objectives
Nowadays, the number of internet-connected devices is estimated to be around 25 bil ion and by
2030, this figure is expected to jump to 125 bil ion. A growing number of IoT devices are being
deployed to enable the col ection of a vast amount of digital data.
We impersonate a company sel ing different IoT sensors. The main purpose of our web application is
to provide an e-commerce platform to accommodate the ordering of our devices, and an online
platform to col ect the measurements from the sensors and visualize a clear il ustration of the data in a dashboard. Main functionalities
The core functionality of our web application is the IoT device monitoring through a dashboard. The
dashboard is divided into several pages where the user can interact and monitor the owned devices.
The sensors col ect different kinds of data at a regular time interval: one may measure the wind speed
and wind bearing, another sensor measures temperatures, humidity and pressure. Our design and
development choices also consider that more sensors with different types of information provided may be added in the future.
In order to let the user monitor its sensors, he must own those devices. So, we also provide an
ecommerce page where the user can order as many sensors as he wants. When the user completes
a purchase, the sensors he bought are automatical y added to the dashboard. Page [1] of [23]
The user firstly needs to be registered on our website. He can do that immediately when he opens the
site through the login/signup page, or he can register during the purchase phase. UserÕs email
address is used for the login.
In order to be maintainable in the long-term, the dashboard charges the users counting the total
number of monthly API cal s from his sensors. We provide a free plan of 1000 cal s/month and a pro
plan is charged with a subscription model where the number of API cal s that he can make are up to 10k cal s/month.
When the user receives the sensor, he has to add a token generated by our dashboard and insert it
into the sensor. This al ows the authentication of the sensor which is sending the data. Our platform
for a security reason, updates automatical y the token of the sensors. This helps to avoid a malicious
user to use a stolen token to perform il egitimate actions.
Each sensor can be added to a group whose name is selected by the user. The groups help to better
organize the sensors since more than one sensor can be added to a group.
All the data taken from the devices are visualized in a dedicated page. SensorÕs internal information is
visualized at a glance in the dedicated sensors page which helps the user to monitor the battery
status and other internal parameters. The state of a device is critical in an IoT application, so our
platform alerts the user whether a certain amount of battery level or a data stream are under a
designated threshold that the user could define. Presentation Logic Layer
The project is thought to be divided into 2 sub-sites: ¥ Sh S o h p
o : where the customer has the possibility to order new devices. In opposition to the
dashboard part, the shop has a more traditional design, as it should be more attractive. It is
subdivided in the fol owing pages: o Ho H m o e m p e a p g a e
g : contains a brief description of the devices that are sold o Pr P o r d o u d c u t c t p a p g a e g :
e contains a ful description of the device with al the technical details o Sh S o h p o p p i p n i g n g c a c r a t r : t
: contains al the products already put in the cart and the order details o Si S g i n g n up u / p S / i S g i n g n in i : n
: page to al ow the user to sign up or to sign in. It is common to the
Dashboard section of the web app. o Or O d r e d r e s r s l ils i t s :
t contains the list of orders made by the customer o Or O d r e d r e r p a p g a e g : e
: contains the list of products included in the order o Cu C s u t s o t m o e m r e r p r p o r f o iflie l : e
: al ows the user to view and modify the setting of hers/his account ¥ Da D s a h s b h o b a o r a d
r : It has a design similar to a control panel and it exploits the whole size of the
screen to al ow the user to see more data. All the pages of the dashboard part have a sidebar
in which there is a menu to al ow the user to surf the site. On the bottom a section with the
customerÕs name, link to her/his profile page, the account type and the number of cal s
already done by the customerÕs devices. It is subdivided in the fol owing pages: o Ho H m o e m p e a p g a e g : e
: page where the user can inspect its own devices pieces of information on o Ma M p a :
p page where the user can visualize where its devices have been deployed o Gr G o r u o p u s p s l ils i t s :
t page on which al the groups created by the current user are displayed. o De D v e i v c i e c :
e page where the details relevant to the single device are displayed. o De D v e i v c i e c e c o c n o f n ifg i u g r u a r t a i t o i n o :
n page on which the device configuration can be customized. Pagina [2] di [23]
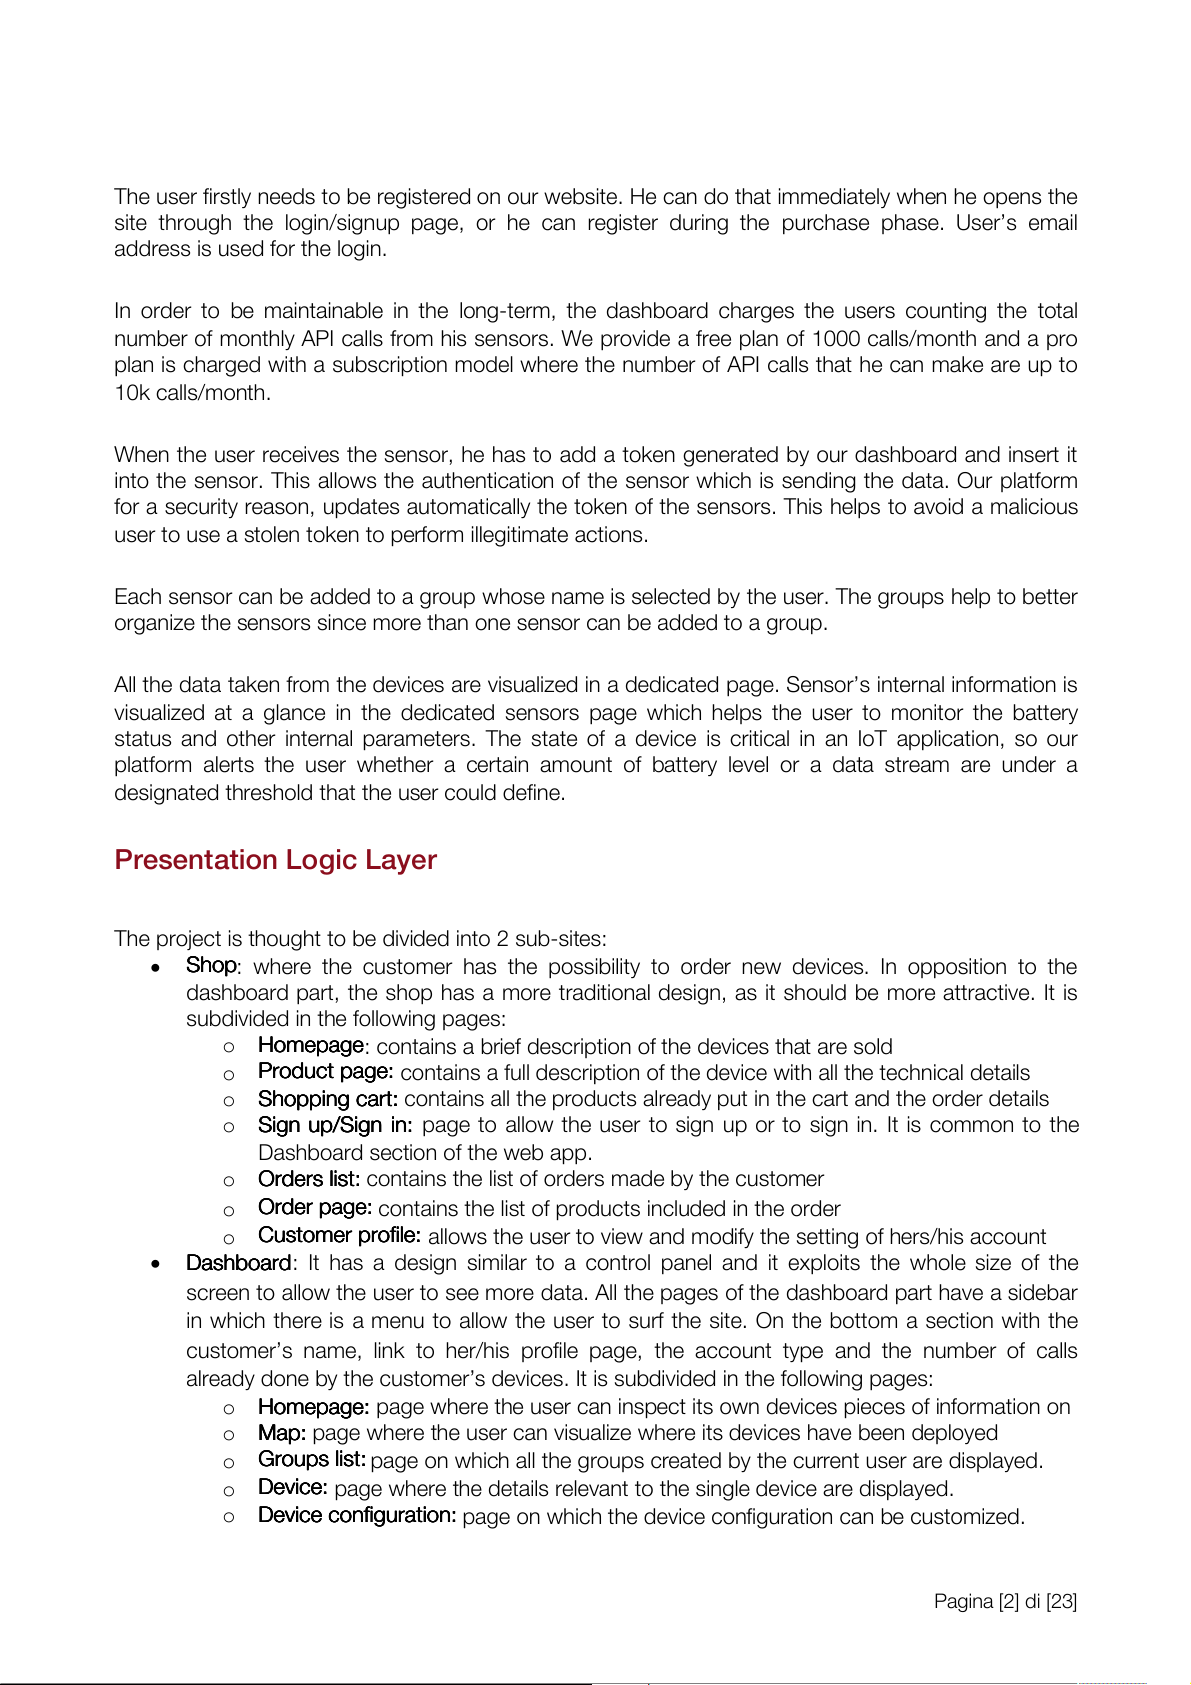
Shop - Home Page (Interface Mockup)
The shop homepage is split into two parts, each one corresponding to a device. Each part contains a
brief description of the device to be sold, together with its picture and name. By clicking on the
product image, it is possible to access the productsÕ page where more details such as the
specifications are listed. A link to the shopping cart is instead provided by clicking on the Òbuy nowÓ
button: this is to directly order one device. On the top right corner of the page, a shopping cart button
al ows the user to go straight to the shopping cart page where the order can be sent.
This should be considered the landing page for the products purchase so it is important to be appealing and wel designed.
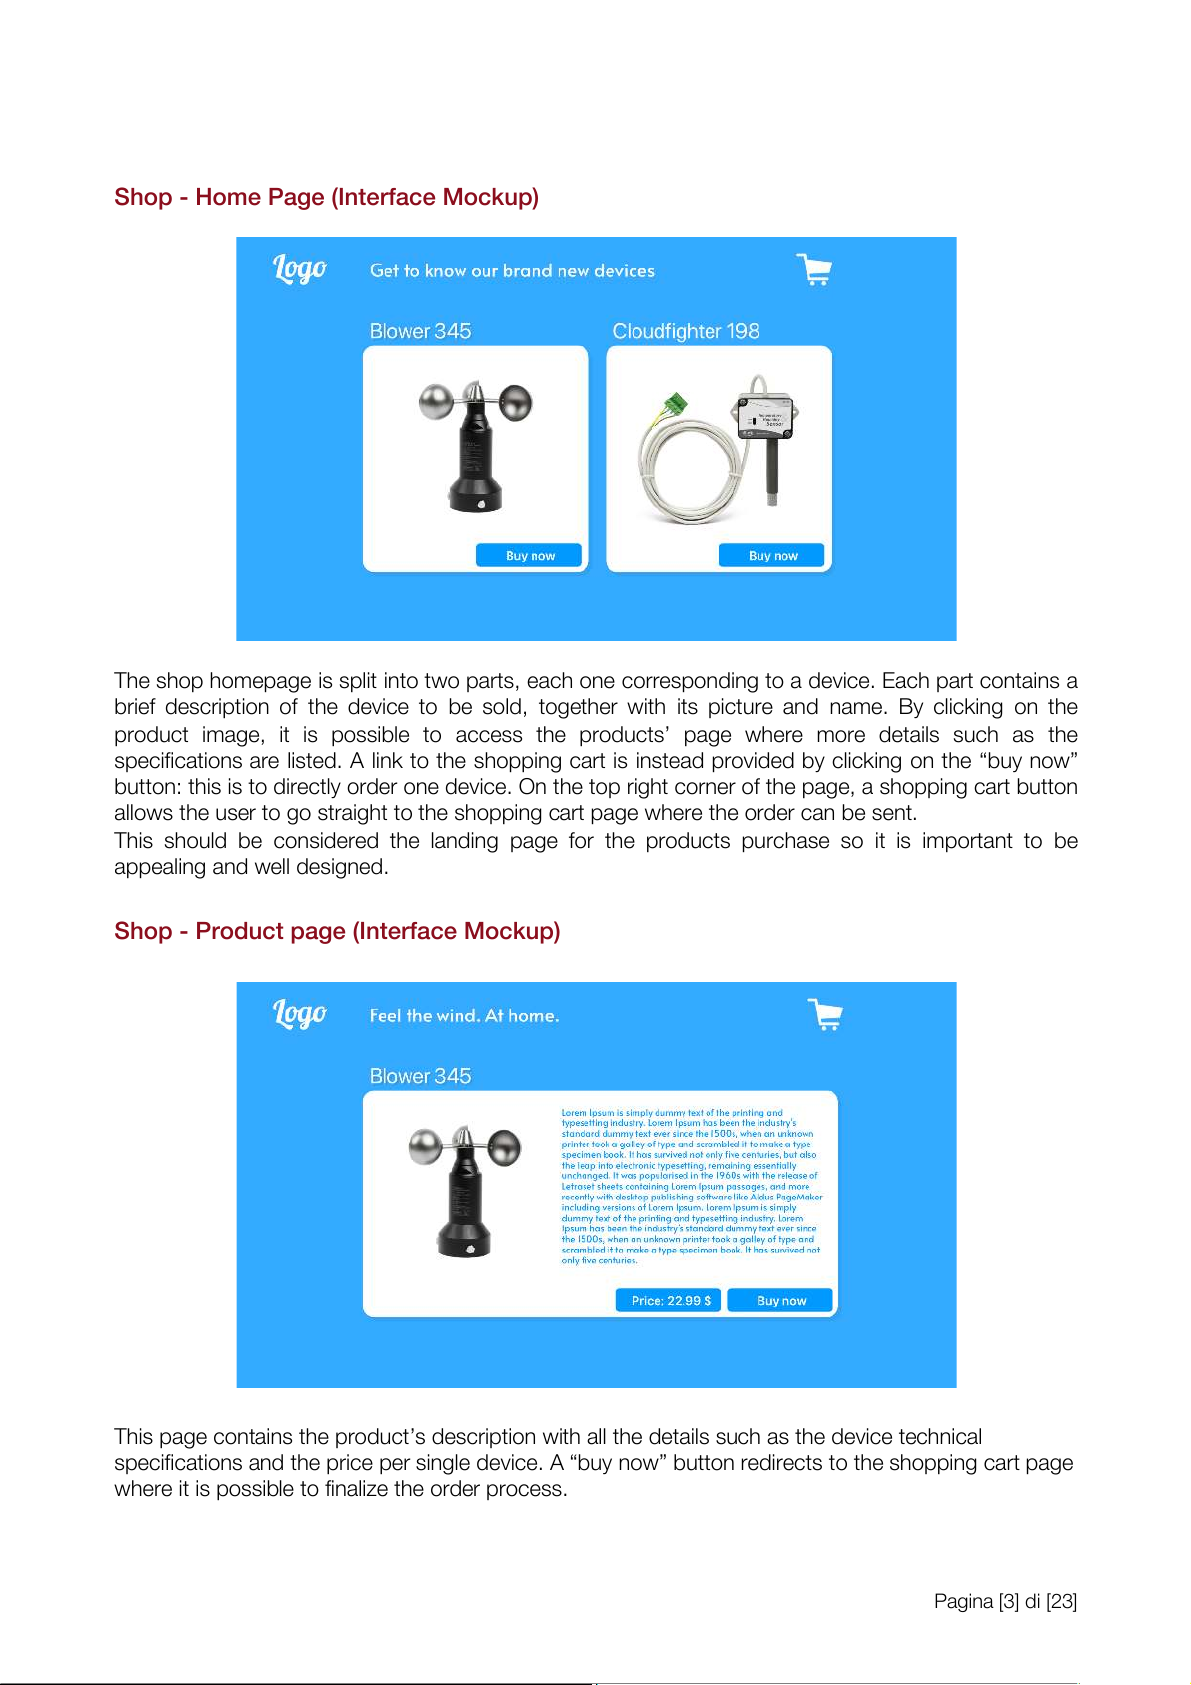
Shop - Product page (Interface Mockup)
This page contains the productÕs description with al the details such as the device technical
specifications and the price per single device. A Òbuy nowÓ button redirects to the shopping cart page
where it is possible to finalize the order process. Pagina [3] di [23]
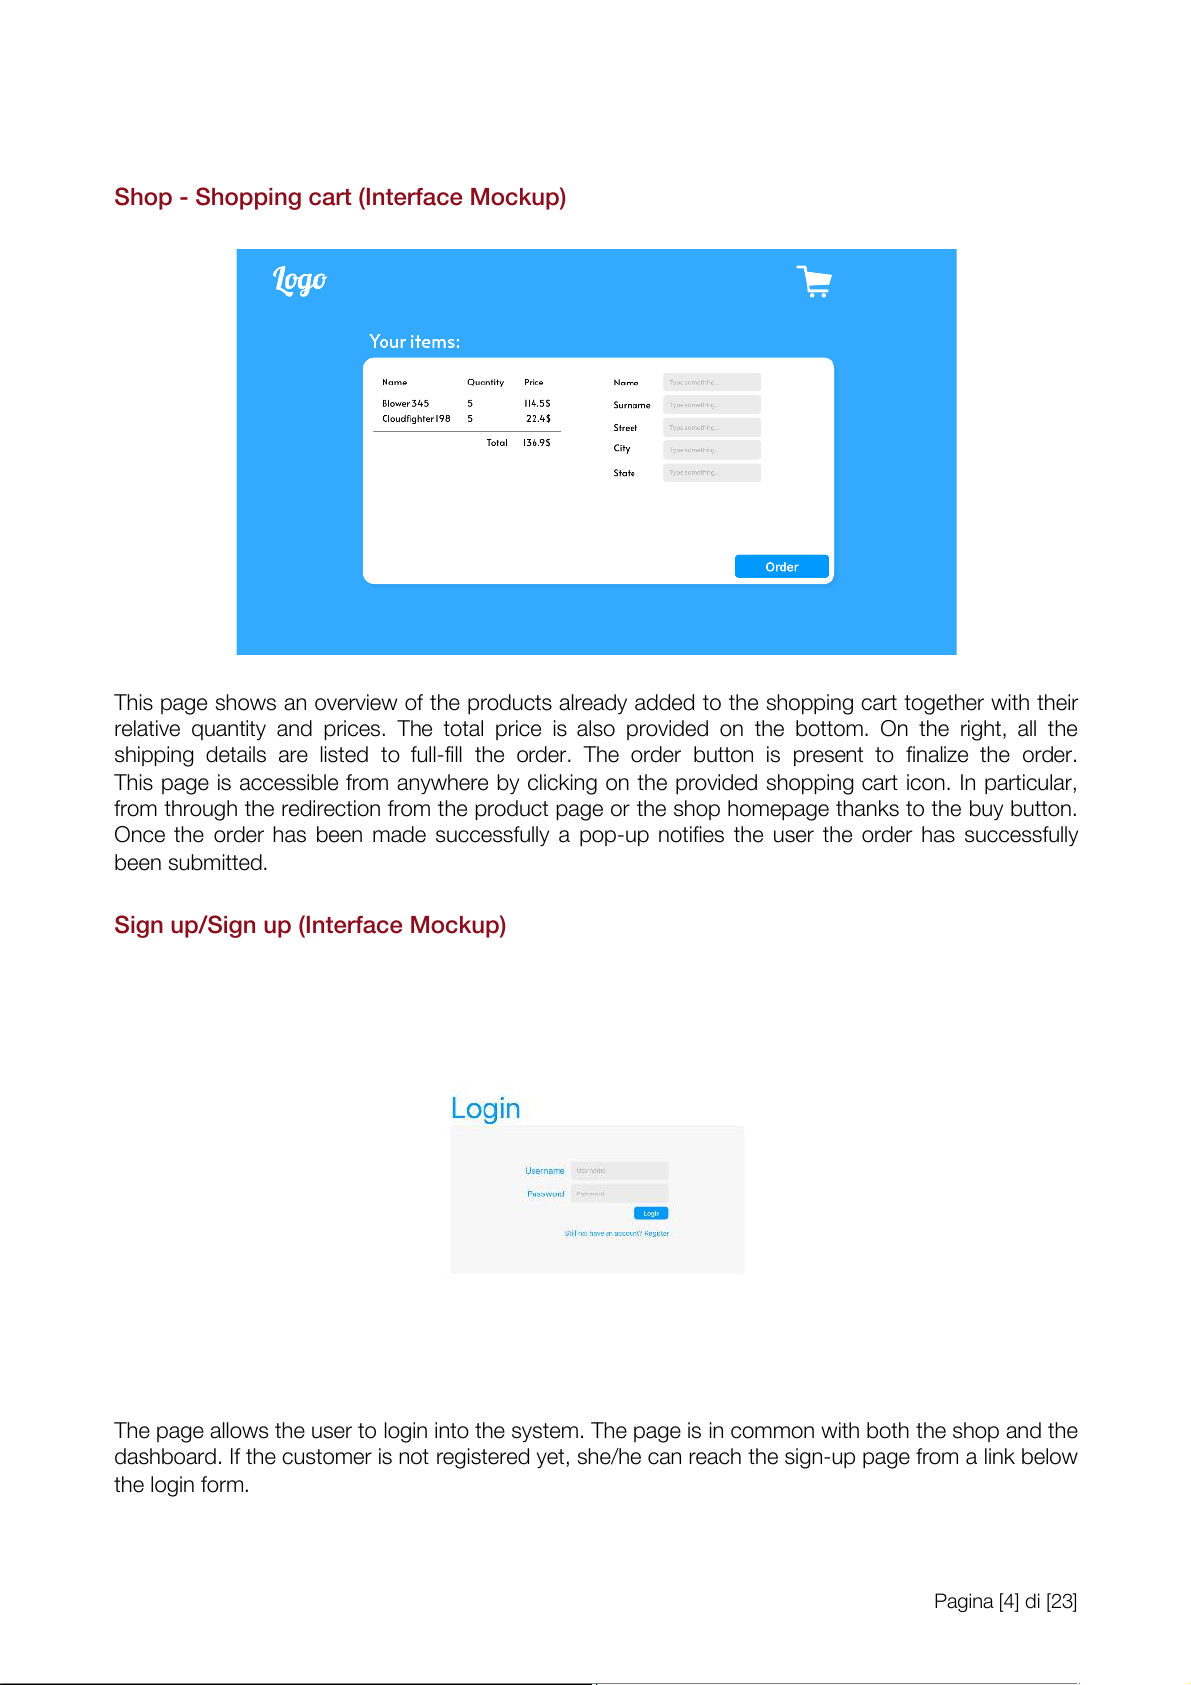
Shop - Shopping cart (Interface Mockup)
This page shows an overview of the products already added to the shopping cart together with their
relative quantity and prices. The total price is also provided on the bottom. On the right, al the
shipping details are listed to ful -fil the order. The order button is present to finalize the order.
This page is accessible from anywhere by clicking on the provided shopping cart icon. In particular,
from through the redirection from the product page or the shop homepage thanks to the buy button.
Once the order has been made successful y a pop-up notifies the user the order has successful y been submitted.
Sign up/Sign up (Interface Mockup)
The page al ows the user to login into the system. The page is in common with both the shop and the
dashboard. If the customer is not registered yet, she/he can reach the sign-up page from a link below the login form. Pagina [4] di [23]
Shop - Orders list (Interface Mockup)
This page contains the list of al the orders made by the customer. Each single order has a link to the
order page to have further details on the order itself and a list of products contained in the order. The
partial and total price is also shown.
Shop - Order page (Interface Mockup)
This page contains the list of al the products included in the order, the quantities for each product,
the partial price and the total count. The destination address is also included in the page.
Shop - Customer profile (Interface Mockup)
This page contains the profile information of the customer, including the account type (free, pro) and
the number of API cal s made by the customerÕs devices (the free plan has a monthly limit of cal s).
This page also al ows to edit the settings, like the account type and to modify the password and the username.
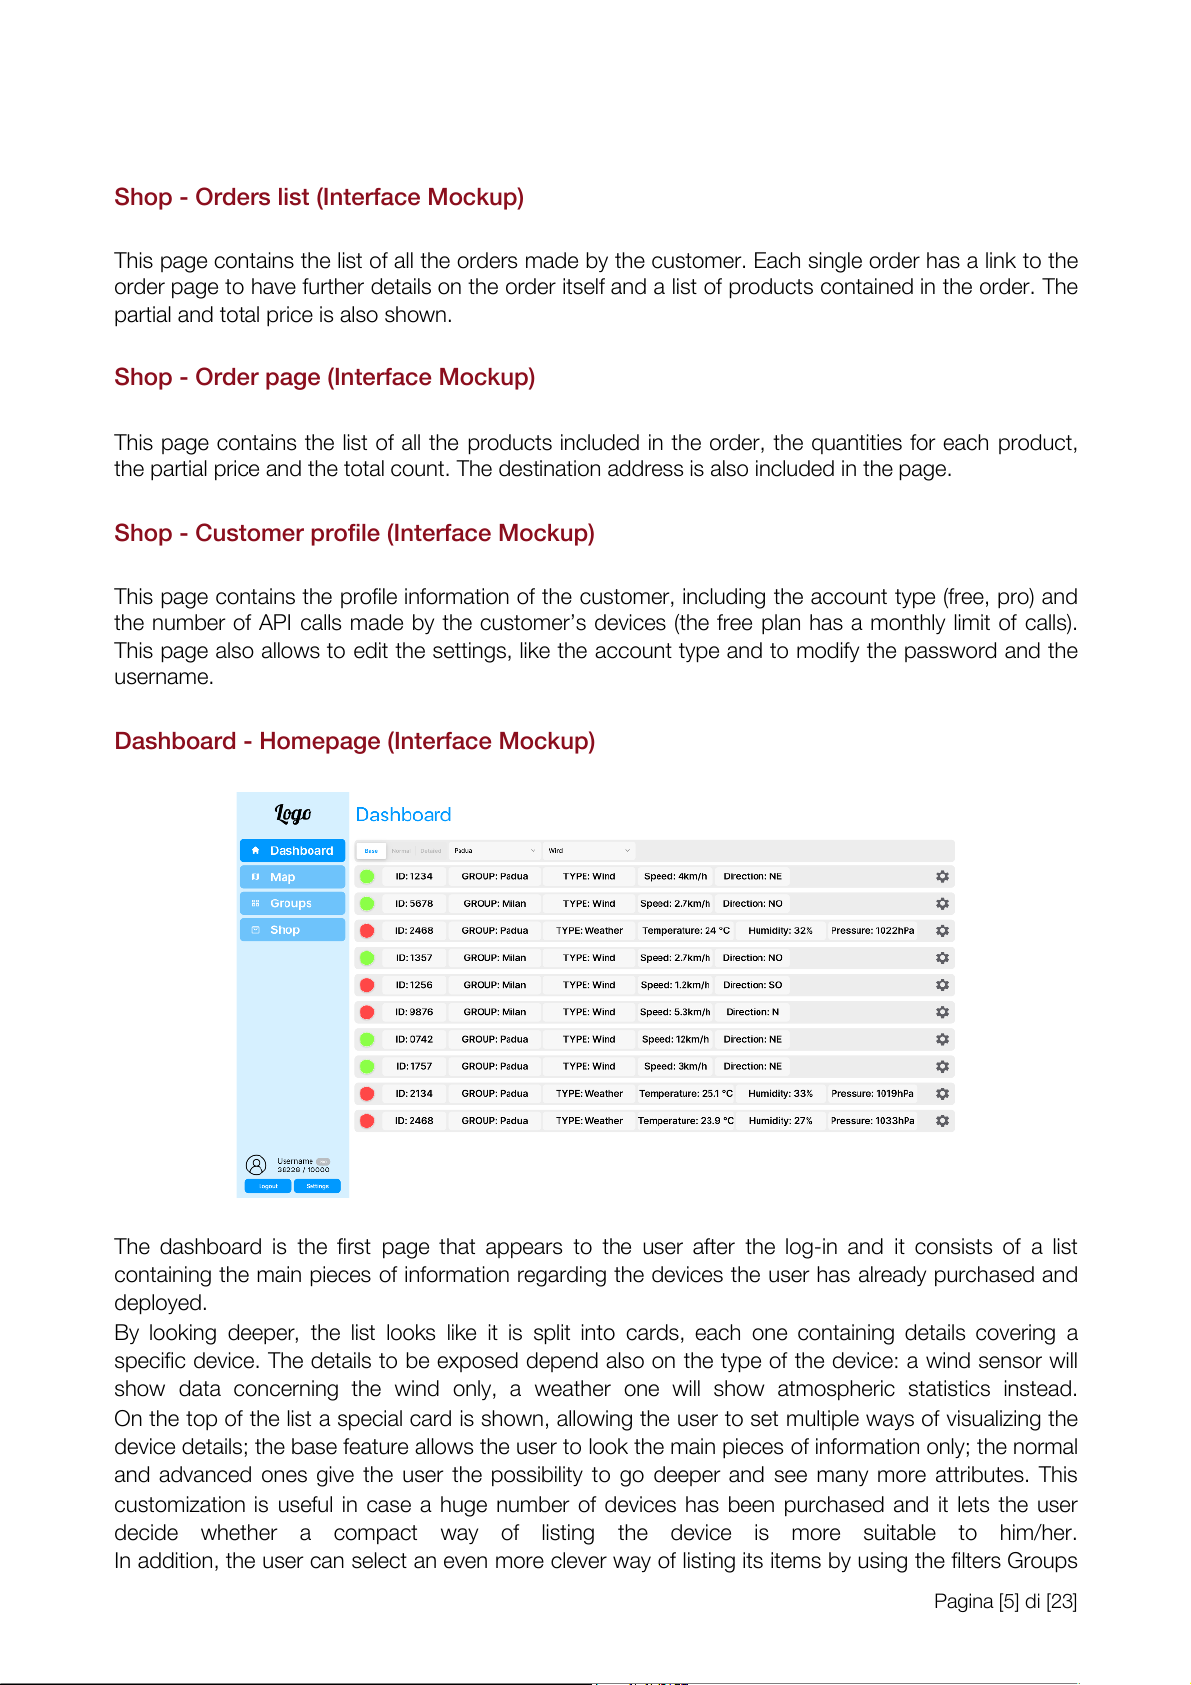
Dashboard - Homepage (Interface Mockup)
The dashboard is the first page that appears to the user after the log-in and it consists of a list
containing the main pieces of information regarding the devices the user has already purchased and deployed.
By looking deeper, the list looks like it is split into cards, each one containing details covering a
specific device. The details to be exposed depend also on the type of the device: a wind sensor wil
show data concerning the wind only, a weather one wil show atmospheric statistics instead.
On the top of the list a special card is shown, al owing the user to set multiple ways of visualizing the
device details; the base feature al ows the user to look the main pieces of information only; the normal
and advanced ones give the user the possibility to go deeper and see many more attributes. This
customization is useful in case a huge number of devices has been purchased and it lets the user
decide whether a compact way of listing the device is more suitable to him/her.
In addition, the user can select an even more clever way of listing its items by using the filters Groups Pagina [5] di [23]
and Type. The groups feature al ows to show a list of devices belonging to a specific group the user
has previously defined, while the Type filter permits to visualize al the devices of a certain type (eg: list al the wind sensors instead of the weather ones).
Getting back to the devices card, depending both on the amount of details the user likes to visualize
and the sensor type, the fol owing parameters might be shown:
¥ A green or red semaphore: it al ows to immediately see whether a device is enabled or not
¥ Group: the group the device belongs to
¥ Type: the type of the device
¥ Speed: the last wind velocity the sensor has registered
¥ Direction: the last wind direction the wind is blowing to the sensor has registered
¥ Temperature: the last temperature the sensor has registered.
¥ Humidity: the last humidity value the sensor has registered
¥ Pressure: the atmospheric pressure the sensor has registered.
Moreover, a gear wheel icon is shown for each device and by clicking on it the user can access the
page from where device options can be changed.
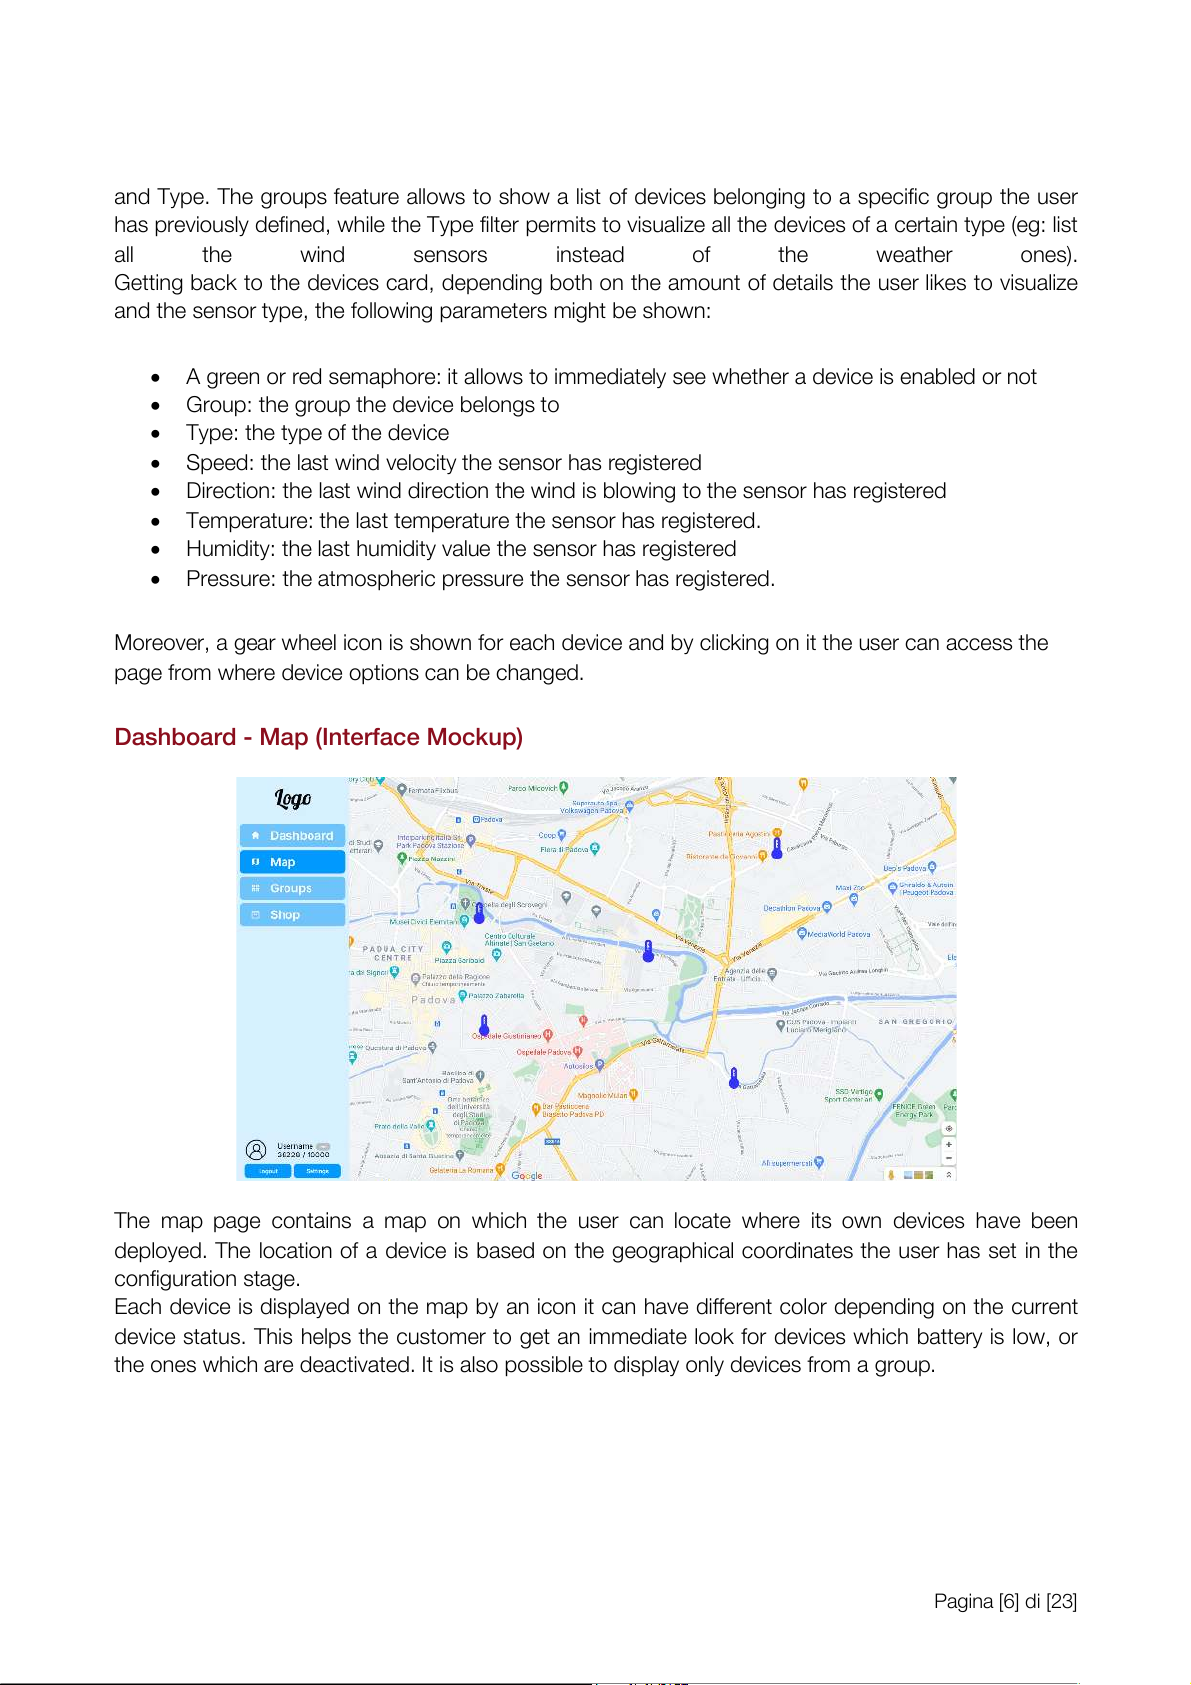
Dashboard - Map (Interface Mockup)
The map page contains a map on which the user can locate where its own devices have been
deployed. The location of a device is based on the geographical coordinates the user has set in the configuration stage.
Each device is displayed on the map by an icon it can have different color depending on the current
device status. This helps the customer to get an immediate look for devices which battery is low, or
the ones which are deactivated. It is also possible to display only devices from a group. Pagina [6] di [23]
Dashboard - Groups list (Interface Mockup)
The groups list is the page on which al the groups created by the current user are displayed.
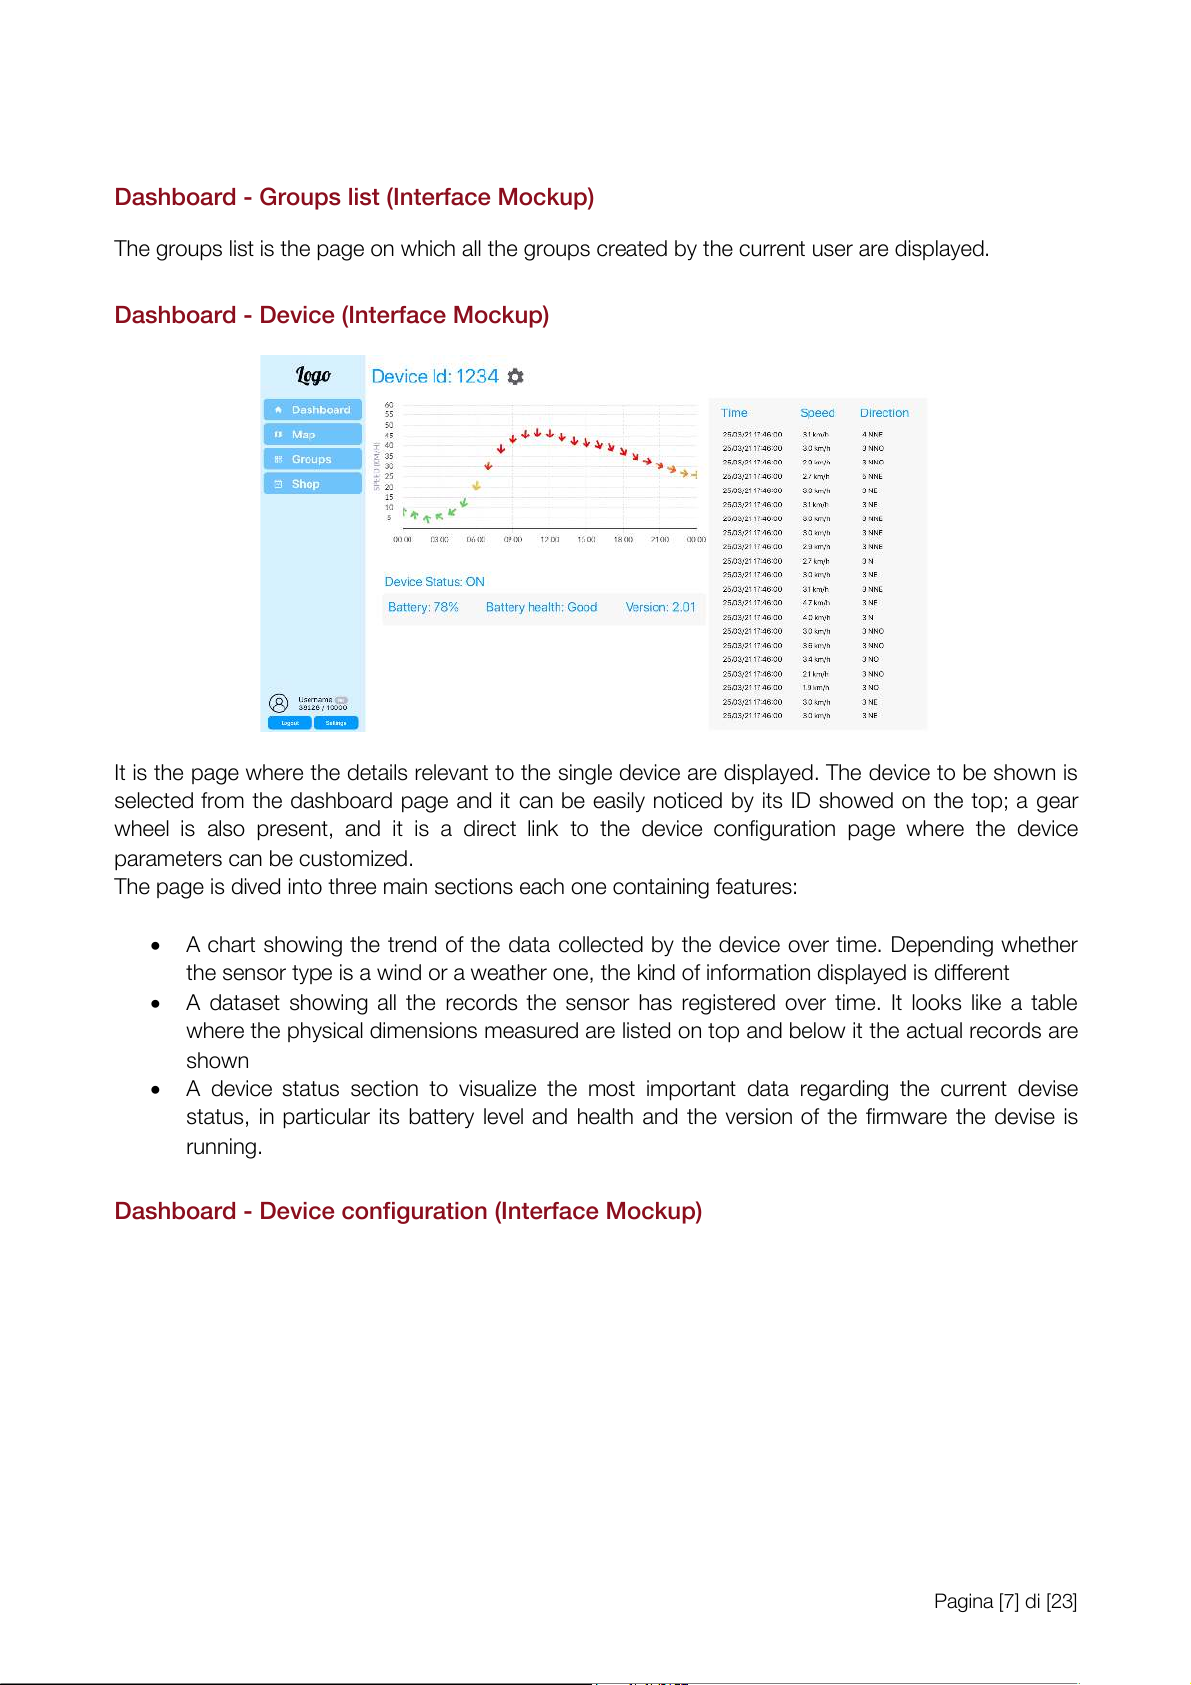
Dashboard - Device (Interface Mockup)
It is the page where the details relevant to the single device are displayed. The device to be shown is
selected from the dashboard page and it can be easily noticed by its ID showed on the top; a gear
wheel is also present, and it is a direct link to the device configuration page where the device parameters can be customized.
The page is dived into three main sections each one containing features:
¥ A chart showing the trend of the data col ected by the device over time. Depending whether
the sensor type is a wind or a weather one, the kind of information displayed is different
¥ A dataset showing al the records the sensor has registered over time. It looks like a table
where the physical dimensions measured are listed on top and below it the actual records are shown
¥ A device status section to visualize the most important data regarding the current devise
status, in particular its battery level and health and the version of the firmware the devise is running.
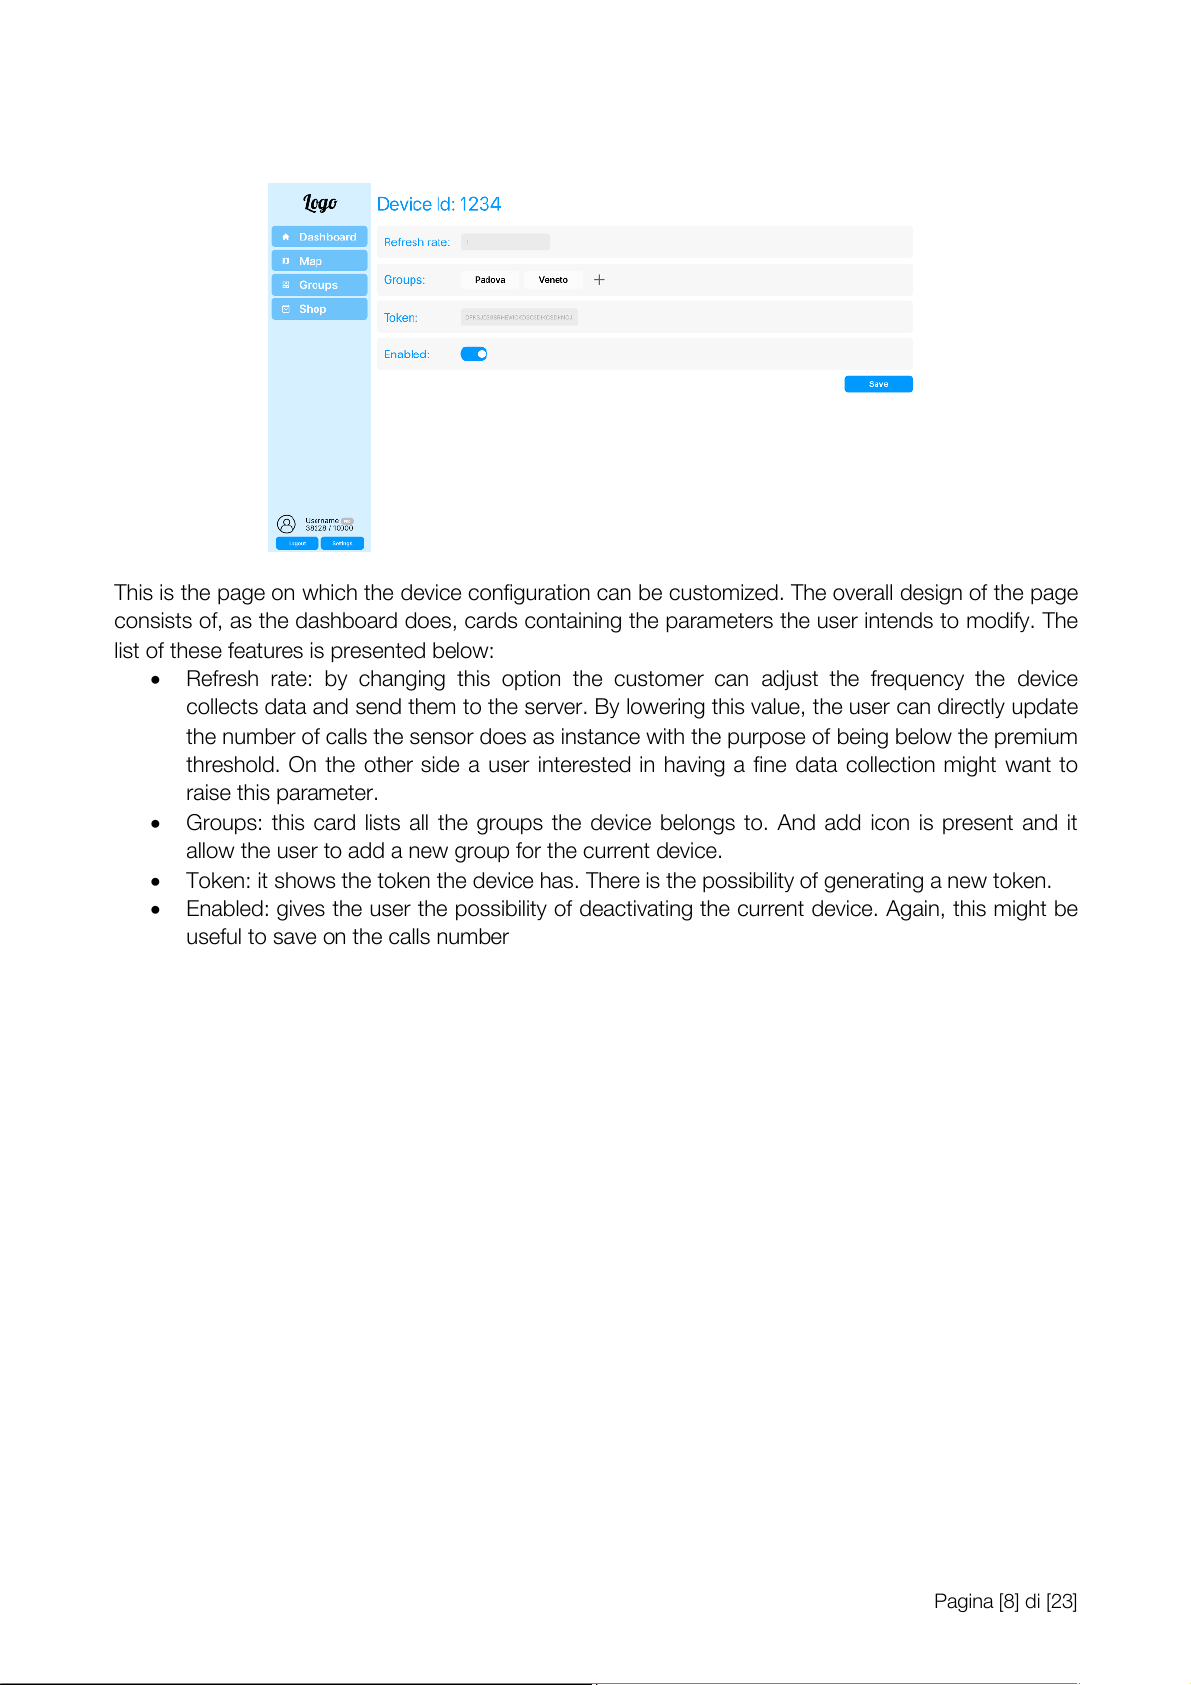
Dashboard - Device configuration (Interface Mockup) Pagina [7] di [23]
This is the page on which the device configuration can be customized. The overal design of the page
consists of, as the dashboard does, cards containing the parameters the user intends to modify. The
list of these features is presented below:
¥ Refresh rate: by changing this option the customer can adjust the frequency the device
col ects data and send them to the server. By lowering this value, the user can directly update
the number of cal s the sensor does as instance with the purpose of being below the premium
threshold. On the other side a user interested in having a fine data col ection might want to raise this parameter.
¥ Groups: this card lists al the groups the device belongs to. And add icon is present and it
al ow the user to add a new group for the current device.
¥ Token: it shows the token the device has. There is the possibility of generating a new token.
¥ Enabled: gives the user the possibility of deactivating the current device. Again, this might be
useful to save on the cal s number Pagina [8] di [23] Data Logic Layer Entity-Relationship Schema
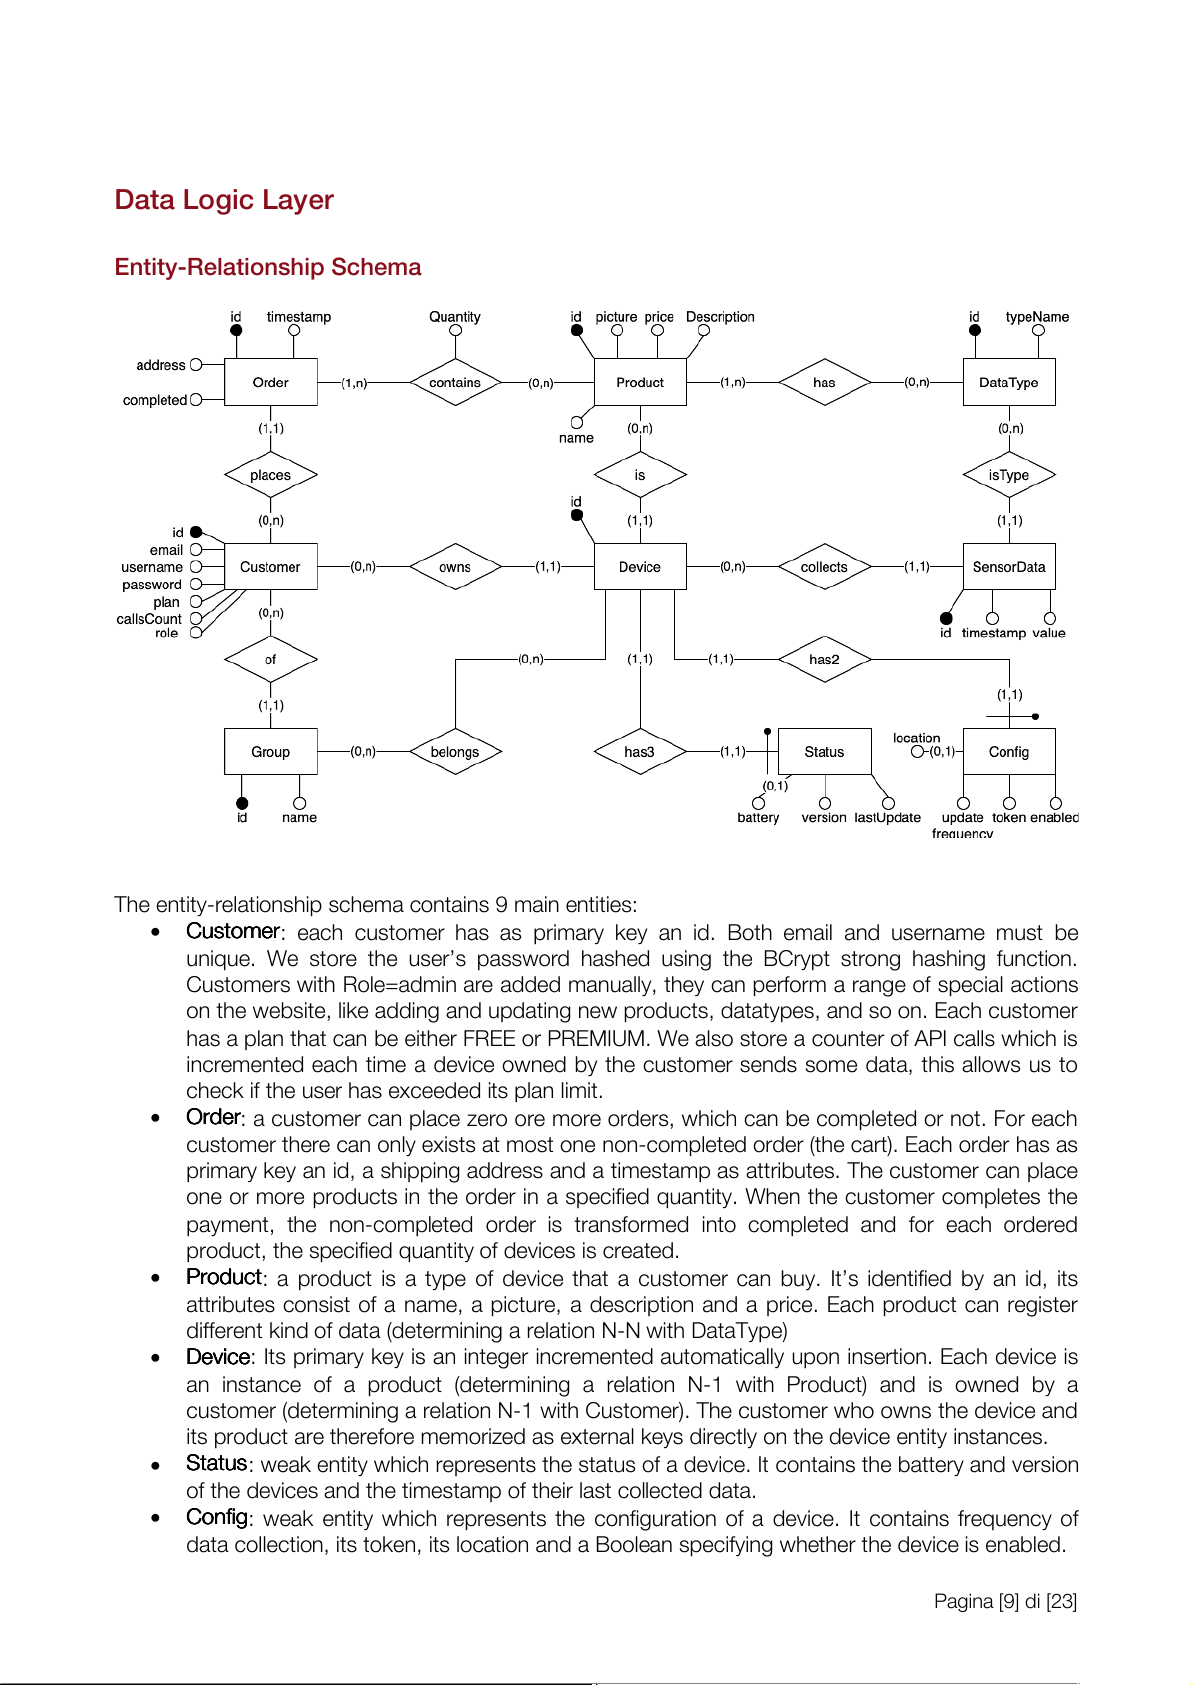
The entity-relationship schema contains 9 main entities: ¥ Cu C s u t s o t m o e m r
e : each customer has as primary key an id. Both email and username must be
unique. We store the userÕs password hashed using the BCrypt strong hashing function.
Customers with Role=admin are added manual y, they can perform a range of special actions
on the website, like adding and updating new products, datatypes, and so on. Each customer
has a plan that can be either FREE or PREMIUM. We also store a counter of API cal s which is
incremented each time a device owned by the customer sends some data, this al ows us to
check if the user has exceeded its plan limit. ¥ Or O d r e d r
e : a customer can place zero ore more orders, which can be completed or not. For each
customer there can only exists at most one non-completed order (the cart). Each order has as
primary key an id, a shipping address and a timestamp as attributes. The customer can place
one or more products in the order in a specified quantity. When the customer completes the
payment, the non-completed order is transformed into completed and for each ordered
product, the specified quantity of devices is created. ¥ Pr P o r d o u d c u t
c : a product is a type of device that a customer can buy. ItÕs identified by an id, its
attributes consist of a name, a picture, a description and a price. Each product can register
different kind of data (determining a relation N-N with DataType) ¥ De D v e i v c i e
c : Its primary key is an integer incremented automatical y upon insertion. Each device is
an instance of a product (determining a relation N-1 with Product) and is owned by a
customer (determining a relation N-1 with Customer). The customer who owns the device and
its product are therefore memorized as external keys directly on the device entity instances. ¥ St S a t t a u t s
u : weak entity which represents the status of a device. It contains the battery and version
of the devices and the timestamp of their last col ected data. ¥ Co C n o f n ifg
i : weak entity which represents the configuration of a device. It contains frequency of
data col ection, its token, its location and a Boolean specifying whether the device is enabled. Pagina [9] di [23] ¥ Se S n e s n o s r o D r a D t a a
t : it is identified by an id. It represents a single measure taken by one of the sensors
present in a device. It is col ected by a specific device in a precise timestamp, and has one
single float value, that can be interpreted by the relationship with DataType. ¥ Da D t a a t T a y T p y e
p : a type of data that a device can register (e.g., temperature, humidity, wind
speedÉ). It is identified by an id and has its name as an attribute. This design was chosen
considering that more sensors providing different types of information may be added in the
future. Moreover, we can have products that col ect multiple datatypes, and some datatypes
could be shared between products. ¥ Gr G o r u o p
u : A customer can group its devices into groups, a group is identified by and id and has
a name, a group owned and accessed by just one customer, it cannot be shared between
different customers, a group can contain zero or more devices of its customer.
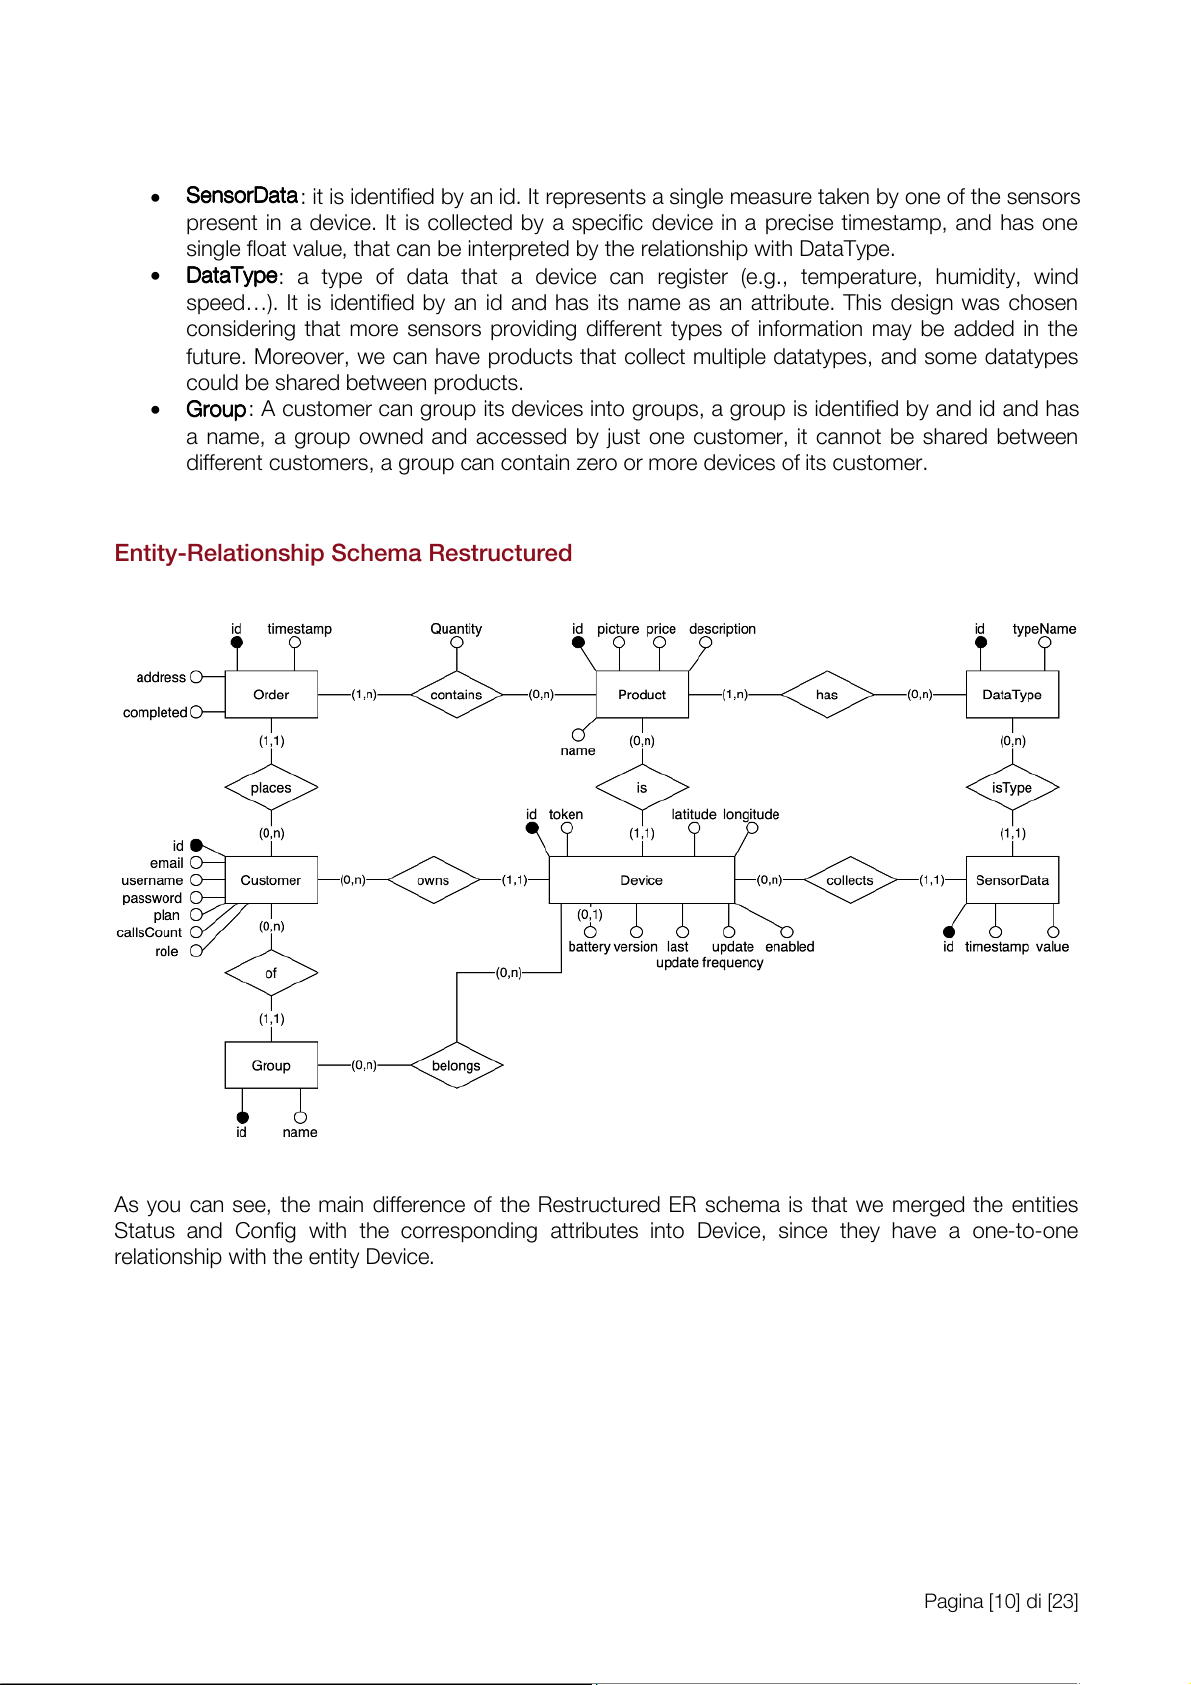
Entity-Relationship Schema Restructured
As you can see, the main difference of the Restructured ER schema is that we merged the entities
Status and Config with the corresponding attributes into Device, since they have a one-to-one
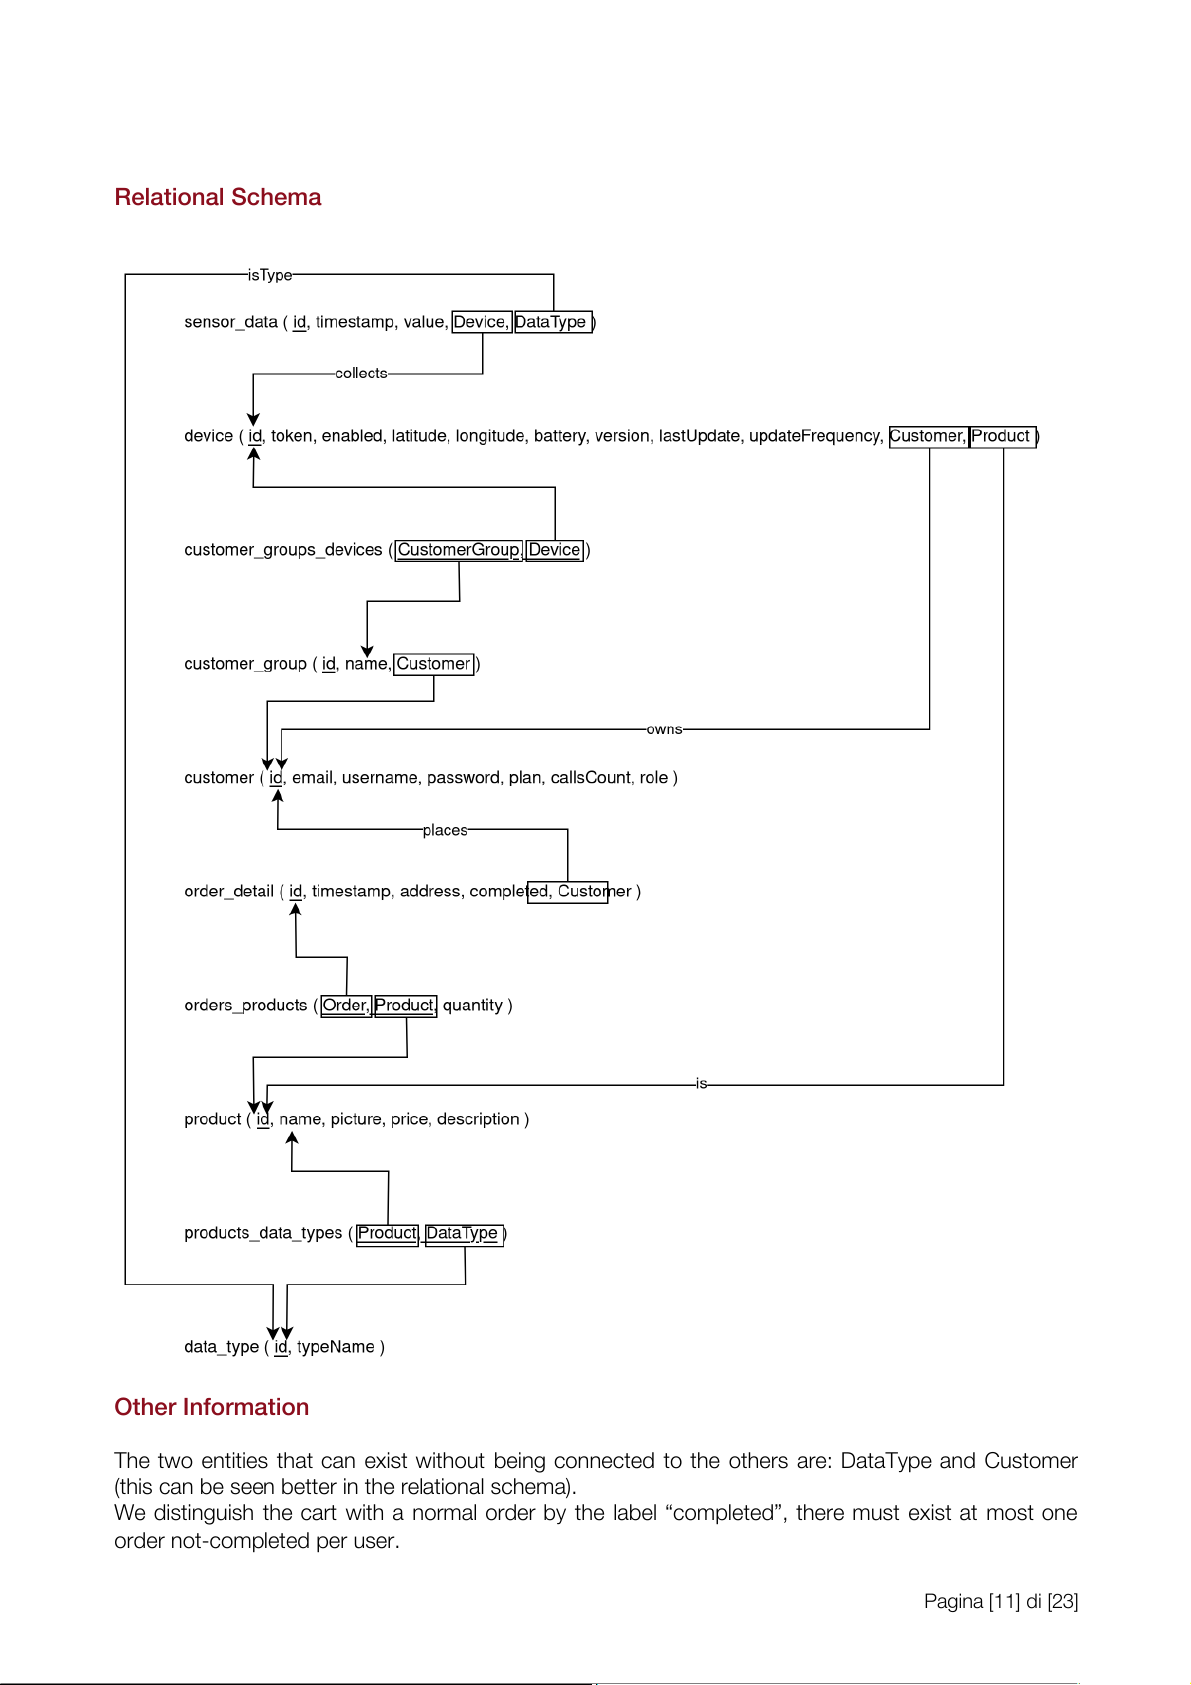
relationship with the entity Device. Pagina [10] di [23] Relational Schema Other Information
The two entities that can exist without being connected to the others are: DataType and Customer
(this can be seen better in the relational schema).
We distinguish the cart with a normal order by the label ÒcompletedÓ, there must exist at most one order not-completed per user. Pagina [11] di [23] Business Logic Layer
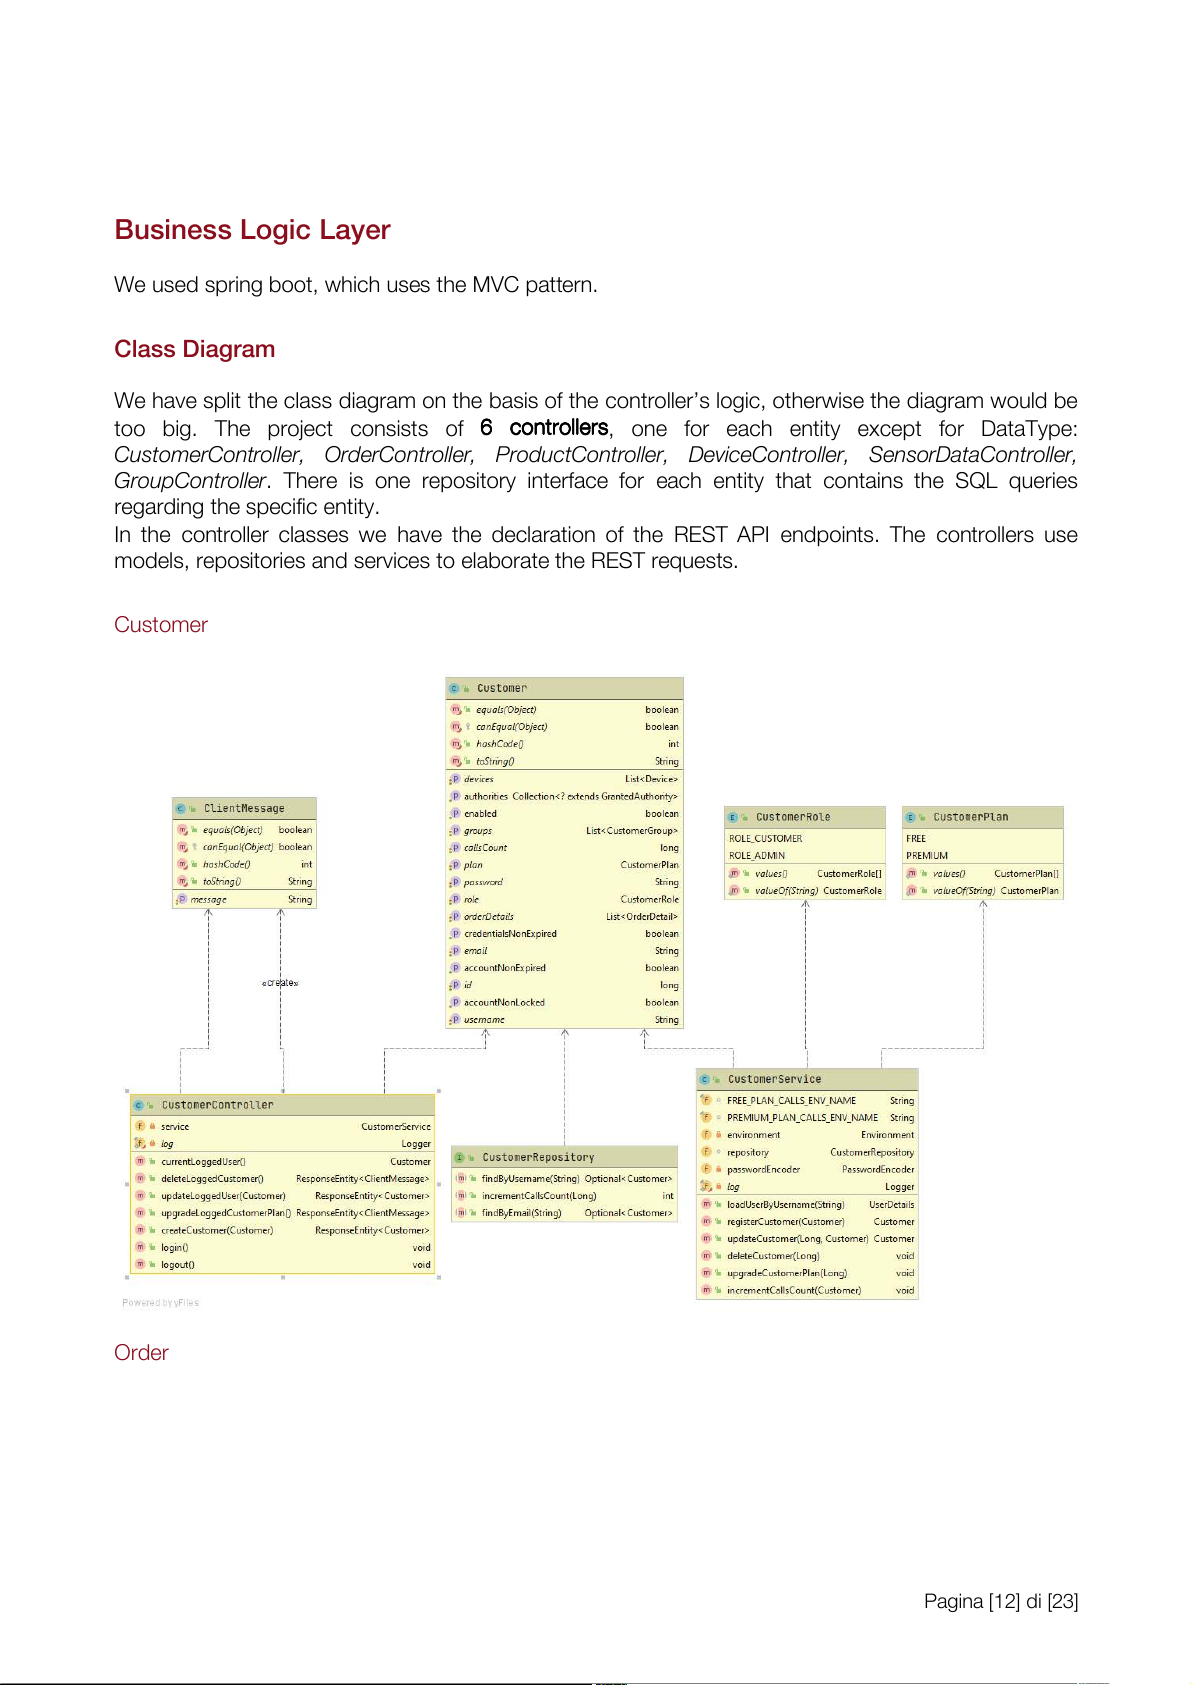
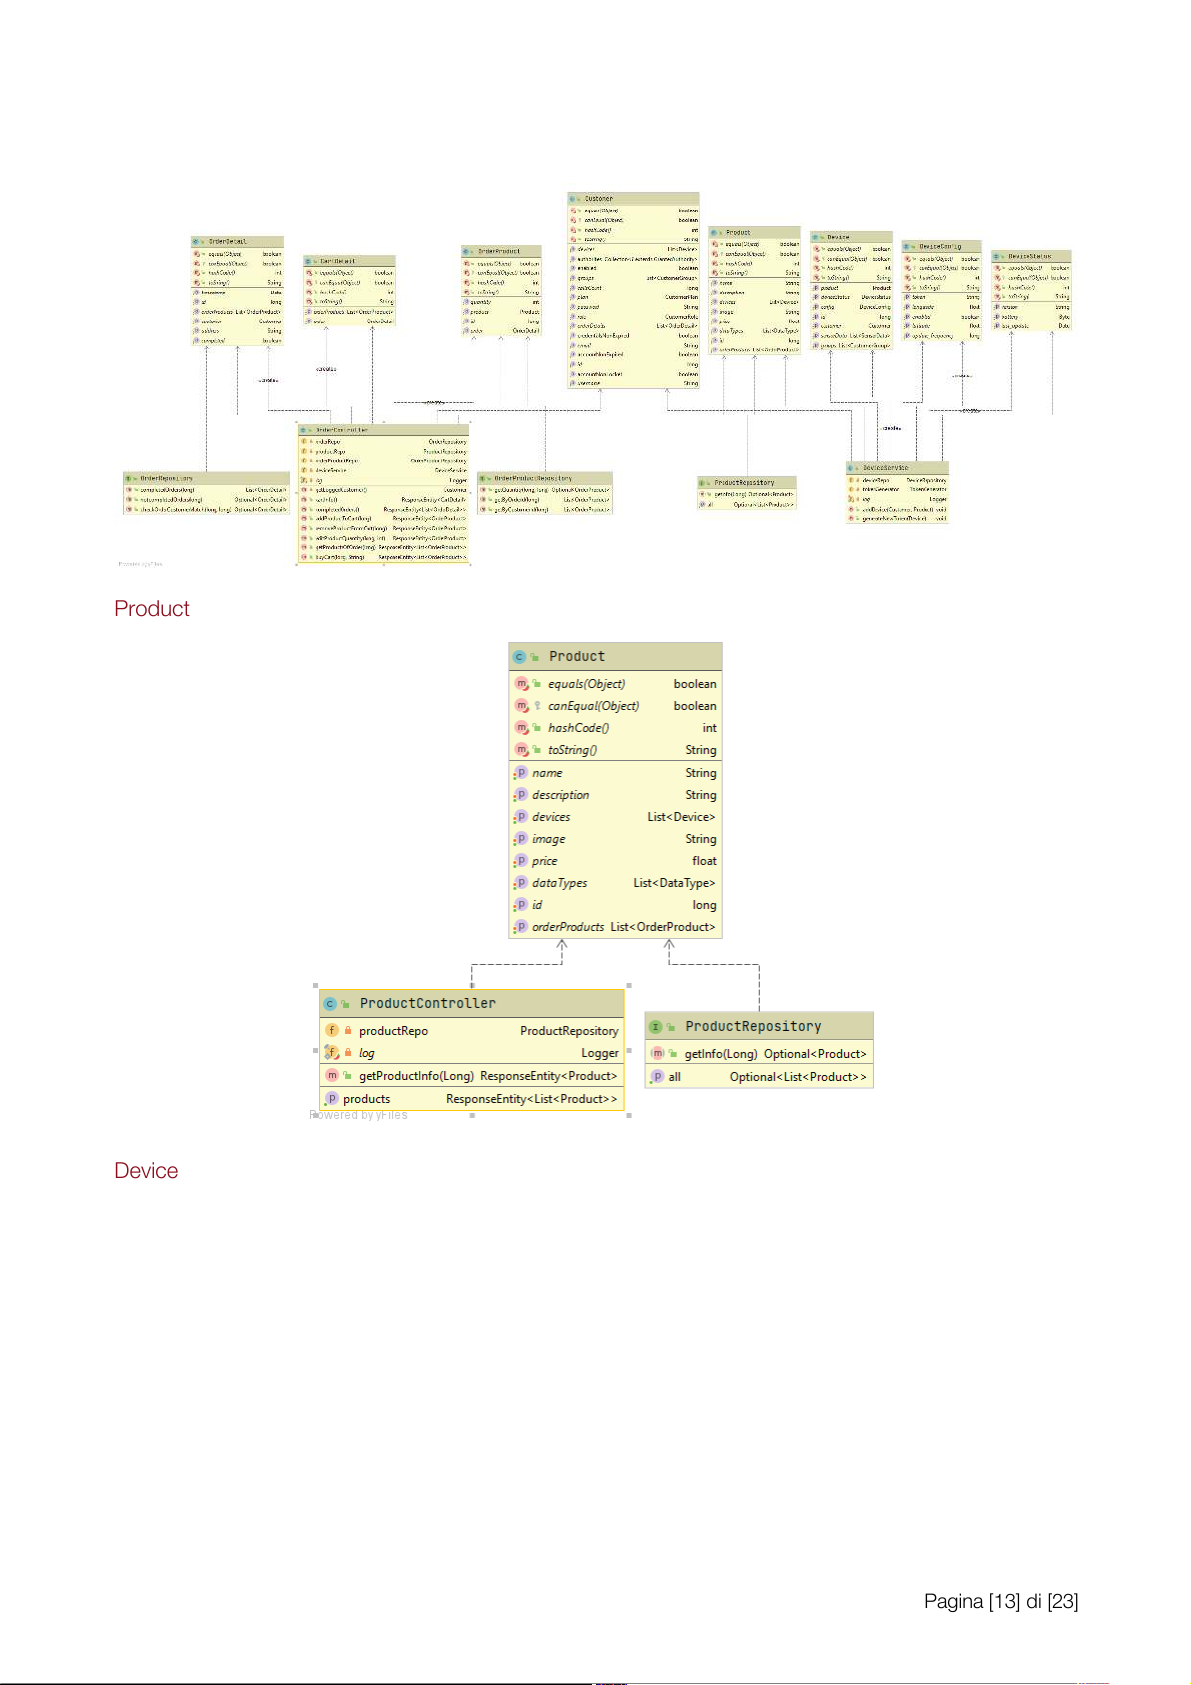
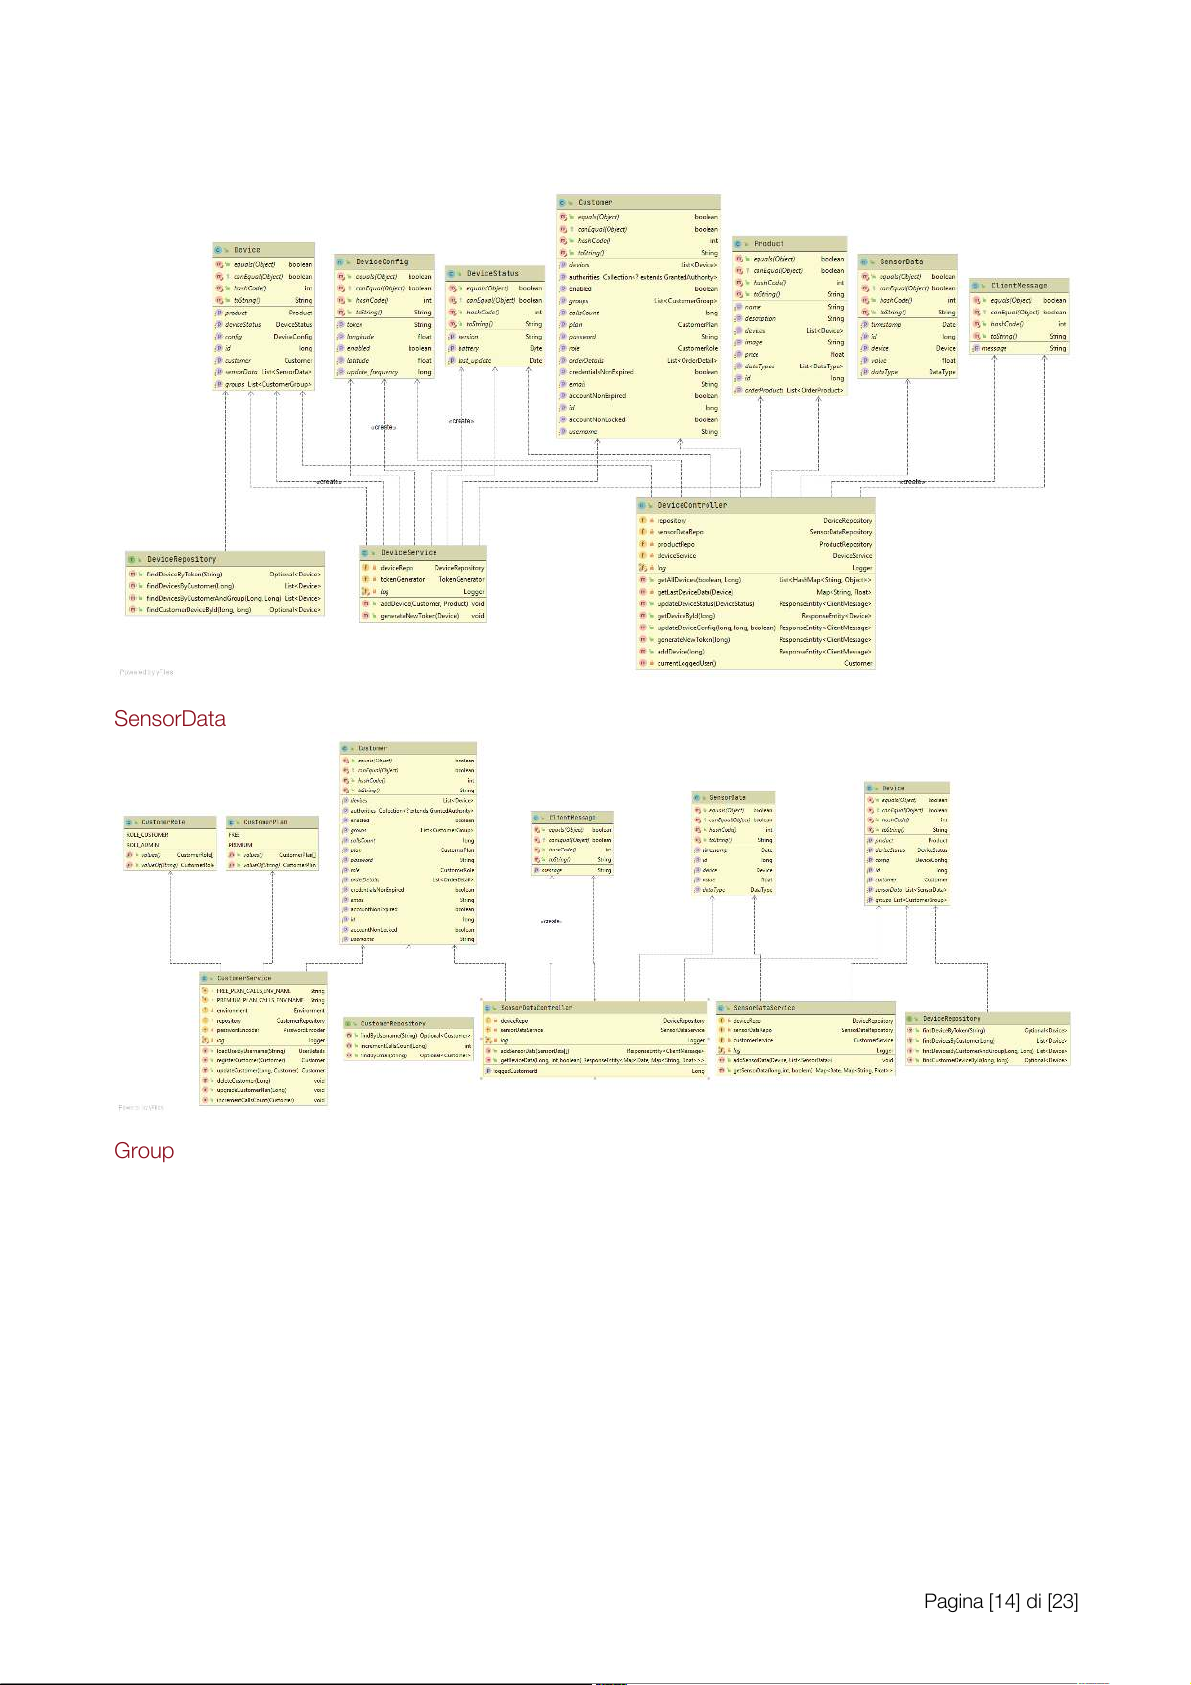
We used spring boot, which uses the MVC pattern. Class Diagram
We have split the class diagram on the basis of the control erÕs logic, otherwise the diagram would be
too big. The project consists of 6 6 co c n o t n r t o r l o lle l r e s
r , one for each entity except for DataType:
CustomerController, OrderController, ProductController, DeviceController, SensorDataController,
GroupController. There is one repository interface for each entity that contains the SQL queries
regarding the specific entity.
In the control er classes we have the declaration of the REST API endpoints. The control ers use
models, repositories and services to elaborate the REST requests. Customer Order Pagina [12] di [23] Product Device Pagina [13] di [23] SensorData Group Pagina [14] di [23] Pagina [15] di [23] Sequence Diagram
The fol owing two examples are representative of how requests are handled for public endpoints and
for endpoints requiring authentication and authorization. -
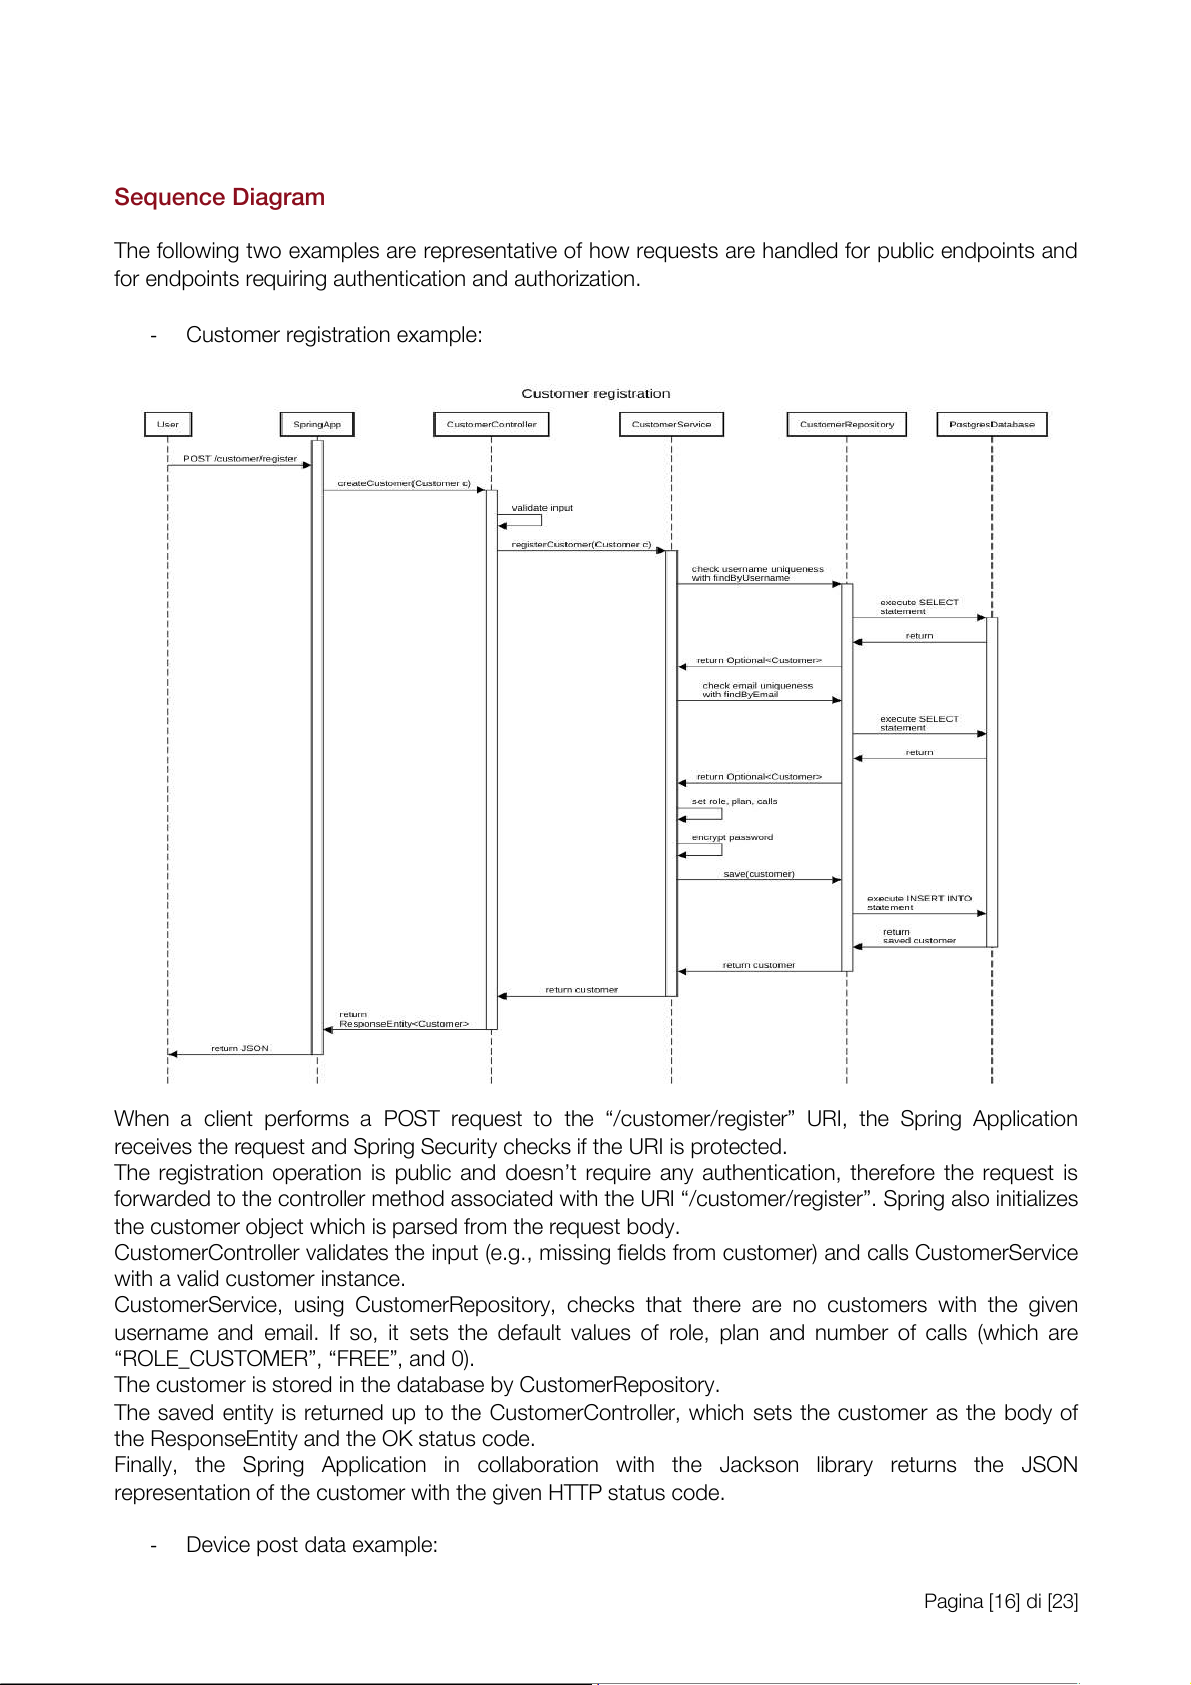
Customer registration example:
When a client performs a POST request to the Ò/customer/registerÓ URI, the Spring Application
receives the request and Spring Security checks if the URI is protected.
The registration operation is public and doesnÕt require any authentication, therefore the request is
forwarded to the control er method associated with the URI Ò/customer/registerÓ. Spring also initializes
the customer object which is parsed from the request body.
CustomerControl er validates the input (e.g., missing fields from customer) and cal s CustomerService
with a valid customer instance.
CustomerService, using CustomerRepository, checks that there are no customers with the given
username and email. If so, it sets the default values of role, plan and number of cal s (which are
ÒROLE_CUSTOMERÓ, ÒFREEÓ, and 0).
The customer is stored in the database by CustomerRepository.
The saved entity is returned up to the CustomerControl er, which sets the customer as the body of
the ResponseEntity and the OK status code.
Final y, the Spring Application in col aboration with the Jackson library returns the JSON
representation of the customer with the given HTTP status code. - Device post data example: Pagina [16] di [23]
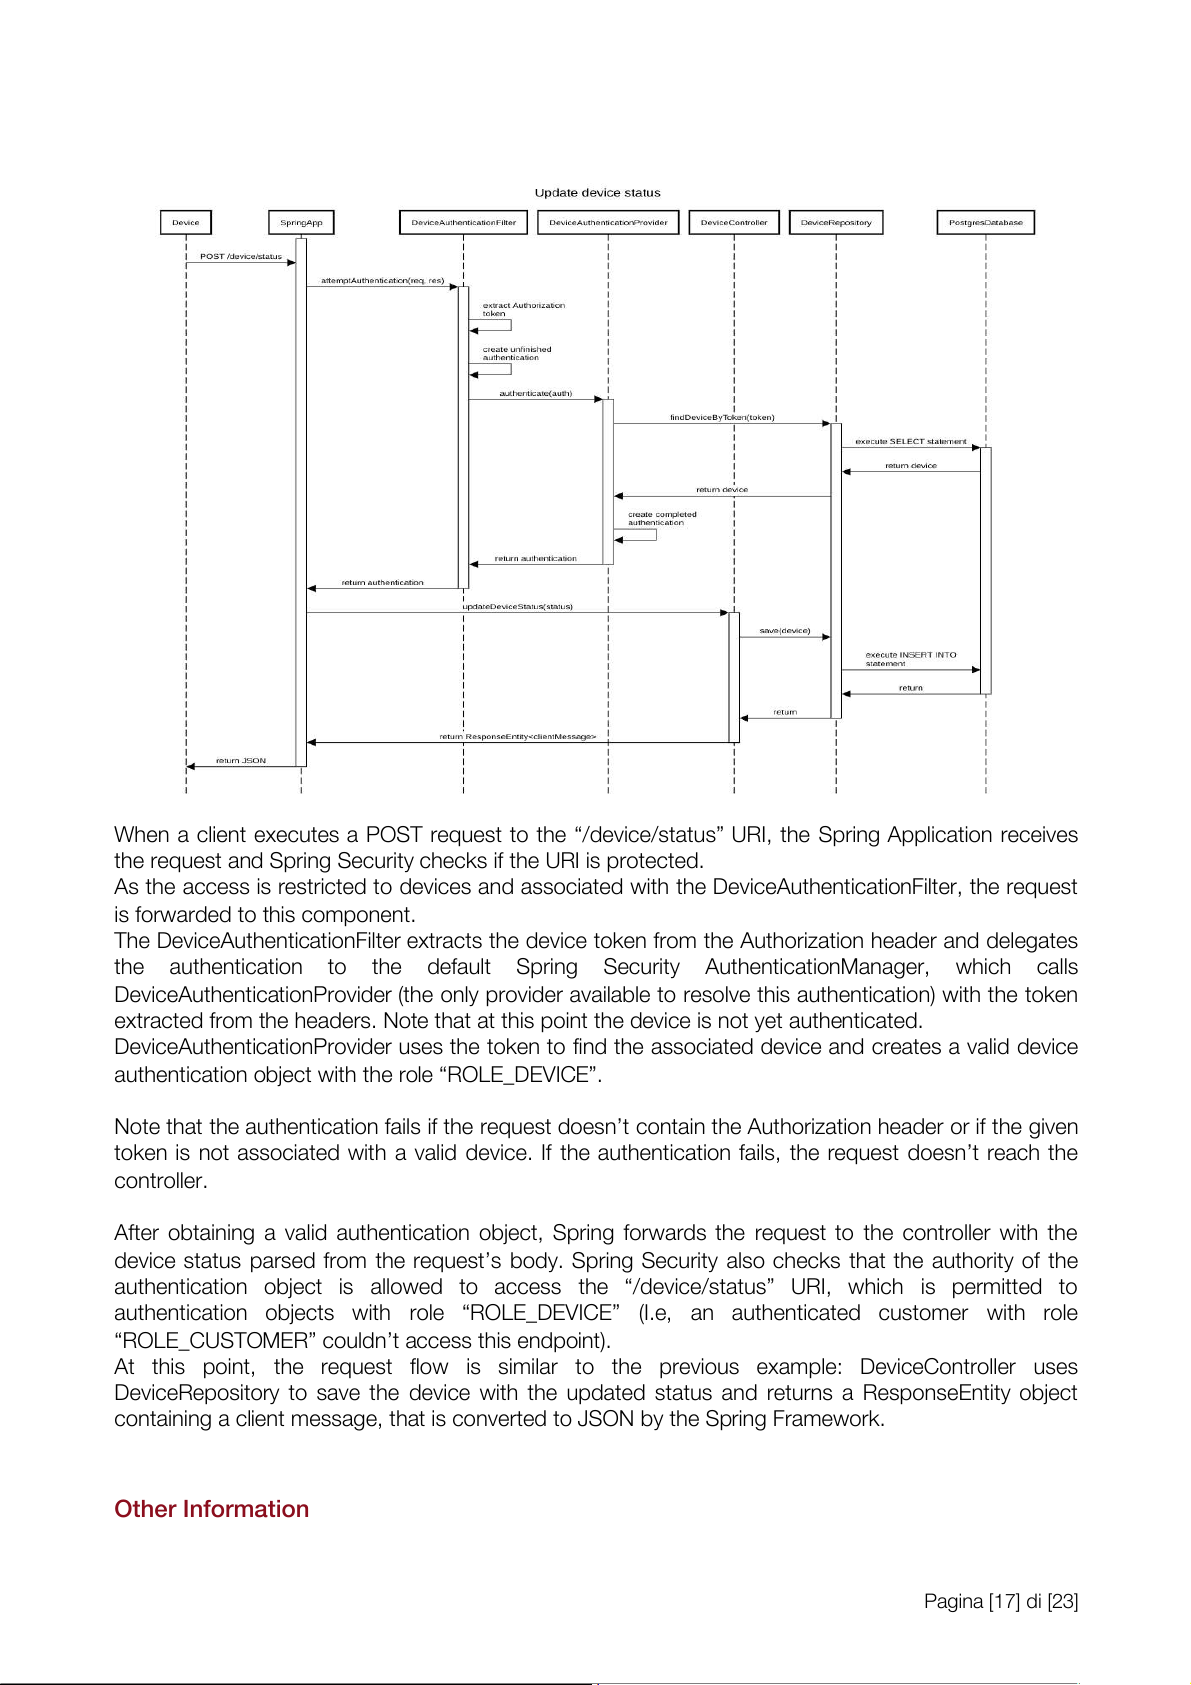
When a client executes a POST request to the Ò/device/statusÓ URI, the Spring Application receives
the request and Spring Security checks if the URI is protected.
As the access is restricted to devices and associated with the DeviceAuthenticationFilter, the request
is forwarded to this component.
The DeviceAuthenticationFilter extracts the device token from the Authorization header and delegates
the authentication to the default Spring Security AuthenticationManager, which cal s
DeviceAuthenticationProvider (the only provider available to resolve this authentication) with the token
extracted from the headers. Note that at this point the device is not yet authenticated.
DeviceAuthenticationProvider uses the token to find the associated device and creates a valid device
authentication object with the role ÒROLE_DEVICEÓ.
Note that the authentication fails if the request doesnÕt contain the Authorization header or if the given
token is not associated with a valid device. If the authentication fails, the request doesnÕt reach the control er.
After obtaining a valid authentication object, Spring forwards the request to the control er with the
device status parsed from the requestÕs body. Spring Security also checks that the authority of the
authentication object is al owed to access the Ò/device/statusÓ URI, which is permitted to
authentication objects with role ÒROLE_DEVICEÓ (I.e, an authenticated customer with role
ÒROLE_CUSTOMERÓ couldnÕt access this endpoint).
At this point, the request flow is similar to the previous example: DeviceController uses
DeviceRepository to save the device with the updated status and returns a ResponseEntity object
containing a client message, that is converted to JSON by the Spring Framework. Other Information Pagina [17] di [23]
Customer authentication is similar to device authentication: a filter extracts username and password
from the request and delegates the authentication to the default Spring Security
AuthenticationManager, which uses the function loadUserByUsername of CustomerService to retrieve
a UserDetail object (I.e., a customer) and checks the given credentials.
The interactions between repositories and the PostgreSQL database are managed by the Spring
framework that under the hood uses the javax.persistence package. REST API Summary
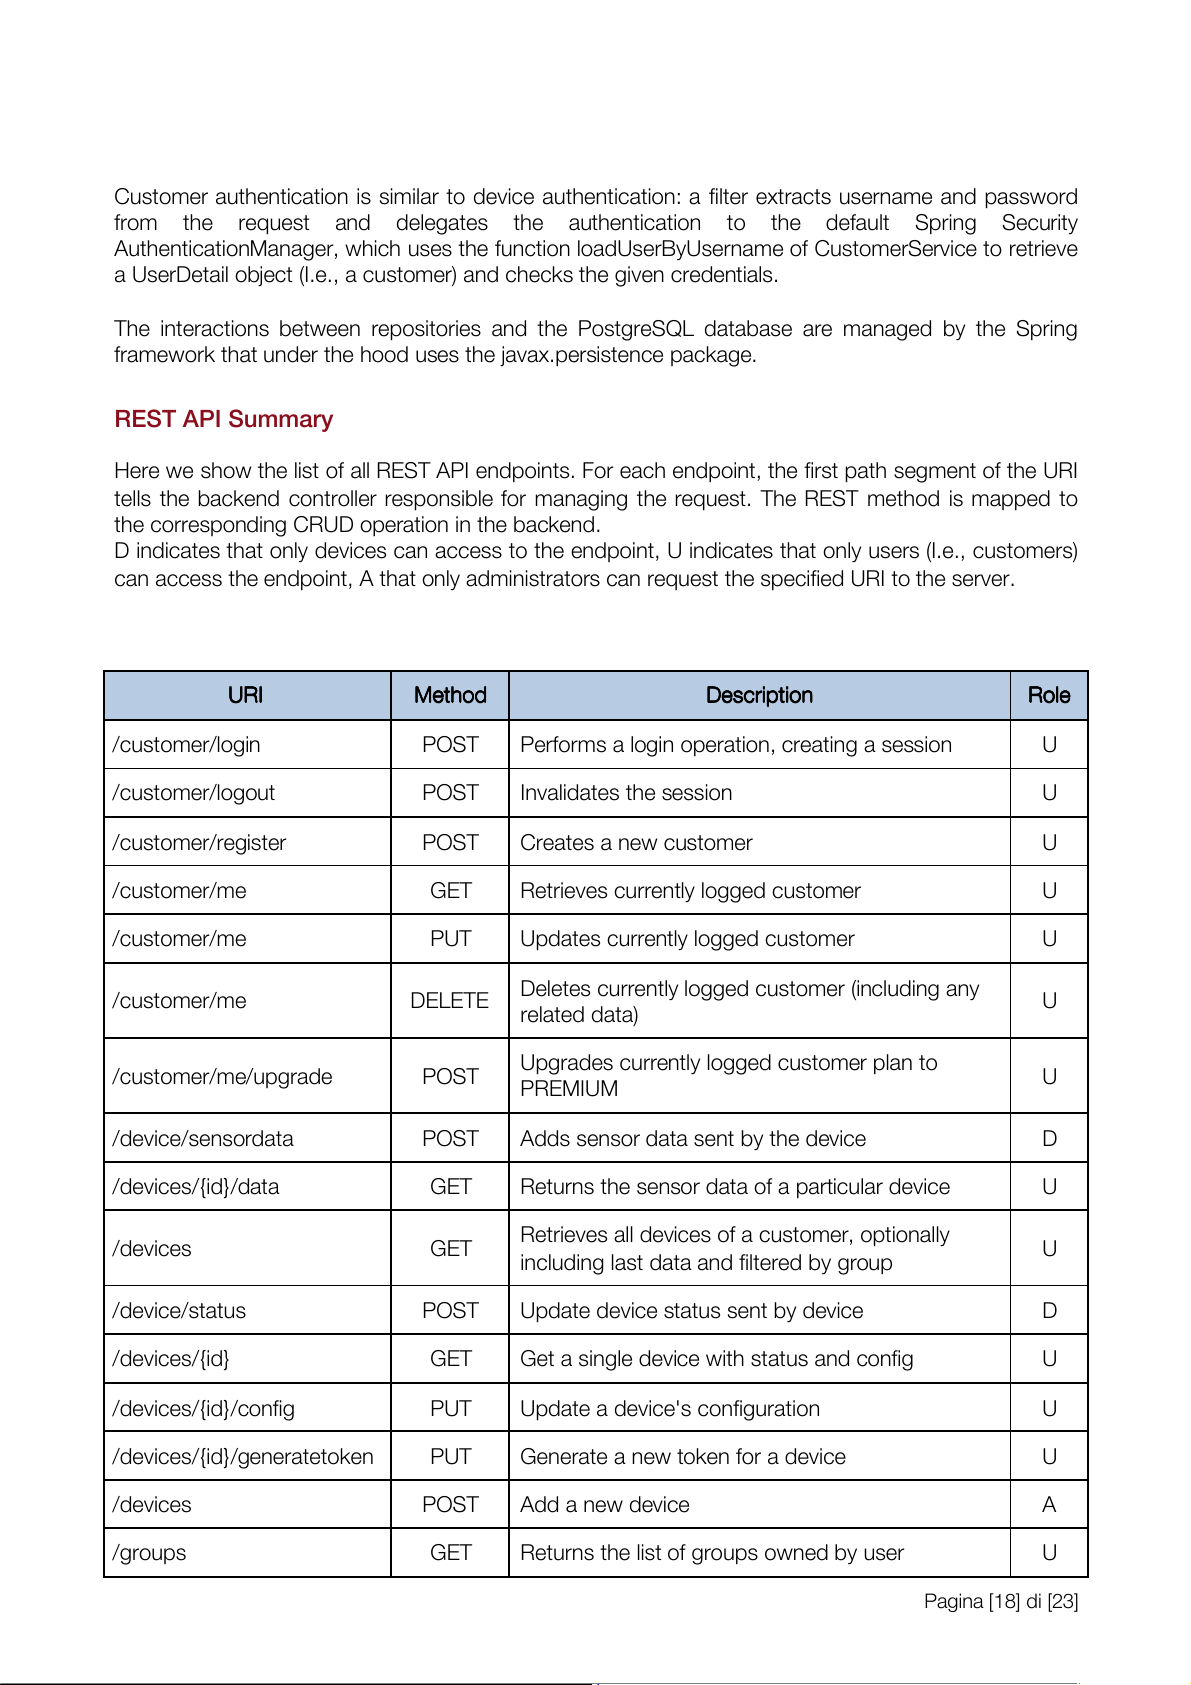
Here we show the list of al REST API endpoints. For each endpoint, the first path segment of the URI
tel s the backend control er responsible for managing the request. The REST method is mapped to
the corresponding CRUD operation in the backend.
D indicates that only devices can access to the endpoint, U indicates that only users (I.e., customers)
can access the endpoint, A that only administrators can request the specified URI to the server. UR U I R I Me M t e h t o h d o d De D s e c s r c i r p i t p i t o i n o n Ro R l o e l e /customer/login POST
Performs a login operation, creating a session U /customer/logout POST Invalidates the session U /customer/register POST Creates a new customer U /customer/me GET
Retrieves currently logged customer U /customer/me PUT
Updates currently logged customer U
Deletes currently logged customer (including any /customer/me DELETE U related data)
Upgrades currently logged customer plan to /customer/me/upgrade POST U PREMIUM / device/sensordata POST
Adds sensor data sent by the device D /devices/{id}/data GET
Returns the sensor data of a particular device U
Retrieves al devices of a customer, optional y /devices GET U
including last data and filtered by group /device/status POST
Update device status sent by device D /devices/{id} GET
Get a single device with status and config U /devices/{id}/config PUT
Update a device's configuration U /devices/{id}/generatetoken PUT
Generate a new token for a device U /devices POST Add a new device A /groups GET
Returns the list of groups owned by user U Pagina [18] di [23] /groups/{name} POST
Adds a new group with specified name U /groups/{id}/delete DELETE
Deletes the group specified with the id U /products GET
Retrieves a list of al the available products U
Retrieves al the pieces of information concerning /products/{id} GET U the device the id is given REST API Error Codes
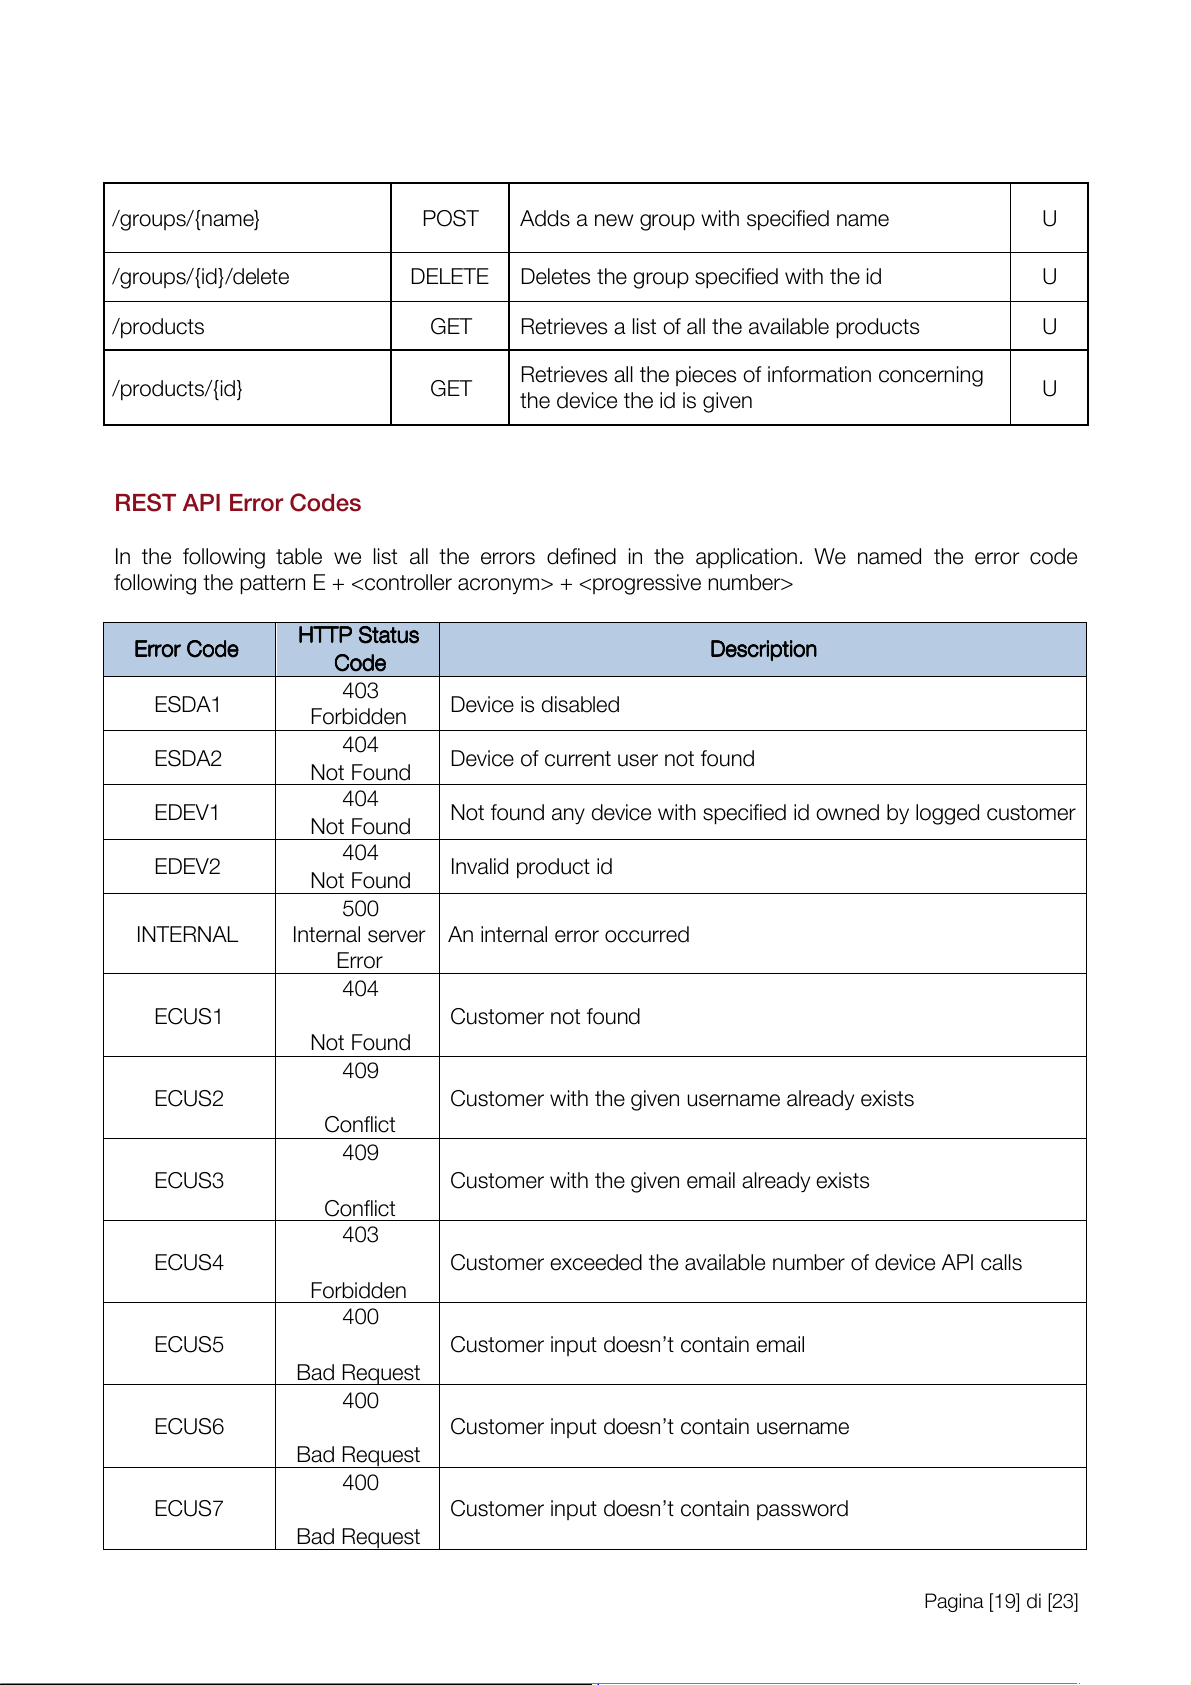
In the fol owing table we list al the errors defined in the application. We named the error code fol owing the pattern E + + HT H T T P T P S t S a t t a u t s u s Er E r r o r r o r C o C d o e d e De D s e c s r c i r p i t p i t o i n o n Co C d o e d e 403 ESDA1 Device is disabled Forbidden 404 ESDA2
Device of current user not found Not Found 404 EDEV1
Not found any device with specified id owned by logged customer Not Found 404 EDEV2 Invalid product id Not Found 500 INTERNAL
Internal server An internal error occurred Error 404 ECUS1 Customer not found Not Found 409 ECUS2
Customer with the given username already exists Conflict 409 ECUS3
Customer with the given email already exists Conflict 403 ECUS4
Customer exceeded the available number of device API cal s Forbidden 400 ECUS5
Customer input doesnÕt contain email Bad Request 400 ECUS6
Customer input doesnÕt contain username Bad Request 400 ECUS7
Customer input doesnÕt contain password Bad Request Pagina [19] di [23] 401 ELOG1
Invalid login operation (missing parameters or invalid credentials) Unauthorized 401 EAUT1
Invalid device authentication (missing or invalid token) Unauthorized 401 EAUT2
Invalid customer authentication (missing credentials) Unauthorized 401 EAUT3
Access denied due to lack of permissions Unauthorized 404
The Group with specified id not found or not belonging to the ECGR1 current customer Not Found 404 EPRD1
The product specified does not exist Not Found 404 EPRD2
The product specified does not belong in the cart Not Found 400 EPRD3
A wrong quantity specified for the selected product in the cart Bad Request 404 EORD1
A non-completed order is not found Not Found 404
The specified order does not exist (nor completed nor non- EORD2 completed) Not Found EORD3 404
Customer does not own the specified order Not Found EORD4 400
Customer input doesnÕt contain orderÕs address Bad Request EORD5 400
Customer is trying to buy an already completed order Bad Request 400
Customer is trying to buy from an empty cart EORD6 Bad Request REST API Details
We report here 3 different resource types that our web application handles during its functioning. Ad A d d d S e S n e s n o s r o r D a D t a a t a Pagina [20] di [23]
Tài liệu liên quan:
-
Tóm tắt lý thuyết môn IoT và ứng dụng | Học viện Công Nghệ Bưu Chính Viễn Thông
23 12 -
Accelerated Corner-Detector Algorithms: GPU Implementations and Results | Iot và ứng dụng | Học viện Công nghệ Bưu chính Viễn thông
46 23 -
Đề xuất Dự án IoT: Thiết bị phát hiện chạm cho xe máy | Iot và ứng dụng | Học viện Công nghệ Bưu chính Viễn thông
35 18 -
Phân Tích và Giải Pháp FastAPI | Iot và ứng dụng | Học viện Công nghệ Bưu chính Viễn thông
30 15 -
Tăng cường pháp chế xã hội chủ nghĩa trong quản lý nhà nước | Iot và ứng dụng | Học viện Công nghệ Bưu chính Viễn thông
25 13