Lab 13 - AWS EBS Overview and Management Techniques. Môn Mạng máy tính (ĐHCN) | Trường Đại học Công nghệ, Đại học Quốc gia Hà Nội.
This lab focuses on Amazon Elastic Block Store (Amazon EBS), a key underlying storage mechanism for Amazon EC2 instances. In this lab, you will learn how to create an Amazon EBS volume, attach it to an instance, apply a file system to the volume, and then take a snapshot backup.
Lab 13 - AWS EBS Overview and Management Techniques. Môn Mạng máy tính (ĐHCN) | Trường Đại học Công nghệ, Đại học Quốc gia Hà Nội.
Tài liệu gồm 9 trang giúp bạn tham khảo, củng cố kiến thức và ôn tập đạt kết quả cao trong kỳ thi sắp tới. Mời bạn đọc đón xem!
Môn: Mạng máy tính (ĐHCN) 12 tài liệu
Trường: Trường Đại học Công nghệ, Đại học Quốc gia Hà Nội 823 tài liệu
Tác giả:


Preview text:
lOMoAR cPSD| 58833082 12/9/24, 11:57 AM Workbench - Vocareum Lab Overview
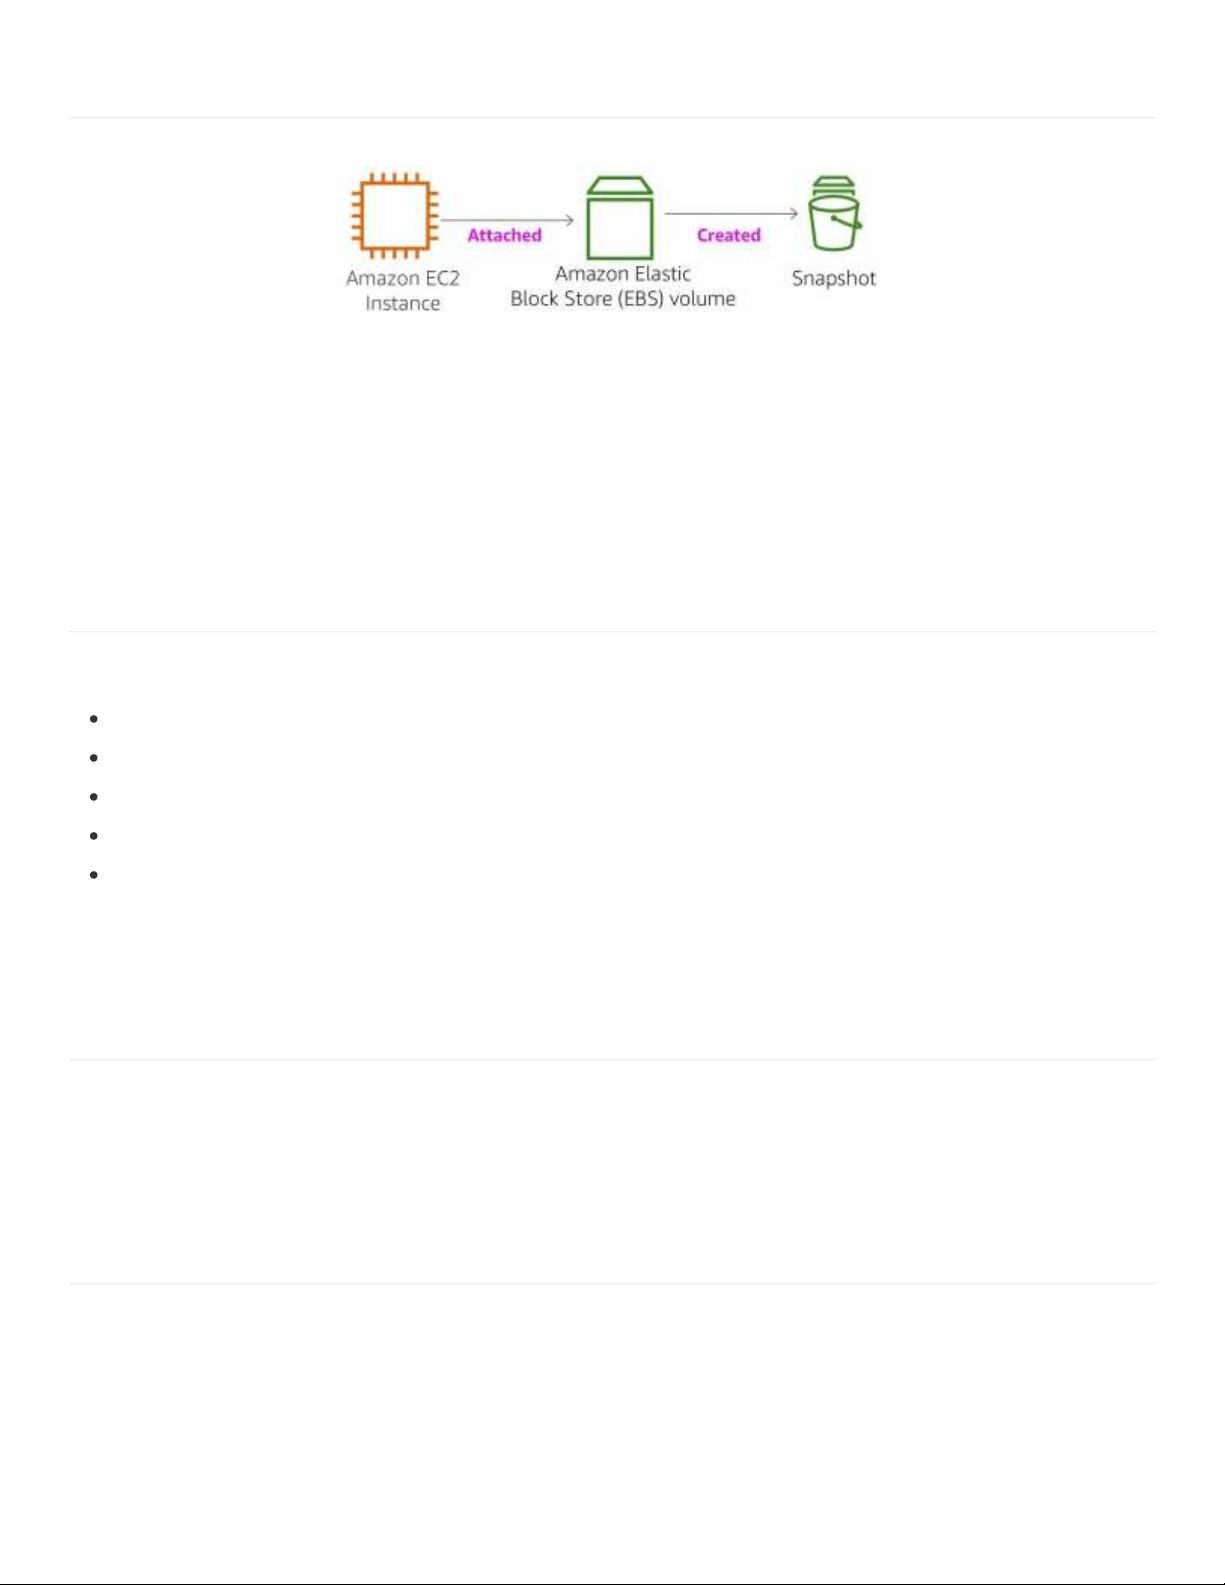
This lab focuses on Amazon Elastic Block Store (Amazon EBS), a key underlying storage mechanism
for Amazon EC2 instances. In this lab, you will learn how to create an Amazon EBS volume, attach it
to an instance, apply a file system to the volume, and then take a snapshot backup. Topics covered
By the end of this lab, you will be able to: Create an Amazon EBS volume
Attach and mount your volume to an EC2 instance
Create a snapshot of your volume
Create a new volume from your snapshot
Attach and mount the new volume to your EC2 instance Duration
This lab will require approximately 30 minutes to complete.
AWS service restrictions
In this lab environment, access to AWS services and service actions might be restricted to the ones
that are needed to complete the lab instructions. You might encounter errors if you attempt to access
other services or perform actions beyond the ones that are described in this lab.
https://labs.vocareum.com/main/main.php?m=clabide&mode=s&asnid=3687885&stepid=3687886&hideNavBar=1 1/9 lOMoAR cPSD| 58833082 12/9/24, 11:57 AM Workbench - Vocareum
What is Amazon Elastic Block Store?
Amazon Elastic Block Store (Amazon EBS) offers persistent storage for Amazon EC2 instances.
Amazon EBS volumes are network-attached and persist independently from the life of an instance.
Amazon EBS volumes are highly available, highly reliable volumes that can be leveraged as an
Amazon EC2 instances boot partition or attached to a running Amazon EC2 instance as a standard block device.
When used as a boot partition, Amazon EC2 instances can be stopped and subsequently restarted,
enabling you to pay only for the storage resources used while maintaining your instance's state.
Amazon EBS volumes offer greatly improved durability over local Amazon EC2 instance stores
because Amazon EBS volumes are automatically replicated on the backend (in a single Availability Zone).
For those wanting even more durability, Amazon EBS provides the ability to create point-in-time
consistent snapshots of your volumes that are then stored in Amazon Simple Storage Service
(Amazon S3) and automatically replicated across multiple Availability Zones. These snapshots can be
used as the starting point for new Amazon EBS volumes and can protect your data for long-term
durability. You can also easily share these snapshots with co-workers and other AWS developers.
This lab guide explains basic concepts of Amazon EBS in a step-by-step fashion. However, it can only
give a brief overview of Amazon EBS concepts. For further information, see the Amazon EBS documentation.
Amazon EBS Volume Features
Amazon EBS volumes deliver the following features:
Persistent storage: Volume lifetime is independent of any particular Amazon EC2 instance.
General purpose: Amazon EBS volumes are raw, unformatted block devices that can be used from any operating system.
High performance: Amazon EBS volumes are equal to or better than local Amazon EC2 drives.
High reliability: Amazon EBS volumes have built-in redundancy within an Availability Zone.
Designed for resiliency: The AFR (Annual Failure Rate) of Amazon EBS is between 0.1% and 1%.
Variable size: Volume sizes range from 1 GB to 16 TB.
Easy to use: Amazon EBS volumes can be easily created, attached, backed up, restored, and deleted.
Accessing the AWS Management Console
1. At the top of these instructions, choose Start Lab. The lab session starts.
https://labs.vocareum.com/main/main.php?m=clabide&mode=s&asnid=3687885&stepid=3687886&hideNavBar=1 2/9 lOMoAR cPSD| 58833082 12/9/24, 11:57 AM Workbench - Vocareum
A timer displays at the top of the page and shows the time remaining in the session.
Tip: To refresh the session length at any time, choose Start Lab again before the timer reaches 0:00.
Before you continue, wait until the circle icon to the right of the AWS link in the upper-left corner turns green.
2. To connect to the AWS Management Console, choose the AWS link in the upper-left corner.
A new browser tab opens and connects you to the console.
Tip: If a new browser tab does not open, a banner or icon is usually at the top of your
browser with the message that your browser is preventing the site from opening pop-up
windows. Choose the banner or icon, and then choose Allow pop-ups.
3. Arrange the AWS Management Console tab so that it displays along side these instructions.
Ideally, you will be able to see both browser tabs at the same time, to make it easier to follow the lab steps.
Getting Credit for your work
At the end of this lab you will be instructed to submit the lab to receive a score based on your progress.
Tip: The script that checks you works may only award points if you name resources and set
configurations as specified. In particular, values in these instructions that appear in This Format should
be entered exactly as documented (case-sensitive).
Task 1: Create a New EBS Volume
In this task, you will create and attach an Amazon EBS volume to a new Amazon EC2 instance.
4. In the AWS Management Console, in the search box next to Services , search for and select EC2.
5. In the left navigation pane, choose Instances.
An Amazon EC2 instance named Lab has already been launched for your lab.
6. Note the Availability Zone of the instance. It will look similar to us-east-1a.
7. In the left navigation pane, choose Volumes.
https://labs.vocareum.com/main/main.php?m=clabide&mode=s&asnid=3687885&stepid=3687886&hideNavBar=1 3/9 lOMoAR cPSD| 58833082 12/9/24, 11:57 AM Workbench - Vocareum
You will see an existing volume that is being used by the Amazon EC2 instance. This volume has
a size of 8 GiB, which makes it easy to distinguish from the volume you will create next, which will be 1 GiB in size.
8. Choose Create volume then configure:
Volume Type: General Purpose SSD (gp2)
Size (GiB): 1 . NOTE: You may be restricted from creating large volumes.
Availability Zone: Select the same availability zone as your EC2 instance. Choose Add tag In the Tag Editor, enter: Key: Name Value: My Volume
9. Choose Create Volume
Your new volume will appear in the list, and will move from the Creating state to the Available
state. You may need to choose refresh to see your new volume.
Task 2: Attach the Volume to an Instance
In this task you will attach the new EBS volume to the Amazon EC2 instance. 10. Select My Volume.
11. In the Actions menu, choose Attach volume.
12. Choose the Instance field, then select the Lab instance.
Note that the Device name is set to /dev/sdf. Notice also the message displayed that "Newer
Linux kernels may rename your devices to /dev/xvdf through /dev/xvdp internally, even when the
device name entered here (and shown in the details) is /dev/sdf through /dev/sdp."
13. Choose Attach volume
The volume state is now In-use.
Task 3: Connect to Your Amazon EC2 Instance
https://labs.vocareum.com/main/main.php?m=clabide&mode=s&asnid=3687885&stepid=3687886&hideNavBar=1 4/9 lOMoAR cPSD| 58833082 12/9/24, 11:57 AM Workbench - Vocareum
In this task, you will connect to the EC2 instance using EC2 Instance Connect which provides access to a terminal in the browser.
14. In the AWS Management Console, in the search box next to Services , search for and select EC2. 15. Choose Instances.
16. Select the Lab instance, and then choose Connect.
17. On the EC2 Instance Connect tab, choose Connect.
An EC2 Instance Connect terminal session opens and displays a $ prompt.
Task 4: Create and Configure Your File System
In this task, you will add the new volume to a Linux instance as an ext3 file system under the /mnt/data-store mount point.
18. View the storage available on your instance: Run the following command: df - h
You should see output similar to:
Filesystem Size Used Avail Use% Mounted on
devtmpfs 4 .0 M 0 4 .0 M 0 % /dev
tmpfs 475M 0 475M 0 % /dev/shm
tmpfs 190M 2 .8 M 188M 2 % /run
/dev/xvda1 8 .0 G 1 .6 G 6 .5 G 20 % / tmpfs 475M 0 475M 0 % /tmp
tmpfs 95M 0 95M 0 % /run/user/1000
The output shows that the original 8GB /dev/xvda1 disk volume mounted at / which indicates that
it is the root volume. It hosts the Linux operating system of the EC2 instance.
The 1GB other volume that you attached to the Lab instance is not listed, because you have not
yet created a file system on it or mounted the disk. Those actions are necessary so that Linux
operating system can make use of the new storage space. You will take those actions next.
19. Create an ext3 file system on the new volume: sudo mkfs - t ext3 /dev/sdf
The output should indicate that a new file system was created on the attached volume.
https://labs.vocareum.com/main/main.php?m=clabide&mode=s&asnid=3687885&stepid=3687886&hideNavBar=1 5/9 lOMoAR cPSD| 58833082 12/9/24, 11:57 AM Workbench - Vocareum
20. Create a directory for mounting the new storage volume: sudo mkdir /mnt/data-store 21. Mount the new volume:
sudo mount /dev/sdf /mnt/data-store
To configure the Linux instance to mount this volume whenever the instance is started, you will
need to add a line to /etc/fstab. Run the command below to accomplish that:
echo "/dev/sdf /mnt/data-store ext3 defaults,noatime 1 2" | sudo tee - a /etc/fstab
22. View the configuration file to see the setting on the last line: cat /etc/fstab
23. View the available storage again: df - h
The output will look similar to what is shown below.
Filesystem Size Used Avail Use% Mounted on devtmpfs 484M 0 484M 0% /dev tmpfs 492M 0 492M 0% /dev/shm tmpfs 492M 460K 491M 1% /run
tmpfs 492M 0 492M 0% /sys/fs/cgroup
/dev/xvda1 8.0G 1.5G 6.6G 19% /
tmpfs 99M 0 99M 0% /run/user/0
tmpfs 99M 0 99M 0% /run/user/1000
/dev/xvdf 976M 1.3M 924M 1% /mnt/data-store
Notice the last line. The output now lists /dev/xvdf which is the new mounted volume.
24. On your mounted volume, create a file and add some text to it.
sudo sh - c "echo some text has been written > /mnt/data-store/file.txt"
25. Verify that the text has been written to your volume.
https://labs.vocareum.com/main/main.php?m=clabide&mode=s&asnid=3687885&stepid=3687886&hideNavBar=1 6/9 lOMoAR cPSD| 58833082 12/9/24, 11:57 AM Workbench - Vocareum cat /mnt/data-store/file.txt
Leave the EC2 Instance Connect session running. You will return to it later in this lab.
Task 5: Create an Amazon EBS Snapshot
In this task, you will create a snapshot of your EBS volume.
You can create any number of point-in-time, consistent snapshots from Amazon EBS volumes at any
time. Amazon EBS snapshots are stored in Amazon S3 with high durability. New Amazon EBS
volumes can be created out of snapshots for cloning or restoring backups. Amazon EBS snapshots
can also be easily shared among AWS users or copied over AWS regions.
26. In the EC2 Console, choose Volumes and select My Volume.
27. In the Actions menu, select Create snapshot.
28. Choose Add tag then configure: Key: Name Value: My Snapshot Choose Create snapshot
29. In the left navigation pane, choose Snapshots.
Your snapshot is displayed. The status will first have a state of Pending, which means that the
snapshot is being created. It will then change to a state of Completed.
Note: Only used storage blocks are copied to snapshots, so empty blocks do not occupy any snapshot storage space.
30. In your EC2 Instance Connect session, delete the file that you created on your volume.
sudo rm /mnt/data-store/file.txt
31. Verify that the file has been deleted. ls /mnt/data-store/ Your file has been deleted.
https://labs.vocareum.com/main/main.php?m=clabide&mode=s&asnid=3687885&stepid=3687886&hideNavBar=1 7/9 lOMoAR cPSD| 58833082 12/9/24, 11:57 AM Workbench - Vocareum
Task 6: Restore the Amazon EBS Snapshot
If you ever wish to retrieve data stored in a snapshot, you can Restore the snapshot to a new EBS volume.
Create a Volume Using Your Snapshot
32. In the EC2 console, select My Snapshot.
33. In the Actions menu, select Create volume from snapshot.
34. For Availability Zone, select the same availability zone that you used earlier.
35. Choose Add tag then configure: Key: Name Value: Restored Volume Choose Create volume
Note: When restoring a snapshot to a new volume, you can also modify the configuration, such as
changing the volume type, size or Availability Zone.
Attach the Restored Volume to Your EC2 Instance
36. In the left navigation pane, choose Volumes.
37. Select Restored Volume.
38. In the Actions menu, select Attach volume.
39. Choose the Instance field, then select the Lab instance that appears.
Note that the Device field is set to /dev/sdg. You will use this device identifier in a later task.
40. Choose Attach volume
The volume state is now in-use.
https://labs.vocareum.com/main/main.php?m=clabide&mode=s&asnid=3687885&stepid=3687886&hideNavBar=1 8/9 lOMoAR cPSD| 58833082 12/9/24, 11:57 AM Workbench - Vocareum
Mount the Restored Volume
41. Create a directory for mounting the new storage volume: sudo mkdir /mnt/data-store2 42. Mount the new volume:
sudo mount /dev/sdg /mnt/data-store2
43. Verify that volume you mounted has the file that you created earlier. ls /mnt/data-store2/ You should see file.txt.
https://labs.vocareum.com/main/main.php?m=clabide&mode=s&asnid=3687885&stepid=3687886&hideNavBar=1 9/9
Tài liệu liên quan:
-
Bài Tập Lớn Mạng Máy Tính - Xây Dựng Hệ Thống Mạng CMC (DCCNTT13.10.18). Môn Mạng máy tính (ĐHCN) | Trường Đại học Công nghệ, Đại học Quốc gia Hà Nội.
108 54 -
Hệ Thống Phát Hiện Phương Tiện Giao Thông Bằng YOLOv3. Môn Mạng máy tính (ĐHCN) | Trường Đại học Công nghệ, Đại học Quốc gia Hà Nội.
104 52 -
Mạng máy tính - Bài tập chương 2: Câu hỏi ôn tập và giải thích.
109 55 -
Mạng máy tính - Bài tập chương 1: Các vấn đề và câu hỏi ôn tập. Môn Mạng máy tính (ĐHCN) | Trường Đại học Công nghệ, Đại học Quốc gia Hà Nội.
120 60