Lab07 - node JS - Tài liệu tham khảo | Đại học Hoa Sen
Lab07 - node JS - Tài liệu tham khảo | Đại học Hoa Sen và thông tin bổ ích giúp sinh viên tham khảo, ôn luyện và phục vụ nhu cầu học tập của mình cụ thể là có định hướng, ôn tập, nắm vững kiến thức môn học và làm bài tốt trong những bài kiểm tra, bài tiểu luận, bài tập kết thúc học phần, từ đó học tập tốt và có kết quả cao cũng như có thể vận dụng tốt những kiến thức mình đã học.
Môn: information technology (IT Sotfware) 30 tài liệu
Trường: Trường Đại học Hoa Sen 5.3 K tài liệu
Tác giả:


Preview text:
LAB 7 MỤC TIÊU:
Kết thúc bài thực hành này bạn có khả năng
✓ Hiểu và cài đặt Authentication
✓ Đăng ký, đăng nhập và mã hoá password ✓ Authentication ✓ Validation PHẦN I Bài 1 (3 điểm)
Viết RESTFUL API thực hiện đăng ký thành viên Bước 1: Tạo model user const Sequelize = re r q e u q i u r i e r ('sequelize'); const sequelize = re r q e u q i u r i e r ('../util/database'); const User = sequelize.de d fi f n i e n ('tblUsers', { id: { ty t p y e p : Sequelize.IN I T N E T G E E G R E , autoIncrement: true, allowNull: false, primaryKey: true }, email: { ty t p y e p : Sequelize.ST S R T I R N I G, required: true }, password: { ty t p y e p : Sequelize.ST S R T I R N I G, required: true }, typeUser: { ty t p y e p : Sequelize.IN I T N E T G E E G R E , required: true } }, { timestamps: false }
WEB503 - NODEJS & RESFUL WEB SERVICE TRANG 1 LAB 7 ); module.exports = User; Bước
Xây dựng controller thực hiện thêm user onst User = re r q e u q i u r i e r ('../models/user'); const bcrypt = re r q e u q i u r i e r ('bcryptjs'); const jwt = re r q e u q i u r i e r ("jsonwebtoken"); exports.cr c e r a e t a e t U e s U e s r e = (req, res, next) => {
const email = req.body.email;
const password = req.body.password;
const confirmPassword = req.bod . y confirmPassword;
const typeUser = req.body.typeUser; console.log o (email); User.fi f n i d n On O e n ({where: { email: email }}) .th t e h n e (user = > { i f (user) { console.lo l g o (user.email); return res.st s a t t a u t s(400).js j o s n
o ({message:"Email da ton tai"}); } return bcrypt.ha h s a h s (password, 12); }) .th t e h n e (hashedPassword=>{ const user = new Us U e s r
e ({ email: email, password: hashedPassword,typeUser:typeUser }); return user.sa s v a e v (); }) .th t e h n e (user = > { res.st s a t t a u t s u (201).js j o s n o ({
message: 'Thêm thành công thành viên!', user: user }); }) .ca c t a c t h c (err => res.st s a t t a u t s u (400).js j o s n o (err)) }; Bước 3: Thực hiện route
const express = require('express'); const userController = re r qu q i u r i e r ('../controllers/auth'); const router = express.Ro R u o te t r e (); // POST /blog/post router.po p s o t
s ('/register', userController.createUser); router.po p s o t
s ('/login/', userController.login);
WEB503 - NODEJS & RESFUL WEB SERVICE TRANG 2 LAB 7 module.exports = router;
Bước 4: Test API với Postman Bài 2 (2 điểm)
Viết REST API xử lý đăng nhập và trả về token Bước 1: Viết API exports.lo l g o i g n i = (req, res, next) = > {
const email = req.body.email;
const password = req.body.password; User.fi f n i d n On O e n ({where: { email: email }}) .th t e h n e (user = > { i f (!user) { return res.st s a t t a u t s(400).js j o s n
o ({message:"Email khong ton tai"}); } return Pr P o r m o i m s i e s .al a ll([bcrypt.co c m o p m a p r a e
r (password, user.password),user]); }) .th t e h n e (result=>{ const isMatch=result[0]; const user=result[1]; if(!isMatch) return res.st s a t t a u t s u (40 ) 0 .js j o s n
o ({message:"Password khong khop"}) const payload={ email:user.email, typeUser:user.typeUser } console.lo l g o (payload); return jwt.si s g i n
g (payload,"FptPolyTechnic",{expiresIn:3600}) }) .th t e h n e (token=>{ console.lo l g o (token); res.st s a t t a u t s u (20 ) 0 .jso s n
o ({message:"Login thanh cong",token}) }) .ca c t a c t h c (err => res.st s a t t a u t s u (400).js j o s n o (err)) };
Bước 2: Test với phương thức với postman
WEB503 - NODEJS & RESFUL WEB SERVICE TRANG 3 LAB 7 PHẦN II Bài 3 (2 điểm)
Xây dựng RESTFUL API Authenticate
Bước 1: Tạo middleWare authen
Bước 2: sử dụng middleware trên cho router.ge g t
e ('/private/',authenticate, userController.testAuth); Bước 3: Test với postman
WEB503 - NODEJS & RESFUL WEB SERVICE TRANG 4 LAB 7 Bài 4 (2 điểm)
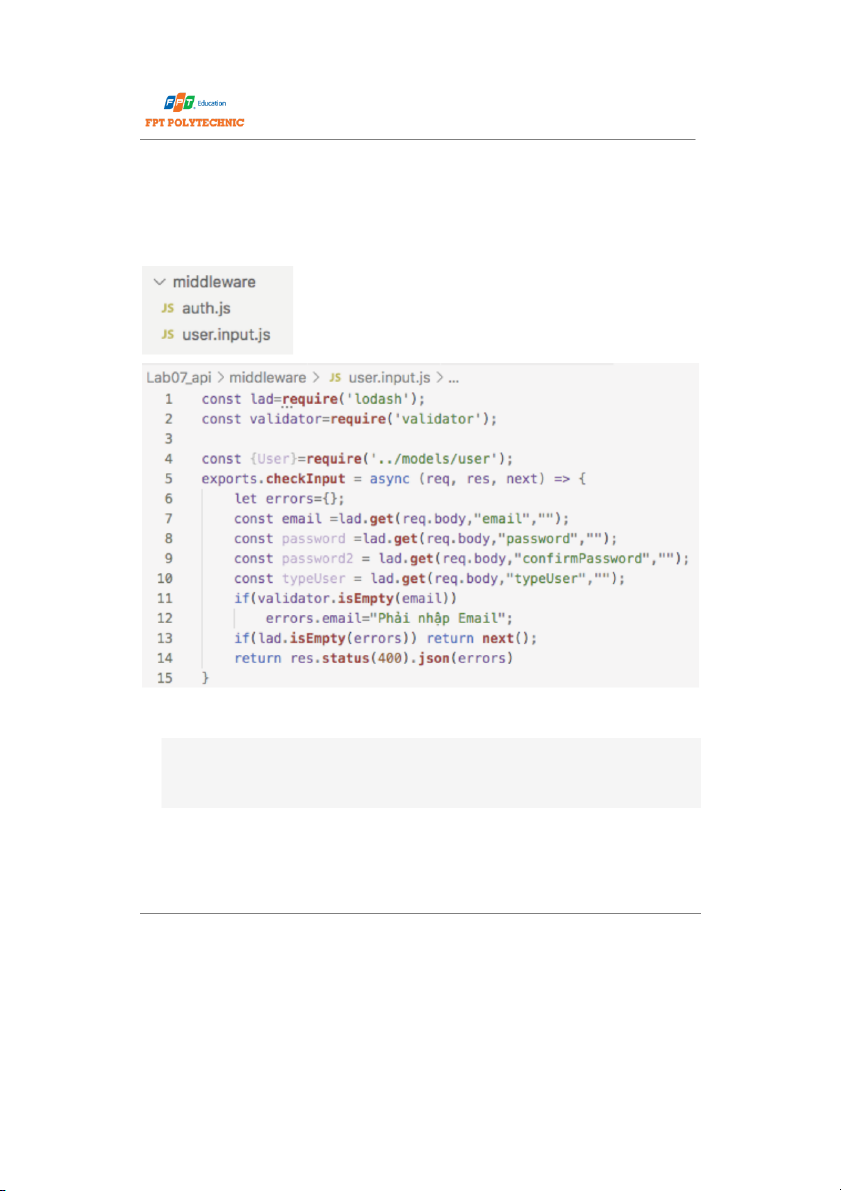
Xây dựng middleware kiểm tra tính hợp lệ dữ liệu nhập vào khi thực hiện đăng ký user. •
Sử dụng validate trong route // POST /blog/post router.po p s o t s ('/register',ch c e h c e k c I k n I p n u p t
u , userController.createUser); router.po p s o t
s ('/login/', userController.login); router.ge g t
e ('/private/',authenticate, userController.testAuth); Bài 5 (1 điểm)
Test REST API: sinh viên thực hiện gọi tất cả các API đã thực hiện ở bài 3,4 với front end.
WEB503 - NODEJS & RESFUL WEB SERVICE TRANG 5 LAB 7
*** Yu cu np bi:
SV nn file (hoc share th mc google drive) bao gm các yêu cu đã thực hiện
trên, np LMS đúng thi gian quy đnh ca giảng viên. KHNG NP BI COI NH KHNG C ĐIM. ---Hết---
WEB503 - NODEJS & RESFUL WEB SERVICE TRANG 6
Tài liệu liên quan:
-
Thiết kế bàn trà mẫu - Tài liệu tham khảo | Đại học Hoa Sen
240 120 -

Xcelsus Audio 2024 - notthing - Tài liệu tham khảo | Đại học Hoa Sen
410 205 -
Dàn mẫu đề án cuối học phần Intro to MIS - Tài liệu tham khảo | Đại học Hoa Sen
280 140 -

Summary Feasibility of LNG as a Fuel for the Mediterranean SSS Fleet - Tài liệu tham khảo | Đại học Hoa Sen
248 124 -

Vision and scope - Example COS - Tài liệu tham khảo | Đại học Hoa Sen
250 125