MOS Study Guide | Tài liệu Microsoft Office SpecialistMOS Study Guide for Microsoft Word Exam MO-100Joan LambertExam MO-100
MOS Study Guide | Tài liệu Microsoft Office SpecialistMOS Study Guide for Microsoft Word Exam MO-100Joan LambertExam MO-100. Tài liệu giúp bạn tham khảo, ôn tập và đạt kết quả cao. Mời đọc đón xem!
Môn: Tài liệu Tổng hợp 3.6 K tài liệu
Trường: Tài liệu khác 3.9 K tài liệu
Tác giả:


Preview text:
MOS Study Guide for Microsoft Word Exam MO-100 Joan Lambert Microsoft Office Specialist Exam MO-100
MOS Study Guide for Microsoft Word Exam MO-100 Editor-in-Chief Brett Bartow
Published with the authorization of Microsoft Corporation by: Pearson Education, Inc. Executive Editor Loretta Yates
Copyright © 2020 by Pearson Education, Inc. Development Editor
All rights reserved. This publication is protected by copyright, and permission Songlin Qiu
must be obtained from the publisher prior to any prohibited reproduction,
storage in a retrieval system, or transmission in any form or by any means, Sponsoring Editor
electronic, mechanical, photocopying, recording, or likewise. For information Charvi Arora
regarding permissions, request forms, and the appropriate contacts within the
Pearson Education Global Rights & Permissions Department, please visit Managing Editor www.pearson.com/permissions. Sandra Schroeder
No patent liability is assumed with respect to the use of the information contained Senior Project Editor
herein. Although every precaution has been taken in the preparation of this book, Tracey Croom
the publisher and author assume no responsibility for errors or omissions. Nor is
any liability assumed for damages resulting from the use of the information Copy Editor contained herein. Elizabeth Welch ISBN-13: 978-0-13-662804-0 Indexer ISBN-10: 0-13-662804-4 Cheryl Ann Lender
Library of Congress Control Number: 2020935470 Proofreader Abigail Manheim ScoutAutomatedPrintCode Technical Editor Trademarks Boyd Nolan
Microsoft and the trademarks listed at http://www.microsoft.com on the
“Trademarks” webpage are trademarks of the Microsoft group of companies. Editorial Assistant
All other marks are property of their respective owners. Cindy Teeters Cover Designer Twist Creative, Seattle Compositor codeMantra Contents Introduction vi
Taking a Microsoft Office Specialist exam xi
Exam MO-100 Microsoft Word 2019 1
Prerequisites. . . . . . . . . . . . . . . . . . . . . . . . . . . . . . . . . . . . . . . . . . . . . . . . . . . . . . . . . . 2 1 Manage documents 7
Objective 1.1: Navigate within documents . . . . . . . . . . . . . . . . . . . . . . . . . . . . . . 8 Search for text 10
Link to locations within documents 13
Move to specific locations and objects in documents 17
Show or hide formatting symbols and hidden text 19
Objective 1.2: Format documents . . . . . . . . . . . . . . . . . . . . . . . . . . . . . . . . . . . . . 22 Modify page setup 22 Apply style sets 25
Insert and modify headers and footers 26 Insert page numbers 30
Format page background elements 31
Objective 1.3: Save and share documents . . . . . . . . . . . . . . . . . . . . . . . . . . . . . . 35
Modify basic document properties 35
Save documents in alternative file formats 36 Modify print settings 40
Share documents electronically 43
Objective 1.4: Inspect documents for issues . . . . . . . . . . . . . . . . . . . . . . . . . . . . 46 iii Contents 2
Insert and format text, paragraphs, and sections 53
Objective 2.1: Insert text and paragraphs . . . . . . . . . . . . . . . . . . . . . . . . . . . . . . 54 Replace text 54
Insert symbols and special characters 56
Objective 2.2: Format text and paragraphs . . . . . . . . . . . . . . . . . . . . . . . . . . . . 59 Format text 59 Apply text effects 60 Format paragraphs 62
Apply built-in styles to text 65 Clear formatting and styles 69
Objective 2.3: Create and configure document sections . . . . . . . . . . . . . . . . 72 Display content in columns 72
Define document pages and sections 76 3
Manage tables and lists 83
Objective 3.1: Create tables . . . . . . . . . . . . . . . . . . . . . . . . . . . . . . . . . . . . . . . . . . . 84
Create tables from scratch or from text 86 Apply table styles 89
Objective 3.2: Modify tables . . . . . . . . . . . . . . . . . . . . . . . . . . . . . . . . . . . . . . . . . . 92 Sort table data 92 Modify table structure 93
Objective 3.3: Create and modify lists . . . . . . . . . . . . . . . . . . . . . . . . . . . . . . . . 103
Create and manage bulleted lists 104
Create and manage numbered lists 106 4
Create and manage references 111
Objective 4.1: Create and manage reference elements. . . . . . . . . . . . . . . . . 112
Create and manage footnotes and endnotes 112
Create and manage bibliography citation sources 116 iv Contents
Objective 4.2: Create and manage reference tables . . . . . . . . . . . . . . . . . . . 122
Create and manage tables of contents 122
Create and manage bibliographies 125 5
Insert and format graphic elements 131
Objective 5.1: Insert illustrations and text boxes . . . . . . . . . . . . . . . . . . . . . . . 132 Insert and modify shapes 132 Insert pictures 134 Insert 3D models 136 Insert SmartArt graphics 137
Insert screenshots and screen clippings 140 Insert text boxes 141
Objective 5.2: Format illustrations and text boxes . . . . . . . . . . . . . . . . . . . . . 146 Visually format objects 147 Format SmartArt graphics 150 Format 3D models 151
Objective 5.3: Add text to graphic elements . . . . . . . . . . . . . . . . . . . . . . . . . . 154
Insert text in text boxes and shapes 154
Modify SmartArt graphic content 155
Objective 5.4: Modify graphic elements . . . . . . . . . . . . . . . . . . . . . . . . . . . . . . 159
Control the placement of objects within text 159
Provide alternative text for accessibility 163 6
Manage document collaboration 167
Objective 6.1: Add and manage comments . . . . . . . . . . . . . . . . . . . . . . . . . . . 168
Objective 6.2: Manage change tracking . . . . . . . . . . . . . . . . . . . . . . . . . . . . . . 172
Review and process tracked changes 176 Index 181 v Introduction
The Microsoft Office Specialist (MOS) certification program has been designed to val-
idate your knowledge of and ability to use applications in the Microsoft Office suite.
This book has been designed to guide you in studying the types of tasks you are likely
to be required to demonstrate in Exam MO-100: Microsoft Word 2019.
See Also For information about the tasks you are likely to be required to demonstrate in
Exam MO-100: Microsoft Word (Word and Word 2019) Expert, see MOS Study Guide for
Microsoft Word Expert Exam MO-101 by Paul McFedries (Microsoft Press, 2020). Who this book is for
MOS Study Guide for Microsoft Word Exam MO-100 is designed for experienced
computer users seeking Microsoft Office Specialist certification in Word 2019 or the
equivalent version of Word for Office 365.
MOS exams for individual programs are practical rather than theoretical. You must
demonstrate that you can complete certain tasks or projects rather than simply
answer questions about program features. The successful MOS certification candidate
will have at least six months of experience using all aspects of the application on a
regular basis; for example, using Word at work or school to create and manage doc-
uments, format document content, present information in tables and lists, insert and
format pictures, create business diagrams, and reference information sources.
As a certification candidate, you probably have a lot of experience with the program
you want to become certified in. Many of the procedures described in this book will
be familiar to you; others might not be. Read through each study section and ensure
that you are familiar with the procedures, concepts, and tools discussed. In some
cases, images depict the tools you will use to perform procedures related to the skill
set. Study the images and ensure that you are familiar with the options available for each tool. vi Introduction How this book is organized
The exam coverage is divided into chapters representing broad skill sets that correlate
to the functional groups covered by the exam. Each chapter is divided into sections
addressing groups of related skills that correlate to the exam objectives. Each section
includes review information, generic procedures, and practice tasks you can complete
on your own while studying. We provide practice files you can use to work through
the practice tasks, and results files you can use to check your work. You can practice
the generic procedures in this book by using the practice files supplied or by using your own files.
Throughout this book, you will find Exam Strategy tips that present information about
the scope of study that is necessary to ensure that you achieve mastery of a skill set
and are successful in your certification effort. vii Introduction
The following table lists the practice files provided for this book.
Folder and objective group Practice files Result files MOSWord2019\Objective1 Word_1-1.docx Word_1-1_results.docx Manage documents Word_1-2.docx Word_1-2_results.docx Word_1-3.docx Word_1-3_results.docx Word_1-4.docx MyCompatible.doc Word_1-4_results.docx MOSWord2019\Objective2 Word_2-1.docx Word_2-1_results.docx Insert and format text, Word_2-2.docx Word_2-2_results.docx paragraphs, and sections Word_2-3.docx Word_2-3_results.docx MOSWord2019\Objective3 Word_3-1.docx Word_3-1_results.docx Manage tables and lists Word_3-2.docx Word_3-2_results.docx Word_3-3.docx Word_3-3_results.docx MOSWord2019\Objective4 Word_4-1.docx Word_4-1_results.docx Create and manage references Word_4-2a.docx Word_4-2a_results.docx Word_4-2b.docx Word_4-2b_results.docx Word_4-2c.docx Word_4-2c_results.docx MOSWord2019\Objective5 Word_5-1.docx Word_5-1_results.docx Insert and format graphic Word_5-1.glb Word_5-2_results.docx elements Word_5-1.jpg Word_5-3_results.docx Word_5-2.docx Word_5-4_results.docx Word_5-3.docx Word_5-4.docx MOSWord2019\Objective6 Word_6-1.docx Word_6-1_results.docx Manage document Word_6-2.docx Word_6-2_results.docx collaboration Adapt procedure steps
This book contains many images of user interface elements that you’ll work with while
performing tasks in Word on a Windows computer. Depending on your screen res-
olution or app window width, the Word ribbon on your screen might look different
from that shown in this book. (If you turn on Touch mode, the ribbon displays signifi-
cantly fewer commands than in Mouse mode.) As a result, procedural instructions that
involve the ribbon might require a little adaptation. viii Introduction
Simple procedural instructions use this format:
➜ On the Insert tab, in the Illustrations group, click the Chart button.
If the command is in a list, our instructions use this format:
➜ On the Home tab, in the Editing group, click the Find arrow and then, in the
Find list, click Go To.
If differences between your display settings and ours cause a button to appear differ-
ently on your screen than it does in this book, you can easily adapt the steps to locate
the command. First click the specified tab, and then locate the specified group. If a
group has been collapsed into a group list or under a group button, click the list or
button to display the group’s commands. If you can’t immediately identify the button
you want, point to likely candidates to display their names in ScreenTips.
The instructions in this book assume that you’re interacting with on-screen elements
on your computer by clicking (with a mouse, touchpad, or other hardware device). If
you’re using a different method—for example, if your computer has a touchscreen
interface and you’re tapping the screen (with your finger or a stylus)—substitute the
applicable tapping action when you interact with a user interface element.
Instructions in this book refer to user interface elements that you click or tap on the
screen as buttons, and to physical buttons that you press on a keyboard as keys, to
conform to the standard terminology used in documentation for these products. Ebook edition
If you’re reading the ebook edition of this book, you can do the following: ■ Search the full text ■ Print ■ Copy and paste
You can purchase and download the ebook edition from the Microsoft Press Store at:
https://MicrosoftPressStore.com/MOSWord100/detail ix Taking a Microsoft Office Specialist exam
Desktop computing proficiency is increasingly important in today’s business world.
When screening, hiring, and training employees, employers can feel reassured by
relying on the objectivity and consistency of technology certification to ensure the
competence of their workforce. As an employee or job seeker, you can use technology
certification to prove that you already have the skills you need to succeed, saving cur-
rent and future employers the time and expense of training you.
Microsoft Office Specialist certification
Microsoft Office Specialist certification is designed to assist students and information
workers in validating their skills with Office programs. The following certification paths are available: ■
A Microsoft Office Specialist is an individual who has demonstrated proficiency
by passing the Excel Associate, Word Associate, Outlook Associate, or Power-
Point Associate certification exam. ■
A Microsoft Office Specialist Associate (MOS Associate) is an individual who has
passed any three of the Associate-level certification exams. ■
A Microsoft Office Specialist Expert (MOS Expert) is an individual who has
completed the MOS Associate credential and any two of the three Expert-level
exams: Access Expert, Word Expert, or Excel Expert.
Selecting a certification path
When deciding which certifications you would like to pursue, assess the following: ■
The program and program version(s) with which you are familiar ■
The length of time you have used the program and how frequently you use it ■
Whether you have had formal or informal training in the use of that program xi
Taking a Microsoft Office Specialist exam ■
Whether you use most or all of the available program features ■
Whether you are considered a go-to resource by business associates, friends,
and family members who have difficulty with the program
Candidates for MOS Associate certification are expected to successfully complete a
wide range of standard business tasks. Successful candidates generally have six or
more months of experience with the specific Office program, including either formal,
instructor-led training or self-study using MOS-approved books, guides, or interactive computer-based materials.
Candidates for MOS Expert certification are expected to successfully complete more
complex tasks that involve using the advanced functionality of the program. Success-
ful candidates generally have at least six months, and might have several years, of
experience with the programs, including formal, instructor-led training or self-study using MOS-approved materials. Test-taking tips
Every MOS certification exam is developed from a set of exam skill standards (referred
to as the objective domain) that are derived from studies of how the Office programs
are used in the workplace. Because these skill standards dictate the scope of each
exam, they provide critical information about how to prepare for certification.
This book follows the structure of the published exam objectives.
See Also For more information about the book structure, see “How this book is organized” in the Introduction.
The MOS certification exams are performance based and require you to complete
business-related tasks in the program for which you are seeking certification. For
example, you might be presented with a document and told to insert and format
additional document elements. Your score on the exam reflects how many of the
requested tasks you complete within the allotted time.
Here is some helpful information about taking the exam: ■
Keep track of the time. Your exam time does not officially begin until after you
finish reading the instructions provided at the beginning of the exam. During
the exam, the amount of time remaining is shown in the exam instruction
window. You can’t pause the exam after you start it. xii
Taking a Microsoft Office Specialist exam ■
Pace yourself. At the beginning of the exam, you will receive information about
the tasks that are included in the exam. During the exam, the number of com-
pleted and remaining tasks is shown in the exam instruction window. ■
Read the exam instructions carefully before beginning. Follow all the
instructions provided completely and accurately. ■
If you have difficulty performing a task, you can restart it without affecting the
result of any completed tasks, or you can skip the task and come back to it after
you finish the other tasks on the exam. ■
Enter requested information as it appears in the instructions, but without dupli-
cating the formatting unless you are specifically instructed to do so. For exam-
ple, the text and values you are asked to enter might appear in the instructions
in bold and underlined text, but you should enter the information without applying these formats. ■
Close all dialog boxes before proceeding to the next exam item unless you are
specifically instructed not to do so. ■
Don’t close task panes before proceeding to the next exam item unless you are
specifically instructed to do so. ■
If you are asked to print a document, worksheet, chart, report, or slide, perform
the task, but be aware that nothing will actually print. ■
Don’t worry about extra keystrokes or mouse clicks. Your work is scored based
on its result, not on the method you use to achieve that result (unless a specific
method is indicated in the instructions). ■
If a computer problem occurs during the exam (for example, if the exam does
not respond or the mouse no longer functions) or if a power outage occurs,
contact a testing center administrator immediately. The administrator will
restart the computer and return the exam to the point where the interruption
occurred, with your score intact.
Exam Strategy This book includes special tips for effectively studying for the Microsoft Office
Specialist exams in Exam Strategy paragraphs such as this one. xiii
Taking a Microsoft Office Specialist exam Certification benefits
At the conclusion of the exam, you will receive a score report, indicating whether you
passed the exam. If your score meets or exceeds the passing standard (the minimum
required score), you will be contacted by email by the Microsoft Certification Pro-
gram team. The email message you receive will include your Microsoft Certification
ID and links to online resources, including the Microsoft Certified Professional site.
On this site, you can download or order a printed certificate, create a virtual business
card, order an ID card, review and share your certification transcript, access the Logo
Builder, and access other useful and interesting resources, including special offers from
Microsoft and affiliated companies.
Depending on the level of certification you achieve, you will qualify to display one of
three logos on your business card and other personal promotional materials. These
logos attest to the fact that you are proficient in the applications or cross-application
skills necessary to achieve the certification. Using the Logo Builder, you can create a
personalized certification logo that includes the MOS logo and the specific programs
in which you have achieved certification. If you achieve MOS certification in multiple
programs, you can include multiple certifications in one logo. xiv Objective group 2 Insert and format text, paragraphs, and sections 2
The skills tested in this section of the Microsoft Office Specialist exam for
Microsoft Word 2019 relate to formatting document content. Specifically, the
following objectives are associated with this set of skills:
2.1 Insert text and paragraphs
2.2 Format text and paragraphs
2.3 Create and configure document sections
Word documents are merely containers for their content. You can create
content directly in the document or reuse and adapt it from other sources.
The way that you present the content—by formatting its appearance and
structure and by maintaining consistency—can improve the effectiveness of the
document in communicating a specific message.
This chapter guides you in studying ways of inserting text, symbols, and special
characters; formatting text; modifying paragraph indentation, spacing, and
layout; applying character and paragraph styles; and structuring a document
by controlling page breaks, creating independently formatted sections, and formatting content in columns.
To complete the practice tasks in this chapter, you need the practice files
contained in the MOSWord2019\Objective2 practice file folder. For more
information, see “Download the practice files” in this book’s introduction. 53
Objective group 2 Insert and format text, paragraphs, and sections
Objective 2.1: Insert text and paragraphs Replace text
See Also This topic is about replacing text through a find-and-replace operation. For
information about locating specific text and objects or moving directly to specific types of
objects, see “Objective 1.1: Navigate within documents.”
When developing document content, you can ensure that the text in your documents
is consistent and accurate by using the Find feature to review every occurrence of a
specific word or phrase, or by using the Replace feature to consistently modify text,
formatting, or styles. You can replace search terms with other text or special characters
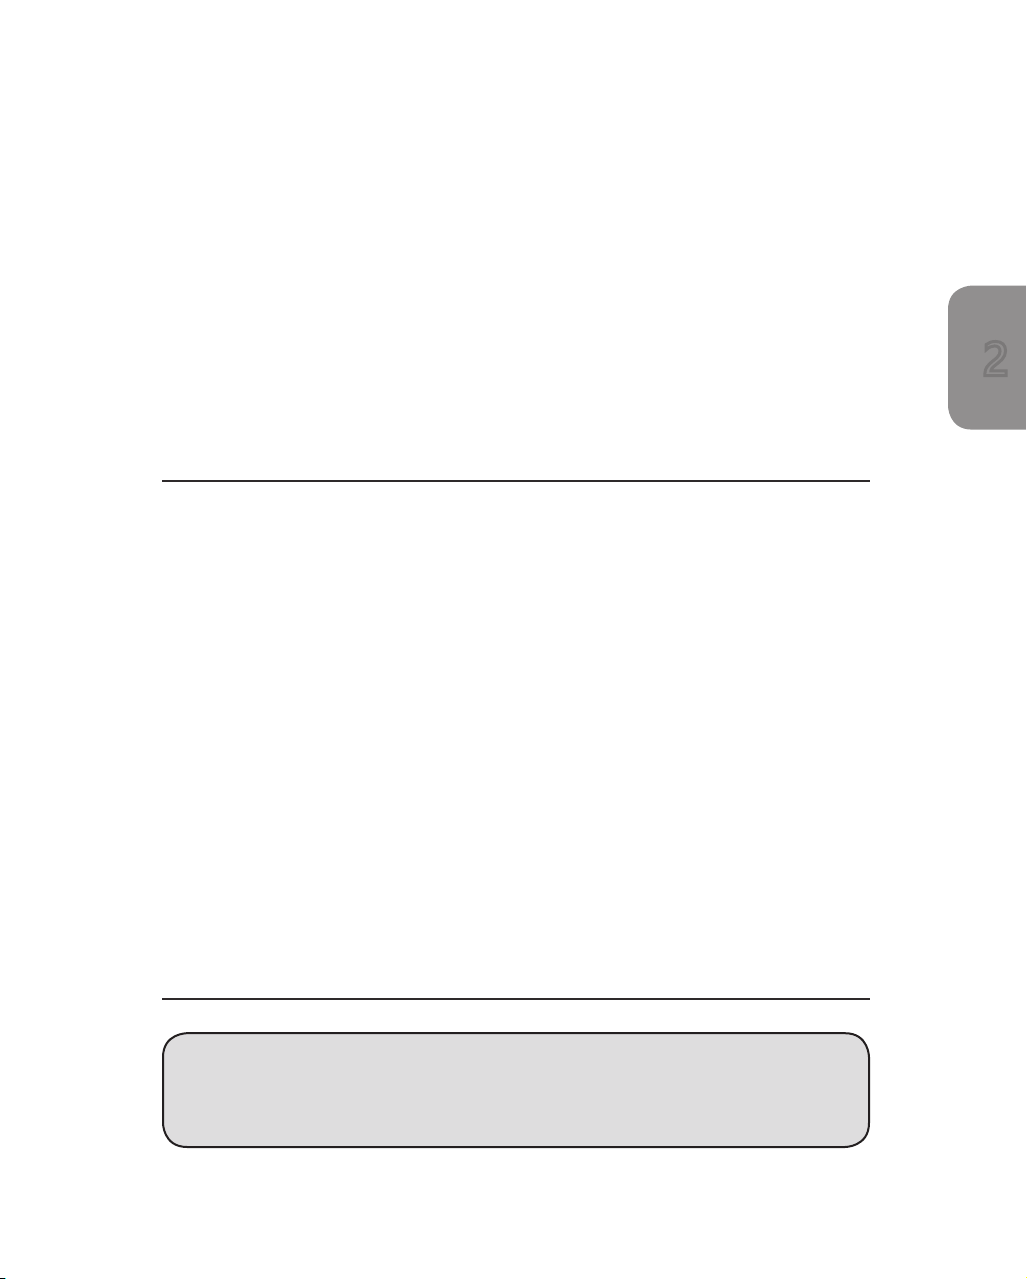
from the Replace tab of the Find And Replace dialog box.
A Replace operation can replace or delete text and objects, modify formatting, and apply styles
To locate and replace text
1. Display the Replace page of the Find and Replace dialog box by doing any of the following: ●
In the Navigation pane, click the Search for more things arrow at the right
end of the search box, and then click Replace. ●
On the Home tab, in the Editing group, click Replace. ● Press Ctrl+H. 54
Objective 2.1: Insert text and paragraphs
2. In the Find what box, specify the text or characters you want to locate by
entering them directly or by selecting them from the Special list.
See Also For information about the Special list content, including formatting marks,
breaks, wildcard characters, special characters, and objects, see “Objective 1.1: Navigate within documents.”
3. In the Search Options area, select the check boxes of any applicable search options. 2
Tip The settings in the Search Options area apply only to the search term. They do not affect the replacement term.
4. With the cursor in the Find what box, from the Format list, select any formatting
or styles that will specifically identify the correct search results.
5. In the Replace with box, enter the text or characters with which you want to replace the search term.
Tip You can’t specify wildcard characters in the Replace With box. You can specify special
characters. For example, you can use the Replace feature to remove blank paragraph marks
from a document by replacing ^p^p (two paragraph marks) with ^p (one paragraph mark).
6. With the cursor in the Replace with box, from the Format list, select any
formatting or styles that you want to apply as part of the replacement operation.
7. Click Find Next to find the first occurrence of the search term. Then do any of the following: ●
Click Find Next to find the next occurrence of the search term. ●
Click Replace to replace the selected occurrence with the text in the
Replace with box and move to the next occurrence. ●
Click Replace All to replace all occurrences of the search term in the
document without individually reviewing them.
Tip You can quickly review all instances of a search term by searching from the Navigation
pane and then scrolling through the search results on the Results page of the Navigation pane. 55
Objective group 2 Insert and format text, paragraphs, and sections
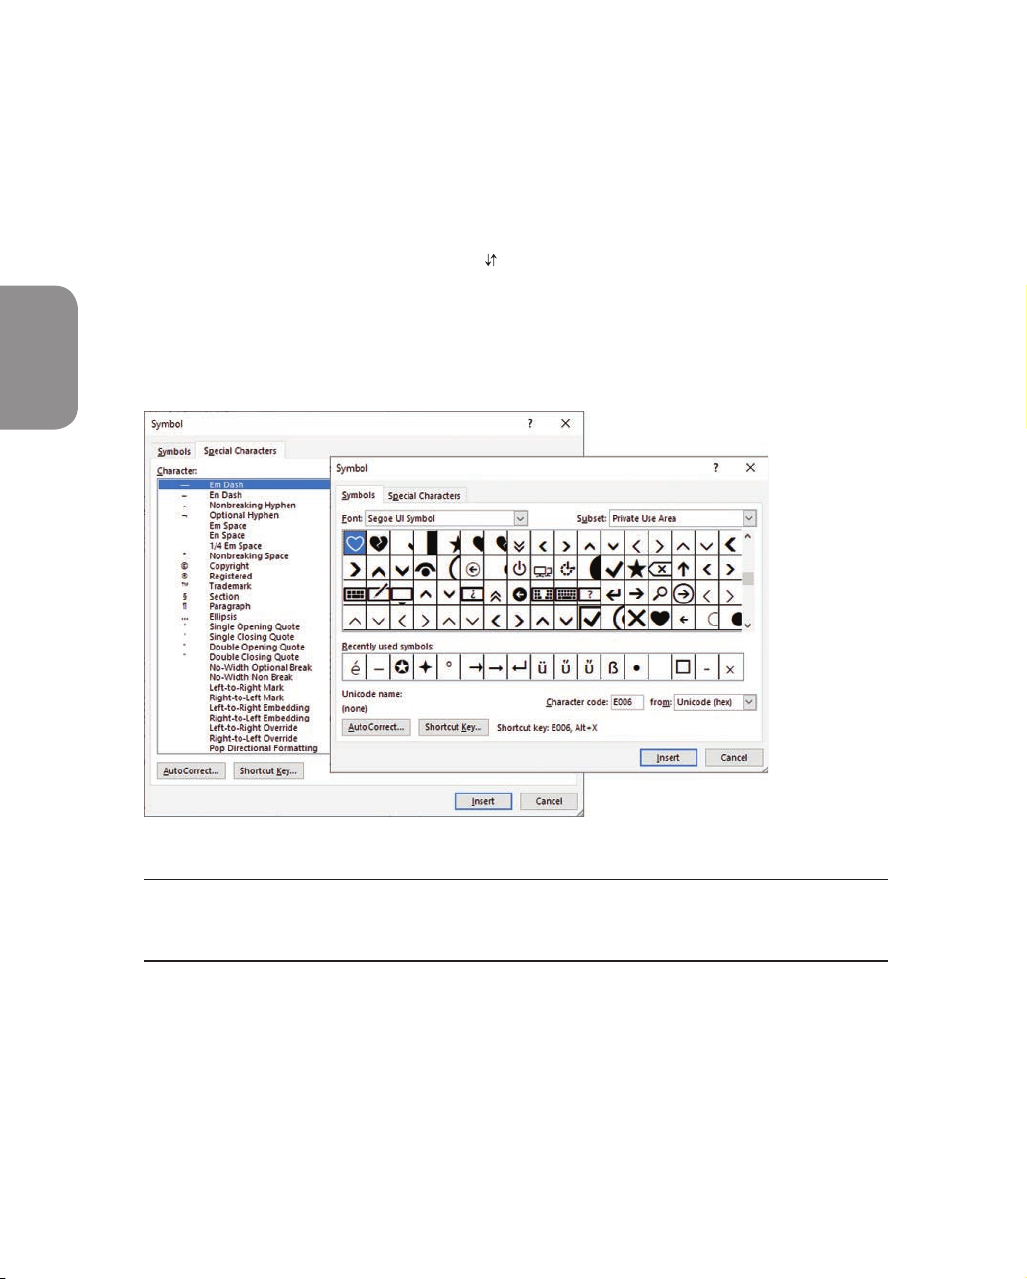
Insert symbols and special characters
Some documents require characters not found on a standard keyboard. These
characters might include the copyright (©) or registered trademark (®) symbols,
currency symbols (such as € or £), Greek letters, or letters with accent marks. Or you
might want to add arrows (such as ↺ or ) or graphic icons (such as or ). Word
gives you easy access to a huge array of symbols that you can easily insert into any
document. Like graphics, symbols can add visual information or eye appeal to a
document. However, they are different from graphics in that they are keyboard
characters displayed in specific fonts.
Hundreds of shapes, symbols, and icons, and special characters are available from the Symbol dialog box
Tip You can insert some common symbols by using keyboard shortcuts. You can review
the assigned keyboard shortcuts in the Symbol dialog box and the AutoCorrect Options dialog box. 56
Objective 2.1: Insert text and paragraphs
To insert a common symbol
➜ On the Insert tab, in the Symbols group, click the Symbol button, and then
click the symbol you want to insert.
➜ Enter any of the following keyboard shortcuts: ●
To insert a copyright symbol, enter (c) or press Alt+Ctrl+C. ●
To insert a Euro symbol, enter (e). ●
To insert a registered trademark symbol, enter (r) or press Alt+Ctrl+R. 2 ●
To insert a trademark symbol, enter (tm) or press Alt+Ctrl+T.
Tip If you turn off the Replace Text As You Type option in the AutoCorrect settings, the paren-
thetical code will not convert to the symbol.
To insert any symbol or special character
1. On the Insert tab, in the Symbols group, click the Symbol button, and then click More Symbols.
2. In the Symbol dialog box, do either of the following: ●
On the Special Characters tab, double-click the character you want to insert. ●
On the Symbols tab, locate and double-click the symbol you want to insert.
Tip The dialog box might be positioned in front of the cursor.
3. After you insert all the symbols you want, close the Symbol dialog box. 57
Objective group 2 Insert and format text, paragraphs, and sections
Objective 2.1 practice tasks
The practice file for these tasks is in the MOSWord2019\Objective2 practice
file folder. The folder also contains a result file that you can use to check your work.
➤ Open the Word_2-1 document and do the following:
❑ In the first paragraph, insert the registered trademark symbol (®)
after the word Microsoft.
❑ Replace all instances of (trademark) in the document with the
trademark symbol (™). Ensure that you replace only instances in
which the word trademark is in parentheses, and no other version of the word.
Tip Enter the trademark symbol in the document, cut it to the Clipboard, and
then choose Clipboard Contents as the replacement.
➤ Save the Word_2-1 document. Open the Word_2-1_results
document and compare the two documents to check your work. Then close the open documents. 58
Tài liệu liên quan:
-

Ung dung game hoa trong cac chien dich MKT
20 10 -
Bao cao Chi so TMDT Viet Nam 2025
22 11 -
Thông tư quy định về việc phân quyền, phân cấp và phân định thẩm quyền quản lý nhà nước về giáo dục cho chính quyền địa phương
25 13 -
Nghị quyết về phát huy các giá trị di sản văn hóa gắn với phát triên du lịch bền vững tỉnh Khánh Hòa đến năm 2025, định hướng đến năm 2030
18 9 -
Quyết định phê duyệt Chiến lược phát triển du lịch Việt Nam đến năm 2030
14 7