Bài giảng về toán học lớp 12 - Chương 1 Đại số và giải tích
scsac
Môn: Quản trị tài chính doanh nghiệp 319 tài liệu
Trường: Trường Đại học Kinh Tế Quốc Dân 8.8 K tài liệu
Tác giả:


Preview text:
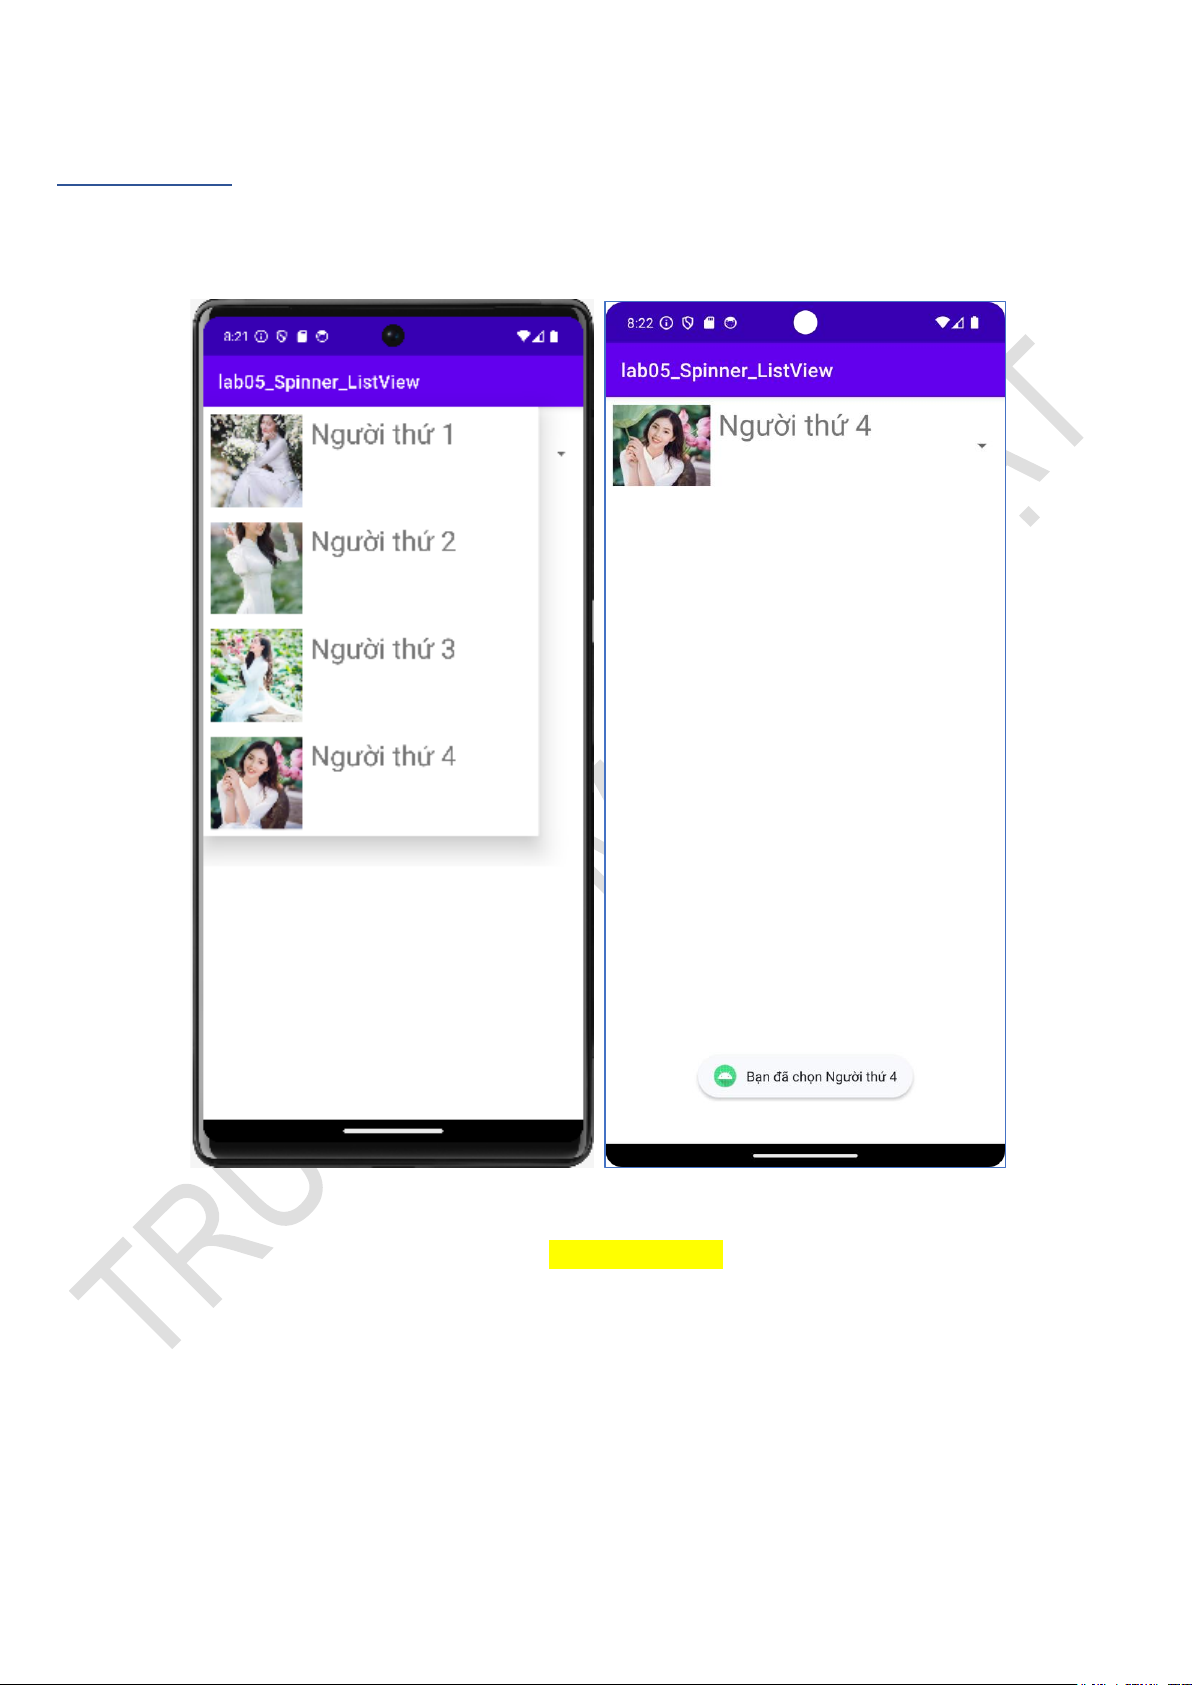
DANH SÁCH ĐỘNG TRONG ANDROID Bài 1. Spinner. Yêu cầu.
Sử dụng Spinner xây dựng giao diện theo mẫu:
Khi load giao diện Khi click chọn item
Khi click chọn 1 Item thì có thông báo “Bạn đã chọn …..”. Hướng dẫn: Nguyên tắc chung: - Tạo layout chứa Spinner
- Tạo layout tùy chỉnh các thành phần sẽ có trong Spinner
- Tạo danh sách sẽ đưa vào Spinner
- Sử dụng Adapter để đưa các thành phần từ danh sách vào Spinner.
- Xây dựng các xử lý khác.
Các bước thực hiện 1. Tạo Project.
Chuẩn bị ảnh và thực hiện import vào project.
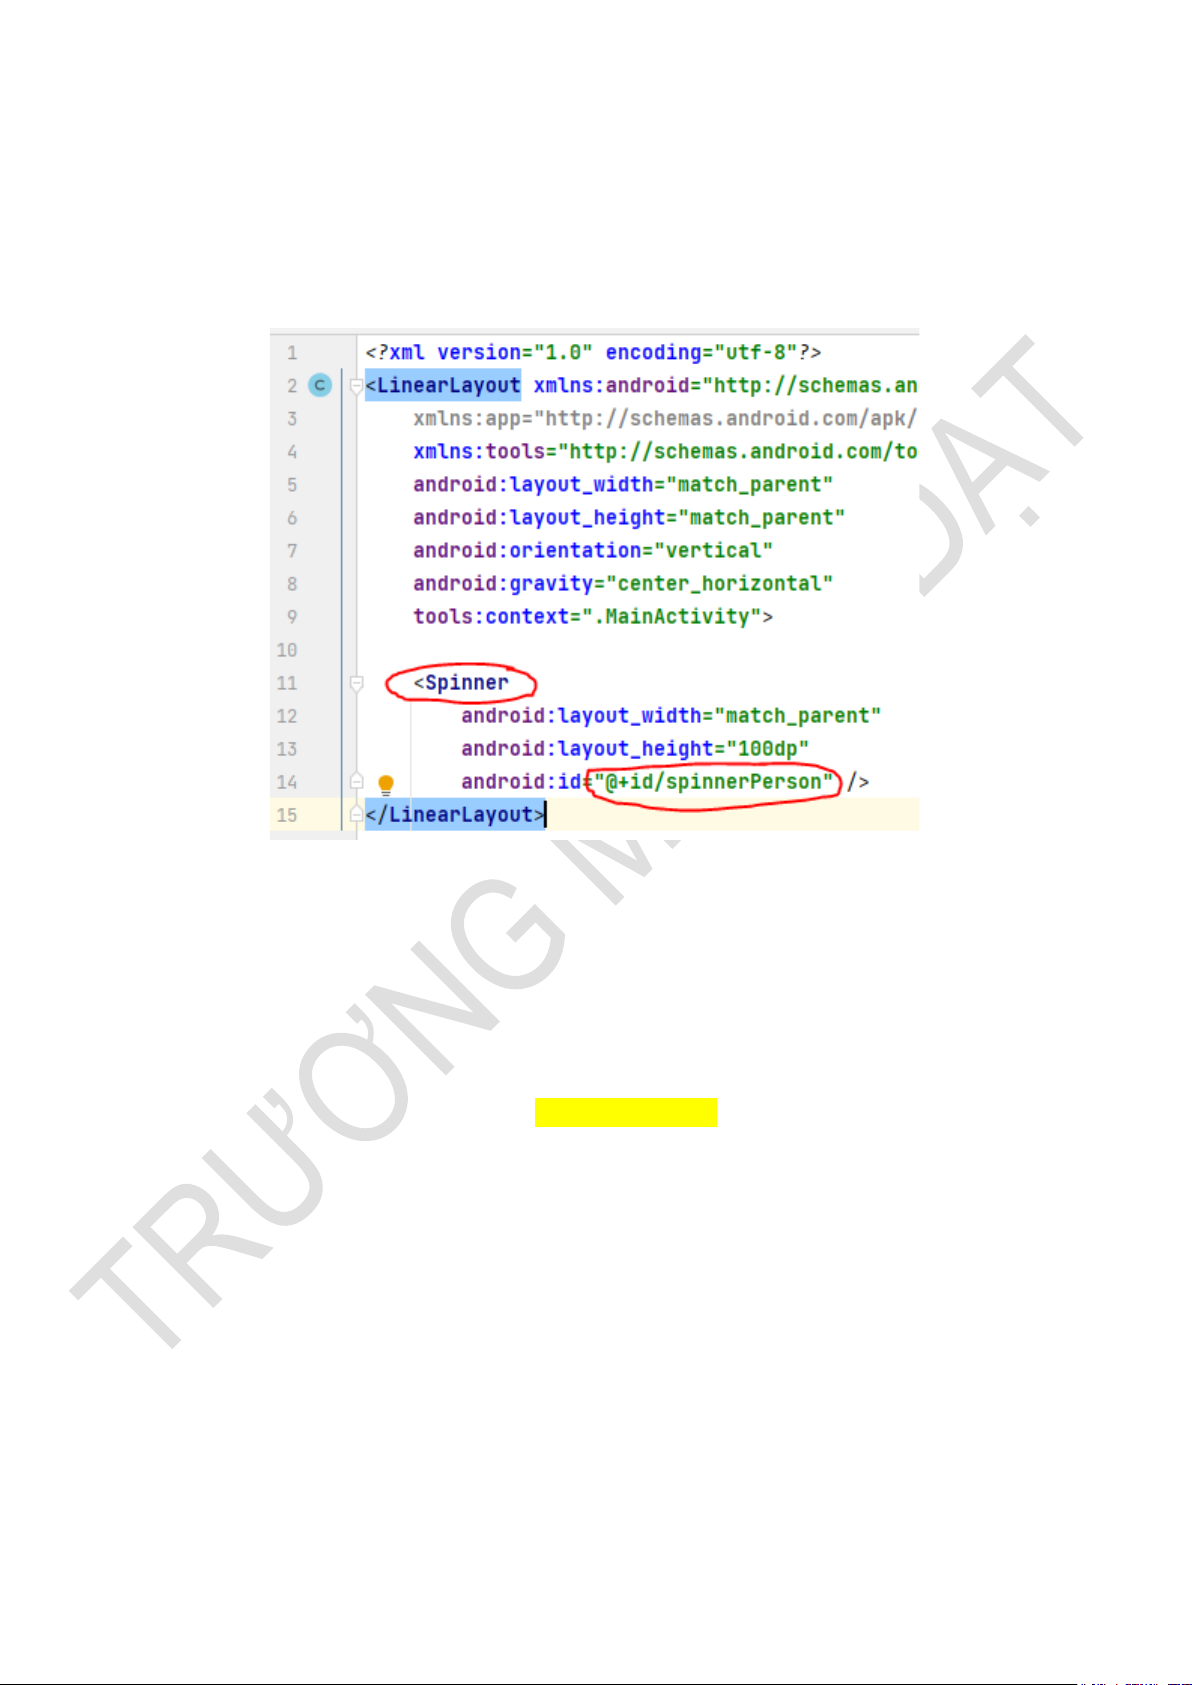
2. Xây dựng layout có chứa spinner, giả sử đặt Spinner trong activity_main.xml:
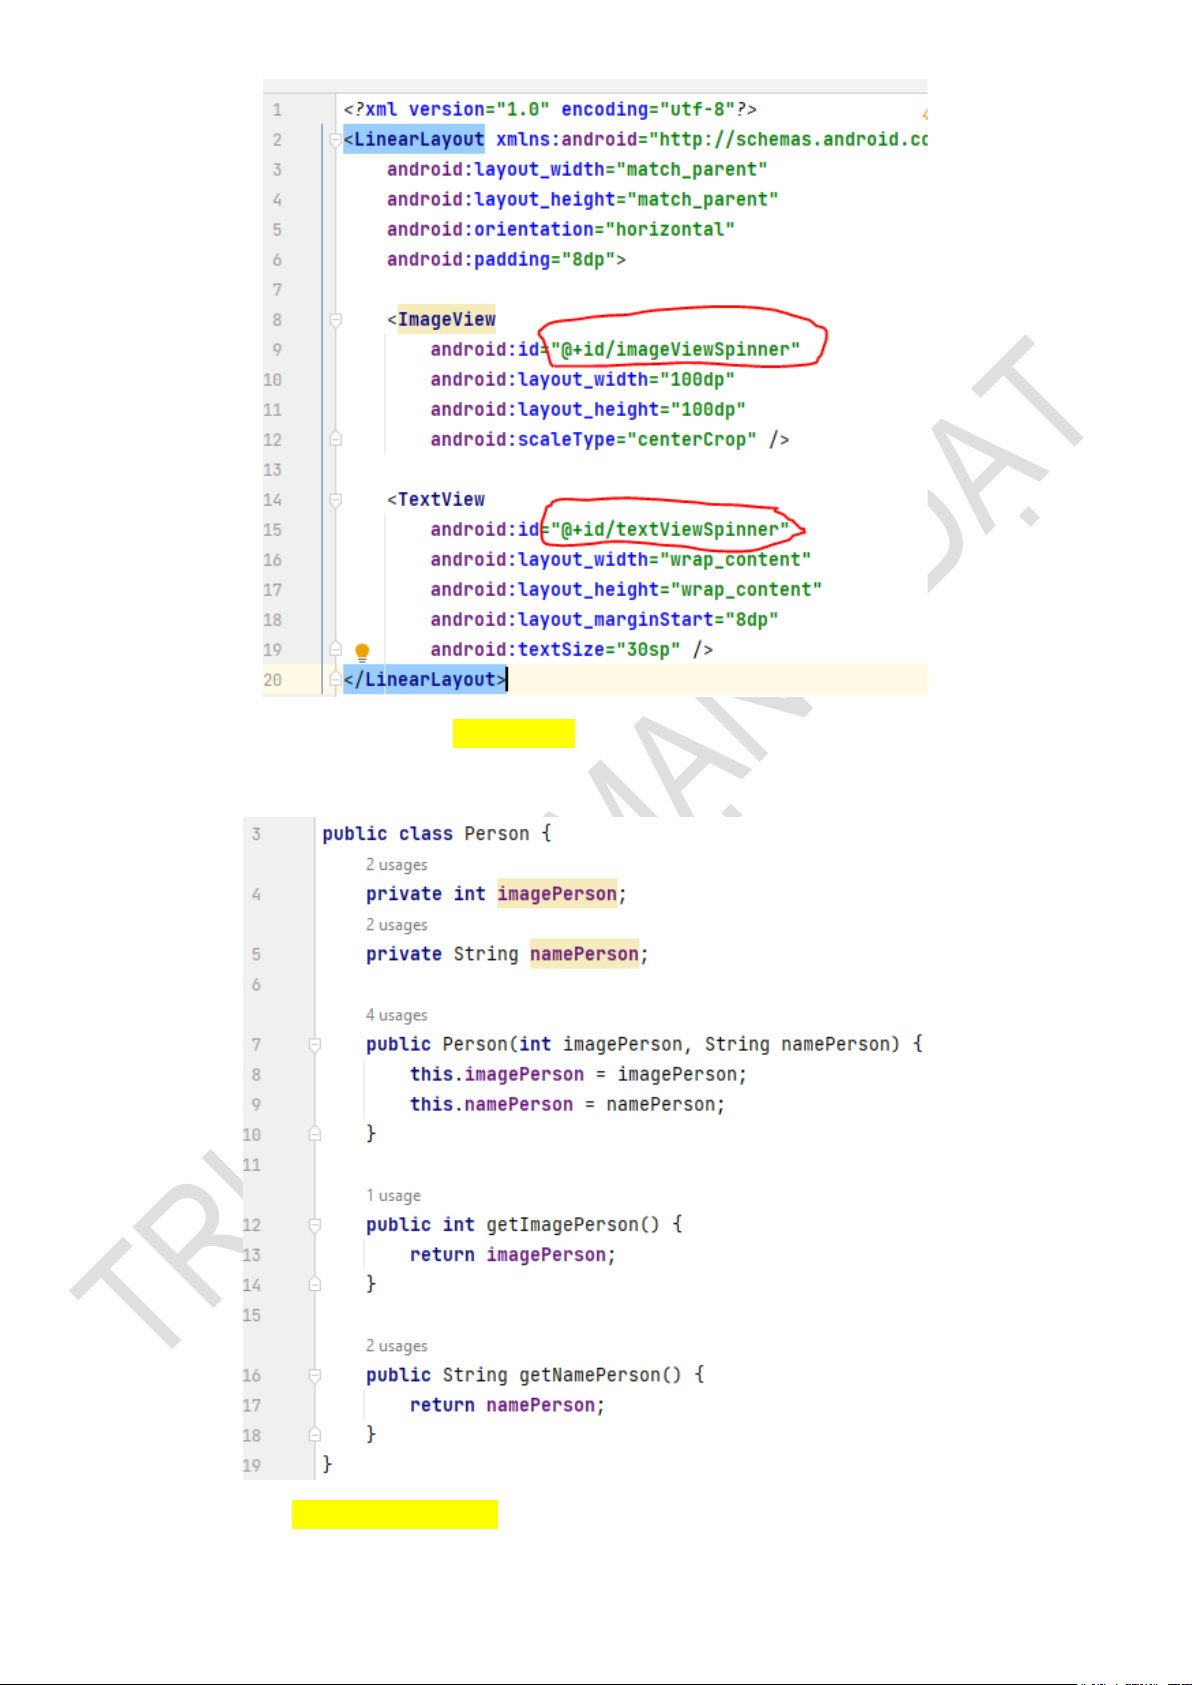
3. Tạo layout tùy chỉnh các thành phần có trong Spinner.
Trong Spinner cần hiển thị Ảnh và Tên người đi kèm nên layout tùy chỉnh của Spinner cũng cần chứa 2 thành phần này: - ImageView: Chứa ảnh
- TextView: Chứa text hiển thị tên người tương ứng.
Giả sử đặt tên layout tùy chỉnh này là spinner_item.xml:
4. Xây dựng đối tượng Person (Class Person.java)
Đối tượng Person có 2 thuộc tính là ảnh và tên:
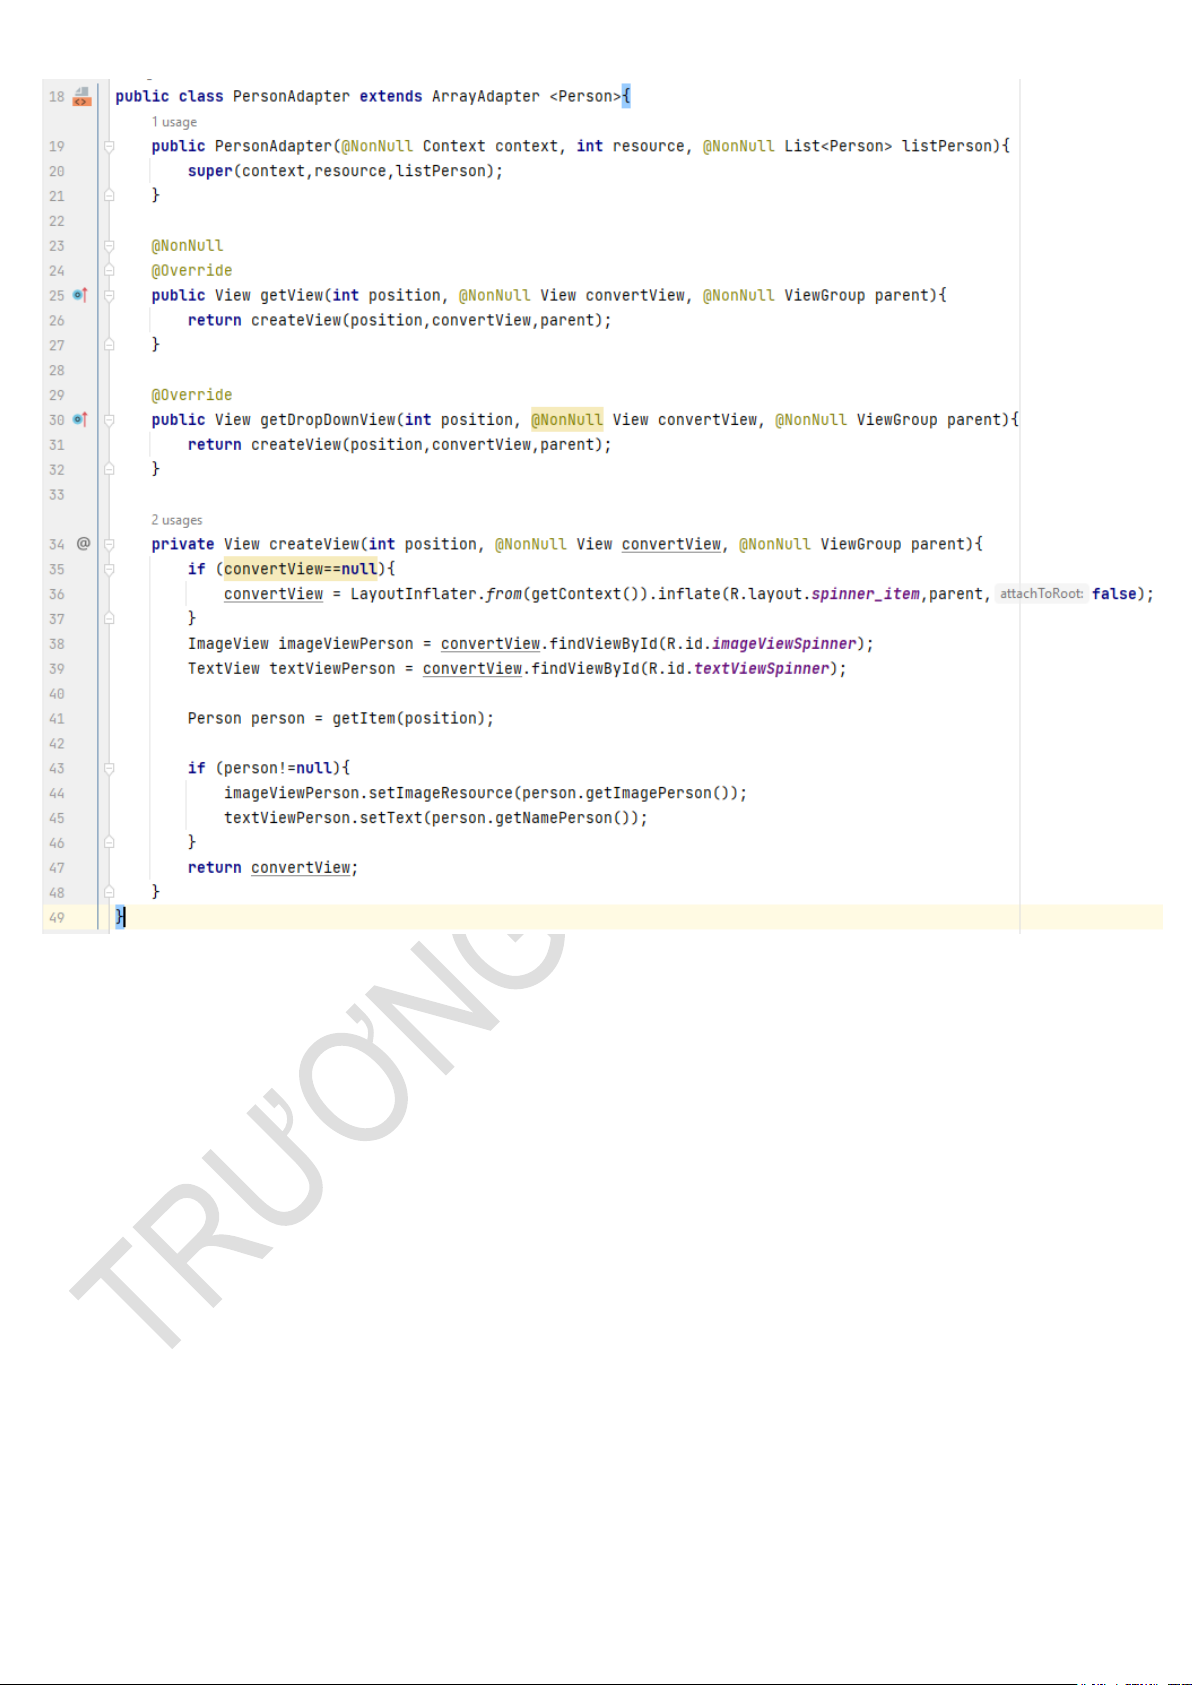
5. Xây dựng Adapter (PersonAdapter.java)
Adapter là một thành phần quan trọng trong Android để kết nối dữ liệu và giao diện người
dùng. Adapter đóng vai trò chuyển đổi dữ liệu thành các View mà hệ thống có thể hiển thị. Trong
trường hợp này, PersonAdapter là một custom Adapter dùng để kết nối dữ liệu từ một danh sách các
đối tượng Person với giao diện của một Spinner.
Các thành phần trong Adapter (Ví dụ PersonAdapter):
a. Constructor (PersonAdapter):
Constructor của Adapter được gọi khi bạn tạo một đối tượng PersonAdapter. Nó nhận ba tham số:
- context: Đối tượng Context liên quan đến hoạt động của ứng dụng.
- resource: ID của layout được sử dụng cho mỗi item trong Spinner.
- listPerson: Danh sách các đối tượng Person mà Adapter sẽ hiển thị.
b. getView() và getDropDownView():
- Hai phương thức này được gọi khi cần hiển thị một item trong Spinner (trong trạng thái
collapsed) hoặc khi mở rộng Spinner để chọn một item.
- Cả hai đều gọi đến createView() để tạo và trả về View cho từng item. c. createView() Method:
- createView() là phương thức riêng tư (private) được tạo ra để giảm sự lặp lại khi tạo View cho từng item.
- Nếu convertView là null, nó được inflate (Trong Android, "inflate" thường đề cập đến quá
trình chuyển đổi một tệp XML (thường là một tệp layout hoặc menu) thành các đối tượng Java tương
ứng. Việc inflate giúp bạn xây dựng và cấu hình các thành phần giao diện người dùng (UI) từ định
dạng XML.) từ layout spinner_item.
- Sau đó, nó lấy ra các thành phần con của View (ImageView và TextView) và thiết lập giá trị
từ đối tượng Person tại vị trí được chỉ định.
- Cuối cùng, nó trả về convertView, là View đã được tạo hoặc tái sử dụng, để hiển thị cho mỗi item trong Spinner.
d. Sử dụng LayoutInflater:
- LayoutInflater.from(getContext()) được sử dụng để tạo một đối tượng LayoutInflater từ
Context, giúp bạn inflate layout từ tệp tin XML.
e. Lấy và Thiết Lập Dữ Liệu (person.getImagePerson() và person.getNamePerson()):
- getItem(position) được sử dụng để lấy đối tượng Person tại vị trí position trong danh sách.
- Sau đó, thông qua person.getImagePerson() và person.getNamePerson(), hình ảnh và tên
của người được thiết lập cho ImageView và TextView tương ứng.
Trong ngữ cảnh của Spinner, Adapter giúp hiển thị danh sách Person theo cách bạn đã thiết kế
trong layout spinner_item, và mỗi item trong Spinner sẽ là một đối tượng Person.
6. Xây dựng lớp xử lý chính (MainActivity.java)
public class MainActivity extends AppCompatActivity {
private Spinner spinnerPerson; @Override
protected void onCreate(Bundle savedInstanceState) {
super.onCreate(savedInstanceState);
setContentView(R.layout.activity_main);
spinnerPerson = findViewById(R.id.spinnerPerson);
//Tạo danh sách Person, listPerson tạo ra được truyền vào Spinner thông qua PersonAdapter
List listPerson = new ArrayList<>();
listPerson.add(new Person(R.drawable._1,"Người thứ 1"));
listPerson.add(new Person(R.drawable._2,"Người thứ 2"));
listPerson.add(new Person(R.drawable._3,"Người thứ 3"));
listPerson.add(new Person(R.drawable._4,"Người thứ 4")); //Tạo Adapter
PersonAdapter personAdapter = new
PersonAdapter(this,R.layout.spinner_item,listPerson); Tên ảnh và tên người
//Set Adapter cho Spinner
spinnerPerson.setAdapter(personAdapter);
//Xử lý sự kiện trong Spinner
spinnerPerson.setOnItemSelectedListener(new AdapterView.OnItemSelectedListener() { @Override
public void onItemSelected(AdapterView<?> parent, View view, int position, long id) {
//Thực hiện các hành động khi chọn item
Person selectedPerson = personAdapter.getItem(position);
if(selectedPerson!=null){
//Hiển thị thông báo tên người đã chọn
String selectedName = selectedPerson.getNamePerson();
Toast.makeText(MainActivity.this, "Bạn đã chọn "+selectedName,
Toast.LENGTH_SHORT).show(); } } @Override
public void onNothingSelected(AdapterView<?> parent) {
//Không có hành động nào khi không chọn item } }); } }
Thực thi ứng dụng và kiểm tra kết quả. Bài 2. ListView
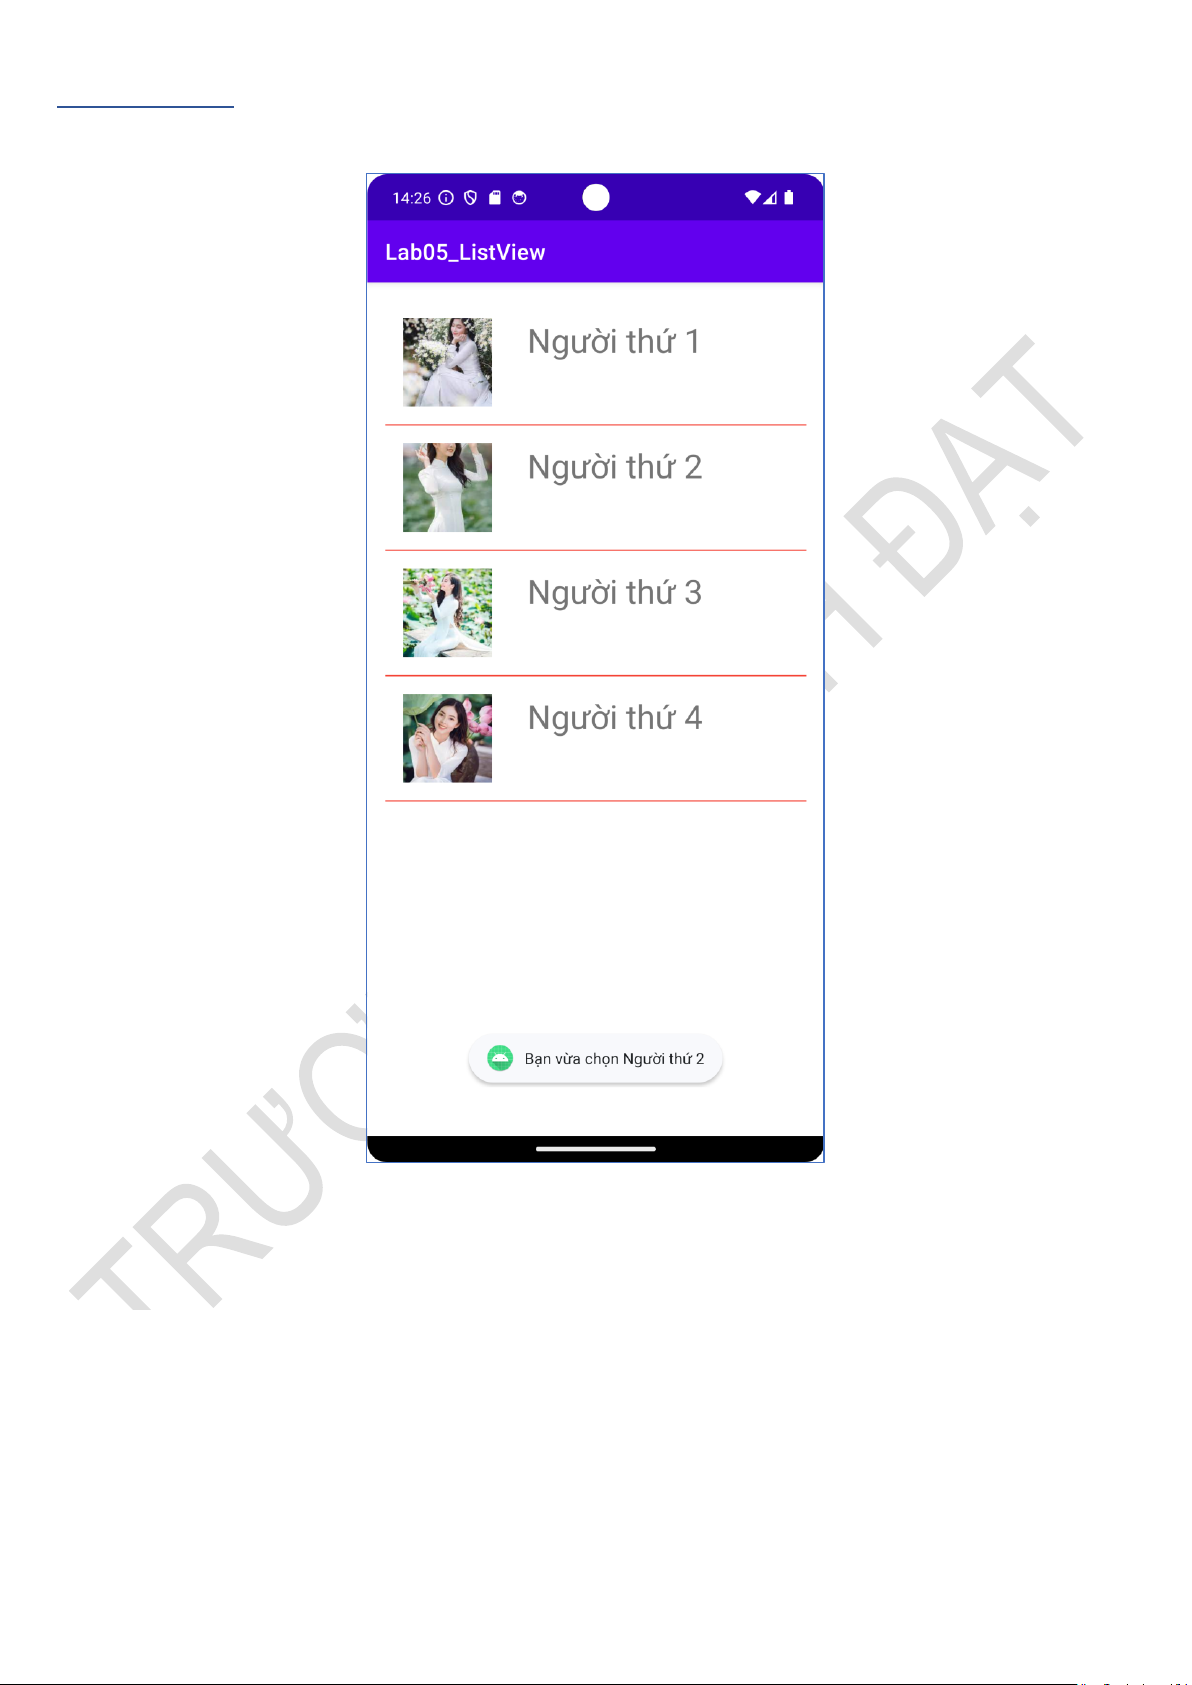
Yêu cầu: Sử dụng ListView để tạo ứng dụng hiển thị danh sách theo mẫu:
ListView hiển thị danh sách các item gồm ảnh và tên người, khi click vào người nào thì có thông
báo hiển thị “Bạn vừa chọn Tên người”
Hướng dẫn: Cách tạo và xử lý Listview hoàn toàn tương tự Spinner Trang trí ListView:
android:divider="#F44336" - Màu của đường kẻ phân chia các item
android:dividerHeight="1dp" – Chiều cao của đường kẻ phân chia các item. Bài 3. RecycleView.
Trình tự sử dụng RecyclerView trong Android
1. Thêm thư viện RecyclerView vào build.gradle (Module: app)
2. Tạo layout chứa RecyclerView (ví dụ: activity_main.xml)
3. Tạo layout item cho từng dòng hiển thị (ví dụ: item_user.xml)
4. Tạo lớp Model (đối tượng dữ liệu) 5. Tạo Adapter
− Tạo ViewHolder bên trong Adapter − Inflate layout item
− Bind dữ liệu vào View
6. Chuẩn bị dữ liệu (ArrayList, List…) trong Activity/Fragment
7. Khởi tạo RecyclerView trong Activity/Fragment − findViewById
− setLayoutManager() (Linear, Grid, Staggered…) − setAdapter()
8. (Tuỳ chọn) Xử lý sự kiện click item
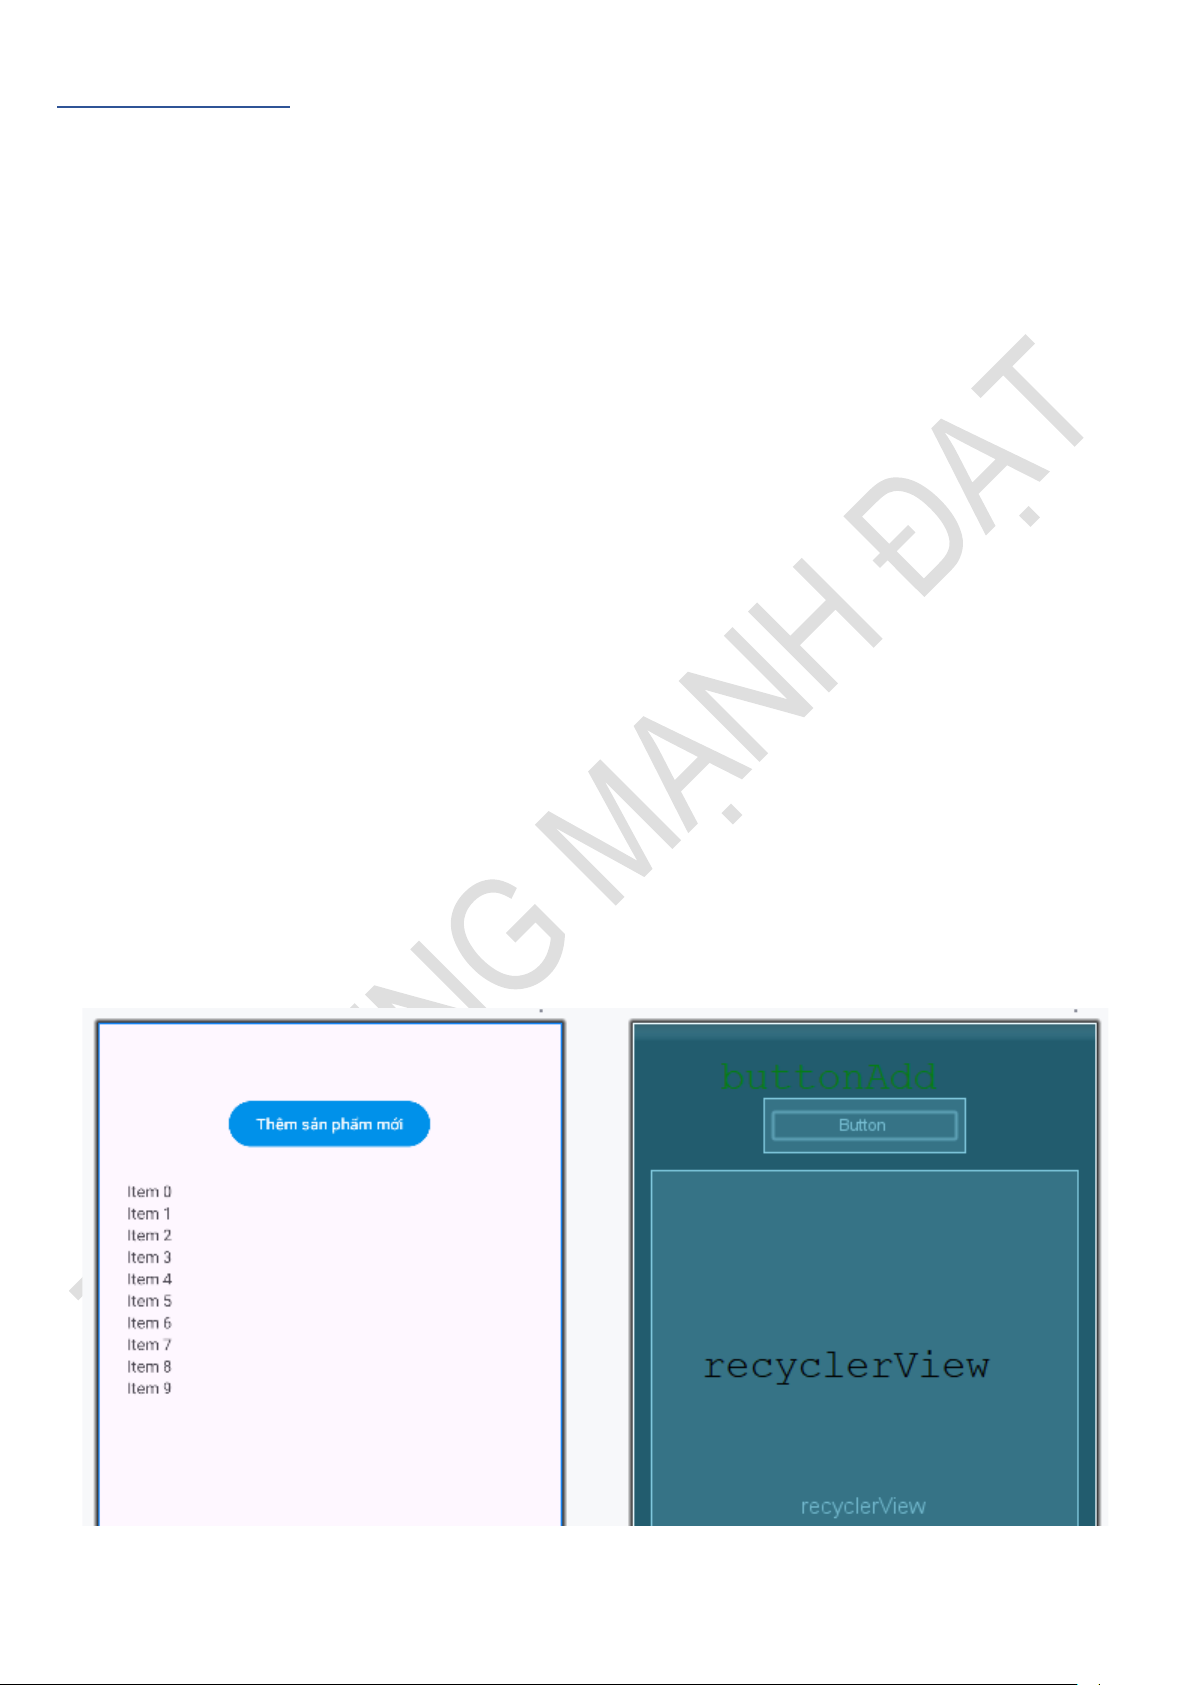
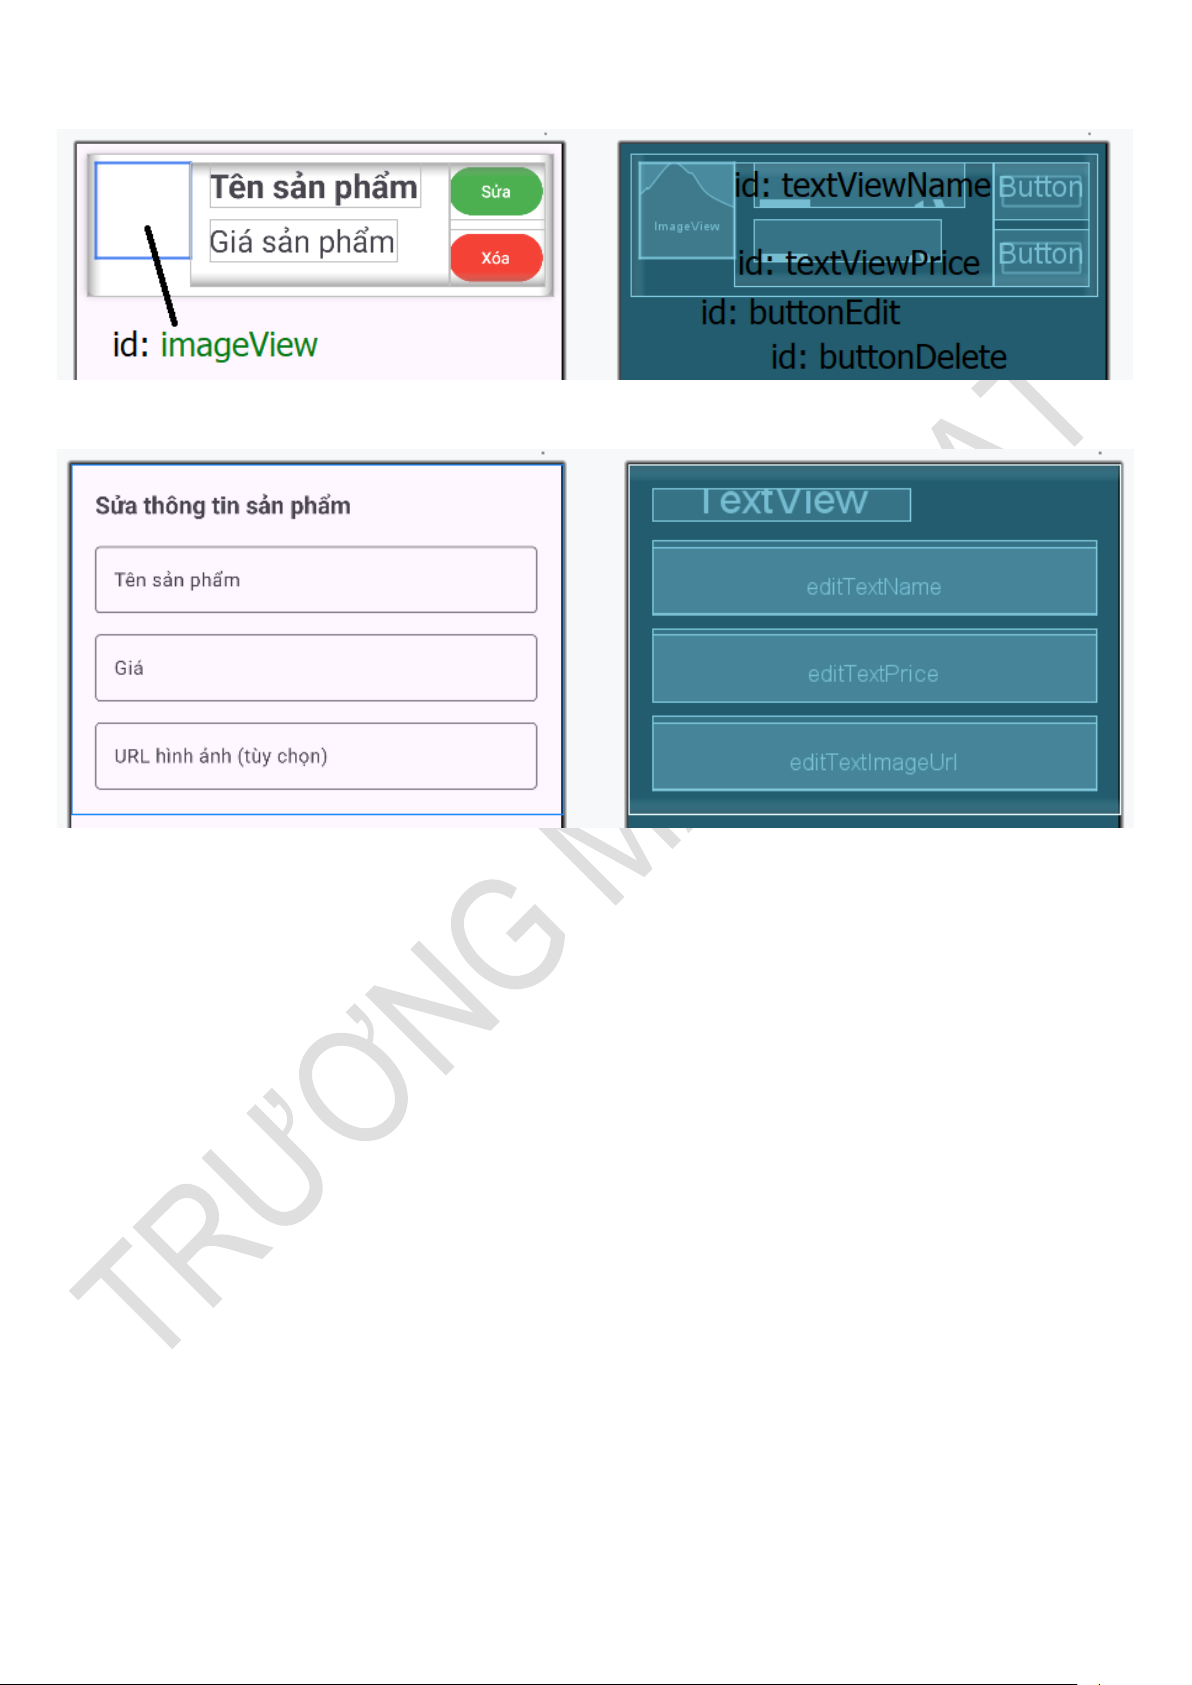
9. (Tuỳ chọn) Thêm Divider / Animation / Decoration Thực hiện. - activity_main.xml. - item_product.xml: - dialog_edit_product.xml: - Product.java: public class Product { private String name; private double price; private String imageUrl;
public Product(String name, double price, String imageUrl) { this.name = name; this.price = price; this.imageUrl = imageUrl; } public String getName() { return name; }
public void setName(String name) { this.name = name; } public double getPrice() { return price; }
public void setPrice(double price) { this.price = price; }
public String getImageUrl() { return imageUrl; }
public void setImageUrl(String imageUrl) { this.imageUrl = imageUrl; } } - ProductAdapter.java
public class ProductAdapter extends RecyclerView.Adapter { private List productList; private Context context;
public ProductAdapter(Context context, List productList) { this.context = context;
this.productList = productList; } @NonNull @Override
public ViewHolder onCreateViewHolder(@NonNull ViewGroup parent, int viewType) {
View view = LayoutInflater.from(parent.getContext()).inflate(R.layout.item_product, parent, false); return new ViewHolder(view); } @Override
public void onBindViewHolder(@NonNull ViewHolder holder, int position) {
Product product = productList.get(position);
holder.textViewName.setText(product.getName());
holder.textViewPrice.setText("$" + product.getPrice()); // Load image dùng Glide
Glide.with(context).load(product.getImageUrl()).into(holder.imageView); // Xử lý click item
holder.itemView.setOnClickListener(v -> {
Toast.makeText(context, "Sản phẩm: " + product.getName() + " - Giá: $" + product.getPrice(), Toast.LENGTH_SHORT).show(); }); // Xử lý nút Sửa
holder.buttonEdit.setOnClickListener(v -> {
showEditDialog(product, position); }); // Xử lý nút Xóa
holder.buttonDelete.setOnClickListener(v -> {
showDeleteConfirmDialog(product, position); }); } @Override public int getItemCount() { return productList.size(); } // Thêm item mới động
public void addProduct(Product product) { productList.add(product);
notifyItemInserted(productList.size() - 1); }
// Hiển thị dialog cho cả thêm mới và sửa sản phẩm
public void showProductDialog(Product product, int position, boolean isEdit) {
AlertDialog.Builder builder = new AlertDialog.Builder(context);
View dialogView = LayoutInflater.from(context).inflate(R.layout.dialog_edit_product, null); builder.setView(dialogView);
// Tìm các view trong dialog
TextView dialogTitle = dialogView.findViewById(R.id.dialogTitle);
TextInputEditText editTextName = dialogView.findViewById(R.id.editTextName);
TextInputEditText editTextPrice = dialogView.findViewById(R.id.editTextPrice);
TextInputEditText editTextImageUrl = dialogView.findViewById(R.id.editTextImageUrl);
// Thiết lập tiêu đề và dữ liệu if (isEdit) {
dialogTitle.setText("Sửa thông tin sản phẩm");
editTextName.setText(product.getName());
editTextPrice.setText(String.valueOf(product.getPrice()));
editTextImageUrl.setText(product.getImageUrl()); } else {
dialogTitle.setText("Thêm sản phẩm mới");
// Để trống các trường }
builder.setPositiveButton(isEdit ? "Lưu" : "Thêm", (dialog, which) -> {
String newName = editTextName.getText().toString().trim();
String newPriceStr = editTextPrice.getText().toString().trim();
String newImageUrl = editTextImageUrl.getText().toString().trim(); // Validate
if (newName.isEmpty() || newPriceStr.isEmpty()) {
Toast.makeText(context, "Vui lòng nhập đầy đủ thông tin!", Toast.LENGTH_SHORT).show(); return; } try {
double newPrice = Double.parseDouble(newPriceStr); if (isEdit) { // Cập nhật sản phẩm product.setName(newName); product.setPrice(newPrice);
product.setImageUrl(newImageUrl.isEmpty() ? "https://via.placeholder.com/150" : newImageUrl); notifyItemChanged(position);
Toast.makeText(context, "Đã cập nhật sản phẩm!", Toast.LENGTH_SHORT).show(); } else { // Thêm sản phẩm mới
Product newProduct = new Product( newName, newPrice,
newImageUrl.isEmpty() ? "https://via.placeholder.com/150" : newImageUrl ); addProduct(newProduct);
Toast.makeText(context, "Đã thêm sản phẩm mới!", Toast.LENGTH_SHORT).show(); }
} catch (NumberFormatException e) {
Toast.makeText(context, "Giá không hợp lệ!", Toast.LENGTH_SHORT).show(); } });
builder.setNegativeButton("Hủy", (dialog, which) -> dialog.dismiss());
AlertDialog dialog = builder.create(); dialog.show(); }
// Hiển thị dialog sửa sản phẩm
private void showEditDialog(Product product, int position) {
showProductDialog(product, position, true); }
// Hiển thị dialog xác nhận xóa
private void showDeleteConfirmDialog(Product product, int position) {
AlertDialog.Builder builder = new AlertDialog.Builder(context);
builder.setTitle("Xác nhận xóa");
builder.setMessage("Bạn có chắc chắn muốn xóa sản phẩm \"" + product.getName() + "\" không?");
builder.setPositiveButton("Xóa", (dialog, which) -> {
productList.remove(position); notifyItemRemoved(position);
notifyItemRangeChanged(position, productList.size());
Toast.makeText(context, "Đã xóa sản phẩm!", Toast.LENGTH_SHORT).show(); });
builder.setNegativeButton("Hủy", (dialog, which) -> dialog.dismiss());
AlertDialog dialog = builder.create(); dialog.show(); }
public static class ViewHolder extends RecyclerView.ViewHolder { ImageView imageView; TextView textViewName; TextView textViewPrice; Button buttonEdit; Button buttonDelete;
public ViewHolder(@NonNull View itemView) { super(itemView);
imageView = itemView.findViewById(R.id.imageView);
textViewName = itemView.findViewById(R.id.textViewName);
textViewPrice = itemView.findViewById(R.id.textViewPrice);
buttonEdit = itemView.findViewById(R.id.buttonEdit);
buttonDelete = itemView.findViewById(R.id.buttonDelete); } } } - MainActivity.java
public class MainActivity extends AppCompatActivity {
private RecyclerView recyclerView;
private ProductAdapter adapter; private List productList; @Override
protected void onCreate(Bundle savedInstanceState) {
super.onCreate(savedInstanceState); EdgeToEdge.enable(this);
setContentView(R.layout.activity_main);
ViewCompat.setOnApplyWindowInsetsListener(findViewById(R.id.main), (v, insets) -> {
Insets systemBars = insets.getInsets(WindowInsetsCompat.Type.systemBars());
v.setPadding(systemBars.left, systemBars.top, systemBars.right, systemBars.bottom); return insets; });
recyclerView = findViewById(R.id.recyclerView);
Button buttonAdd = findViewById(R.id.buttonAdd);
// Dữ liệu hardcode giả lập
productList = new ArrayList<>();
productList.add(new Product("Sản phẩm 1", 10.99, "https://via.placeholder.com/150/FF5722/FFFFFF?text=SP1"));
productList.add(new Product("Sản phẩm 2", 20.49, "https://via.placeholder.com/150/4CAF50/FFFFFF?text=SP2"));
productList.add(new Product("Sản phẩm 3", 15.00, "https://via.placeholder.com/150/2196F3/FFFFFF?text=SP3")); // Setup RecyclerView
adapter = new ProductAdapter(this, productList);
recyclerView.setLayoutManager(new LinearLayoutManager(this));
recyclerView.setAdapter(adapter);
// Thêm item mới khi click button - sử dụng dialog
buttonAdd.setOnClickListener(v -> {
// Gọi dialog thêm mới (isEdit = false)
adapter.showProductDialog(null, -1, false); }); } } Bài 4. ViewPager2.
Sử dụng ViewPager2 tạo ứng dụng hiển thị 3 layout. - activity_main.xml.
Layout chính đóng vai trò là Container chứa ViewPager2:
<?xml version="1.0" encoding="utf-8"?>
xmlns:android="http://schemas.android.com/apk/res/android"
xmlns:app="http://schemas.android.com/apk/res-auto"
xmlns:tools="http://schemas.android.com/tools" android:id="@+id/main"
android:layout_width="match_parent"
android:layout_height="match_parent"
tools:context=".MainActivity"> android:id="@+id/viewPager"
android:layout_width="match_parent"
android:layout_height="match_parent"
app:layout_constraintTop_toTopOf="parent"
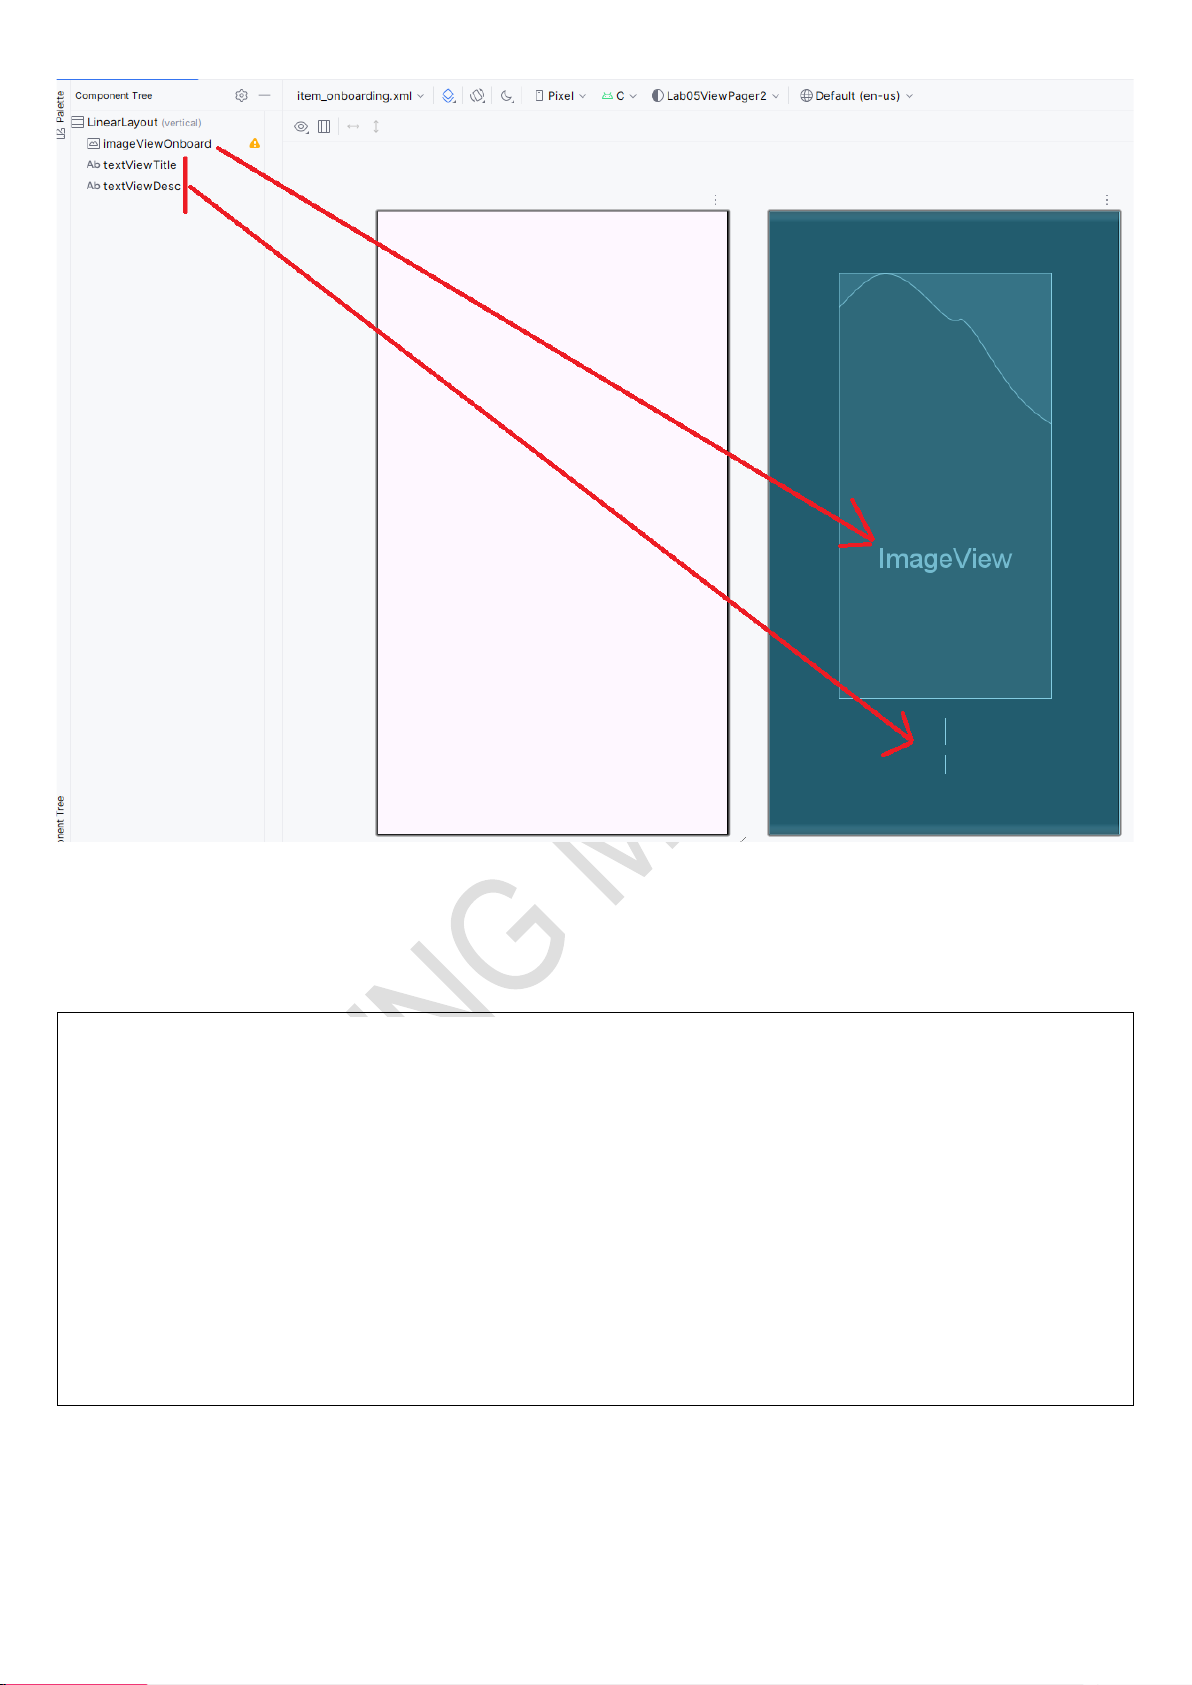
app:layout_constraintBottom_toBottomOf="parent"/> - item_onboarding.xml
Layout chứa các thành phần sẽ hiển thị bởi ViewPager2 - OnboardingItem.java
Lớp đối tượng trên Onboarding. public class OnboardingItem { int image; String title; String description;
public OnboardingItem(int image, String title, String description) { this.image = image; this.title = title;
this.description = description; } }
- OnboardingAdapter.java Đóng vai trò là Adapter
public class OnboardingAdapter extends RecyclerView.Adapter { List items;
public OnboardingAdapter(List items) { this.items = items; } @NonNull @Override
public ViewHolder onCreateViewHolder(@NonNull ViewGroup parent, int viewType) {
View view = LayoutInflater.from(parent.getContext())
.inflate(R.layout.item_onboarding, parent, false); return new ViewHolder(view); } @Override
public void onBindViewHolder(@NonNull ViewHolder holder, int position) {
OnboardingItem item = items.get(position);
holder.imageViewOnboard.setImageResource(item.image);
holder.textViewTitle.setText(item.title);
holder.textViewDesc.setText(item.description); } @Override public int getItemCount() { return items.size(); }
static class ViewHolder extends RecyclerView.ViewHolder { ImageView imageViewOnboard;
TextView textViewTitle, textViewDesc;
public ViewHolder(@NonNull View itemView) { super(itemView);
imageViewOnboard = itemView.findViewById(R.id.imageViewOnboard);
textViewTitle = itemView.findViewById(R.id.textViewTitle);
textViewDesc = itemView.findViewById(R.id.textViewDesc); } } }