Lab 8.3. Using shared viewmodel in android fragments codelab môn Phát triển ứng dụng đa nền tảng | Trường Đại học Bách Khoa Hà Nội
You have learned how to use activities, fragments, intents, data binding, navigation components, and the basics of architecture components. In this codelab, you will put everything together and work on an advanced sample, a cupcake ordering app. Tài liệu được sưu tầm gồm 59 trang, giúp các bạn ôn luyện và phục vụ cho việc học tập, đạt kết quả tốt. Mời các bạn đón xem!
Môn: Phát triển ứng dụng đa nền tảng 10 tài liệu
Trường: Đại học Bách Khoa Hà Nội 5.8 K tài liệu
Tác giả:


Preview text:
Shared ViewModel Across Fragments 1. Before you begin 2. Starter app overview
3. Complete the Navigation Graph 4. Create a shared ViewModel
5. Use the ViewModel to update the UI
6. Use ViewModel with data binding
7. Update pickup and summary fragment to use view model
8. Calculate price from order details
9. Setup click listeners using listener binding 10. Solution code 11. Summary 12. Learn more 1. Before you begin
You have learned how to use activities, fragments, intents, data binding, navigation components,
and the basics of architecture components. In this codelab, you will put everything together and
work on an advanced sample, a cupcake ordering app.
You will learn how to use a shared ViewModel to share data between the fragments of the same
activity and new concepts like LiveData transformations. Prerequisites •
Comfortable with reading and understanding Android layouts in XML •
Familiar with the basics of the Jetpack Navigation Component •
Able to create a navigation graph with fragment destinations in an app •
Have previously used fragments within an activity •
Can create a ViewModel to store app data •
Can use data binding with LiveData to keep the UI up-to-date with the app data in the ViewModel What you'll learn •
How to implement recommended app architecture practices within a more advanced use case •
How to use a shared ViewModel across fragments in an activity •
How to apply a LiveData transformation What you'll build
• A Cupcake app that displays an order flow for cupcakes, allowing the user to choose the
cupcake flavor, quantity, and pickup date. What you need •
A computer with Android Studio installed. •
Starter code for the Cupcake app.
2. Starter app overview Cupcake app overview
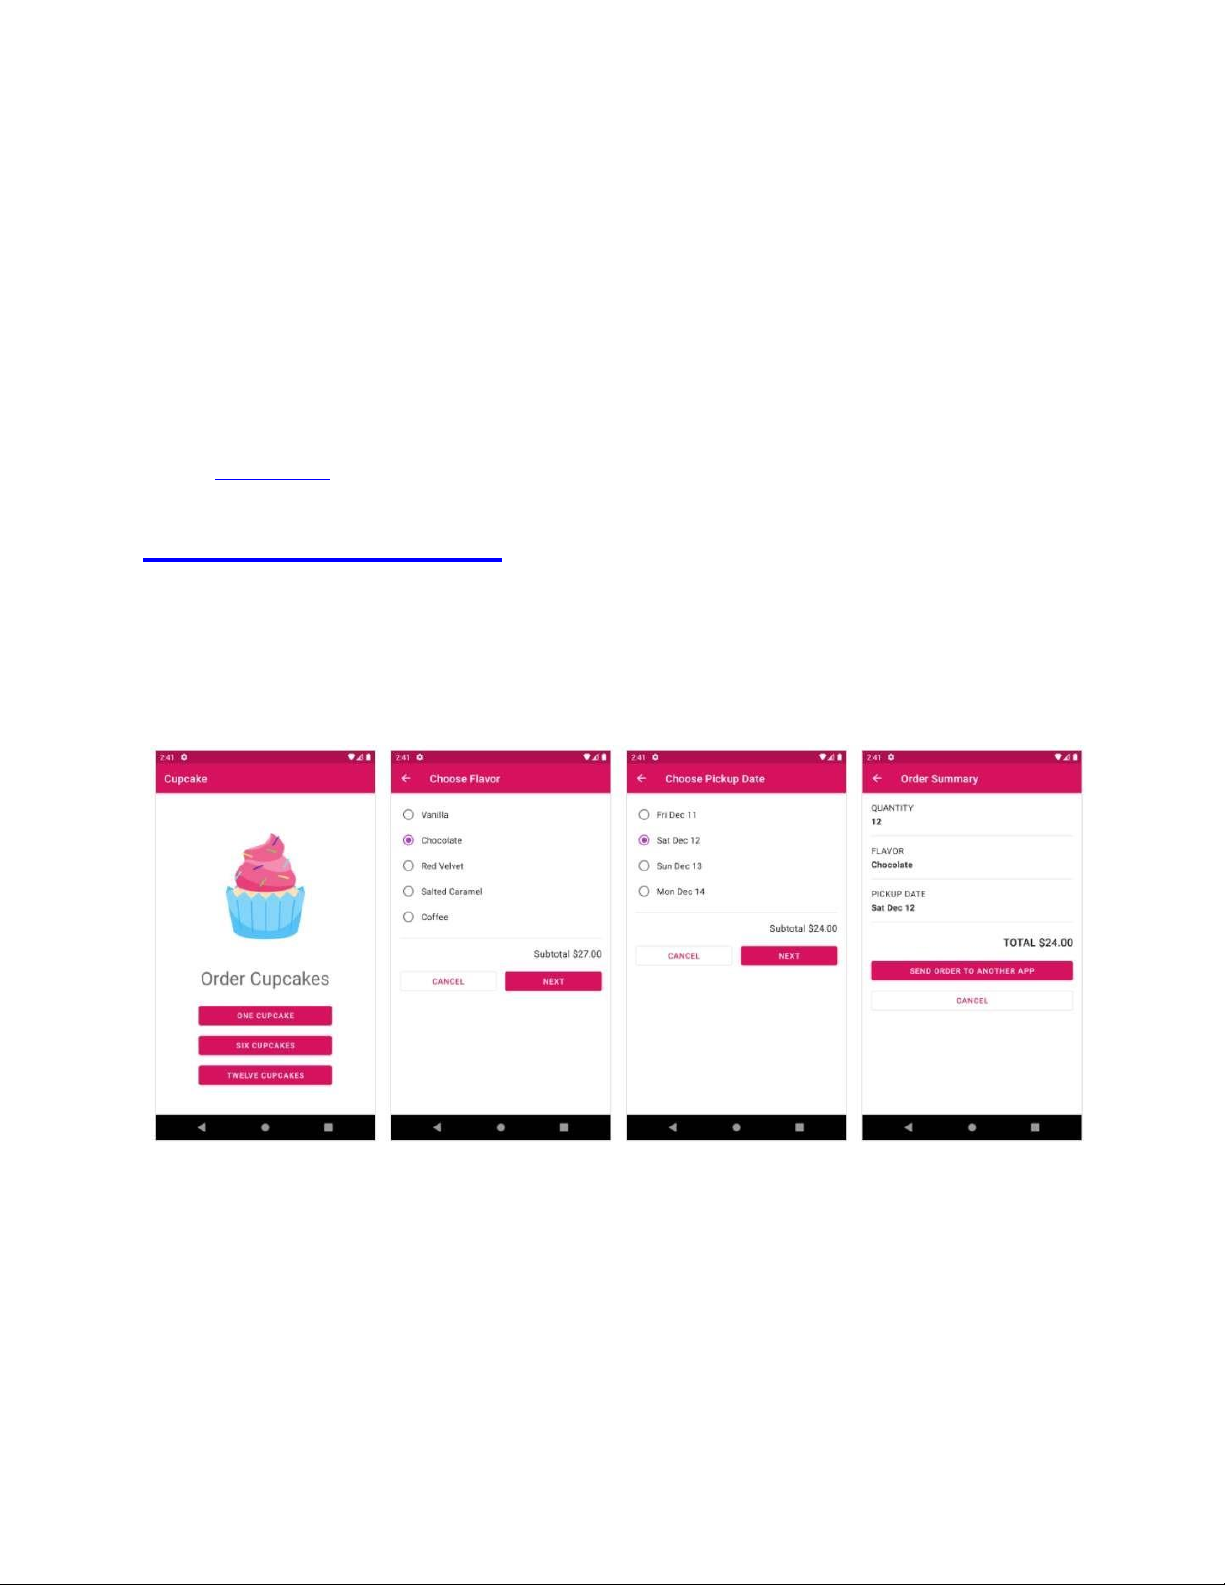
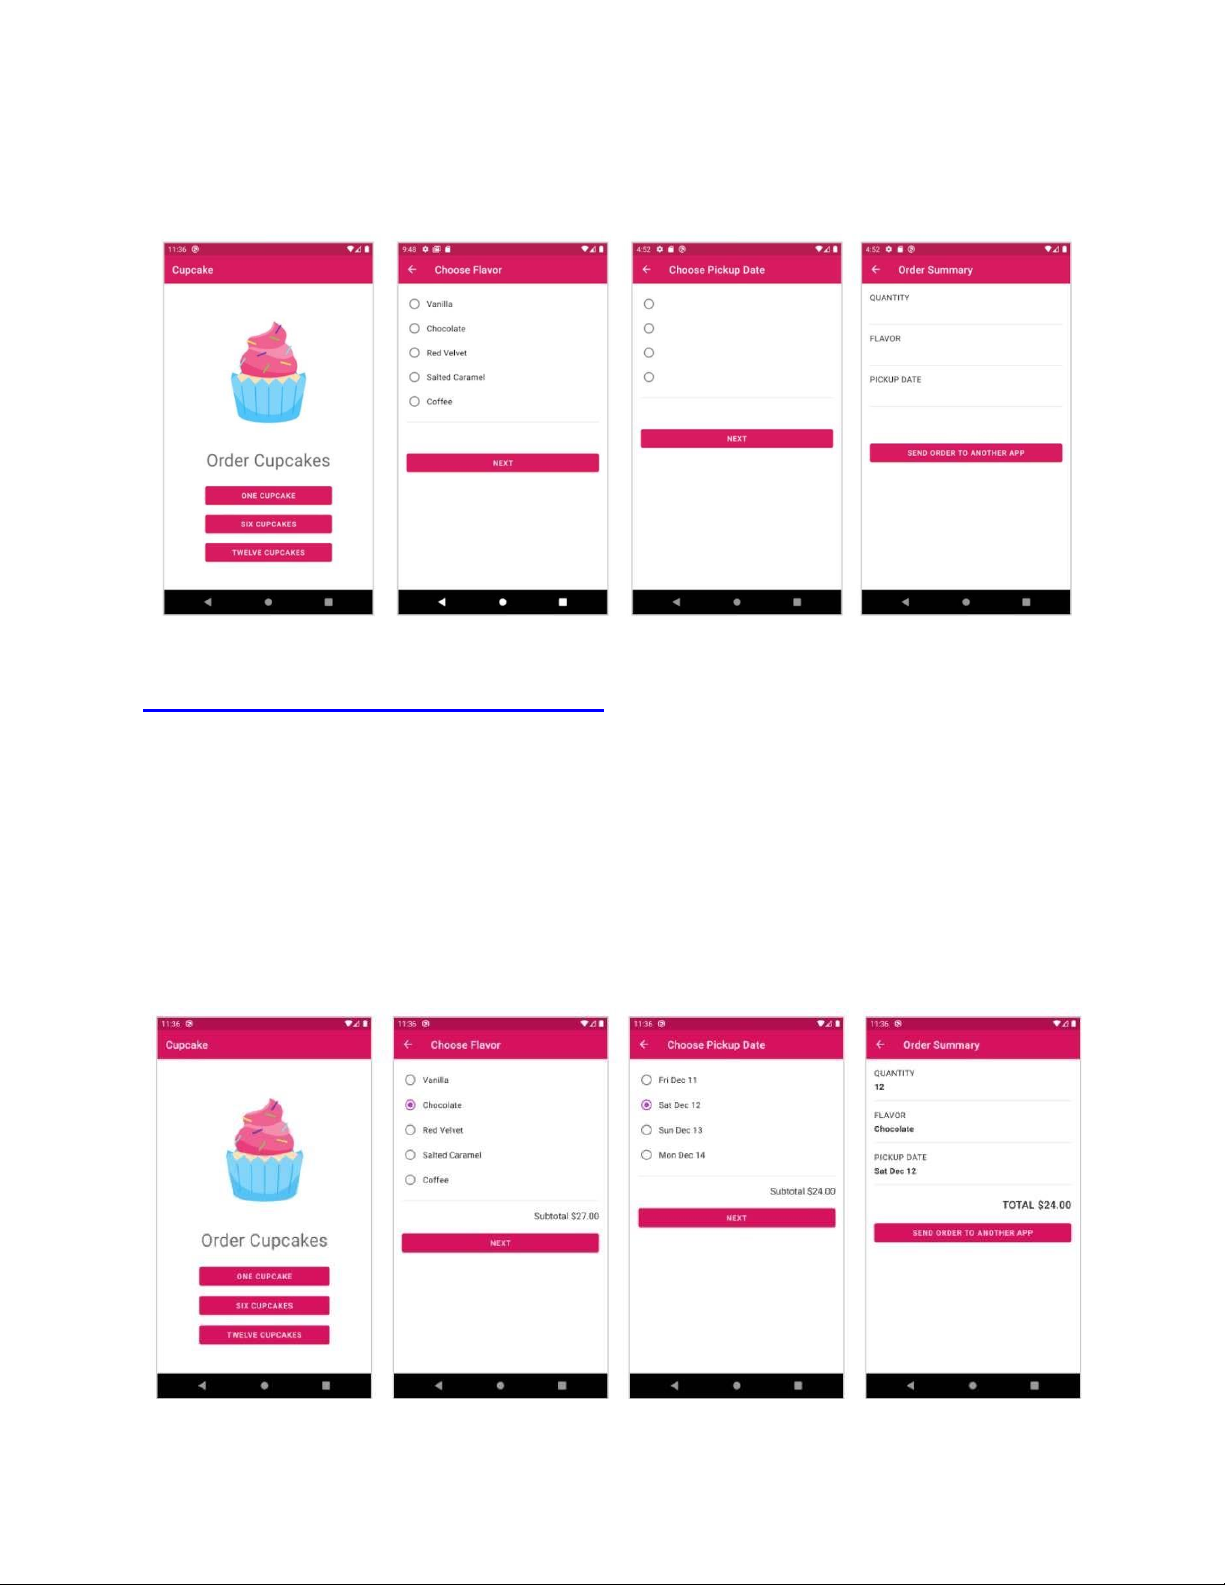
The cupcake app demonstrates how to design and implement an online ordering app. At the end
of this pathway, you will have completed the Cupcake app with the following screens. The user
can choose the quantity, flavor, and other options for the cupcake order.
Download the starter code for this codelab
This codelab provides starter code for you to extend with features taught in this codelab. The
starter code will contain code that is familiar to you from previous codelabs.
If you download the starter code from GitHub, note that the folder name of the project is
android-basics-kotlin-cupcake-app-starter. Select this folder when you open the project in Android Studio.
Starter Code URL: https://github.com/google-developer-training/android-basics-kotlincupcake- app/tree/starter
To get the code for this codelab and open it in Android Studio, do the following. Get the code
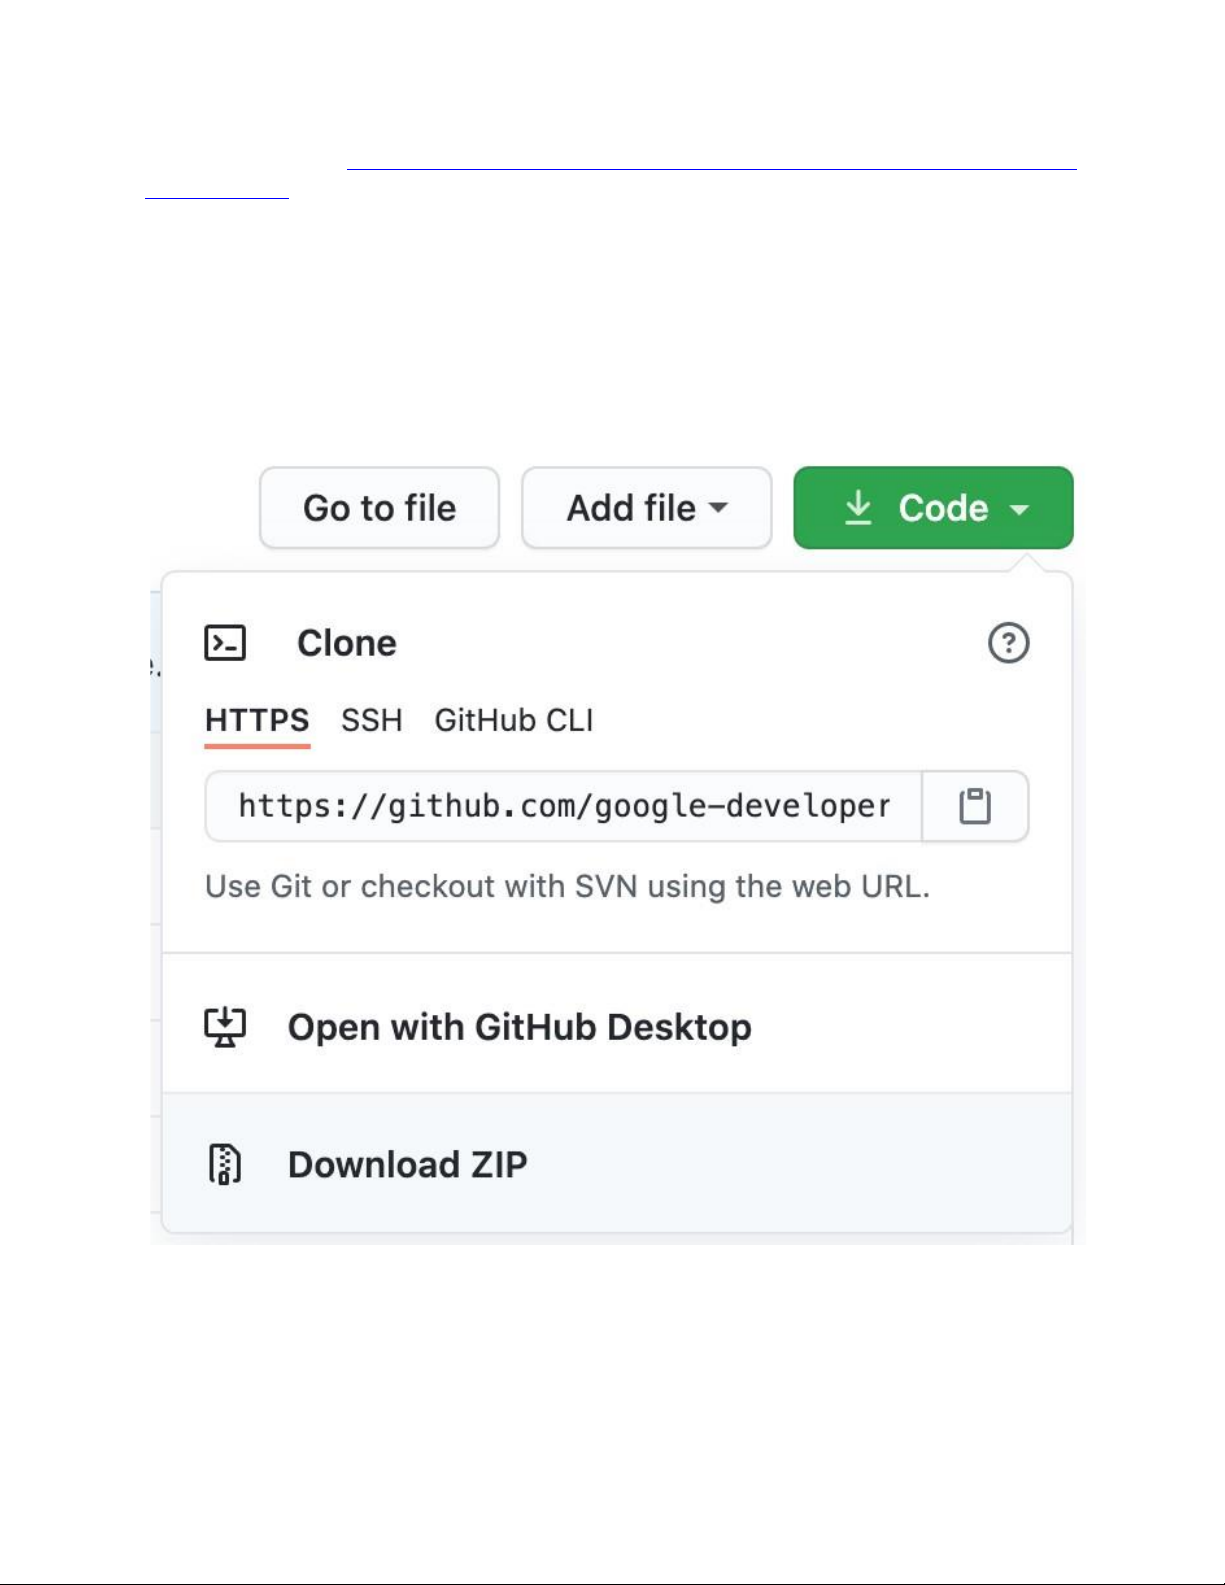
1. Click on the provided URL. This opens the GitHub page for the project in a browser.
2. On the GitHub page for the project, click the Code button, which brings up a dialog.
3. In the dialog, click the Download ZIP button to save the project to your computer. Wait for the download to complete.
4. Locate the file on your computer (likely in the Downloads folder).
5. Double-click the ZIP file to unpack it. This creates a new folder that contains the project files.
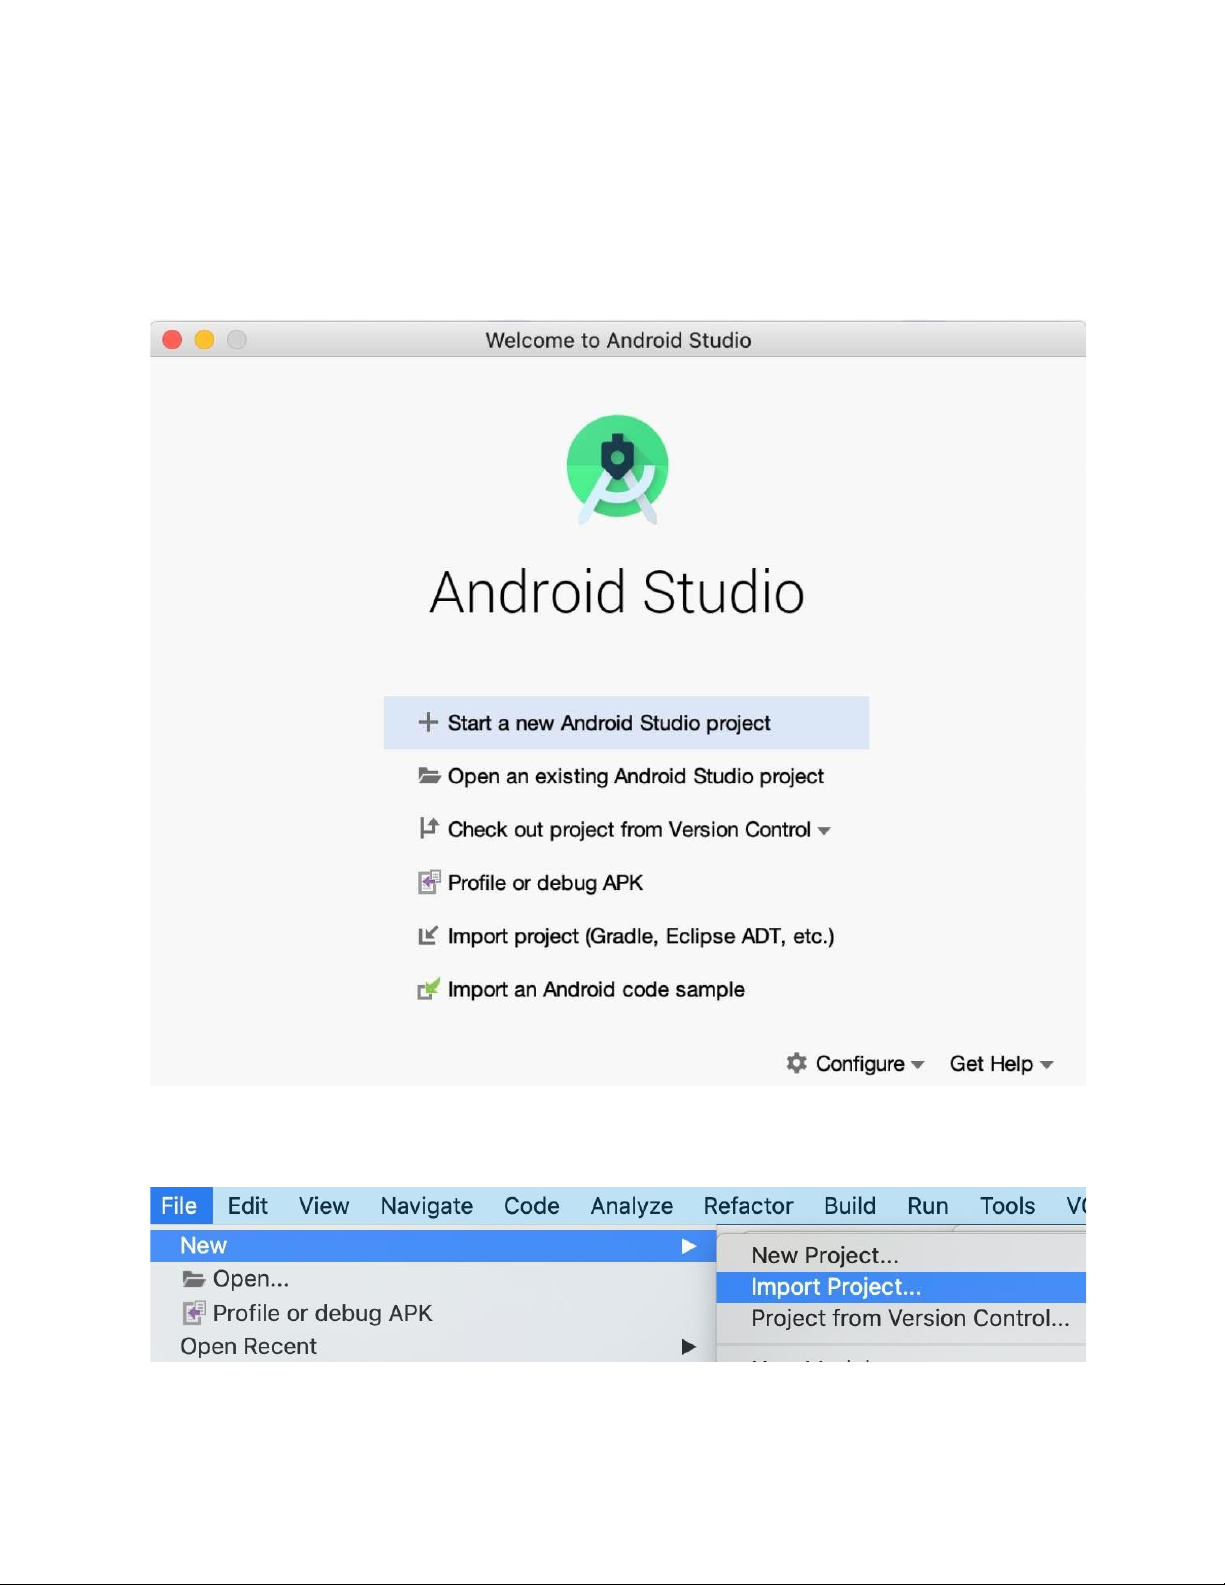
Open the project in Android Studio 1. Start Android Studio.
2. In the Welcome to Android Studio window, click Open an existing Android Studio project.
Note: If Android Studio is already open, instead, select the File > New > Import Project menu option.
3. In the Import Project dialog, navigate to where the unzipped project folder is located
(likely in your Downloads folder).
4. Double-click on that project folder.
5. Wait for Android Studio to open the project.
6. Click the Run button
to build and run the app. Make sure it builds as expected.
7. Browse the project files in the Project tool window to see how the app is set-up.
Starter code walk through
1. Open the downloaded project in Android Studio. The folder name of the project is
android-basics-kotlin-cupcake-app-starter. Then run the app.
2. Browse the files to understand the starter code. For layout files, you can use the Split
option in the top right corner to see a preview of the layout and the XML at the same time.
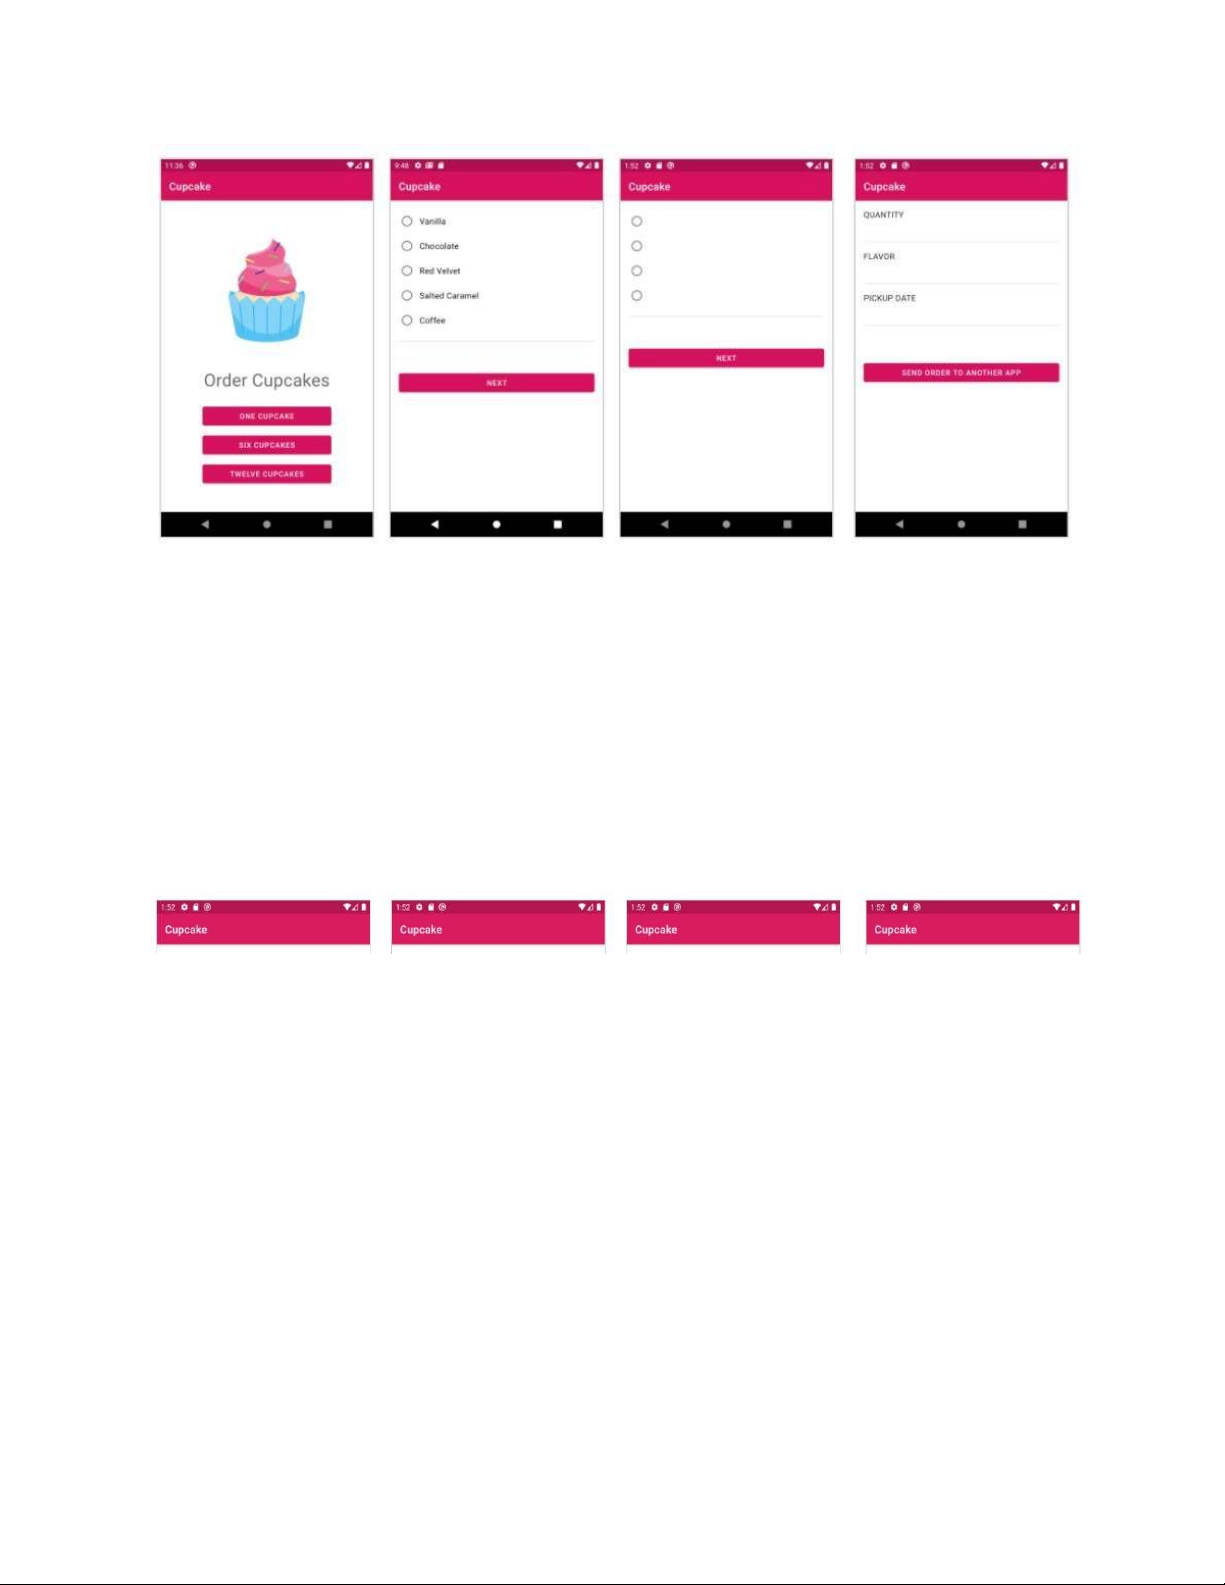
3. When you compile and run the app, you'll notice the app is incomplete. The buttons don't
do much (except for displaying a Toast message) and you can't navigate to the other fragments.
Here's a walkthrough of important files in the project. MainActivity:
The MainActivity has similar code to the default generated code, which sets the activity's
content view as activity_main.xml. This code uses a parameterized constructor
AppCompatActivity(@LayoutRes int contentLayoutId) which takes in a layout that will be
inflated as part of super.onCreate(savedInstanceState). Code in the MainActivity class class MainActivity :
AppCompatActivity(R.layout.activity_main) is same as the following code
using the default AppCompatActivity constructor:
class MainActivity : AppCompatActivity() {
override fun onCreate(savedInstanceState: Bundle?) {
super.onCreate(savedInstanceState)
setContentView(R.layout.activity_main) } }
Layouts (res/layout folder):
The layout resource folder contains activity and fragment layout files. These are simple layout
files, and the XML is familiar from the previous codelabs. •
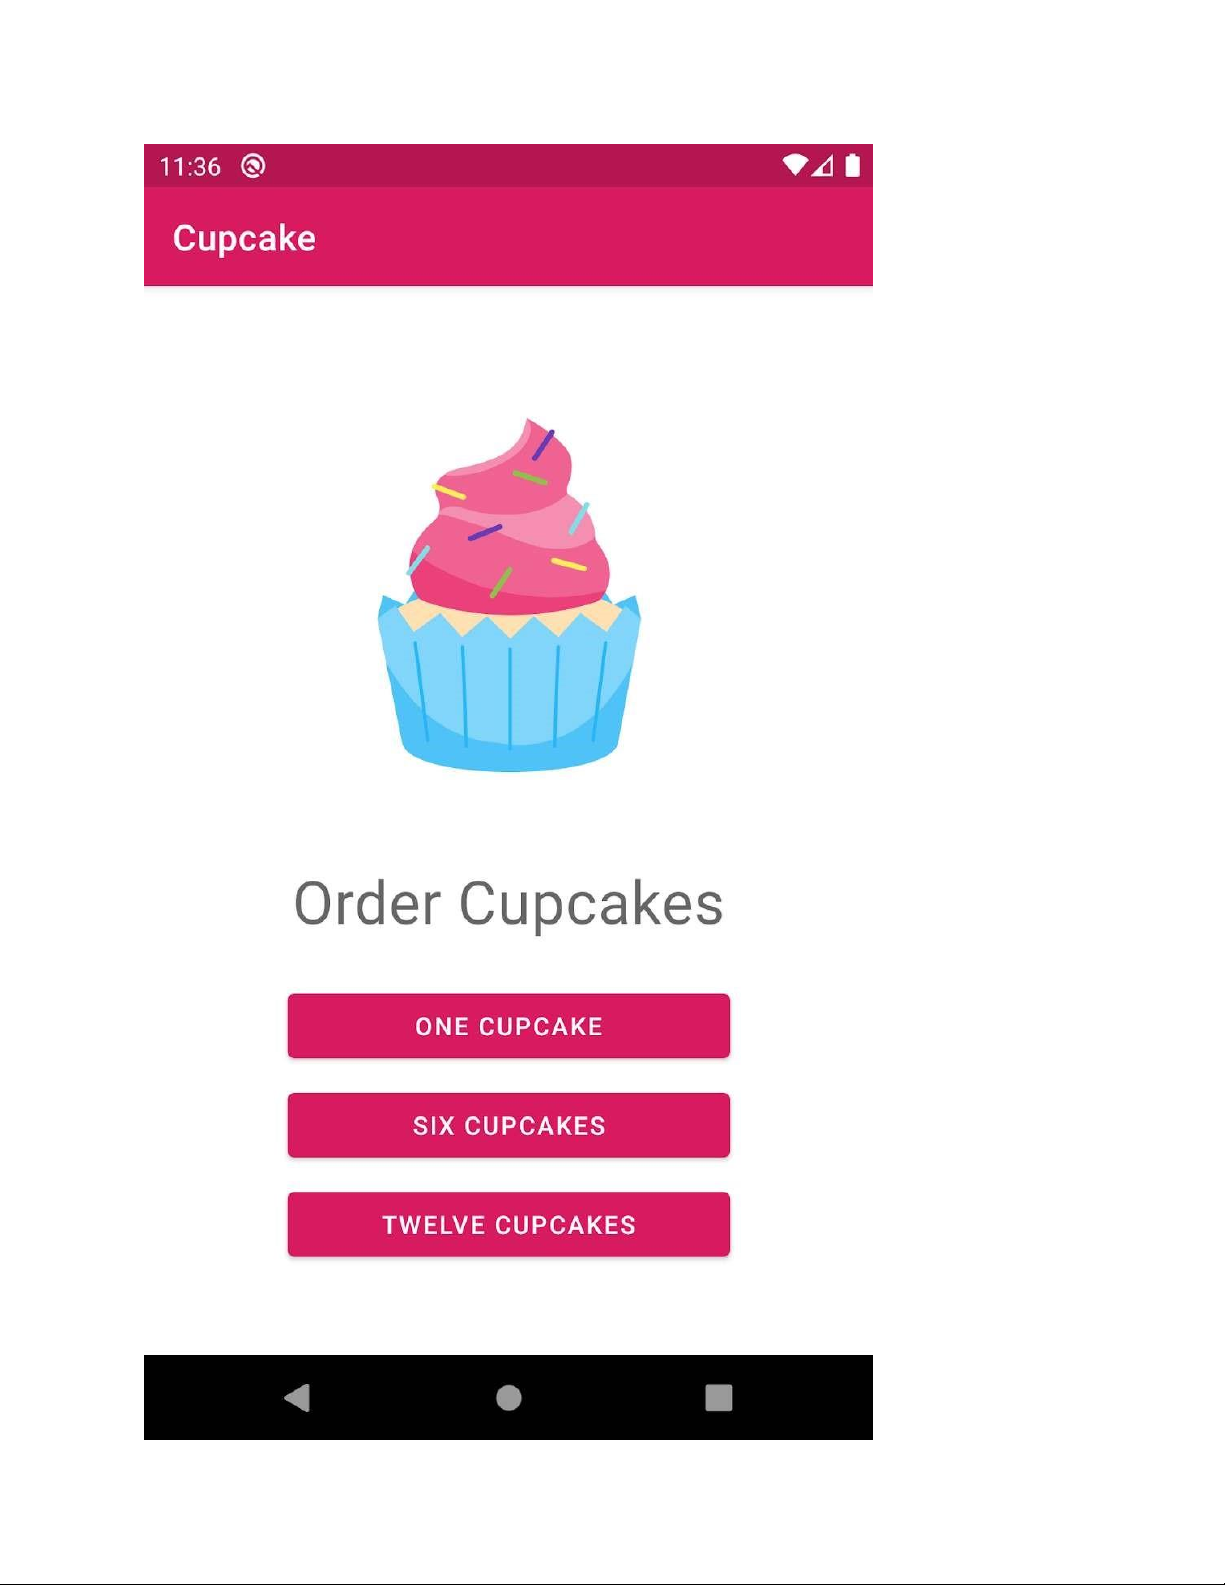
fragment_start.xml is the first screen shown in the app. It has a cupcake image and
three buttons to choose the number of cupcakes to order: one cupcake, six cupcakes, and twelve cupcakes. •
fragment_flavor.xml shows a list of cupcake flavors as radio button options with a Next button. •
fragment_pickup.xml provides an option to select pickup day and a Next button to go to the summary screen. •
fragment_summary.xml displays a summary of the order details such as quantity, flavor
and a button to send the order to another app. Fragment classes: •
StartFragment.kt is the first screen shown in the app. This class contains the view
binding code and a click handler for the three buttons. •
FlavorFragment.kt , PickupFragment.kt, and SummaryFragment.kt classes contain
mostly boilerplate code and a click handler for the Next or Send Order to Another App
button, which show a toast message.
Resources (res folder): •
drawable folder contains the cupcake asset for the first screen, as well as the launcher icon files. •
navigation/nav_graph.xml contains four fragment destinations (startFragment,
flavorFragment, pickupFragment, and summaryFragment) without Actions, which you
will define later in the codelab. •
values folder contains the colors, dimensions, strings, styles, and themes used for
customizing the app theme. You should be familiar with these resource types from previous codelabs.
3. Complete the Navigation Graph
In this task, you'll connect the screens of the Cupcake app together and finish implementing
proper navigation within the app.
Do you remember what we need to use the Navigation component? Follow this guide for a
refresher on how to set up your project and app to: •
Include the Jetpack Navigation library • Add a NavHost to the activity • Create a navigation graph •
Add fragment destinations to the navigation graph
Connect destinations in navigation graph
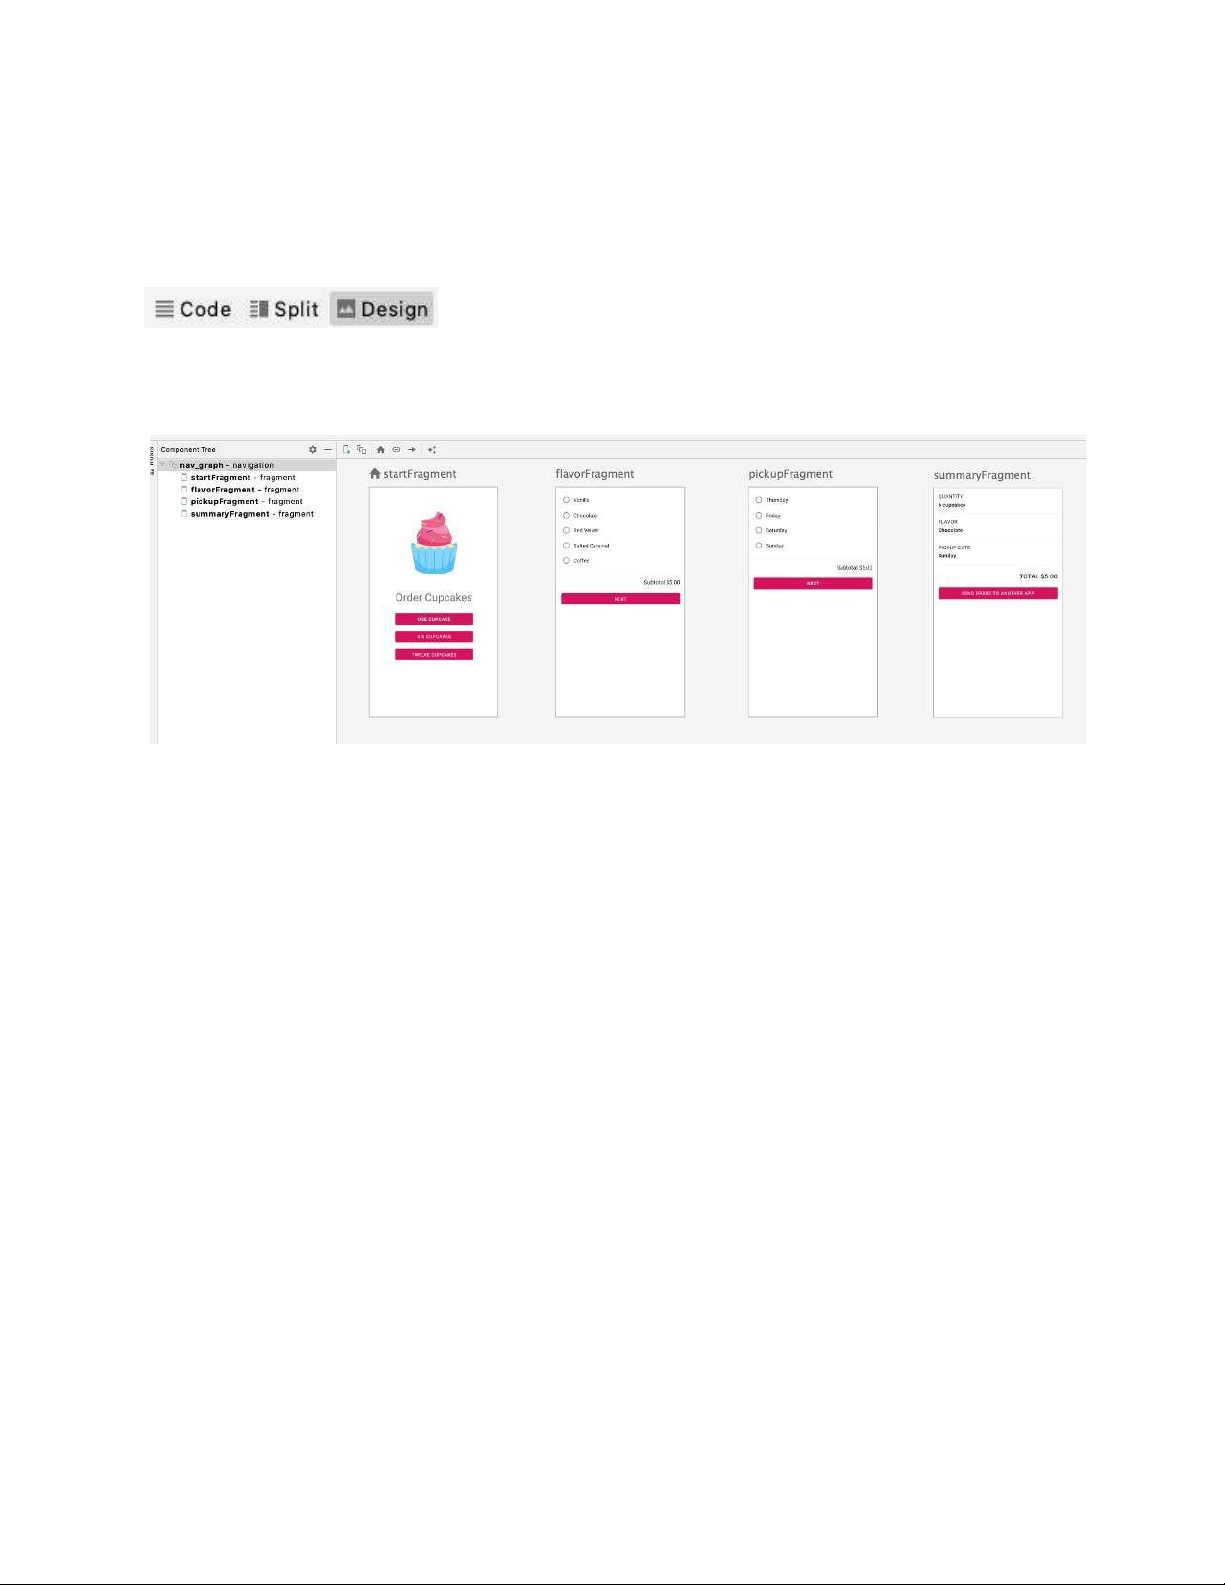
1. In Android Studio, in the Project window, open res > navigation > nav_graph.xml file.
Switch to the Design tab, if it's not already selected.
2. This opens the Navigation Editor to visualize the navigation graph in your app. You
should see the four fragments that already exist in the app.
Note: If the destination fragments are laid out differently in your Android Studio, click and drag
the destinations to rearrange similarly to the above screenshot. This makes it easier to configure
navigation actions later in the codelab.
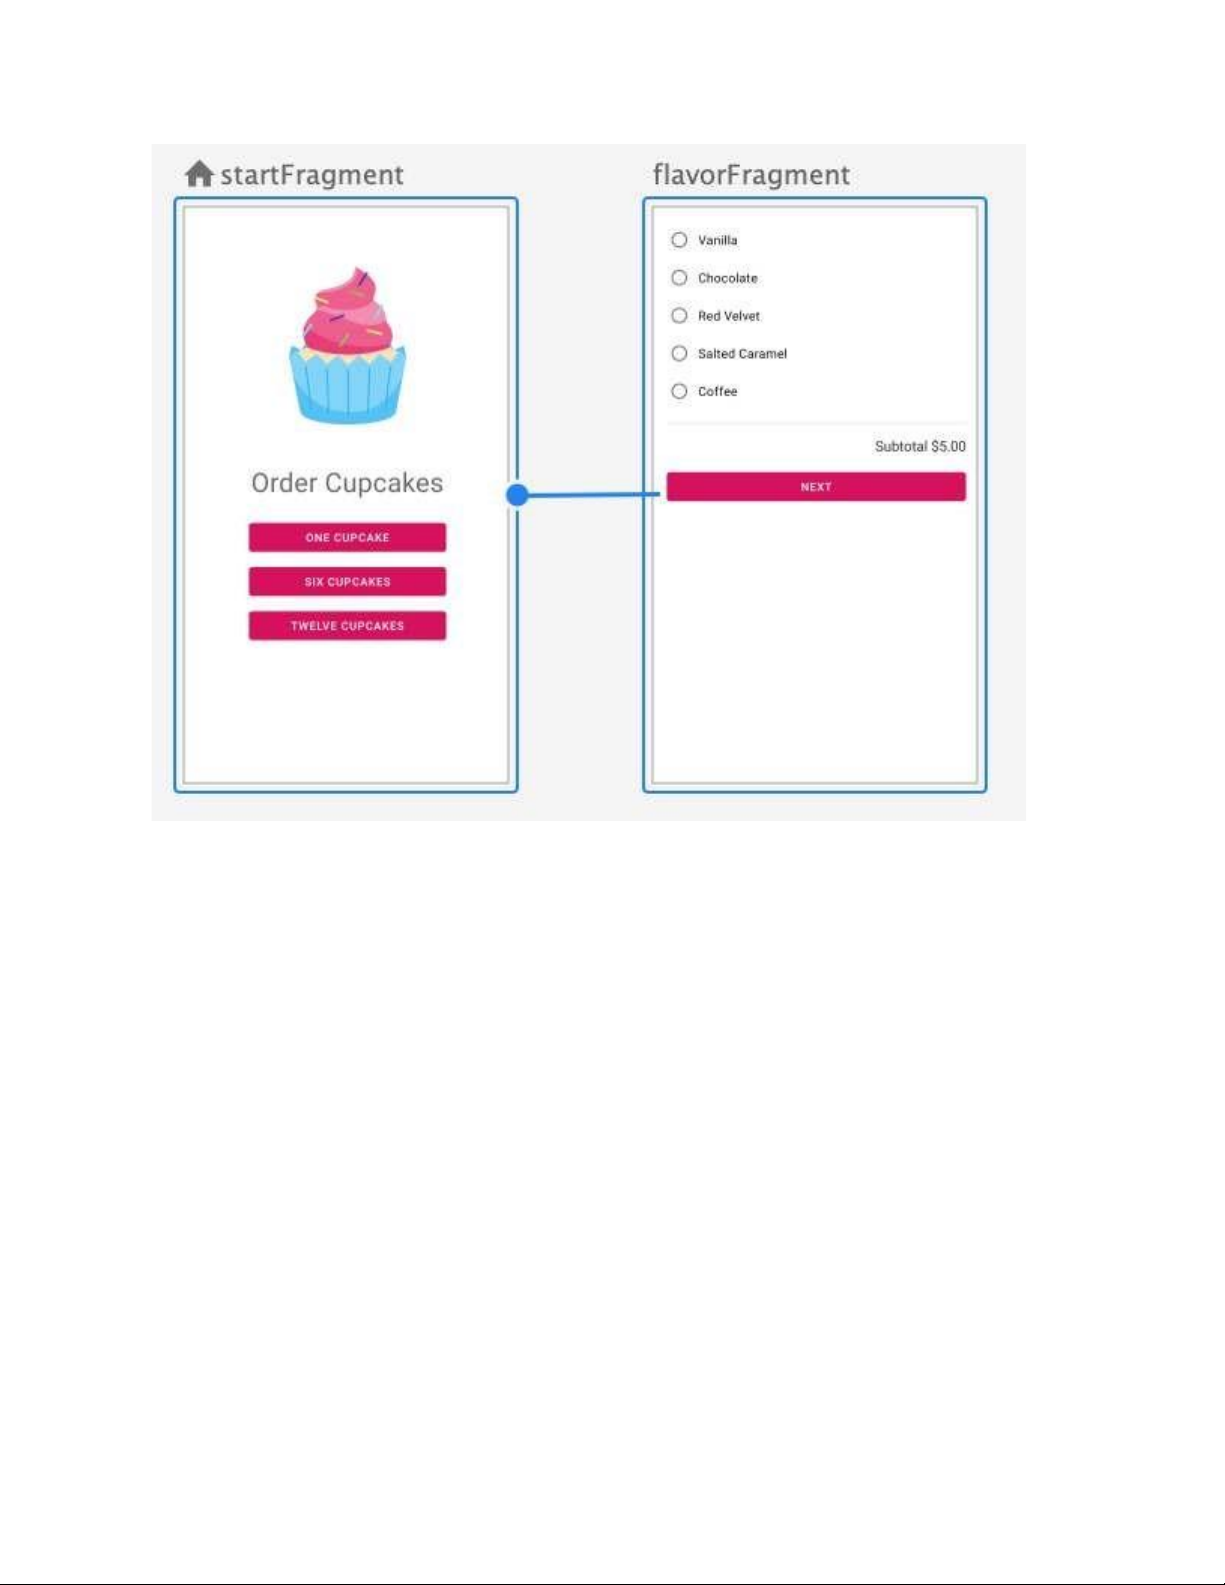
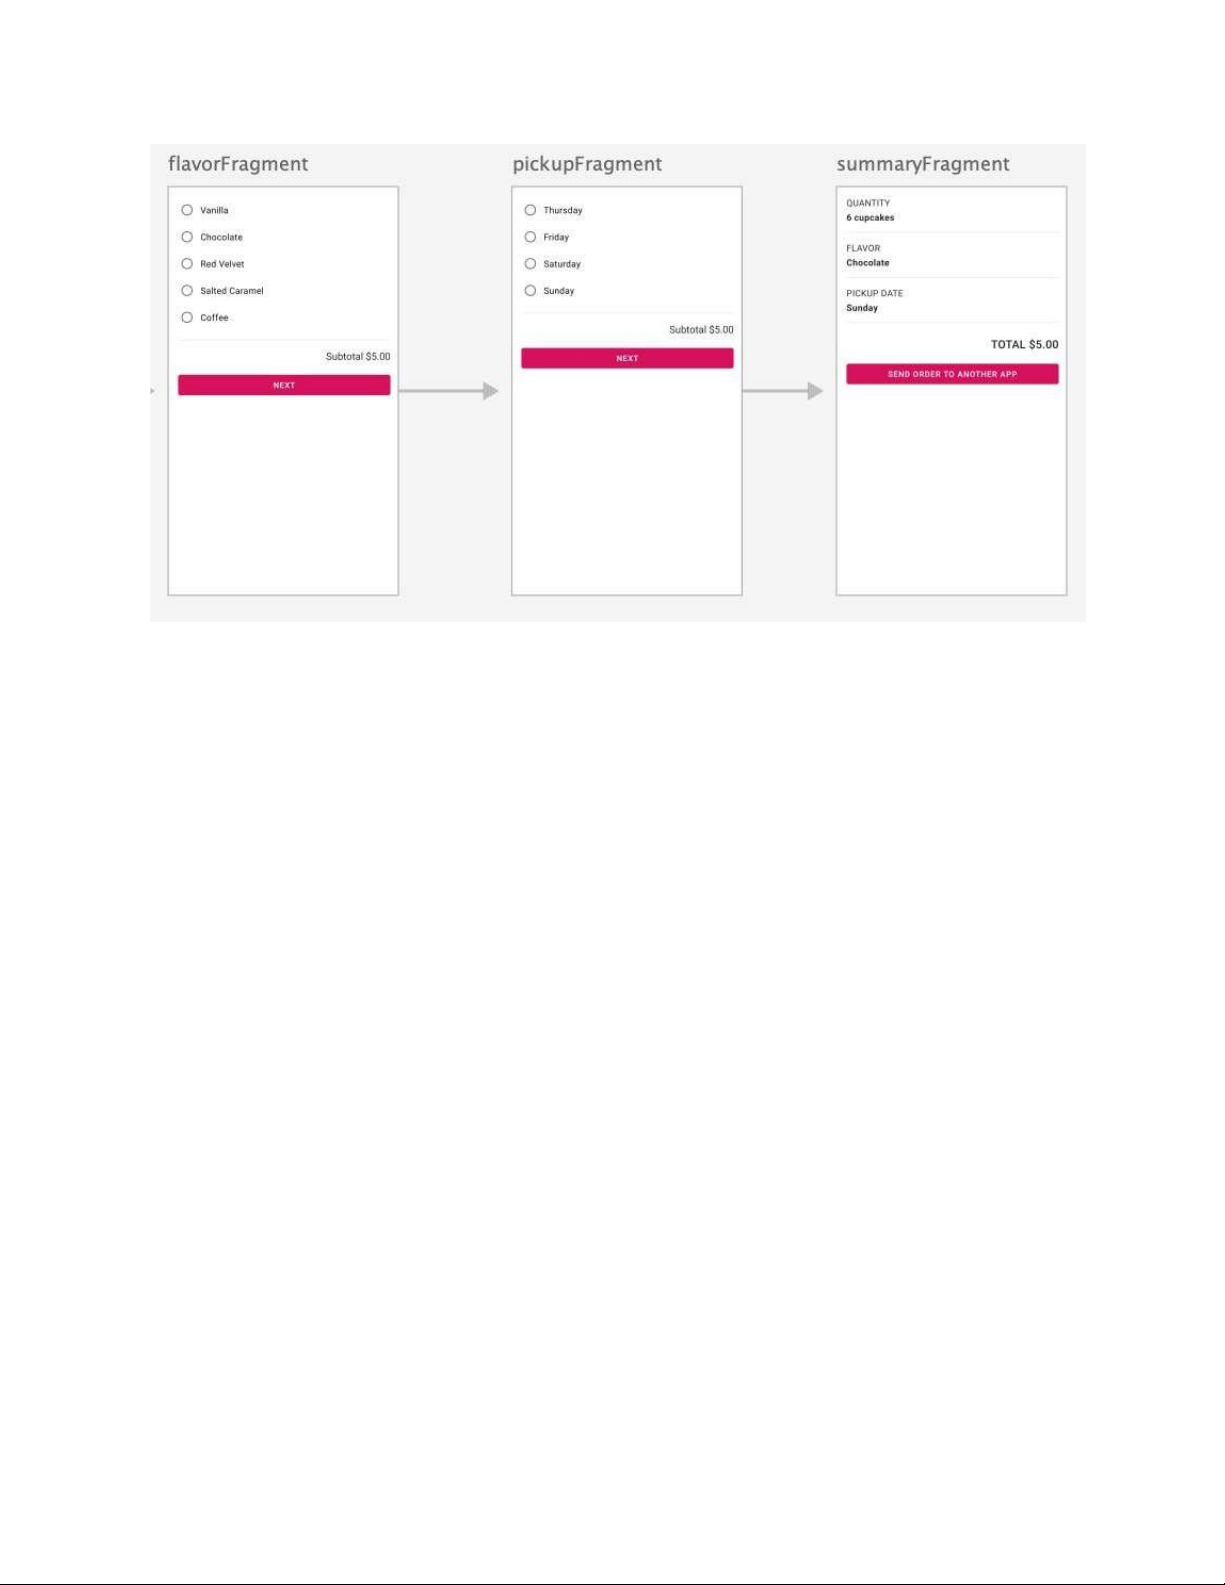
3. Connect the fragment destinations in the nav graph. Create an action from the
startFragment to the flavorFragment, a connection from the flavorFragment to the
pickupFragment, and a connection from the pickupFragment to the summaryFragment.
Follow the next few steps if you need more detailed instructions.
4. Hover over the startFragment until you see the gray border around the fragment and the
gray circle appear over the center of the right edge of the fragment. Click on the circle
and drag to the flavorFragment, and then release the mouse.
5. An arrow between the two fragments indicates a successful connection, meaning you will
be able to navigate from the startFragment to the flavorFragment. This is called a
Navigation action, which you have learned in a previous codelab.
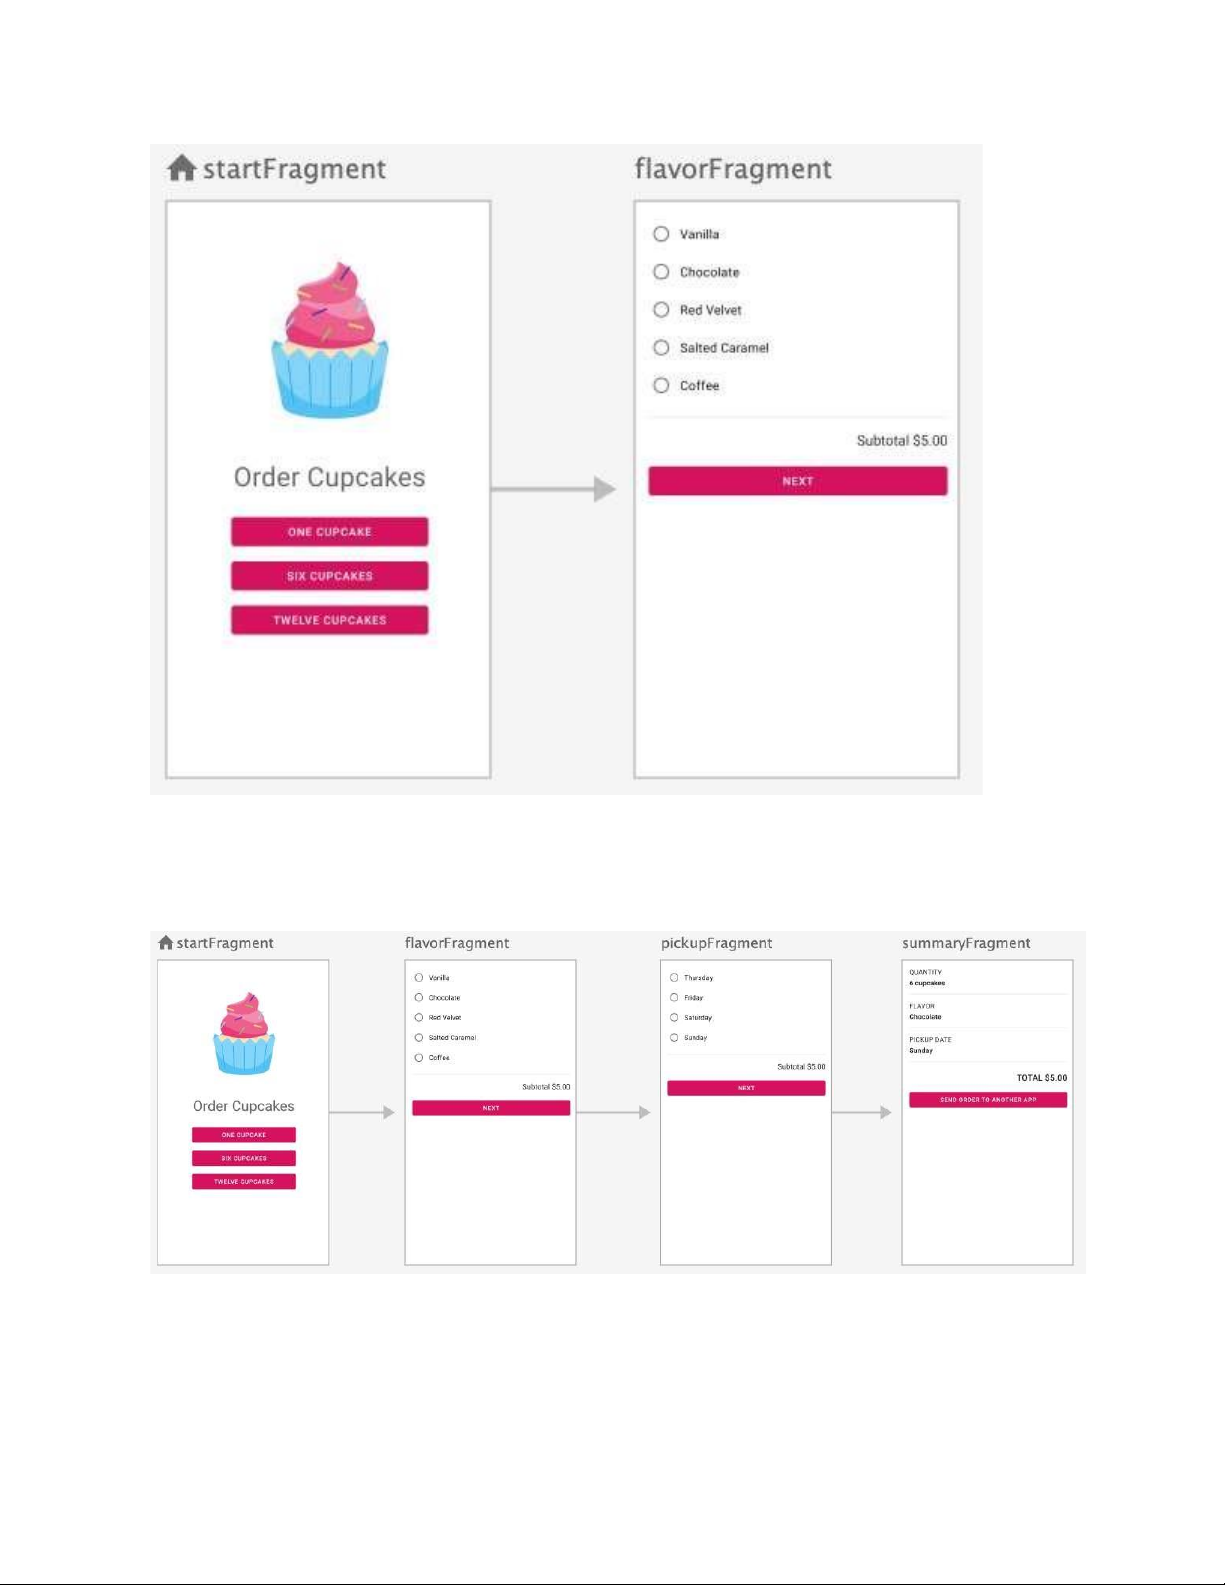
6. Similarly add navigation actions from flavorFragment to pickupFragment and from
pickupFragment to summaryFragment. When you're done creating the navigation
actions, the completed navigation graph should look like the following.
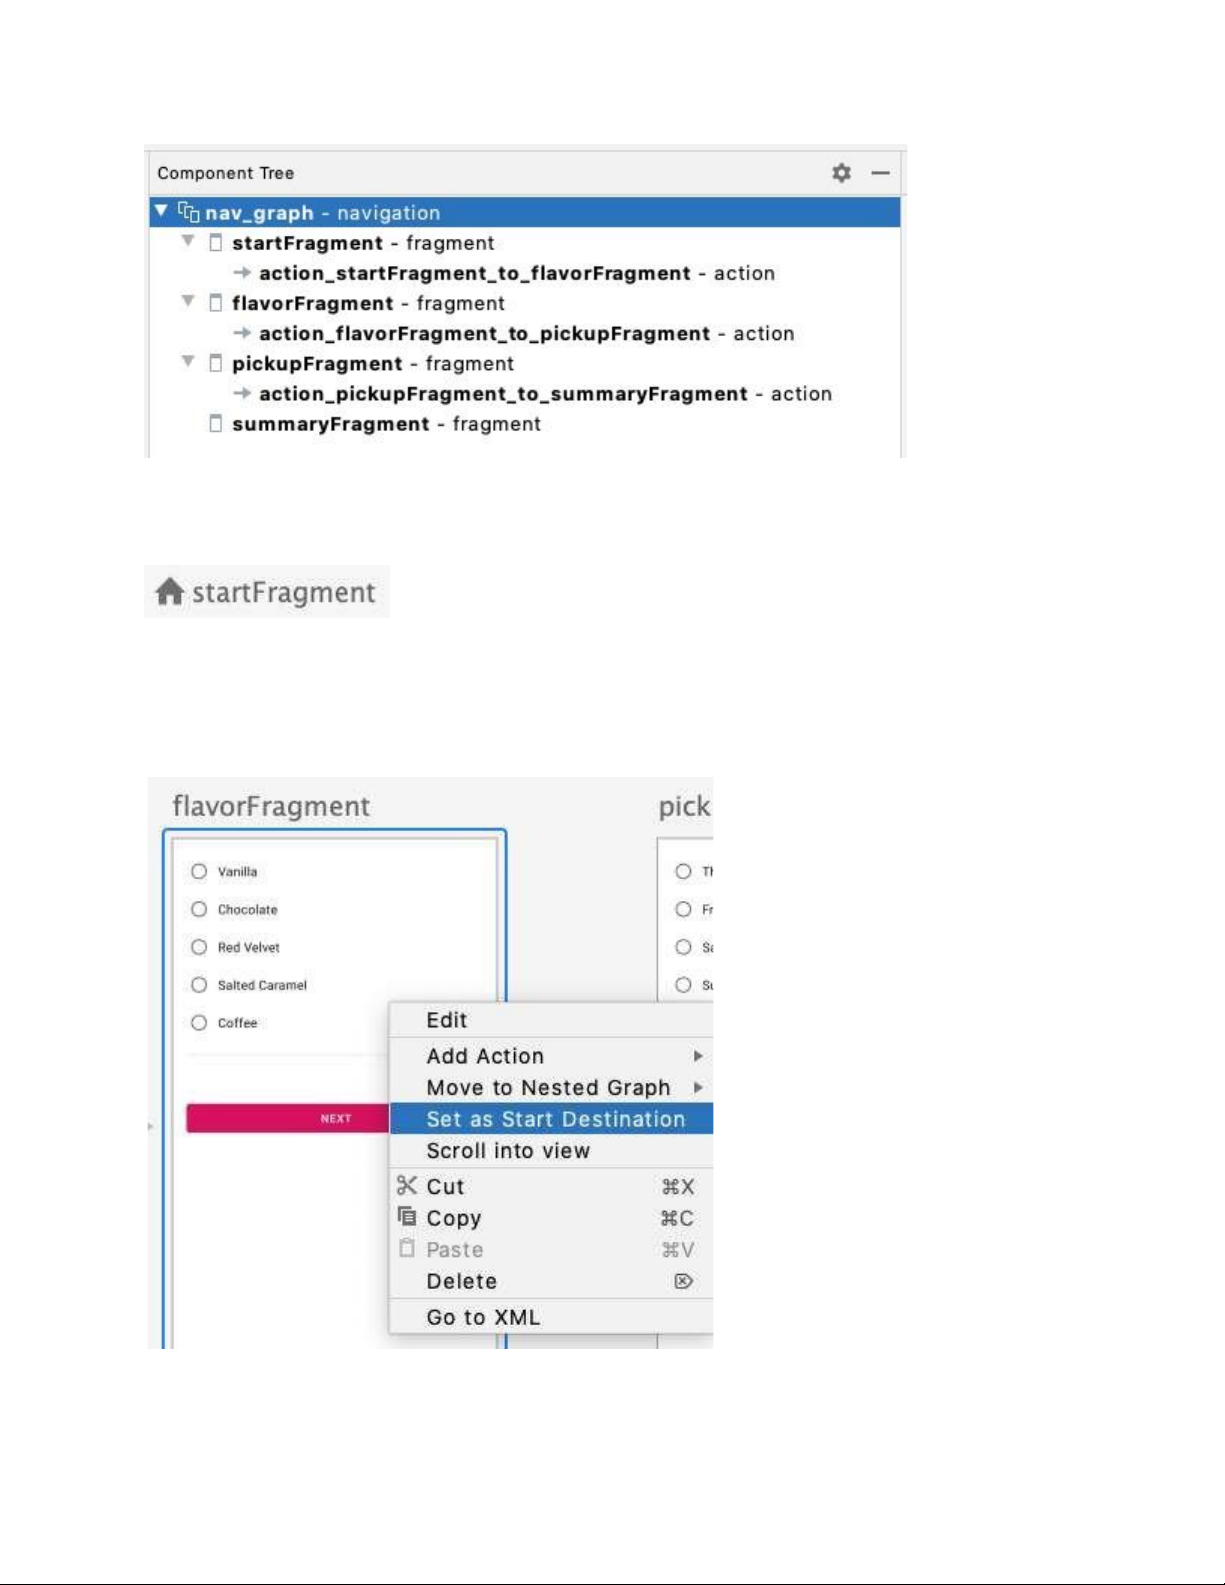
7. The three new actions you created should be reflected in the Component Tree pane as well.
8. When you define a navigation graph, you also want to specify the start destination.
Currently you can see that startFragment has a little house icon next to it.
That indicates that startFragment will be the first fragment to be shown in the NavHost. Leave
this as the desired behavior for our app. For future reference, you can always change the start
destination by right clicking on a fragment and selecting the menu option Set as Start Destination.
Navigate from start fragment to flavor fragment
Next, you will add code to navigate from startFragment to flavorFragment by tapping the
buttons in the first fragment, instead of displaying a Toast message. Below is the reference of
the start fragment layout. You will pass the quantity of cupcakes to the flavor fragment in a later task.
1. In the Project window, open the app > java > com.example.cupcake > StartFragment Kotlin file.
2. In the onViewCreated() method, notice the click listeners are set on the three buttons.
When each button is tapped, the orderCupcake() method is called with the quantity of
cupcakes (either 1, 6, or 12 cupcakes) as its parameter. Reference code:
orderOneCupcake.setOnClickListener { orderCupcake(1) }
orderSixCupcakes.setOnClickListener { orderCupcake(6) }
orderTwelveCupcakes.setOnClickListener { orderCupcake(12) }
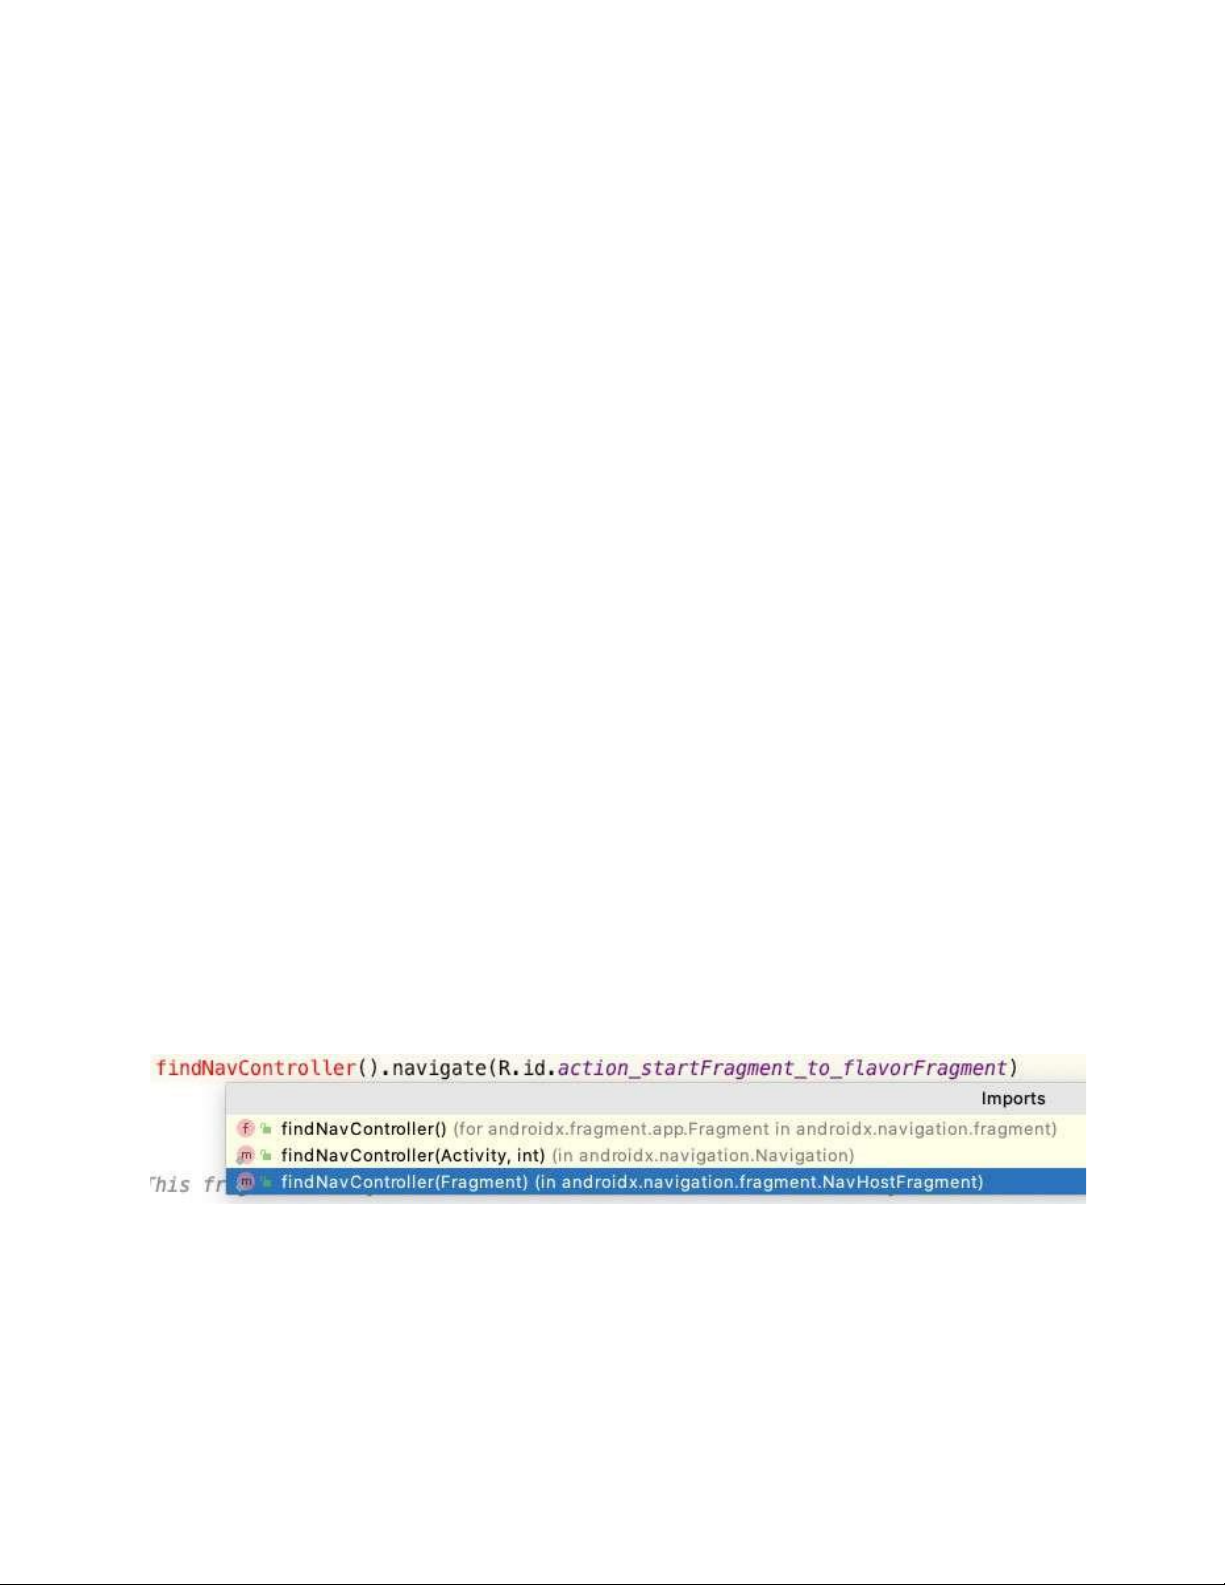
3. In the orderCupcake() method, replace the code displaying the toast message with the
code to navigate to the flavor fragment. Get the NavController using
findNavController() method and call navigate() on it, passing in the action ID,
R.id.action_startFragment_to_flavorFragment. Make sure this action ID matches
the action declared in your nav_graph.xml. Replace
fun orderCupcake(quantity: Int) {
Toast.makeText(activity, "Ordered $quantity cupcake(s)", Toast.LENGTH_SHORT).show() } with
fun orderCupcake(quantity: Int) {
findNavController().navigate(R.id.action_startFragment_to_flavorFragment) }
4. Add the Import import androidx.navigation.fragment.findNavController or you
can select from the options provided by Android Studio.
Add Navigation to the flavor and pickup fragments
Similar to the previous task, in this task you will add the navigation to the other fragments: flavor and the pickup fragments.
1. Open app > java > com.example.cupcake > FlavorFragment.kt. Notice the method
called within the Next button click listener is goToNextScreen() method.
2. In FlavorFragment.kt, inside the goToNextScreen() method, replace the code
displaying the toast to navigate to the pickup fragment. Use the action ID,
R.id.action_flavorFragment_to_pickupFragment and make sure this ID matches
the action declared in your nav_graph.xml. fun goToNextScreen() {
findNavController().navigate(R.id.action_flavorFragment_to_pickupFragment ) }
Remember to import androidx.navigation.fragment.findNavController.
3. Similarly in PickupFragment.kt, inside the goToNextScreen() method, replace the
existing code to navigate to the summary fragment. fun goToNextScreen() {
findNavController().navigate(R.id.action_pickupFragment_to_summaryFragmen t) }
Import androidx.navigation.fragment.findNavController.
4. Run the app. Make sure the buttons work to navigate from screen to screen. The
information displayed on each fragment may be incomplete, but don't worry, you'll be
populating those fragments with the correct data in upcoming steps.
Update title in app bar
As you navigate through the app, notice the title in the app bar. It is always displayed as Cupcake.
It would be a better user experience to provide a more relevant title based on the functionality of the current fragment.
Change the title in the app bar (also known as action bar) for each fragment using the
NavController and display an Up (←) button.
1. In MainActivity.kt, override the onCreate() method to set up the navigation
controller. Get an instance of NavController from the NavHostFragment.
2. Make a call to setupActionBarWithNavController(navController) passing in the
instance of NavController. This will do the following: Show a title in the app bar based
off of the destination's label, and display the Up button whenever you're not on a toplevel destination.
class MainActivity : AppCompatActivity(R.layout.activity_main) {
override fun onCreate(savedInstanceState: Bundle?) {
super.onCreate(savedInstanceState)
val navHostFragment = supportFragmentManager
.findFragmentById(R.id.nav_host_fragment) as NavHostFragment
val navController = navHostFragment.navController
setupActionBarWithNavController(navController) } }
3. Add necessary imports when prompted by Android Studio. import android.os.Bundle
import androidx.navigation.fragment.NavHostFragment import
androidx.navigation.ui.setupActionBarWithNavController
4. Set the app bar titles for each fragment. Open navigation/nav_graph.xml and switch to Code tab.
5. In nav_graph.xml, modify the android:label attribute for each fragment destination.
Use the following string resources that have already been declared in the starter app.
For start fragment, use @string/app_name with value Cupcake.
For flavor fragment, use @string/choose_flavor with value Choose Flavor.
For pickup fragment, use @string/choose_pickup_date with value Choose Pickup Date.
For summary fragment, use @string/order_summary with value Order Summary.
android:id="@+id/startFragment" ...
android:label="@string/app_name" ... >
android:id="@+id/flavorFragment" ...
android:label="@string/choose_flavor" ... >
android:id="@+id/pickupFragment" ...
android:label="@string/choose_pickup_date" ... >
android:id="@+id/summaryFragment" ...
android:label="@string/order_summary" ... />
6. Run the app. Notice the title in the app bar changes as you navigate to each fragment
destination. Also notice that the Up button (arrow ←) is now showing in the app bar. If
you tap on it, it doesn't do anything. You will implement the Up button behavior in the next codelab.
4. Create a shared ViewModel
Let's move onto populating the correct data in each of the fragments. You'll be using a shared
ViewModel to save the app's data in a single ViewModel. Multiple fragments in the app will
access the shared ViewModel using their activity scope.
It is a common use case to share data between fragments in most production apps. For example
in the final version(of this codelab) of the Cupcake app (notice the screenshots below), the user
selects the quantity of cupcakes in the first screen, and in the second screen the price is
calculated and displayed based on the quantity of the cupcakes. Similarly other app data such as
flavor and pickup date are also used in summary screen.
From looking at the app features, you can reason that it would be useful to store this order
information in a single ViewModel, which can be shared across the fragments in this activity.
Recollect that ViewModel is a part of the Android Architecture Components. The app data saved
within the ViewModel is retained during configuration changes. To add a ViewModel to your app,
you create a new class that extends from the ViewModel class. Create OrderViewModel
In this task, you will create a shared ViewModel for the Cupcake app called OrderViewModel.
You will also add the app data as properties inside the ViewModel and methods to update and
modify the data. Here are the properties of the class: • Order quantity (Integer) • Cupcake flavor (String) • Pickup date (String) • Price (Double)
Follow ViewModel best practices
In a ViewModel, it is a recommended practice to not expose view model data as public
variables. Otherwise the app data can be modified in unexpected ways by the external classes
and create edge cases your app didn't expect to handle. Instead, make these mutable properties
private, implement a backing property, and expose a public immutable version of each
property, if needed. The convention is to prefix the name of the private mutable properties with an underscore (_).
Here are the methods to update the properties above, depending on the user's choice: •
setQuantity(numberCupcakes: Int) •
setFlavor(desiredFlavor: String) • setDate(pickupDate: String)
You don't need a setter method for the price because you will calculate it within the
OrderViewModel using other properties. The steps below walk you through how to implement the shared ViewModel.
You will create a new package in your project called model and add the OrderViewModel class.
This will separate out the view model code from the rest of your UI code (fragments and
activities). It is a coding best practice to separate code into packages depending on the functionality.
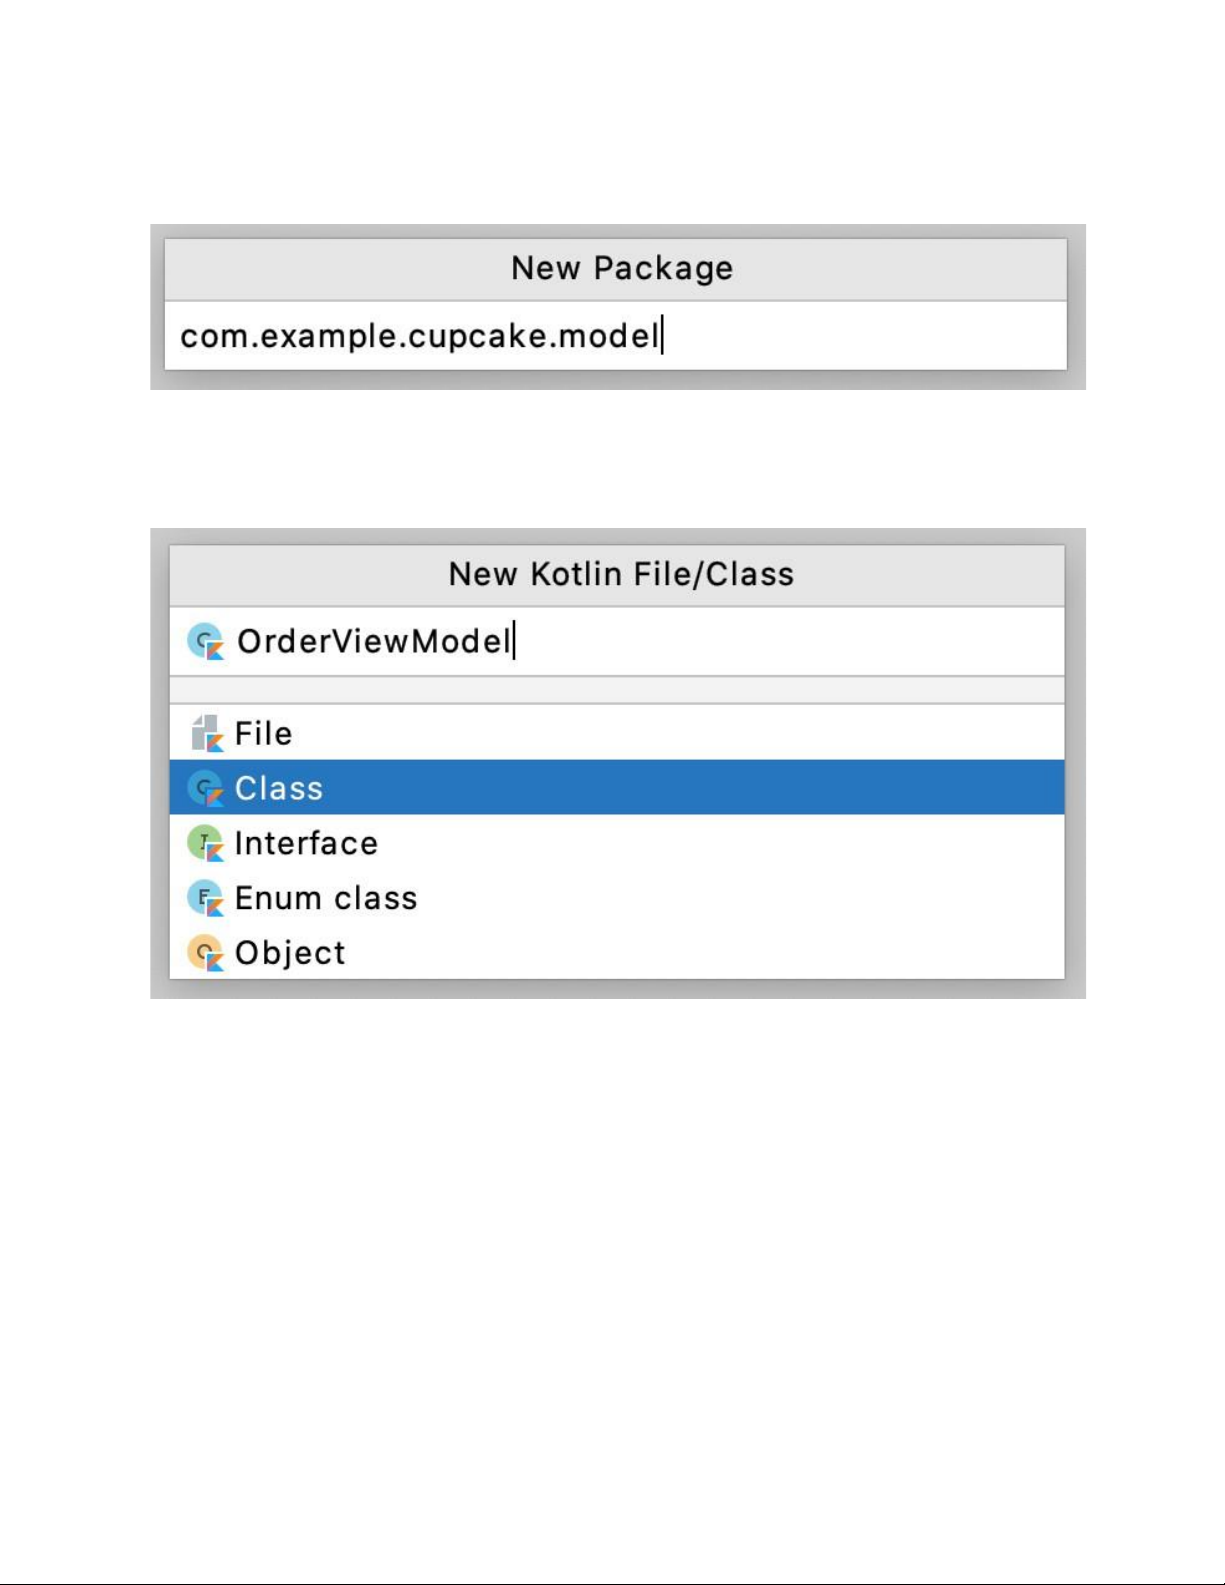
1. In the Project window of Android Studio, right click on com.example.cupcake > New > Package.
2. A New Package dialog will be opened, give the package name as com.example.cupcake.model.
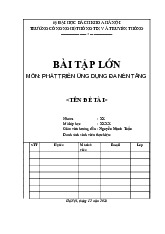
3. Create the OrderViewModel Kotlin class under the model package. In the Project
window, right-click on the model package and select New > Kotlin File/Class. In the
new dialog, give the filename OrderViewModel.
4. In OrderViewModel.kt, change the class signature to extend from ViewModel.
import androidx.lifecycle.ViewModel
class OrderViewModel : ViewModel() { }
5. Inside the OrderViewModel class, add the properties that were discussed above as private val.
6. Change the property types to LiveData and add backing fields to the properties, so that
these properties can be observable and UI can be updated when the source data in the view model changes.
private val _quantity = MutableLiveData(0) val
quantity: LiveData = _quantity
private val _flavor = MutableLiveData("") val flavor: LiveData = _flavor
private val _date = MutableLiveData("") val date: LiveData = _date
private val _price = MutableLiveData(0.0) val price: LiveData = _price
You will need to import these classes:
import androidx.lifecycle.LiveData import
androidx.lifecycle.MutableLiveData
7. In OrderViewModel class, add the methods that were discussed above. Inside the
methods, assign the argument passed in to the mutable properties.
8. Since these setter methods need to be called from outside the view model, leave them as
public methods (meaning no private or other visibility modifier needed before the fun
keyword). The default visibility modifier in Kotlin is public.
fun setQuantity(numberCupcakes: Int) {
_quantity.value = numberCupcakes }
fun setFlavor(desiredFlavor: String) {
_flavor.value = desiredFlavor }
fun setDate(pickupDate: String) { _date.value = pickupDate }
9. Build and run your app to make sure there are no compile errors. There should be no
visible change in your UI yet.
Nice work! Now you have the start to your view model. You'll incrementally add more to this
class as you build out more features in your app and realize you need more properties and methods in your class.
If you see the class names, property names, or method names in gray font in Android Studio,
that's expected. That means the class, properties, or methods or not being used at the moment,
but they will be! That's coming up next.
Tài liệu liên quan:
-

Lab 9.2: Integrating room and flow for bus schedule app development môn Phát triển ứng dụng đa nền tảng | Trường Đại học Bách Khoa Hà Nội
111 56 -

Lab 9.1: Introduction to SQL Basics for Android Development môn Phát triển ứng dụng đa nền tảng | Trường Đại học Bách Khoa Hà Nội
114 57 -
Mẫu báo cáo Bài tập lớn môn Phát triển ứng dụng đa nền tảng | Trường Đại học Bách Khoa Hà Nội
149 75 -

Bài tập tổng hợp môn Phát triển ứng dụng đa nền tảng | Trường Đại học Bách Khoa Hà Nội
116 58