Lab 9.2: Integrating room and flow for bus schedule app development môn Phát triển ứng dụng đa nền tảng | Trường Đại học Bách Khoa Hà Nội
In the previous codelab, you learned about the fundamentals of relational databases, and how to read and write data using the SQL commands: SELECT, INSERT, UPDATE, and DELETE. Learning to work with relational databases is a fundamental skill you'll take with you throughout your programming journey. Tài liệu được sưu tầm gồm 30 trang, giúp các bạn ôn luyện và phục vụ cho việc học tập, đạt kết quả tốt. Mời các bạn đón xem!
Môn: Phát triển ứng dụng đa nền tảng 10 tài liệu
Trường: Đại học Bách Khoa Hà Nội 5.8 K tài liệu
Tác giả:


Preview text:
Introduction to Room and Flow 1. Before you begin 2. Get started 3. Add Room dependency 4. Create an entity 5. Define the DAO 6. Define the ViewModel
7. Create database class and pre-populate database 8. Create the ListAdapter
9. Respond to data changes using Flow 10. Solution code 11. Congratulations 1. Before you begin
In the previous codelab, you learned about the fundamentals of relational databases, and how to
read and write data using the SQL commands: SELECT, INSERT, UPDATE, and DELETE.
Learning to work with relational databases is a fundamental skill you'll take with you throughout
your programming journey. Knowing how relational databases work is also essential for
implementing data persistence in an Android application, which you'll start doing in this lesson.
An easy way to use a database in an Android app is with a library called Room. Room is what's
called an ORM (Object Relational Mapping) library, which as the name implies, maps the tables
in a relational database to objects usable in Kotlin code. In this lesson, you're just going to focus
on reading data. Using a pre-populated database, you'll load data from a table of bus arrival times
and present them in a RecyclerView.
In the process, you'll learn about the fundamentals of using Room, including the database class,
the DAO, entities, and view models. You'll also be introduced to the ListAdapter class, another
way to present data in a RecyclerView, and flow, a Kotlin language feature similar to LiveData
that will allow your UI to respond to changes in the database. Prerequisites •
Familiarity with object-oriented programming and using classes, objects and inheritance in Kotlin. •
Basic knowledge of relational databases and SQL taught in the SQL basics codelab. •
Experience using Kotlin coroutines. What you'll learn
At the end of this lesson, you should be able to •
Represent database tables as Kotlin objects (entities). •
Define the database class to use Room in the app, and pre-populate a database from a file. •
Define the DAO class and use SQL queries to access the database from Kotlin code. •
Define a view model to allow the UI to interact with the DAO. •
How to use ListAdapter with a recycler view. •
The basics of Kotlin flow and how to use it to make the UI respond to changes in the underlying data. What you'll build
• Read data from a prepopulated database using Room and present it in a recycler view in a simple bus schedule app. 2. Get started
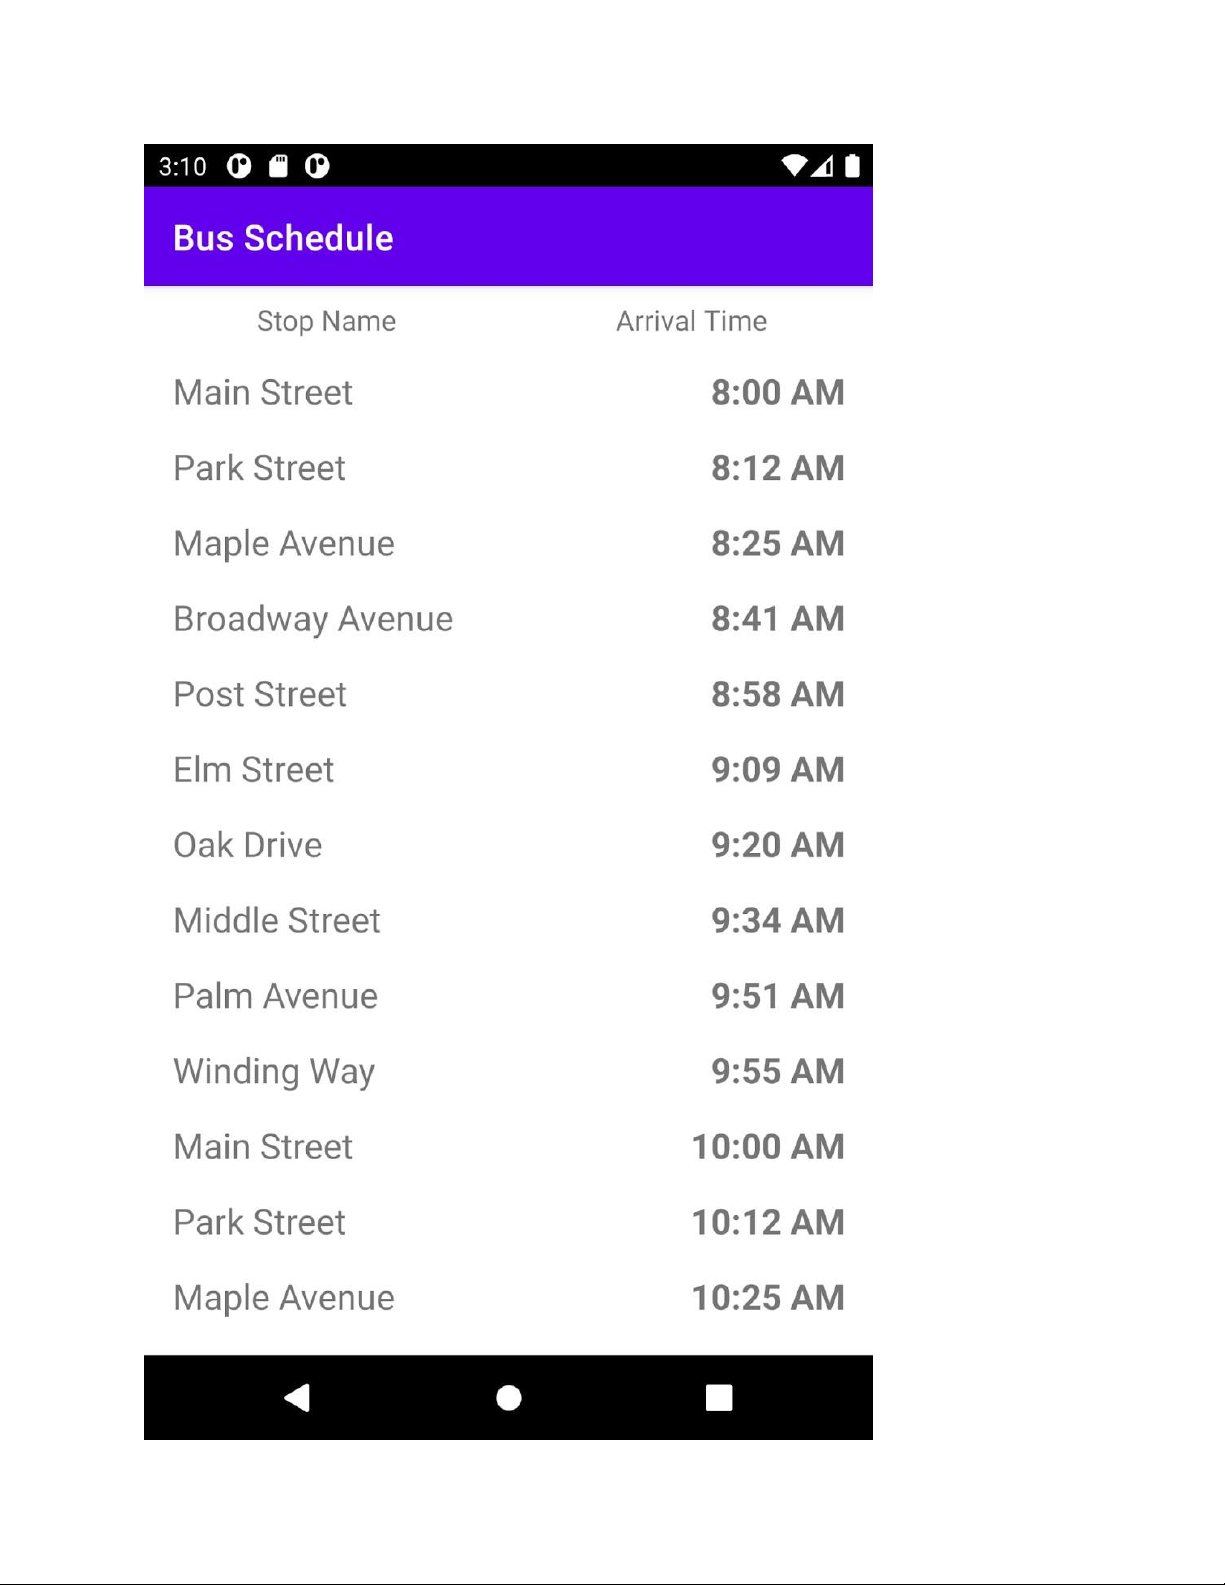
The app you'll be working with in this codelab is called Bus Schedule. The app presents a list of
bus stops and arrival times from earliest to latest.
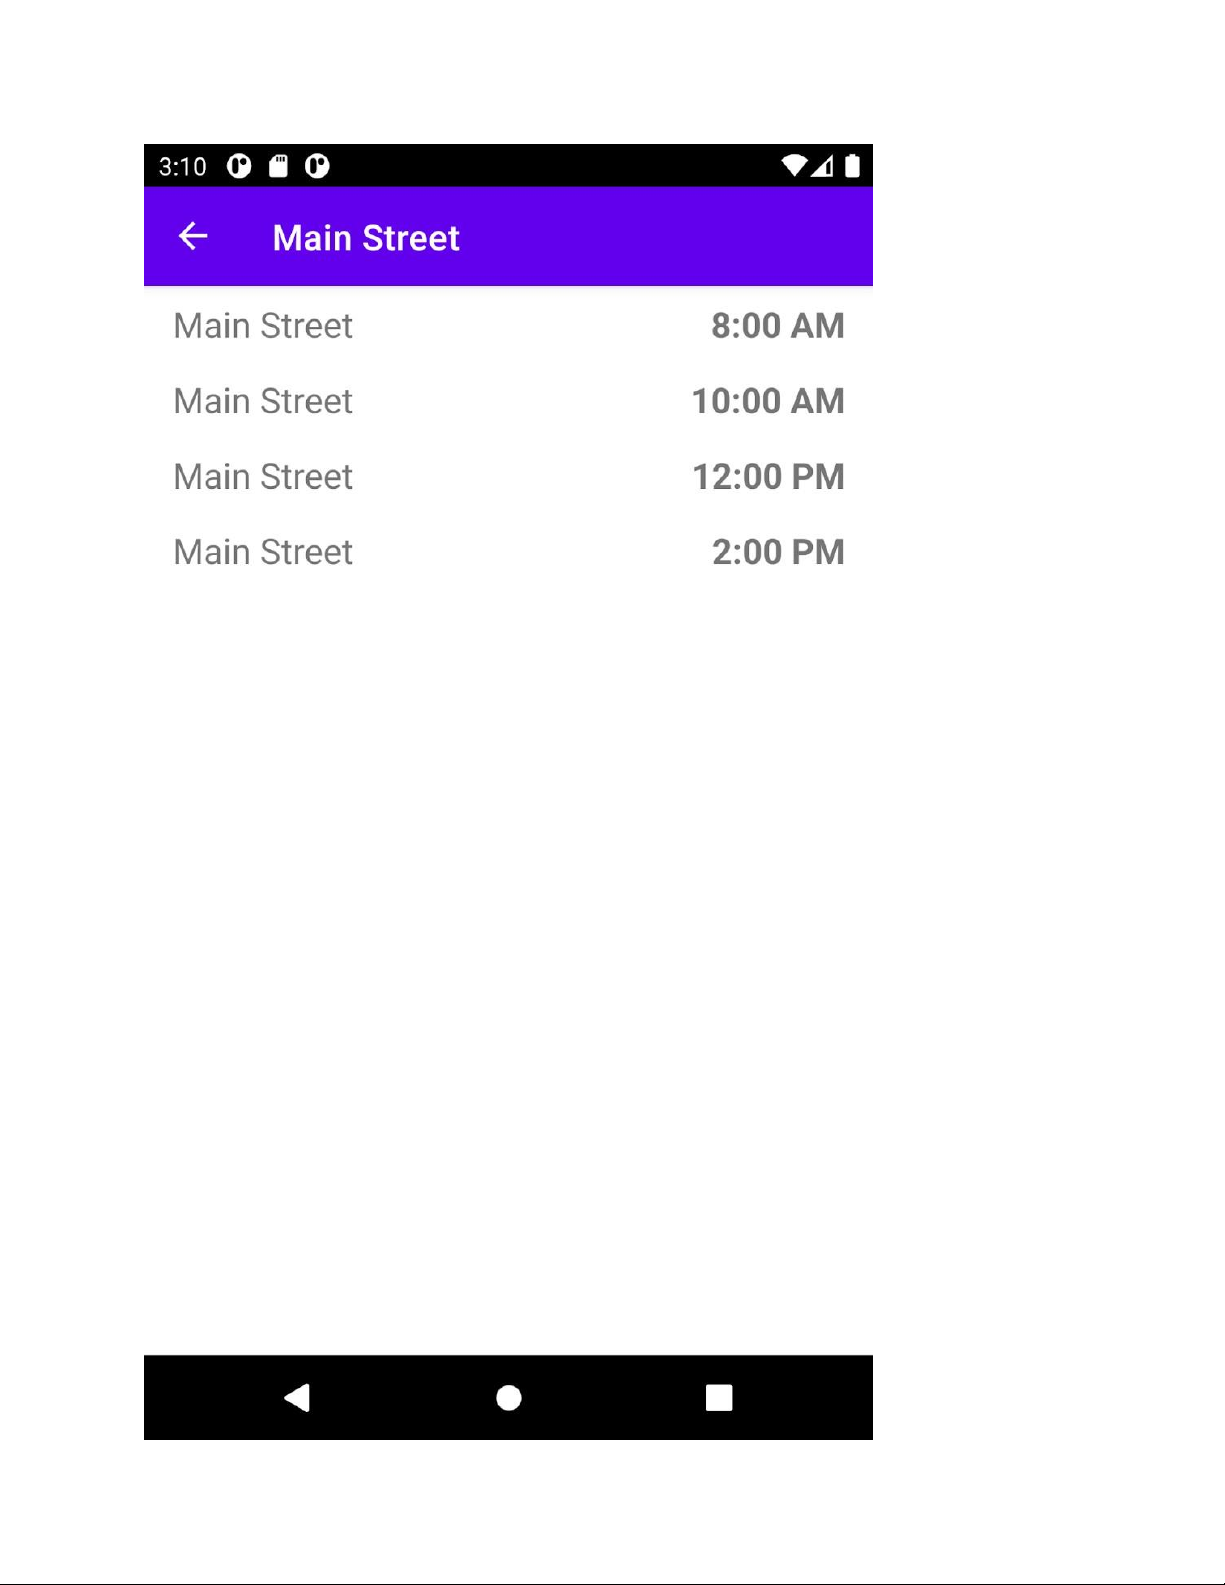
Tapping on a row in the first screen leads to a new screen showing only the upcoming arrival
times for the selected bus stop.
The bus stop data comes from a database prepackaged with the app. In its current state, however,
nothing will be shown when the app runs for the first time. Your job is to integrate Room so that
the app displays the prepopulated database of arrival times.
Starter Code URL: https://github.com/google-developer-training/android-basics-kotlin- busschedule-app/tree/starter Branch: starter
1. Navigate to the provided GitHub repository page for the project.
2. Verify that the branch name matches the branch name specified in the codelab. For
example, in the following screenshot the branch name is main.
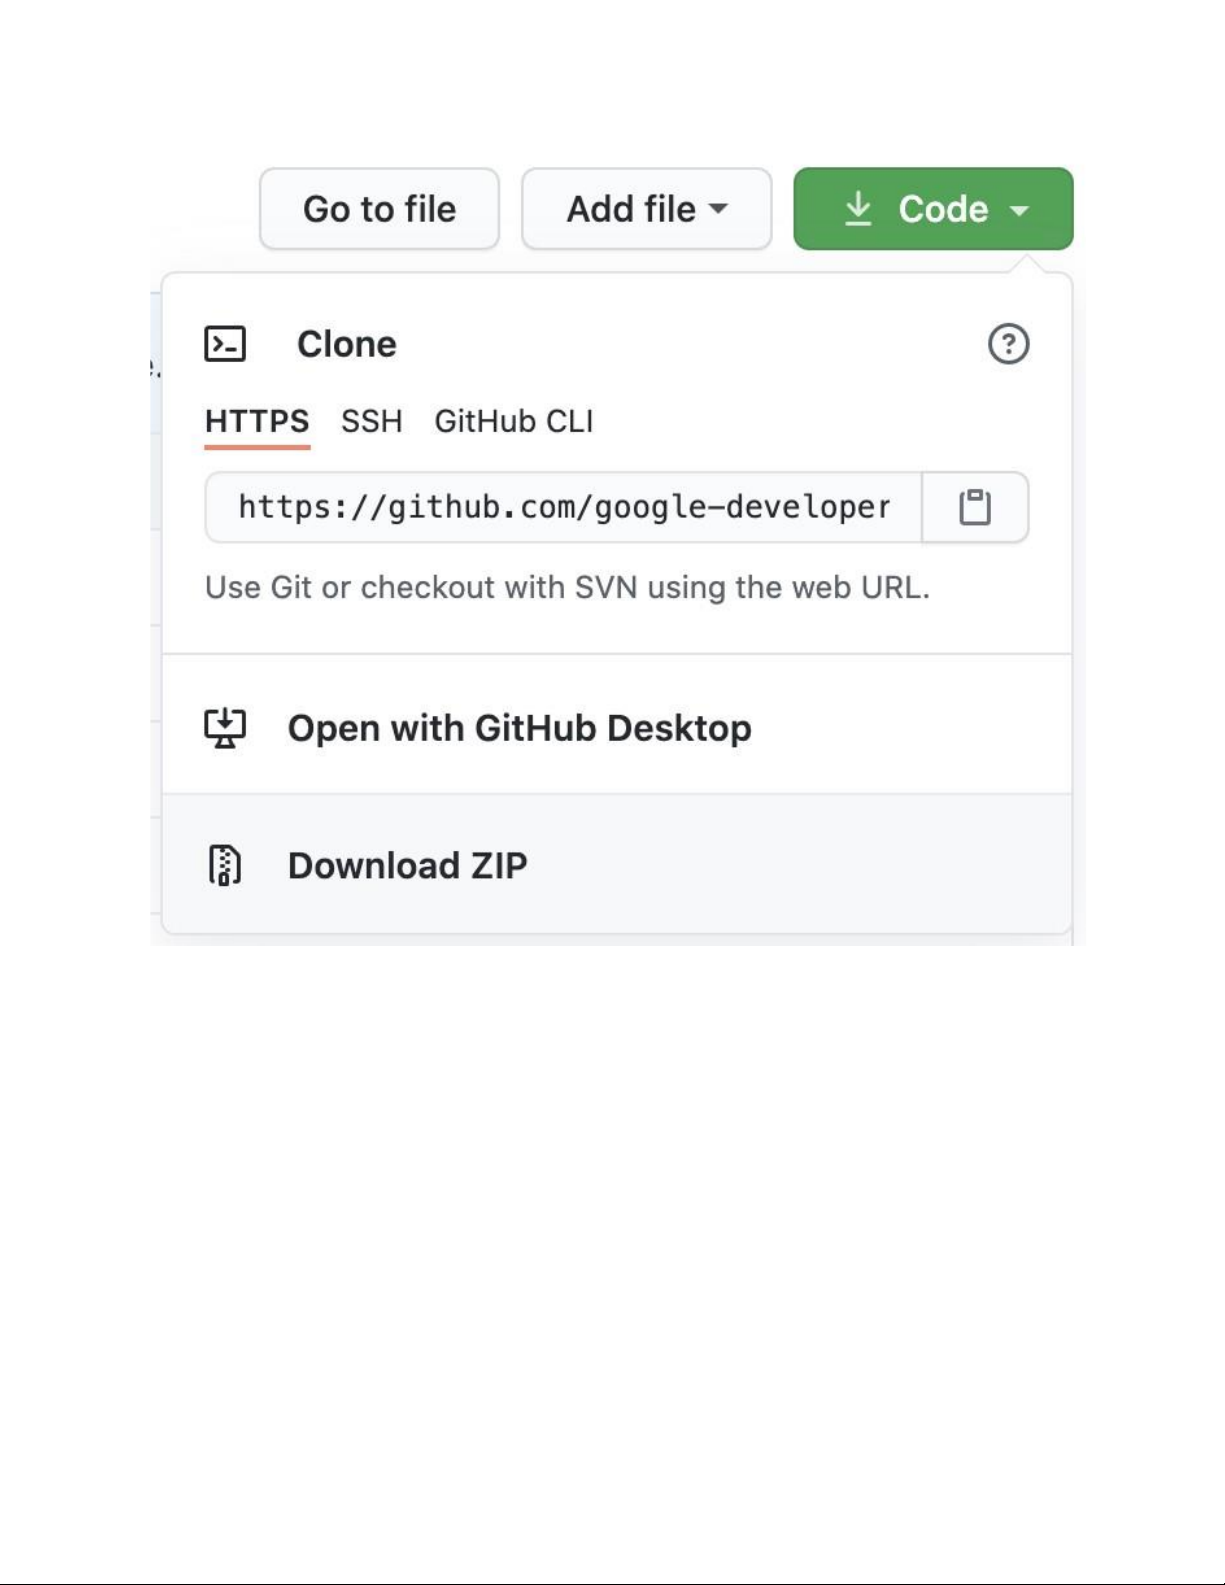
3. On the GitHub page for the project, click the Code button, which brings up a popup.
4. In the popup, click the Download ZIP button to save the project to your computer. Wait for the download to complete.
5. Locate the file on your computer (likely in the Downloads folder).
6. Double-click the ZIP file to unpack it. This creates a new folder that contains the project files.
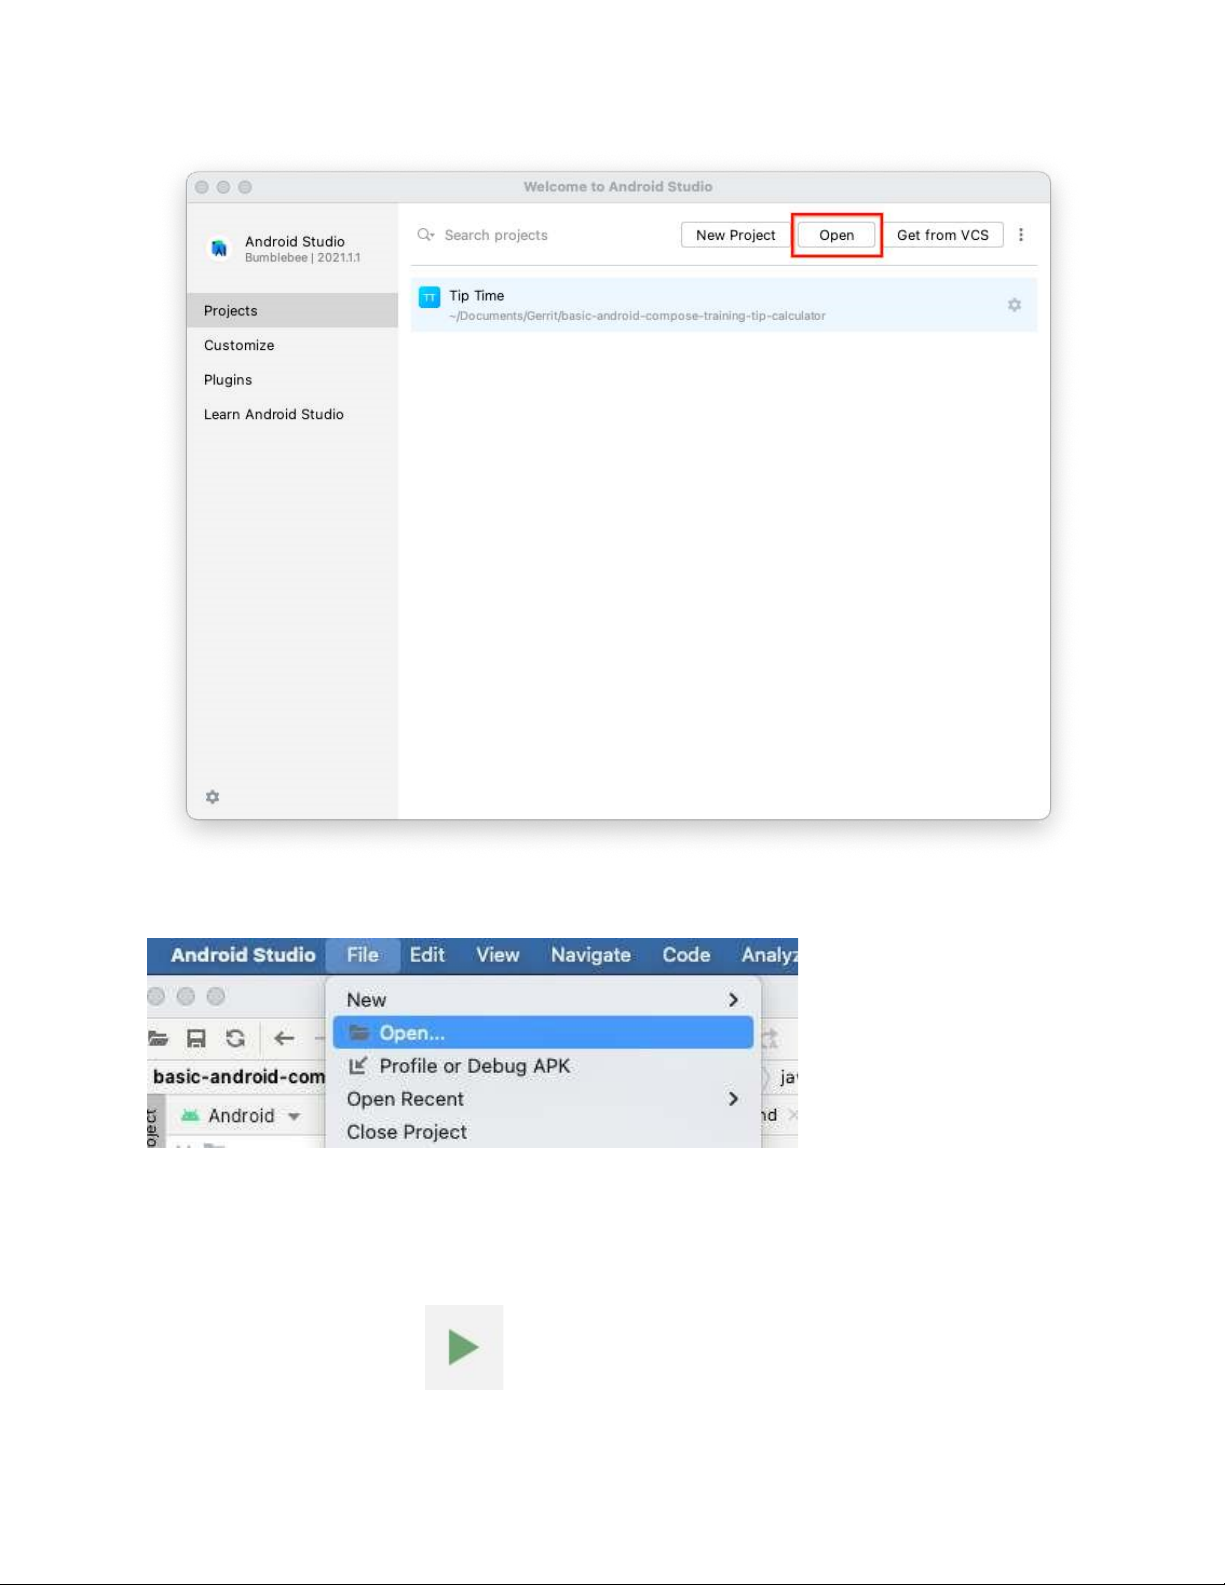
Open the project in Android Studio 1. Start Android Studio.
2. In the Welcome to Android Studio window, click Open.
Note: If Android Studio is already open, instead, select the File > Open menu option.
3. In the file browser, navigate to where the unzipped project folder is located (likely in your Downloads folder).
4. Double-click on that project folder.
5. Wait for Android Studio to open the project.
6. Click the Run button
to build and run the app. Make sure it builds as expected. 3. Add Room dependency
Like with any other library, you first need to add the necessary dependencies to be able to use
Room in the Bus Schedule app. This will require just two small changes, one in each Gradle file.
1. In the project-level build.gradle file, define the room_version in the ext block. ext { kotlin_version = "1.6.20"
nav_version = "2.4.1" room_version = ’2.4.2’ }
2. In the app-level build.gradle file, at the end of the dependencies list, add the following dependencies.
implementation "androidx.room:room-runtime:$room_version" kapt
"androidx.room:room-compiler:$room_version"
// optional - Kotlin Extensions and Coroutines support for Room implementation
"androidx.room:room-ktx:$room_version"
3. Sync the changes and build the project to verify the dependencies were added correctly.
Over the next few pages, you'll be introduced to the components needed to integrate Room into
an app: models, the DAO, view models, and the database class. 4. Create an entity
When you learned about relational databases in the previous codelab, you saw how data was
organized into tables consisting of multiple columns, each one representing a specific property of
a specific data type. Much like classes in Kotlin provide a template for each object, a table in a
database provides a template for each item, or row, in that table. It should come as no surprise
then that a Kotlin class can be used to represent each table in the database.
When working with Room, each table is represented by a class. In an ORM (Object Relational
Mapping) library, such as Room, these are often called model classes, or entities.
The database for the Bus Schedule app just consists of a single table, schedule, which includes
some basic information about a bus arrival. •
id: An integer providing a unique identifier that serves as the primary key • stop_name: A string • arrival_time: An integer
Note that the SQL types used in the database are actually INTEGER for Int and TEXT for String.
When working with Room, however, you should only be concerned with the Kotlin types when
defining your model classes. Mapping the data types in your model class to the ones used in the
database is handled automatically.
When a project has many files, you should consider organizing your files in different packages to
provide better access control for each class and to make it easier to locate related classes. To
create an entity for the "schedule" table, in the com.example.busschedule package, add a new
package called database. Within that package, add a new package called schedule, for your
entity. Then in the database.schedule package, create a new file called Schedule.kt and define a data class called Schedule. data class Schedule( )
As discussed in the SQL Basics lesson, data tables should have a primary key to uniquely
identify each row. The first property you'll add to the Schedule class is an integer to represent a
unique id. Add a new property and mark it with the @PrimaryKey annotation. This tells Room to
treat this property as the primary key when new rows are inserted. @PrimaryKey val id: Int
Add a column for the name of the bus stop. The column should be of type String. For new
columns, you'll need to add a @ColumnInfo annotation to specify a name for the column.
Typically, SQL column names will have words separated by an underscore, as opposed to the
lowerCamelCase used by Kotlin properties. For this column, we also don't want the value to be
null , so you should mark it with the @NonNull annotation.
@NonNull @ColumnInfo(name = "stop_name") val stopName: String,
Note: In SQL, columns can have null values by default and need to be explicitly marked as non
null if you want otherwise. This is the opposite of how things work in Kotlin, where values can't be null by default.
Arrival times are represented in the database using integers. This is a Unix timestamp that can be
converted into a usable date. While different versions of SQL offer ways to convert dates, for
your purposes, you'll stick with Kotlin date formatting functions. Add the following @NonNull column to the model class.
@NonNull @ColumnInfo(name = "arrival_time") val arrivalTime: Int
Finally, for Room to recognize this class as something that can be used to define database tables,
you need to add an annotation to the class itself. Add @Entity on a separate line before the class name.
By default, Room uses the class name as the database table name. Thus, the table name as
defined by the class right now would be Schedule. Optionally, you could also specify
@Entity(tableName="schedule"), but since Room queries are not case sensitive, you can omit
explicitly defining a lowercase table name here.
The class for the schedule entity should now look like the following. @Entity data class Schedule( @PrimaryKey val id: Int,
@NonNull @ColumnInfo(name = "stop_name") val stopName: String,
@NonNull @ColumnInfo(name = "arrival_time") val arrivalTime: Int ) 5. Define the DAO
The next class you'll need to add to integrate Room is the DAO. DAO stands for Data Access
Object and is a Kotlin class that provides access to the data. Specifically, the DAO is where you
would include functions for reading and manipulating data. Calling a function on the DAO is the
equivalent of performing a SQL command on the database. In-fact, DAO functions like the ones
you'll define in this app, often specify a SQL command so you can specify exactly what you
want the function to do. Your knowledge of SQL from the previous codelab will come in handy when defining the DAO.
1. Add a DAO class for the Schedule entity. In the database.schedule package, create a new
file called ScheduleDao.kt and define an interface called ScheduleDao. Similar to the
Schedule class, you need to add an annotation, this time @Dao, to make the interface usable with Room. @Dao interface ScheduleDao { }
Note: While DAO is an acronym, naming conventions for Kotlin code only capitalize the first
letter in acronyms, thus the name ScheduleDao and not ScheduleDAO.
2. There are two screens in the app and each will need a different query. The first screen
shows all the bus stops in ascending order by arrival time. In this use case, the query just
needs to get all columns and include an appropriate ORDER BY clause. The query is
specified as a string passed into a @Query annotation. Define a function getAll() that
returns a List of Schedule objects including the @Query annotation as shown.
@Query("SELECT * FROM schedule ORDER BY arrival_time ASC") fun getAll(): List
3. For the second query, you also want to select all columns from the schedule table.
However, you only want results that match the selected stop name, so you need to add a
WHERE clause. You can reference Kotlin values from the query by preceding it with a
colon (:) (e.g. :stopName from the function parameter). Like before, the results are
ordered in ascending order by arrival time. Define a getByStopName() function that
takes a String parameter called stopName and returns a List of Schedule objects, with a @Query annotation as shown.
@Query("SELECT * FROM schedule WHERE stop_name = :stopName ORDER BY arrival_time ASC")
fun getByStopName(stopName: String): List
6. Define the ViewModel
Now that you've set up the DAO, you technically have everything you need to start accessing the
database from your fragments. However, while this works in theory, it's generally not considered
best practice. The reason is that in more complex apps, you likely have multiple screens that
access only a specific portion of the data. While ScheduleDao is relatively simple, it's easy to
see how this can get out of hand when working with two or more different screens. For example,
a DAO might look something like this: @Dao interface ScheduleDao { @Query(...) getForScreenOne() ... @Query(...) getForScreenTwo() ... @Query(...) getForScreenThree() }
While the code for Screen 1 can access getForScreenOne(), there's no good reason for it to
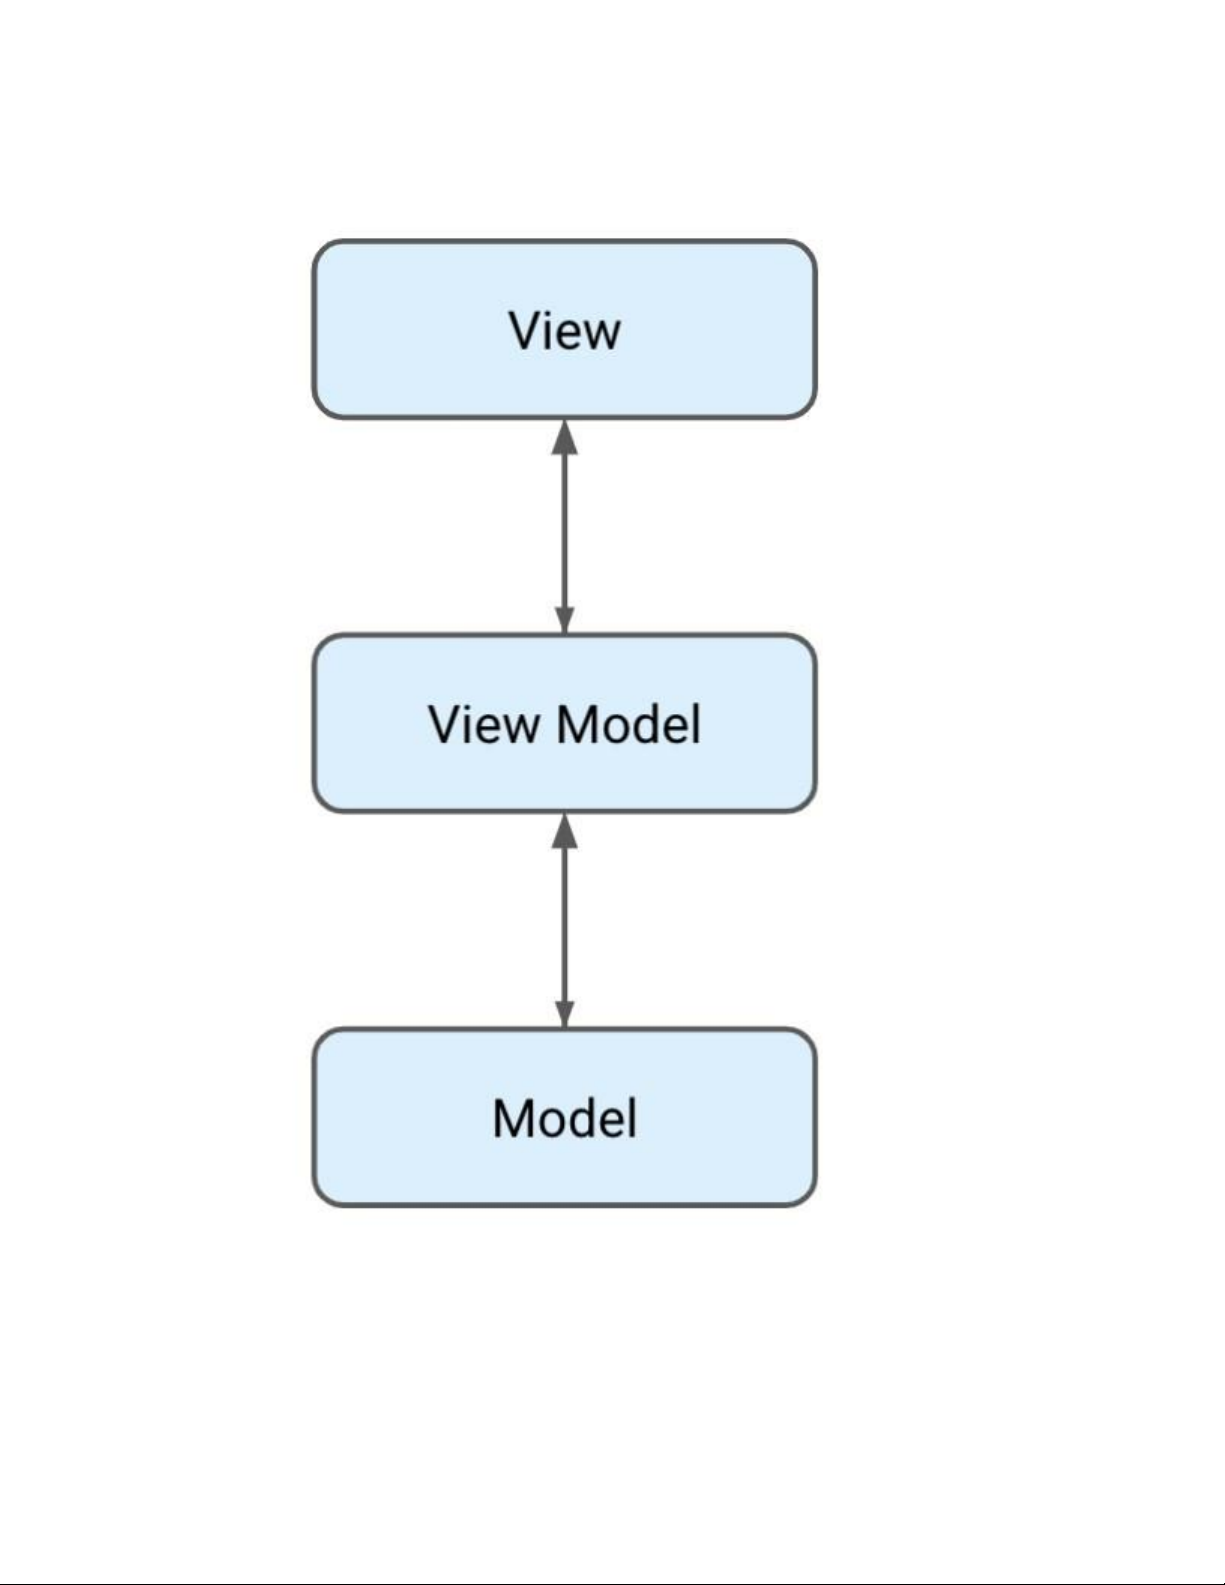
access the other methods. Instead, it's considered best practice to separate the part of the DAO
you expose to the view into a separate class called a view model. This is a common architectural
pattern in mobile apps. Using a view model helps enforce a clear separation between the code for
your app's UI and its data model. It also helps with testing each part of your code independently,
a topic you'll explore further as you continue your Android development journey.
By using a view model, you can take advantage of the ViewModel class. The ViewModel class is
used to store data related to an app's UI, and is also lifecycle aware, meaning that it responds to
lifecycle events much like an activity or fragment does. If lifecycle events such as screen rotation
cause an activity or fragment to be destroyed and recreated, the associated ViewModel won't
need to be recreated. This is not possible with accessing a DAO class directly, so it's best practice
to use ViewModel subclass to separate the responsibility of loading data from your activity or fragment.
Note: Bus Schedule is a relatively simple app and only includes two screens of mostly identical
content. For teaching purposes, we'll be creating a single view model class that can be used by
both screens, but in a larger app, you may want to use a separate view model for each fragment.
1. To create a view model class, create a new file called BusScheduleViewModel.kt in a
new package called viewmodels. Define a class for the view model. It should take a
single parameter of type ScheduleDao.
class BusScheduleViewModel(private val scheduleDao: ScheduleDao): ViewModel() {
2. Since this view model will be used with both screens, you'll need to add a method to get
the full schedule as well as a filtered schedule by stop name. You can do this by calling
the corresponding methods from ScheduleDao.
fun fullSchedule(): List = scheduleDao.getAll()
fun scheduleForStopName(name: String): List =
scheduleDao.getByStopName(name)
Although you've finished defining the view model, you can't just instantiate a
BusScheduleViewModel directly and expect everything to work. As the ViewModel class
BusScheduleViewModel is meant to be lifecycle aware, it should be instantiated by an object
that can respond to lifecycle events. If you instantiate it directly in one of your fragments, then
your fragment object will have to handle everything, including all the memory management,
which is beyond the scope of what your app's code should do. Instead, you can create a class,
called a factory, that will instantiate view model objects for you.
1. To create a factory, below the view model class, create a new class
BusScheduleViewModelFactory, that inherits from ViewModelProvider.Factory.
class BusScheduleViewModelFactory(
private val scheduleDao: ScheduleDao
) : ViewModelProvider.Factory { }
2. You'll just need a bit of boilerplate code to correctly instantiate a view model. Instead of
initializing the class directly, you'll override a method called create() that returns a
BusScheduleViewModelFactory with some error checking. Implement the create()
inside the BusScheduleViewModelFactory class as follows.
override fun create(modelClass: Class): T {
if (modelClass.isAssignableFrom(BusScheduleViewModel::class.java)) { @Suppress("UNCHECKED_CAST")
return BusScheduleViewModel(scheduleDao) as T }
throw IllegalArgumentException("Unknown ViewModel class") }
You can now instantiate a BusScheduleViewModelFactory object with
BusScheduleViewModelFactory.create(), so that your view model can be lifecycle aware
without your fragment having to handle this directly.
7. Create database class and pre-populate database
Now that you've defined the models, DAO, and a view model for fragments to access the DAO,
you still need to tell Room what to do with all of these classes. That's where the AppDatabase
class comes in. An Android app using Room, such as yours, subclasses the RoomDatabase class
and has a few key responsibilities. In your app, the AppDatabase needs to
1. Specify which entities are defined in the database.
2. Provide access to a single instance of each DAO class.
3. Perform any additional setup, such as pre-populating the database.
While you may be wondering why Room can't just find all the entities and DAO objects for you,
it's quite possible that your app could have multiple databases, or any number of scenarios where
the library can't assume the intent of you, the developer. The AppDatabase class gives you
complete control over your models, DAO classes, and any database setup you wish to perform.
1. To add an AppDatabase class, in the database package, create a new file called
AppDatabase.kt, and define a new abstract class AppDatabase that inherits from RoomDatabase.
abstract class AppDatabase: RoomDatabase() { }
2. The database class allows other classes easy access to the DAO classes. Add an abstract
function that returns a ScheduleDao.
abstract fun scheduleDao(): ScheduleDao
3. When using an AppDatabase class, you want to ensure that only one instance of the
database exists to prevent race conditions or other potential issues. The instance is stored
in the companion object, and you'll also need a method that either returns the existing
instance, or creates the database for the first time. This is defined in the companion
object. Add the following companion object just below the scheduleDao() function. companion object { }
In the companion object, add a property called INSTANCE of type AppDatabase. This value is
initially set to null, so the type is marked with a ?. This is also marked with a @Volatile
annotation. While the details about when to use a volatile property are a bit advanced for this
lesson, you'll want to use it for your AppDatabase instance to avoid potential bugs.
@Volatile private var INSTANCE: AppDatabase? = null
Below the INSTANCE property, define a function to return the AppDatabase instance:
fun getDatabase(context: Context): AppDatabase {
return INSTANCE ?: synchronized(this) {
val instance = Room.databaseBuilder( context, AppDatabase::class.java, "app_database")
.createFromAsset("database/bus_schedule.db") .build() INSTANCE = instance instance } }
In the implementation for getDatabase(), you use the Elvis operator to either return the
existing instance of the database (if it already exists) or create the database for the first time if
needed. In this app, since the data is prepopulated. You also call createFromAsset() to load the
existing data. The bus_schedule.db file can be found in the assets.database package in your project.
4. Just like the model classes and DAO, the database class requires an annotation providing
some specific information. All the entity types (you access the type itself using
ClassName::class) are listed in an array. The database is also given a version number,
which you'll set to 1. Add the @Database annotation as follows.
@Database(entities = arrayOf(Schedule::class), version = 1)
Note: The version number is incremented each time you make a schema change. The app checks
this version with the one in the database to determine if and how a migration should be performed.
Now that you've created your AppDatabase class, there's just one more step to make it usable.
You'll need to provide a custom subclass of the Application class, and create a lazy property
that will hold the result of getDatabase().
5. In the com.example.busschedule package, add a new file called
BusScheduleApplication.kt, and create a BusScheduleApplication class that inherits from Application.
class BusScheduleApplication : Application() { }
6. Add a database property of type AppDatabase. The property should be lazy and return the
result of calling getDatabase() on your AppDatabase class.
class BusScheduleApplication : Application() {
val database: AppDatabase by lazy { AppDatabase.getDatabase(this) }
7. Finally, to make sure that BusScheduleApplication class is used (instead of the default
base class Application), you need to make a small change to the manifest. In
AndroidMainifest.xml, set the android:name property to
com.example.busschedule.BusScheduleApplication.
android:name="com.example.busschedule.BusScheduleApplication" ...
That's it for setting up your app's model. You're all set to start using data from Room in your UI.
On the next few pages, you'll create a ListAdapter for your app's RecyclerView to present the
bus schedule data and respond to data changes dynamically.
8. Create the ListAdapter
It's time to take all that hard work and hook up the model to the view. Previously, when using a
RecyclerView, you would use a RecyclerView.Adapter to present a static list of data. While
this will certainly work for an app like Bus Schedule, a common scenario when working with
databases is to handle changes to the data in real time. Even if only one item's contents change,
the entire recycler view is refreshed. This won't be sufficient for the majority of apps using persistence.
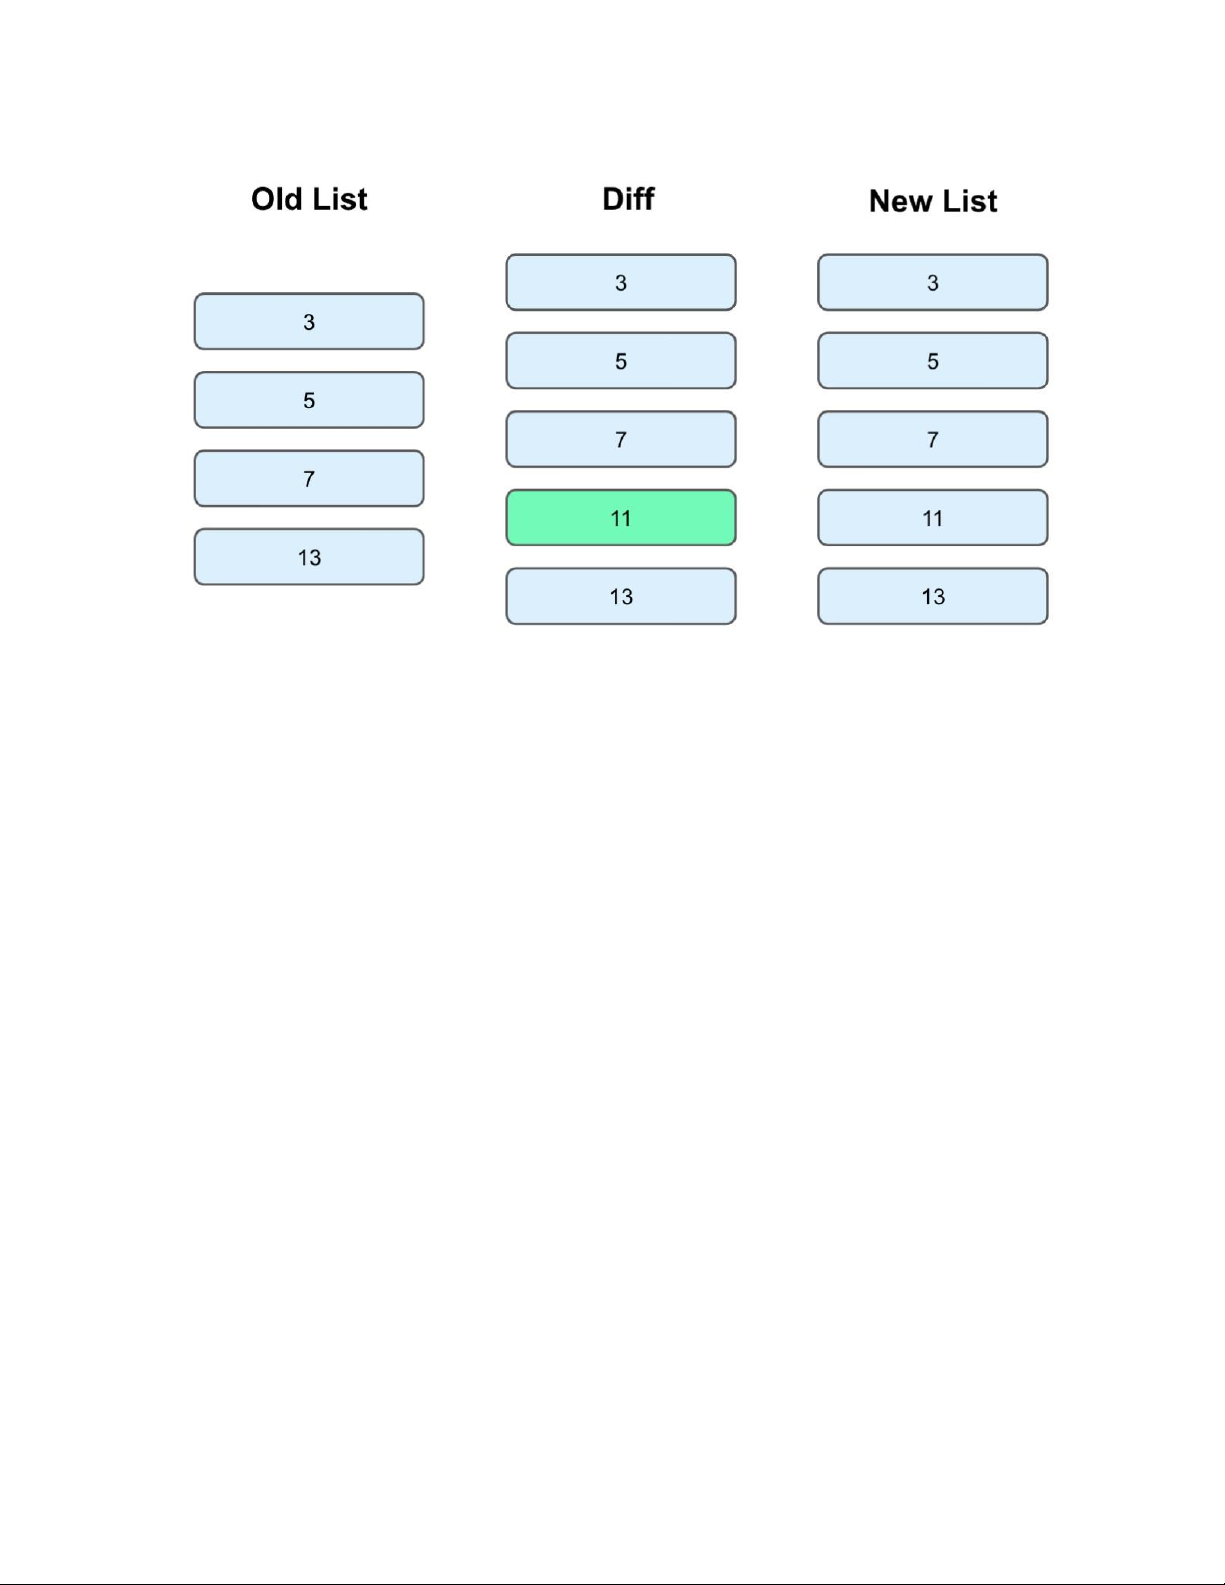
An alternative for a dynamically changing list is called ListAdapter. ListAdapter uses
AsyncListDiffer to determine the differences between an old list of data and a new list of data.
Then, the recycler view is only updated based on the differences between the two lists. The result
is that your recycler view is more performant when handling frequently updated data, as you'll
often have in a database application.
Because the UI is identical for both screens, you'll just need to create a single ListAdapter that
can be used with both screens.
1. Create a new file BusStopAdapter.kt and a BusStopAdapter class as shown. The class
extends a generic ListAdapter that takes a list of Schedule objects and a
BusStopViewHolder class for the UI. For the BusStopViewHolder, you also pass in a
DiffCallback type which you'll define soon. The BusStopAdapter class itself also takes
a parameter, onItemClicked(). This function will be used to handle navigation when an
item is selected on the first screen, but for the second screen, you'll just pass in an empty function.
class BusStopAdapter(private val onItemClicked: (Schedule) -> Unit) : ListAdapter(DiffCallback) { }
2. Similar to a recycler view adapter, you need a view holder so that you can access views
created from your layout file in code. The layout for the cells is already created. Simply,
create a BusStopViewHolder class as shown and implement the bind() function to set
stopNameTextView's text to the stop name and the arrivalTimeTextView's text to the formatted date.
class BusStopViewHolder(private var binding: BusStopItemBinding):
RecyclerView.ViewHolder(binding.root) {
@SuppressLint("SimpleDateFormat")
fun bind(schedule: Schedule) {
binding.stopNameTextView.text = schedule.stopName
binding.arrivalTimeTextView.text = SimpleDateFormat(
"h:mm a").format(Date(schedule.arrivalTime.toLong() * 1000) ) } }
3. Override and implement onCreateViewHolder() and inflate the layout and set the
onClickListener() to call onItemClicked() for the item at the current position.
override fun onCreateViewHolder(parent: ViewGroup, viewType: Int): BusStopViewHolder {
val viewHolder = BusStopViewHolder( BusStopItemBinding.inflate(
LayoutInflater.from( parent.context), parent, false ) )
viewHolder.itemView.setOnClickListener {
val position = viewHolder.adapterPosition
onItemClicked(getItem(position)) } return viewHolder }
4. Override and implement onBindViewHolder() and to bind the view at the specified position.
override fun onBindViewHolder(holder: BusStopViewHolder, position: Int) {
holder.bind(getItem(position)) }
5. Remember that DiffCallback class you specified for the ListAdapter? This is just an
object that helps the ListAdapter determine which items in the new and old lists are
different when updating the list. There are two methods: areItemsTheSame() checks if
the object (or row in the database in your case) is the same by only checking the ID.
areContentsTheSame() checks if all properties, not just the ID, are the same. These
methods allow the ListAdapter to determine which items have been inserted, updated,
and deleted so that the UI can be updated accordingly.
Add a companion object and implement DiffCallback as shown. companion object {
private val DiffCallback = object : DiffUtil.ItemCallback() {
override fun areItemsTheSame(oldItem: Schedule, newItem: Schedule): Boolean {
return oldItem.id == newItem.id
} override fun areContentsTheSame(oldItem: Schedule, newItem: Schedule): Boolean { return oldItem == newItem } }
Tài liệu liên quan:
-
Lab 8.3. Using shared viewmodel in android fragments codelab môn Phát triển ứng dụng đa nền tảng | Trường Đại học Bách Khoa Hà Nội
118 59 -

Lab 9.1: Introduction to SQL Basics for Android Development môn Phát triển ứng dụng đa nền tảng | Trường Đại học Bách Khoa Hà Nội
114 57 -
Mẫu báo cáo Bài tập lớn môn Phát triển ứng dụng đa nền tảng | Trường Đại học Bách Khoa Hà Nội
148 74 -

Bài tập tổng hợp môn Phát triển ứng dụng đa nền tảng | Trường Đại học Bách Khoa Hà Nội
115 58