Lab 9.1: Introduction to SQL Basics for Android Development môn Phát triển ứng dụng đa nền tảng | Trường Đại học Bách Khoa Hà Nội
Previously, you learned about how to incorporate networked data into your app, and learned about using coroutines to handle concurrent tasks. In this pathway, you'll learn another fundamental skill of Android development that will enable you to build quality apps: persistence. Tài liệu được sưu tầm gồm 17 trang, giúp các bạn nắm vững kiến thức, rèn luyện kỹ năng và đạt được kết quả tốt trong học tập. Mời các bạn đón xem!
Môn: Phát triển ứng dụng đa nền tảng 10 tài liệu
Trường: Đại học Bách Khoa Hà Nội 5.8 K tài liệu
Tác giả:


Preview text:
SQL basics 1. Before you begin
2. Overview of a relational database
3. Starter code - Parks database 4. Basic SELECT statements 5. Common SQL functions
6. Ordering and grouping query results
7. Inserting and deleting rows 8. Solutions to exercises 9. Congratulations Learn more 1. Before you begin
Previously, you learned about how to incorporate networked data into your app, and learned
about using coroutines to handle concurrent tasks. In this pathway, you'll learn another
fundamental skill of Android development that will enable you to build quality apps: persistence.
Even if you haven't heard the term before, you've likely encountered persistence before when
using an app. From writing a shopping list, to scrolling through pictures from several years ago
in a photos app, to pausing and resuming a game, apps use persistence to provide a seamless user
experience. While it's easy for users to take these features for granted, persisting data is an
essential skill for a developer to build high quality apps.
Later in this unit, you'll learn more about persistence on Android, and learn about a library called
Room that allows your apps to read and write from a database. However, before you dive into
working with persistence on Android, it's important to get familiar with the basics of relational
databases, and how to read and manipulate data with something called SQL (short for Structured
Query Language). If you're already familiar with these concepts, consider this lesson as a review
to make sure these concepts are fresh when you learn about Room. If not, then that's perfectly
fine! We don't expect you to know anything about databases at this point. By the end of this
codelab, you'll have all the fundamentals you need to start learning how to work with databases in an Android app. Prerequisites
• Navigate a project in Android Studio. What you'll learn •
The structure of a relational database: tables, columns, and rows •
SELECT statements including WHERE, ORDER BY, GROUP BY, and LIMIT clauses •
How to insert, update, and delete rows using SQL What you'll need
• A computer with Android studio installed.
2. Overview of a relational database
What is a relational database?
In computing, a database is simply a structured collection of data that can be electronically
accessed and written to. Databases can store any of the same information you can represent in an
app using Kotlin. On mobile devices, databases are commonly used to save data from a running
app so that it can be accessed the next time the app is opened, without retrieving the data from
another source, like the internet. This is known as data persistence.
When talking about data persistence, you'll often hear the term "relational database." A relational
database is a common type of database that organizes data into tables, columns, and rows. When
writing Kotlin code, you create classes that represent objects. A table in a relational database
works the same way. Besides representing data, tables can also reference other tables so that you
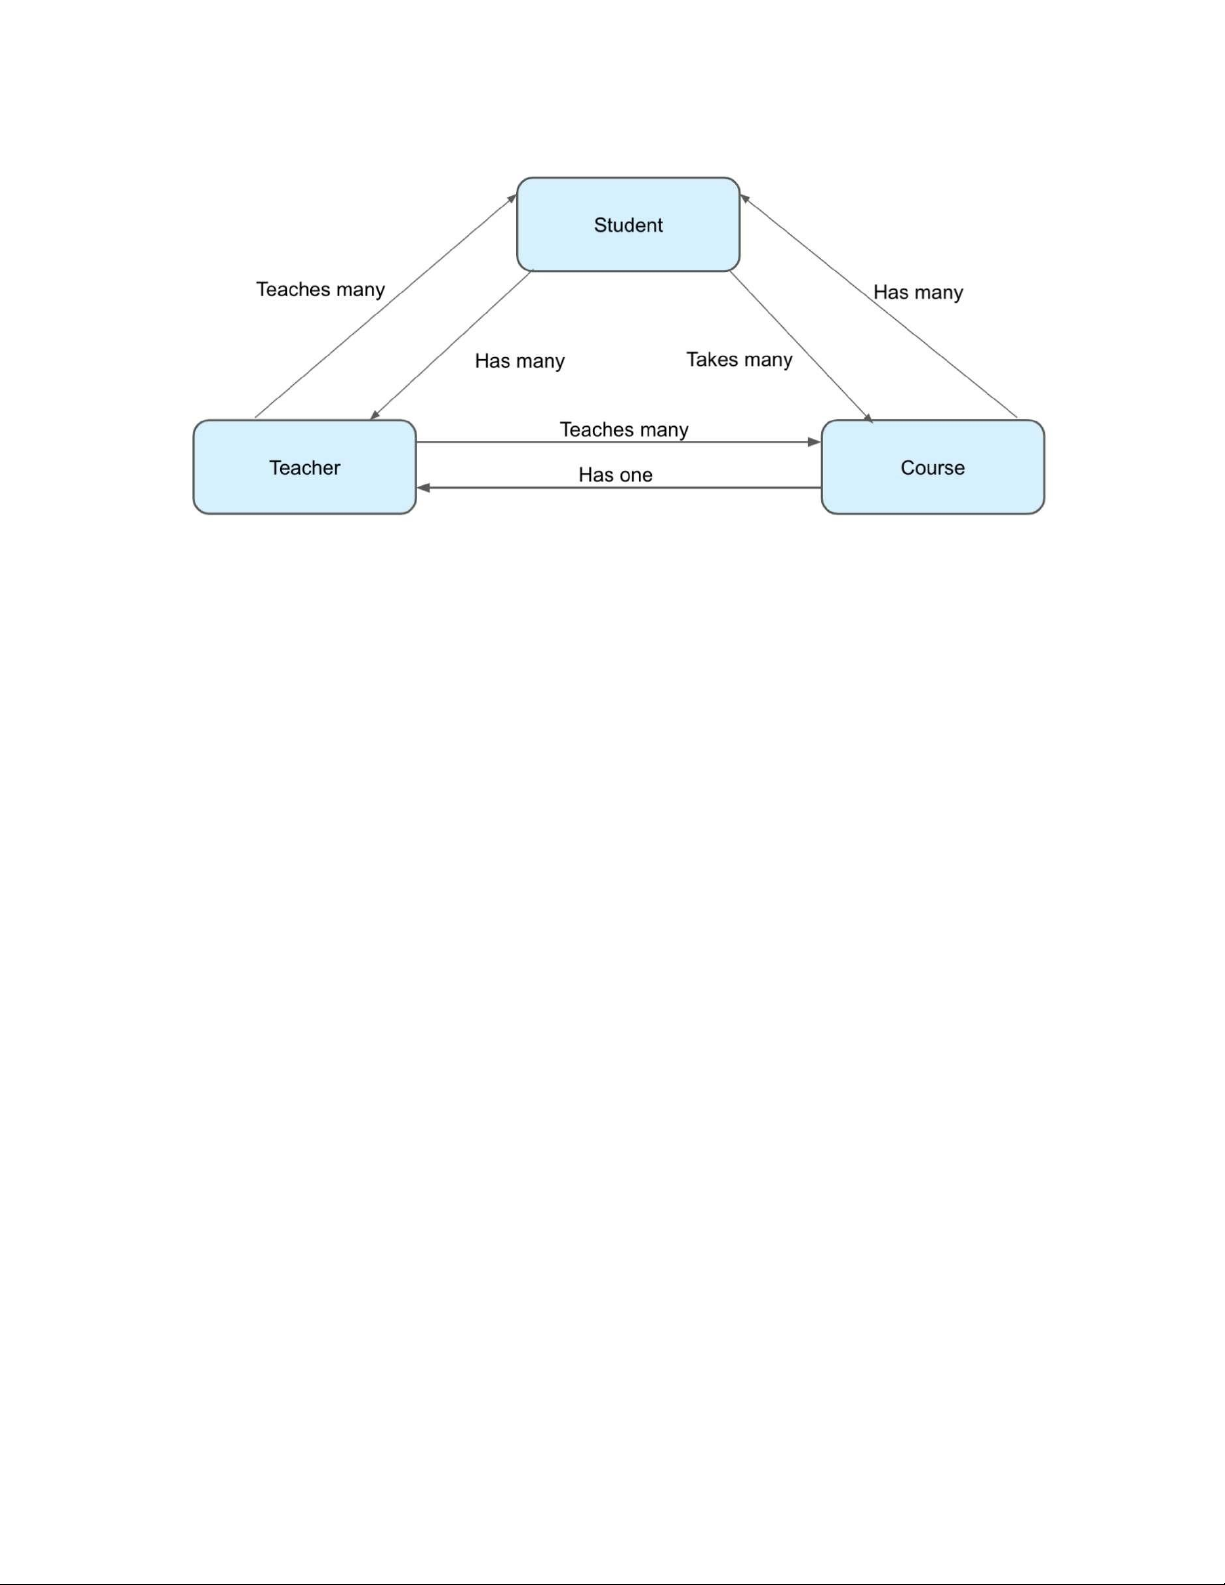
can have relationships between them. A classic example would be a table of "students",
"teachers," and "course." A course would have one teacher, but a student might have many
courses. A database can represent the relationships between these tables, which is why you'll
often hear the term relational database.
Real world relationships can be represented with relationships between tables. Tables, columns, and rows
Defining the tables, or what data you're representing, is only the first step in creating a relational
database. You also need to think about what specific pieces of information are stored in each
table. Specific properties are represented by columns. A column consists of a name, and a data
type. You're already familiar with properties from working with classes in Kotlin. You can think
of SQL tables the same way. A table is like a class definition, describing the type of "thing" you
want to represent. A column is a specific property of the "thing" created with each entry in the table. Plant id INTEGER species TEXT (string) name TEXT (string) color TEXT (string) Garden id INTEGER name TEXT (string) length INTEGER width INTEGER
Individual table entries are called rows. This is just like an instance of a class in Kotlin. Each row
has data corresponding to each column. The table provides the template, but the rows define the
actual data stored in the table. id species name color 1 Camellia Sinensis Tea Plant green
2 Echinacea Purpurea Purple Coneflower purple 3 Ferula Foetida Asafoetida green Primary Key
In the above example, notice how there's a column for an id property. While chances are that
plant species in nature, or whatever you represent in your database, probably don't have a
conveniently numbered id, it's important for rows in a data table to have some sort of unique
identifier. This is commonly known as the primary key, and is unique to each row in the table.
This is useful if you need to reference rows in one data table from another table. Say for
example, there was another table called "garden" where you want to associate a garden with all
the plant species it contains. You can use the primary key in the plants table to reference a plant
from an entry in the garden table, or any other table in the database.
Primary keys make it possible to have the relationships in a relational database. While you won't
be using databases with more than one table in this course, having a unique ID helps with
querying, updating, and deleting existing items in a table. Data Types
Just like with defining properties of Kotlin classes, columns in a database can be one of many
possible data types. A column can represent a character, string, number (with or without a
decimal), or binary data. Other data like dates and times could either be represented numerically
or as a string depending on the use case. When working with Room, you'll mainly be working
with Kotlin types, but they map to SQL types behind the scenes.
Note: Like in Kotlin, columns in a database can have different data types. These aren't quite the
same as data types in Kotlin. If you're interested in learning more, check out this resource for an
overview of the basic data types in SQL. When working with a database in Room, however, you
won't be working with these data types directly, but rather, defining your data tables in code
using equivalent Kotlin data types. SQL
When accessing a relational database, whether on its own or using a library such as Room, you'll
need something called SQL.
What's SQL? SQL (sometimes pronounced "sequel") stands for Structured Query Language, and
allows you to read and manipulate data in a relational database. Don't worry though - you won't
have to learn an entirely new programming language just to implement persistence in your app.
Unlike a programming language like Kotlin, SQL consists of just a few types of statements for
reading and writing from a database. Once you learn the basic format of each, it's just a matter of
filling in the blanks for the specific information you're reading or writing from the database.
Below are the most common SQL statements, and the ones you'll be working with.
Gets specific information from a data table and results can be filtered and sorted in SELECT various ways.
INSERT Adds a new row to a table.
UPDATE Updates an existing row (or rows) in a table.
DELETE Removes an existing row (or rows) from a table.
Now, before you can do anything in SQL, you're going to need a database. On the next screen,
you'll get set up with a sample project that includes a database for you to practice SQL queries.
3. Starter code - Parks database
The starter code you'll download is a bit different than for previous codelabs. Instead of building
upon an existing project, we'll provide a simple Android Studio project that creates a database
that you can use to practice SQL queries. After running the app once, you'll be able to access the
database using an Android Studio tool called the Database Inspector.
Starter Code URL: https://github.com/google-developer-training/android-basics-kotlin- sqlbasics-app Branch: main
To get the code for this codelab and open it in Android Studio, do the following. Get the code
1. Click on the provided URL. This opens the GitHub page for the project in a browser.
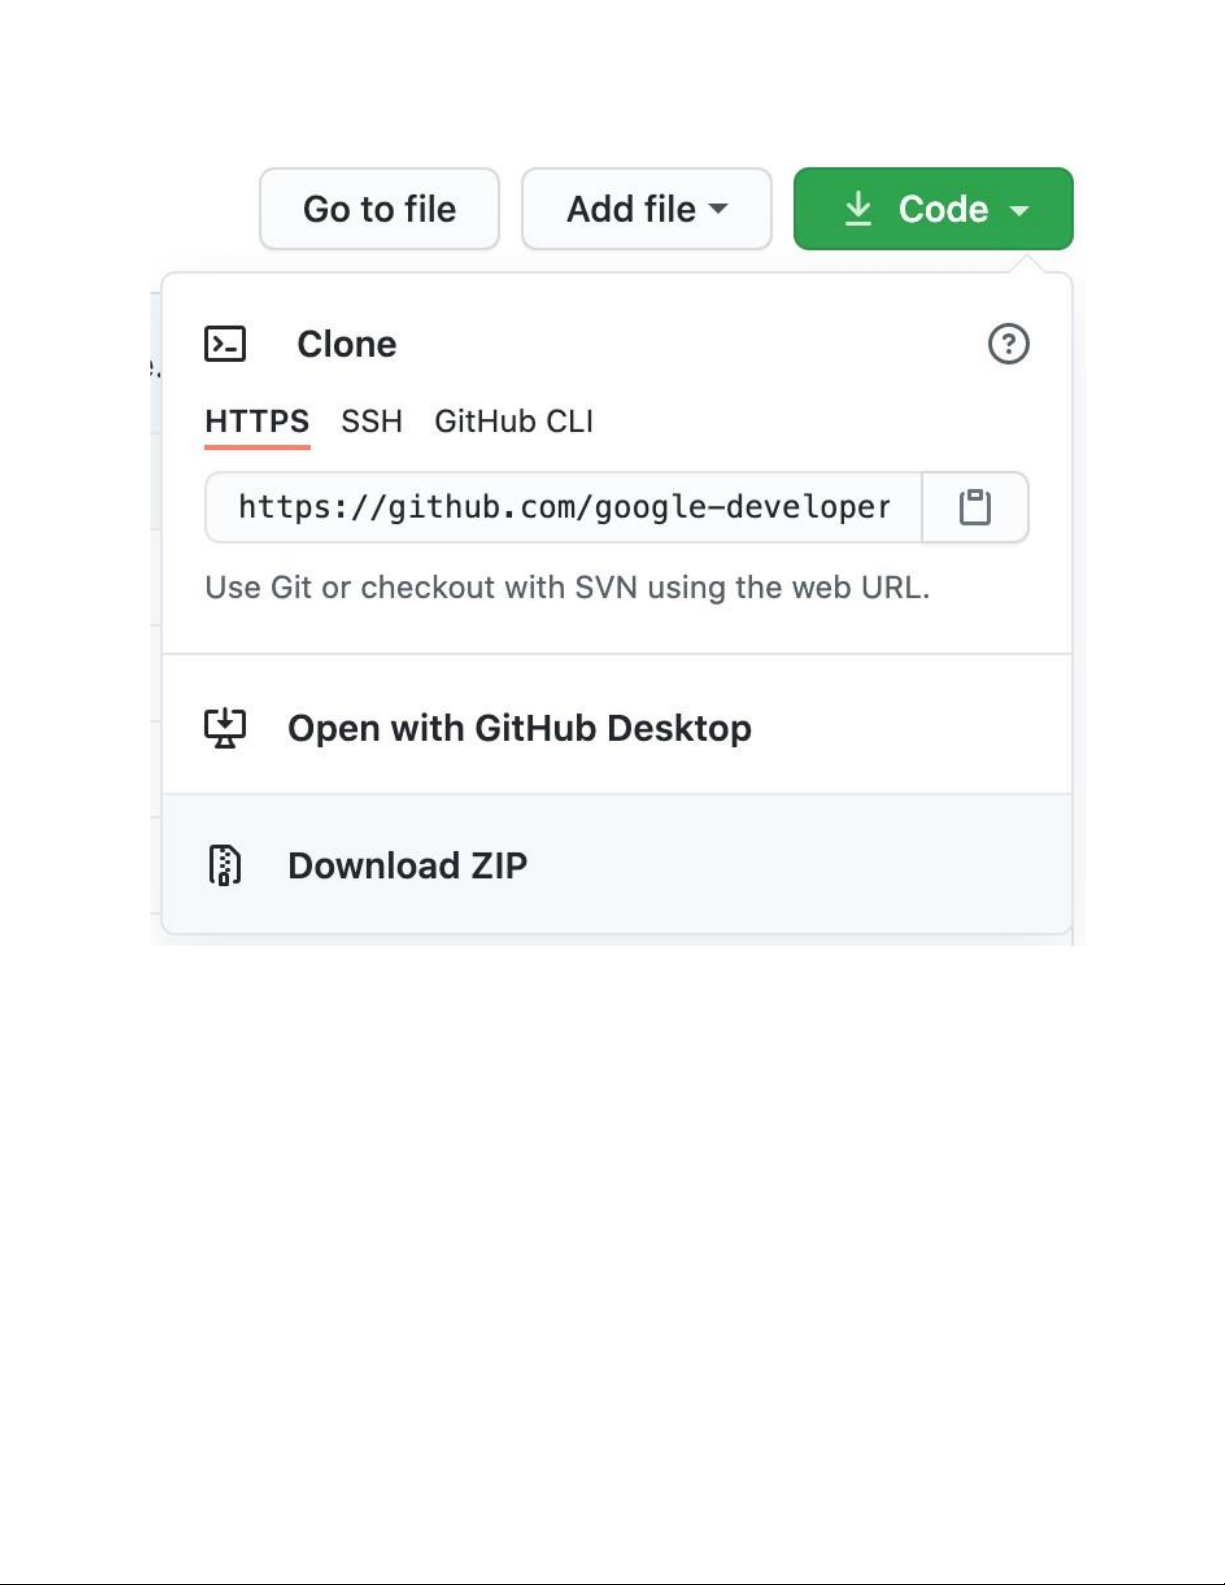
2. On the GitHub page for the project, click the Code button, which brings up a dialog.
3. In the dialog, click the Download ZIP button to save the project to your computer. Wait for the download to complete.
4. Locate the file on your computer (likely in the Downloads folder).
5. Double-click the ZIP file to unpack it. This creates a new folder that contains the project files.
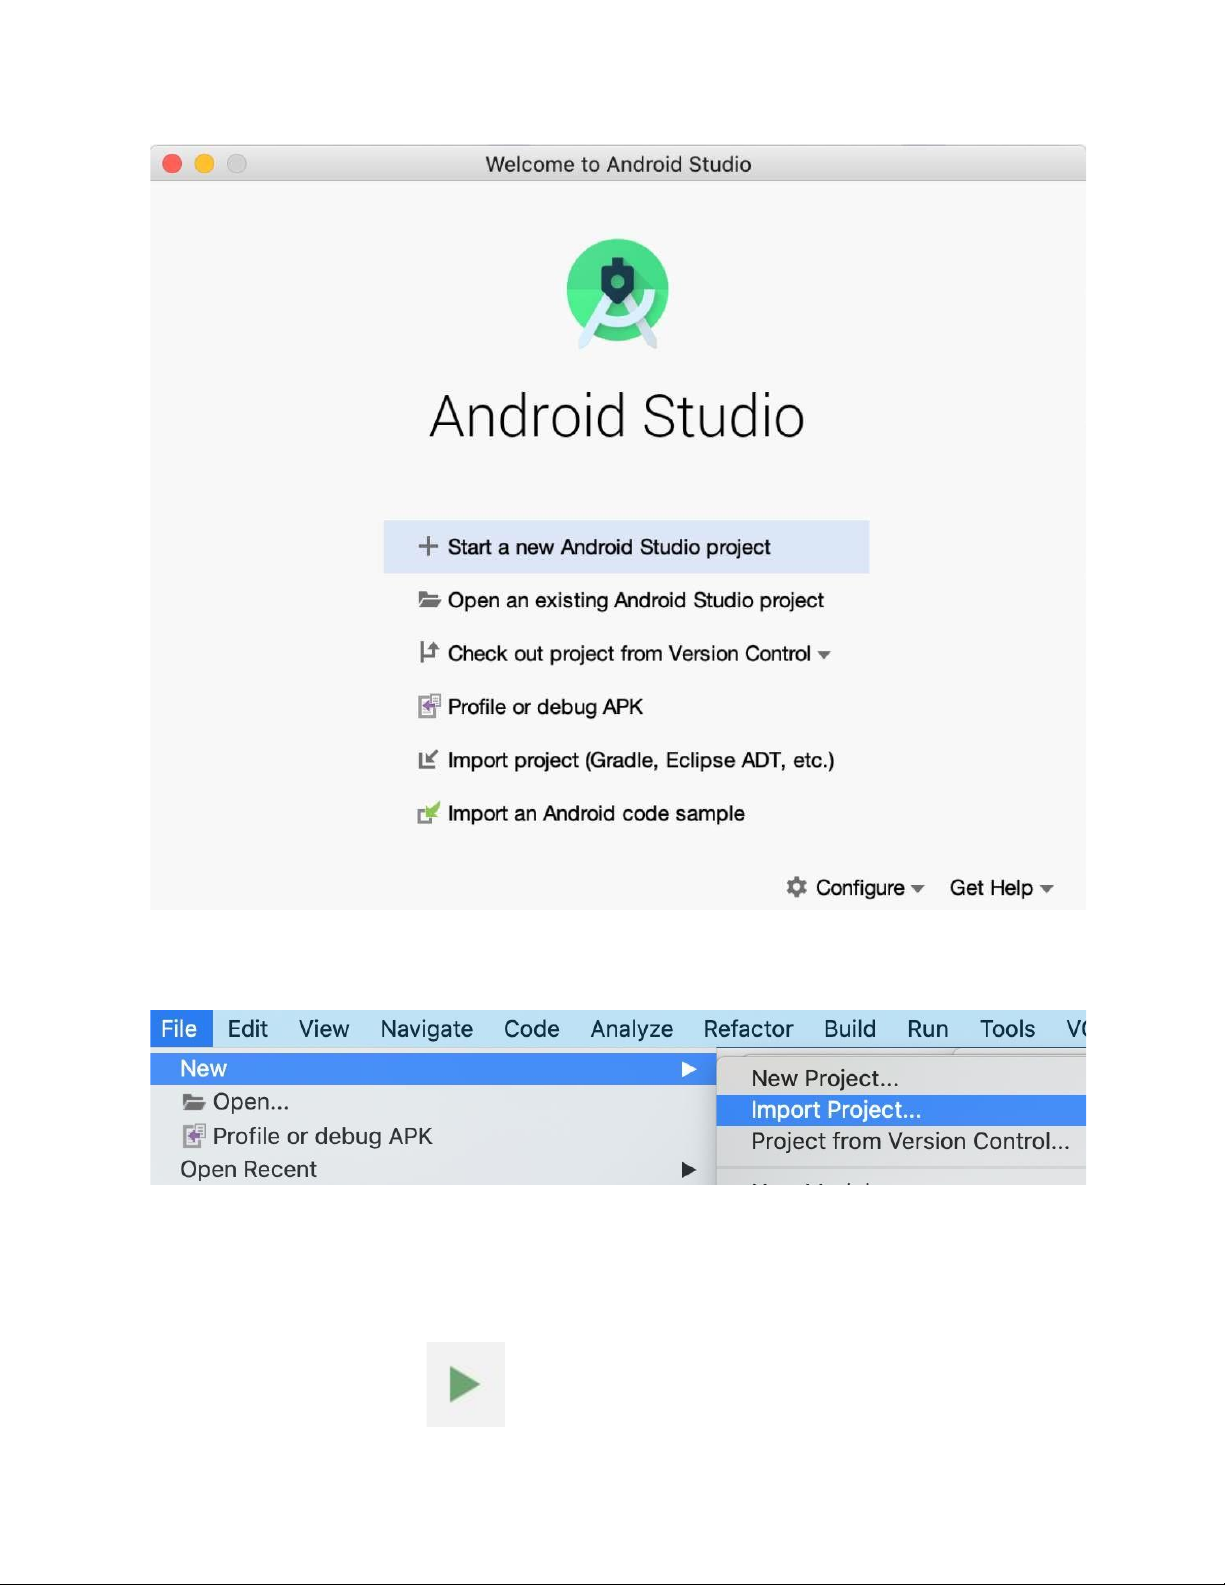
Open the project in Android Studio 1. Start Android Studio.
2. In the Welcome to Android Studio window, click Open an existing Android Studio project.
Note: If Android Studio is already open, instead, select the File > New > Import Project menu option.
3. In the Import Project dialog, navigate to where the unzipped project folder is located
(likely in your Downloads folder).
4. Double-click on that project folder.
5. Wait for Android Studio to open the project.
6. Click the Run button
to build and run the app. Make sure it builds as expected.
7. Browse the project files in the Project tool window to see how the app is set-up.
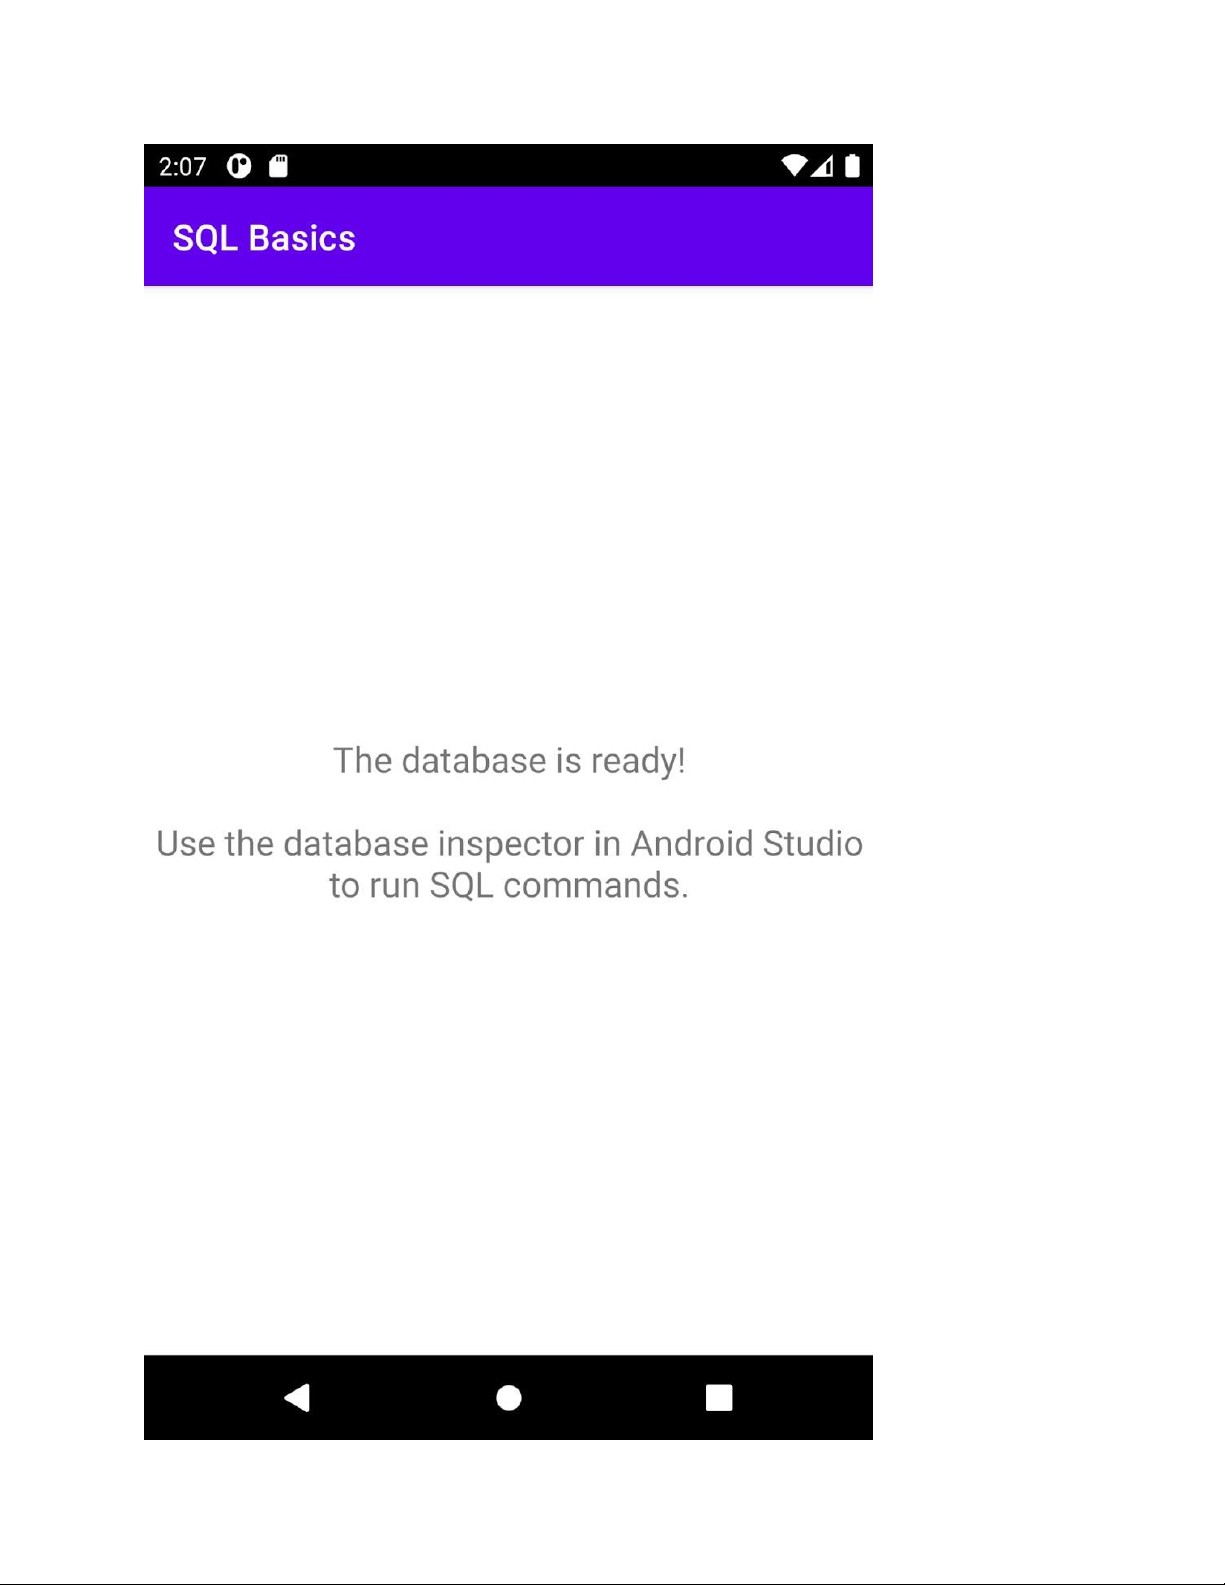
Before moving onto the next section, complete the following steps to make sure you're set up with the starter project.
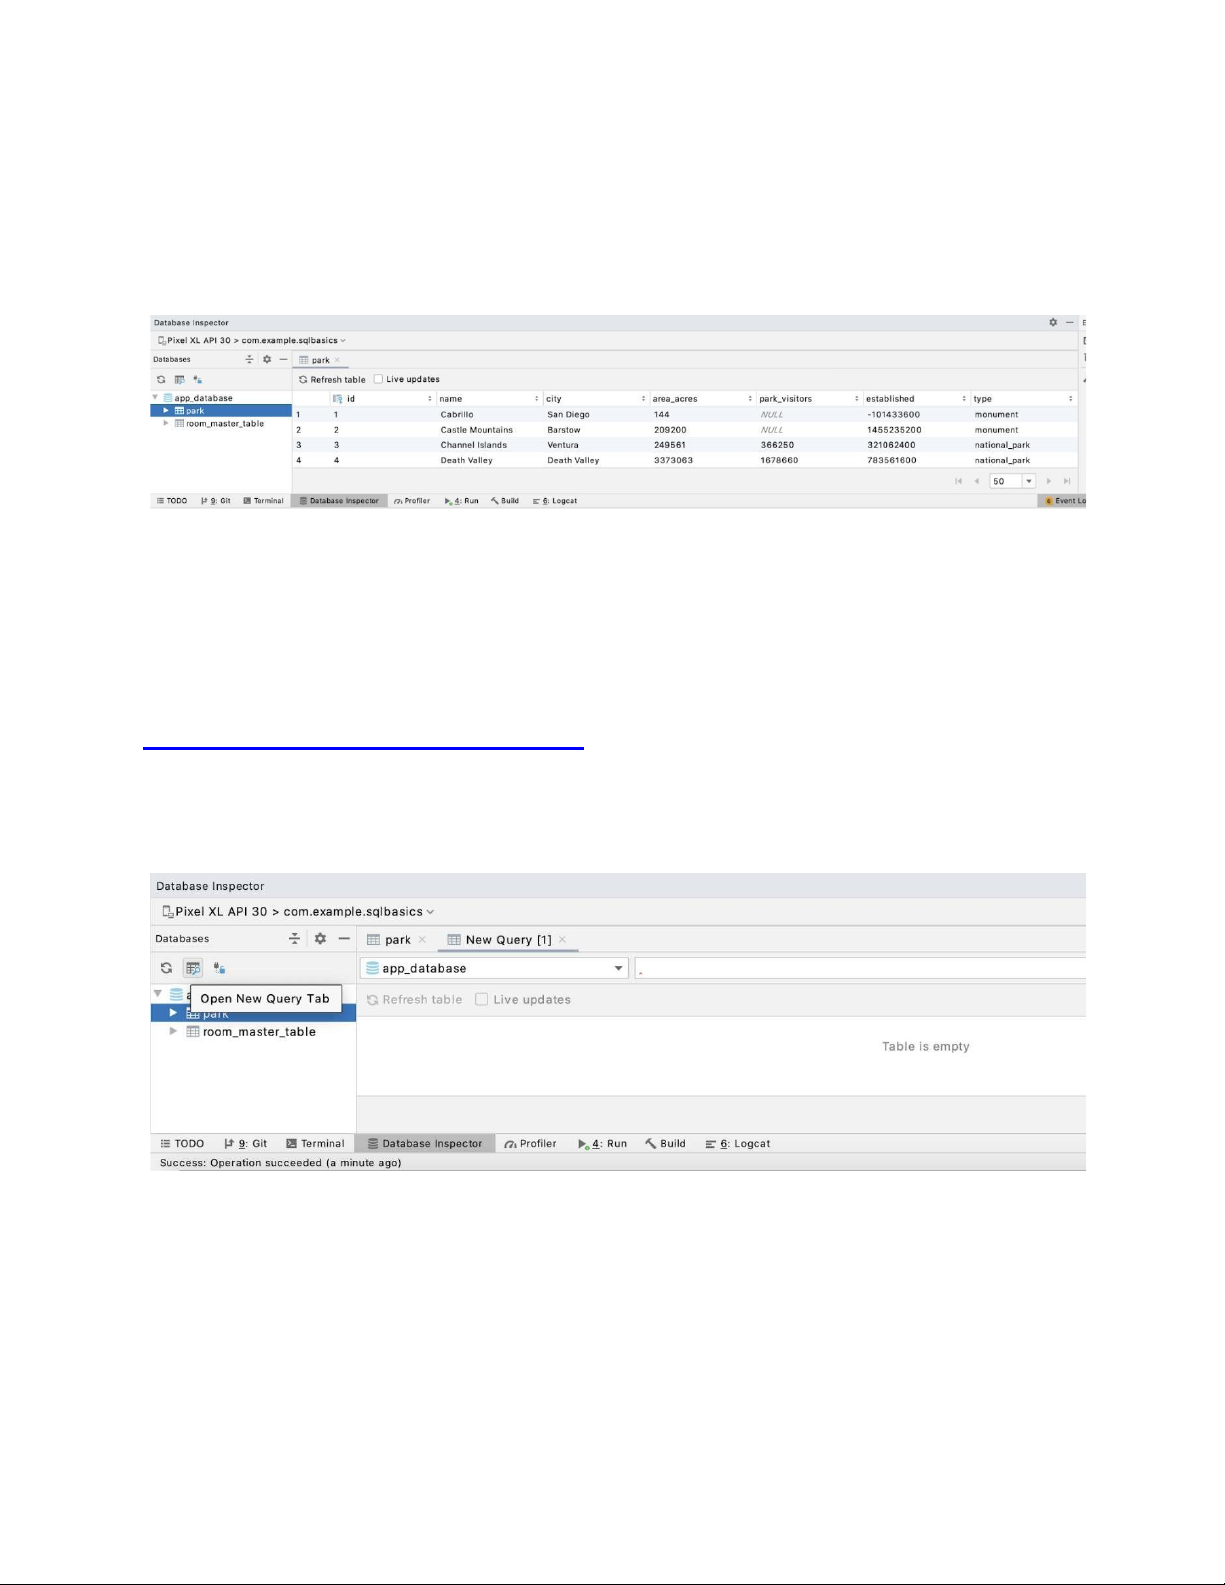
1. Run the application. The app should show a single screen that looks like this.
3. In Android Studio, open the Database Inspector with View > Tool Windows > Database Inspector.
4. You should see a new tab at the bottom labeled "Database Inspector." It may take a few
seconds to load, but you should see a list on the left with the data tables, which you can
select to run queries against.
Note: If you're using Android Studio 2020.3.1 Arctic Fox, the Database Inspector can be
accessed using View > Tool > App Inspection. The tab at the bottom will still be called Database Inspector. 4. Basic SELECT statements
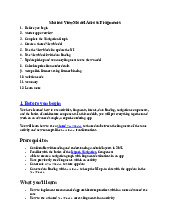
For the following exercises, you'll run the queries in the Database Inspector. Make sure you
select the correct table in the left pane (park), click the Open New Query Tab button and you
should see a text box where you can type SQL commands.
A SQL statement is a command, sort of like a line of code, that accesses (either reading or
writing) a database. The most basic thing you can do in SQL is simply getting all the data in a
table. To do this, you start with the word SELECT, meaning that you want to read data. Then, you
add a star (*). This is where you would specify the columns you want to select, and using a star is
shorthand for selecting all columns. Then, use the FROM keyword followed by the name of the
data table, park. Run the following command in the Database Inspector, and observe the entire
table with all the rows and columns. SELECT * FROM park
If you want to only select a specific column instead of all columns in the data table, you can specify a column name. SELECT city FROM park
You can also select multiple specific columns, each separated with a comma.
SELECT name, established, city FROM park
Sometimes selecting all the rows in a database isn't entirely necessary. You can add clauses-part
of a SQL statement-to further narrow down your results.
One clause is LIMIT, which allows you to set a limit on the number of rows returned. So instead
of returning all 23 results, the following query only returns the first five. SELECT name FROM park LIMIT 5
One of the most common and useful clauses is the WHERE clause. A WHERE clause lets you filter
results based on one or more columns. SELECT name FROM park WHERE type = "national_park"
Note: Unlike in Kotlin, where the = operator is used for assignment and == is used for
comparison, in SQL, you only use a single equal sign to compare two values.
There's also a "not equal to" (!=) operator. The following query lists all parks over 100,000 acres
that are not a recreation_area. With WHERE clauses, you can also use Boolean operators like
AND or OR to add more than one condition. SELECT name FROM park
WHERE type != "recreation_area" AND area_acres > 100000 Practice
SQL queries can be useful to answer a variety of questions about your data, and the best way to
practice is to write your own queries. Over the next few steps, you'll have the opportunity to
write a query to answer a particular question. Be sure to test it in the Database Inspector before moving on.
All exercises will build on the cumulative knowledge from all previous sections, and there will
be walkthroughs at the end of the codelab to check your answers. Problem 1:
Write a SQL query to get the names of all parks with fewer than 1,000,000 visitors. 5. Common SQL functions
The first query you wrote simply returned every row in the database. SELECT * FROM park
However, perhaps you don't want to return a long list of results. SQL also offers aggregate
functions which can help you reduce data into a single meaningful value. For example, say you
want to know the number of rows in the park table. Instead of SELECT * ..., use the COUNT()
function and pass in * (for all rows) or a column name, and the query will instead return a count of all rows. SELECT COUNT(*) FROM park
Another useful aggregate function is the SUM() function, for adding up the values in a column.
This query filters only national parks (as these are the only entries with a park_visitors
column that's not null), and adds up the total number of visitors for every park.
SELECT SUM(park_visitors) FROM park WHERE type = "national_park"
It's worth noting that you can still use SUM() on a null value, but value will simply be treated as
zero. The following query will return the same as the one above. However, it's still a good idea to
be as specific as possible to avoid bugs when you start using SQL in your apps.
SELECT SUM(park_visitors) FROM park
In addition to aggregating values, other useful functions exist, like MAX() and MIN() to get the
largest or smallest value respectively.
SELECT MAX(area_acres) FROM park
WHERE type = ’national_park’ Getting DISTINCT values
You may notice that for some rows, the column has the same value as other rows. For example,
the type column only has a finite number of possible values. You can eliminate duplicate values
from your query results using the DISTINCT keyword. For example, to get all the unique values
for the type column, you can use the following query.
SELECT DISTINCT type FROM park
You can also use DISTINCT in an aggregate function, so instead of listing out the unique types
and counting them yourself, you can simply return the count.
SELECT COUNT(DISTINCT type) FROM park Practice
Take the time to apply what you've learned and see if you can write the following queries. Be
sure to use the Database Inspector to verify that your code works. Problem 2:
Write a SQL query to get the number of distinct cities in the park table Problem 3:
Write a SQL query to get the total number of visitors to parks in San Francisco.
6. Ordering and grouping query results
In the previous examples, it may have been difficult to find a specific entry. Thankfully, you can
also sort results of a SELECT statement using an ORDER BY clause. You add an ORDER BY clause at
the end of the query after the WHERE clause (if any) and simply specify the column name you'd
like to sort by. The following example gets the name of every park in the database, but sorts the
results in alphabetical order. SELECT name FROM park ORDER BY name
By default, results are sorted in ascending order, but you can add either the ASC or DESC keyword
to the order by clause to sort in ascending or descending order. You don't need to specify ASC as
the first query lists results in ascending order to begin with, but if you want to get results in
descending order, add the DESC keyword to the end of the ORDER BY clause. SELECT name FROM park ORDER BY name DESC
To make results easier to read, you also have the option to group them by column. Before the
ORDER BY clause (if any), you can optionally specify a GROUP BY clause and a column. What this
does is separate the results into a subset specific to the column in the GROUP BY, and for each
column, the results will be filtered and ordered according to the rest of the query. SELECT type, name FROM park GROUP BY type ORDER BY name
This is best understood using an example. Instead of counting all the parks in the database, you
can see how many parks of each type are present, and get a separate count for each.
SELECT type, COUNT(*) FROM park GROUP BY type ORDER BY type Practice
Take the time to apply what you've learned and see if you can write the following query. Be sure
to use the Database Inspector to verify that your code works.
Problem 4: Write a SQL query to the top 5 park names along with their visitor count that had the
most visitors, in descending order.
7. Inserting and deleting rows
You'll need to be able to write data in order to take full advantage of persisting data on Android
with Room. In addition to querying a database, there are also SQL statements for inserting,
updating, and deleting rows. You'll need a basic knowledge of these when you learn to write data with Room later in Pathway 2. INSERT statement
To add a new row, you use the INSERT statement. The INSERT statement is followed by the INTO
keyword and the name of the table in which you'd like to add a row. After the VALUES keyword,
you provide the value for each column (in order) in parentheses, with each one separated by a
comma. The format of an INSERT statement is as follows. INSERT INTO table_name
VALUES (column1, column2, ...)
To add a row to the park table, the INSERT statement would look something like this. The values
match the order in which the columns are defined for the park table. Notice that some of the data
is not specified. That's OK for now, as you can always update a row after it's been inserted. INSERT INTO park
VALUES (null, ’Googleplex’, ’Mountain View’, 12, null, 0, ’’)
Also notice that you pass in null for the ID. While you can provide a specific number, this isn't
exactly convenient as your app would have to keep track of the latest ID to make sure there are
no duplicates. You can, however, configure your database so that the primary key is
automatically incremented, which was done here. That way you can pass in null, and the next ID is chosen automatically.
Verify that the entry was created, using a WHERE clause to specify the park named "Googleplex". SELECT * FROM park WHERE name = ’Googleplex’ UPDATE statement
After a row has been created, you can change its contents at any time. You can do so using an
UPDATE statement. Like all the other SQL statements you've seen, you first need to specify the
table name. In the SET clause, simply set each column you want to change to its new value. UPDATE table_name SET column1 = ..., column2 = ..., ... WHERE column_name = ... ...
For the Googleplex entry, one existing property is updated, and some other fields are filled in
(these fields previously had a value but it was an empty string, ""). You can update multiple (or
all) fields at once with an UPDATE statement. UPDATE park SET area_acres = 46, established = 1088640000, type = ’office’ WHERE name = ’Googleplex’
See the updates reflected in the query results SELECT * FROM park WHERE name = ’Googleplex’ DELETE Statement
Finally, you can also use a SQL command to delete rows from the database. Again, specify the
table name, and just like you did with SELECT statements, you use a WHERE clause to provide
criteria for the rows you want to delete. Since a WHERE clause can match multiple rows, you can
delete multiple rows with a single command. DELETE FROM table_name WHERE = ...
Because the Googleplex isn't a national park, try using a DELETE statement to remove this entry from the database. DELETE FROM park WHERE name = ’Googleplex’
Verify to make sure the row is deleted using a SELECT statement. The query should return no
results, meaning all the rows that had the name "Googleplex" were successfully deleted. SELECT * FROM park WHERE name = ’Googleplex’
That's all there is to inserting, updating, and deleting data. All you need to know is the format for
the SQL command you want to perform, and specify values that match the columns in the
database. When we introduce Room in the next codelab, you'll primarily be focused on reading
from a database. Inserting, updating, and deleting data will be covered in detail in Pathway 2. 8. Solutions to exercises
Hopefully the practice exercises were helpful in solidifying your understanding of SQL concepts.
If you got stuck on any of them, or would like to check your answers, feel free to refer to our answers below
Problem 1: Write a SQL query to get the names of all parks with fewer than 1,000,000 visitors.
This problem asks for the park names (a single column) with the requirement that there are fewer
than 1,000,000 visitors, which can be specified in the WHERE clause. SELECT name FROM park
WHERE park_visitors < 1000000
Problem 2: Write a SQL query to get the number of distinct cities in the park table
The total count of a column can be calculated using the COUNT() function, but since you only
want distinct cities (since some cities have multiple parks), you can use the DISTINCT keyword
before the column name in the COUNT() function.
SELECT COUNT(DISTINCT city) FROM park
Problem 3: Write a SQL query to get the total number of visitors to parks in San Francisco.
The total number of visitors can be calculated using the SUM() function. Additionally, you also
need a WHERE clause to specify only parks located in San Francisco.
SELECT SUM(park_visitors) FROM park WHERE city = "San Francisco"
Problem 4: Write a SQL query to the top 5 parks (names only) along with their visitor count that
had the most visitors, in descending order.
The query needs to get both the name and park_visitors columns. The results are sorted on the
park_visitors column in descending order using the ORDER BY clause. Because you don't want
to group the results on another column and sort within those groups, a GROUP BY clause is not necessary.
SELECT name, park_visitors FROM park
ORDER BY park_visitors DESC LIMIT 5 9. Congratulations In summary: •
Relational databases allow you to store data, organized into tables, columns, and rows. •
You can retrieve data from a database using the SQL SELECT statement. •
You can use a variety of clauses in a SELECT statement including WHERE, GROUP BY,
ORDER BY, and LIMIT to make your queries more specific. •
You can use aggregate functions to combine data from multiple rows into a single column. •
You can add, update, and delete rows in a database using the SQL INSERT, UPDATE, and
DELETE statements respectively. Learn more • SQL data types • Aggregate functions • Joins
Tài liệu liên quan:
-
Lab 8.3. Using shared viewmodel in android fragments codelab môn Phát triển ứng dụng đa nền tảng | Trường Đại học Bách Khoa Hà Nội
119 60 -

Lab 9.2: Integrating room and flow for bus schedule app development môn Phát triển ứng dụng đa nền tảng | Trường Đại học Bách Khoa Hà Nội
111 56 -
Mẫu báo cáo Bài tập lớn môn Phát triển ứng dụng đa nền tảng | Trường Đại học Bách Khoa Hà Nội
149 75 -

Bài tập tổng hợp môn Phát triển ứng dụng đa nền tảng | Trường Đại học Bách Khoa Hà Nội
116 58