Hướng dẫn ghép nối phân tử: Sử dụng AutoDock & Chimera để tìm chất ức chế HDAC môn Hóa Dược| Trường Đại học Y Dược, Đại học Quốc gia Hà Nội
Vì mô hình HDAC1 tương thích (HDAC loại I) đượcxây dựng dựa trên thử nghiệm dữ liệu. Chúng tôi sẽ sử dụng HDAC8/TSA phức hợp (PDB input 1t64) để thực hiện quá trình kết nối tổng hợp. Tài liệu giúp bạn tham khảo, ôn tập và đạt kết quả cao. Mời đọc đón xem!
Môn: Hóa Dược (BLA2021) 59 tài liệu
Trường: Trường Đại học Y Dược, Đại học Quốc gia Hà Nội 269 tài liệu
Tác giả:


Preview text:
21:30, 08/01/2026
Molecular Docking Tutorial: Using AutoDock & Chimera for HDAC Inhibitors - Studocu
http://rcmd-server.frm.uniroma1.it
http://cassandra.bio.uniroma1.it/
http://www.mmvsl.farm.unipi.it/
Phân tích kết nối hướng dẫn qua
Rino Ragno (RCMD)
Anna Tramontano (BIOCOMPUTING)
Adriano Martinelli (MMVSL)
Tiziano Tuccinardi (MMVSL)
Sử dụng Chimera và các công cụ AutoDock1.4.4 và Auto dock 4.0.1 như
Các công cụ nghiên cứu histone deacetyl aEnzyme se (HDAC) консультатр ..
Hội thảo Châu Âu lần thứ VI vềThiết kế
Ngày 3-10 tháng 6 năm 2007
Chứng nhận Pontignano (Siena – Ý) 1 21:30, 08/01/2026
Molecular Docking Tutorial: Using AutoDock & Chimera for HDAC Inhibitors - Studocu
Giới thiệu Tại sao cần Autodock?
Vì nó được cấp phép miễn phí theo GPL! ( http://autodock.scripps.edu/ ) Và bởi vì nó là mchương trình được sử
Use for phân tích kết nối công việc!
Cũng như trong mọi lĩnh vực khoa học, bất kỳ thí nghiệm phương pháp nào cũng cần được xác định trước khi sử công!
Do đó, ngay trong lần sử dụng chương trình autodock đầu tiên , bạn sẽ được hướng dẫn cách nhận biết xem quá
Chương trình (Autodock 4.0.1) có thể phù hợp để nghiên cứu chế độ liên kết của một số phân tử định nghĩa tối đ đánh giá).
Tất nhiên, đối lập với bất kỳ chương trình kết nối nào.Mục tiêu cần đạt được là tái tạo giới hạn thực tế.
sự biến đổi của thành phần phân phối và tiêu chí của nóphân tử (giá liên kết).
Vì mô hình HDAC1 tương thích (HDAC loại I) được xây dựng dựa trên thử nghiệm dữ liệu.
Chúng tôi sẽ sử dụng HDAC8/TSA phức hợp (PDB input 1t64) để thực hiện quá trình kết nối tổng hợp.
đánh giá. Thực tế là không thể, mẫu HDAC4 không được kết hợp tương tự với bất kỳ chất ức chế/chất nền nào.
Do đó, liên kết xác thực không thể được thực hiện đối với HDAC loại II.
Một khi họ đã chứng minh được rằng khả năng tự động kết nốitái tạo hỗn hợp thí nghiệm gốc như vậy
Quy trình này có thể được áp dụng cho các phức hợp HDAC1 và HDAC4 được mô hình hóa trước bằng cách kế
Mô hình TSA được mô phỏng và thứ hai là các phân phối khác (mà chúng tôi biết là bộ lọc chế độ lọc chất ức ch
Từ một phân tử chỉnh sửa trình duyệt trên web.
LƯU Ý. Hướng dẫn này không nhằm mục đích minh họa cách sử dụng au todock4 mà chỉ để minh họa cách sử d
chương trình autodock như một công cụ tiềm năng để liên kết các chất ức chếin the protein model (HDAC1 và H
Để biết thêm thông tin về chương trình chimera, ADT và autodock, người dùng nên tham khảo tài liệu sau:
các hướng dẫn/hướng dẫn tài liệu tương ứng. 2 21:30, 08/01/2026
Molecular Docking Tutorial: Using AutoDock & Chimera for HDAC Inhibitors - Studocu
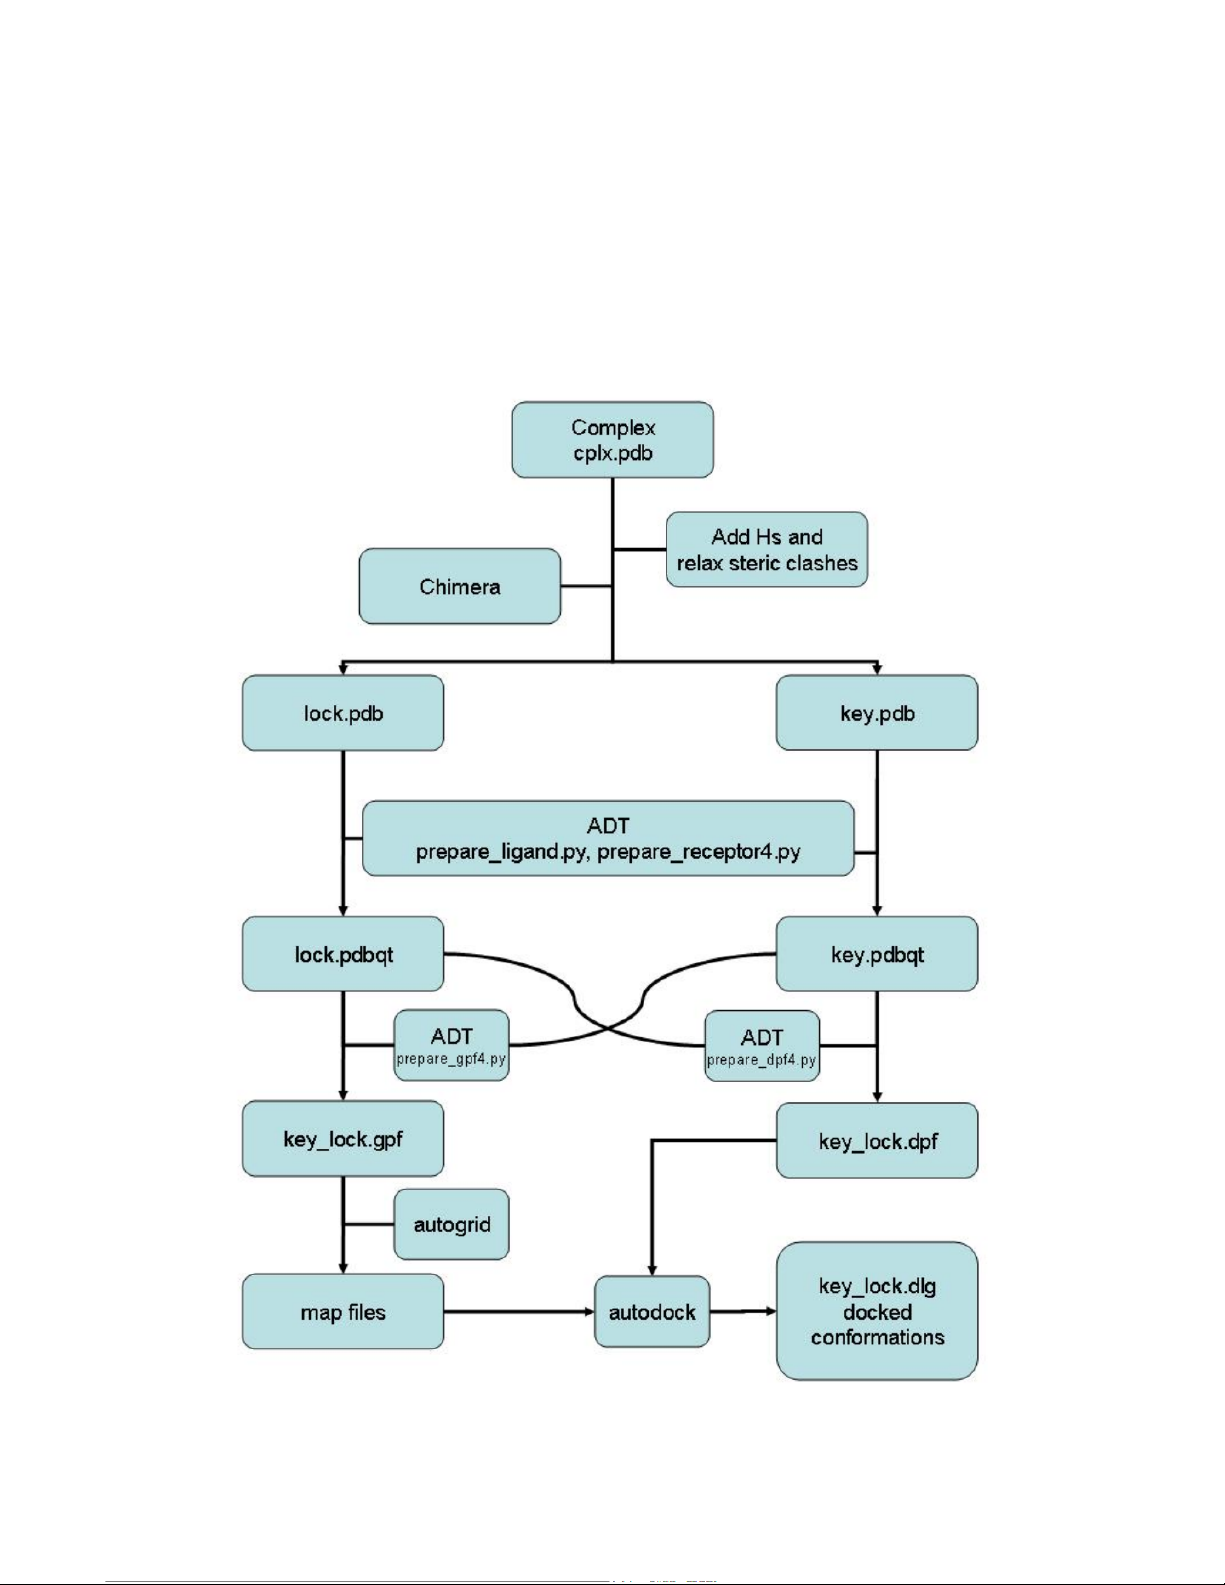
SƠ ĐỒ QUY TRÌNH CẬP BẾN
(sử dụng chimera, ADT và autodo)ck) 3 21:30, 08/01/2026
Molecular Docking Tutorial: Using AutoDock & Chimera for HDAC Inhibitors - Studocu
Đã nhận được hợp nhất (CPL)speed X) (tức là từ)(PDB)
Thanh khu vực lớn
(Xóa bỏ tất cả các phân tử nước và môi trường cũng như tất cả các ion không tương tác)
Thêm các nguyên tử hydro/ chuỗi nhánh còn thiếu.nguyên tử và được tối thiể
phức hợp (AMBER9)
Dọn dẹp khu phức hợp tối thiểu
(xóa tất cả các phân tử nước và dung môi và tất cả)các ion không tương tác)
Tách riêng minimizex CPLX trongđại phân tửecule (LOCK) và ligand
(CHÌA KHÓA)
Chuẩn bị bộ đồ kết nốiCác tệp ble cho LOCK và KEY (tệp pdbqt)
Chuẩn bị tất cả các tệp cần thiết fhoặc cập bến
(tệp tham số lưới, tệp bản đồ , tệp tham số ghép nối)
Tiến hành ghép nối
Phân tích kết quả ghép nối
LƯU Ý. Trong ngăn kéo nhà bạnbạn sẽtìm bến tàuthư mục bên dưới
tất cả các phép tính đều được lưu lại .Những việc đã được làm sẵn cho bạn rồi.
Một thư mục thứ hai (EWDD_MD_Tut) đã được tạo, trong đó bạn sẽ tìm thấy...
chỉ các tập tin ban đầu để chạyKhắp toàn bộ hướng dẫn. 4 21:30, 08/01/2026
Molecular Docking Tutorial: Using AutoDock & Chimera for HDAC Inhibitors - Studocu 1. Kết nố Đ iánh gsiá ử dụng
cấu hình phối tử liên kếtsự hình thành
Trong hướng dẫn này, bạn sẽ được hướng dẫn cách chạy.các thí nghiệm ghép nối ni ng từ AMBER được tối ưu h
phức hợp. Chương trình chimera sẽ được sử dụng để chuẩn bị phân tử lớn (khóa) và chất ức chế.
(các) tập tin chính. Tiếp theo, chương trình AutoDockTools 1.4.4 ( ADT) sẽ được sử dụng để chuẩn bị các tập tin
và các tham số để chạy quá trình ghép nối và phân tích kết quả.
Trong bước đầu tiên này, chúng ta sẽ xem liệu bến tàu có thể hoạt động được không.Chương trình này sẽ thành c
phức hợp thực nghiệm sử dụng cấu hình liên kết phối tử thực nghiệm làm điểm xuất phát như
được tìm thấy trong phức hợp thực nghiệm (1t64).
1.1. Chuẩn bị tệp pdb từ mô hình đã được tối ưu hóa hình học.plex.
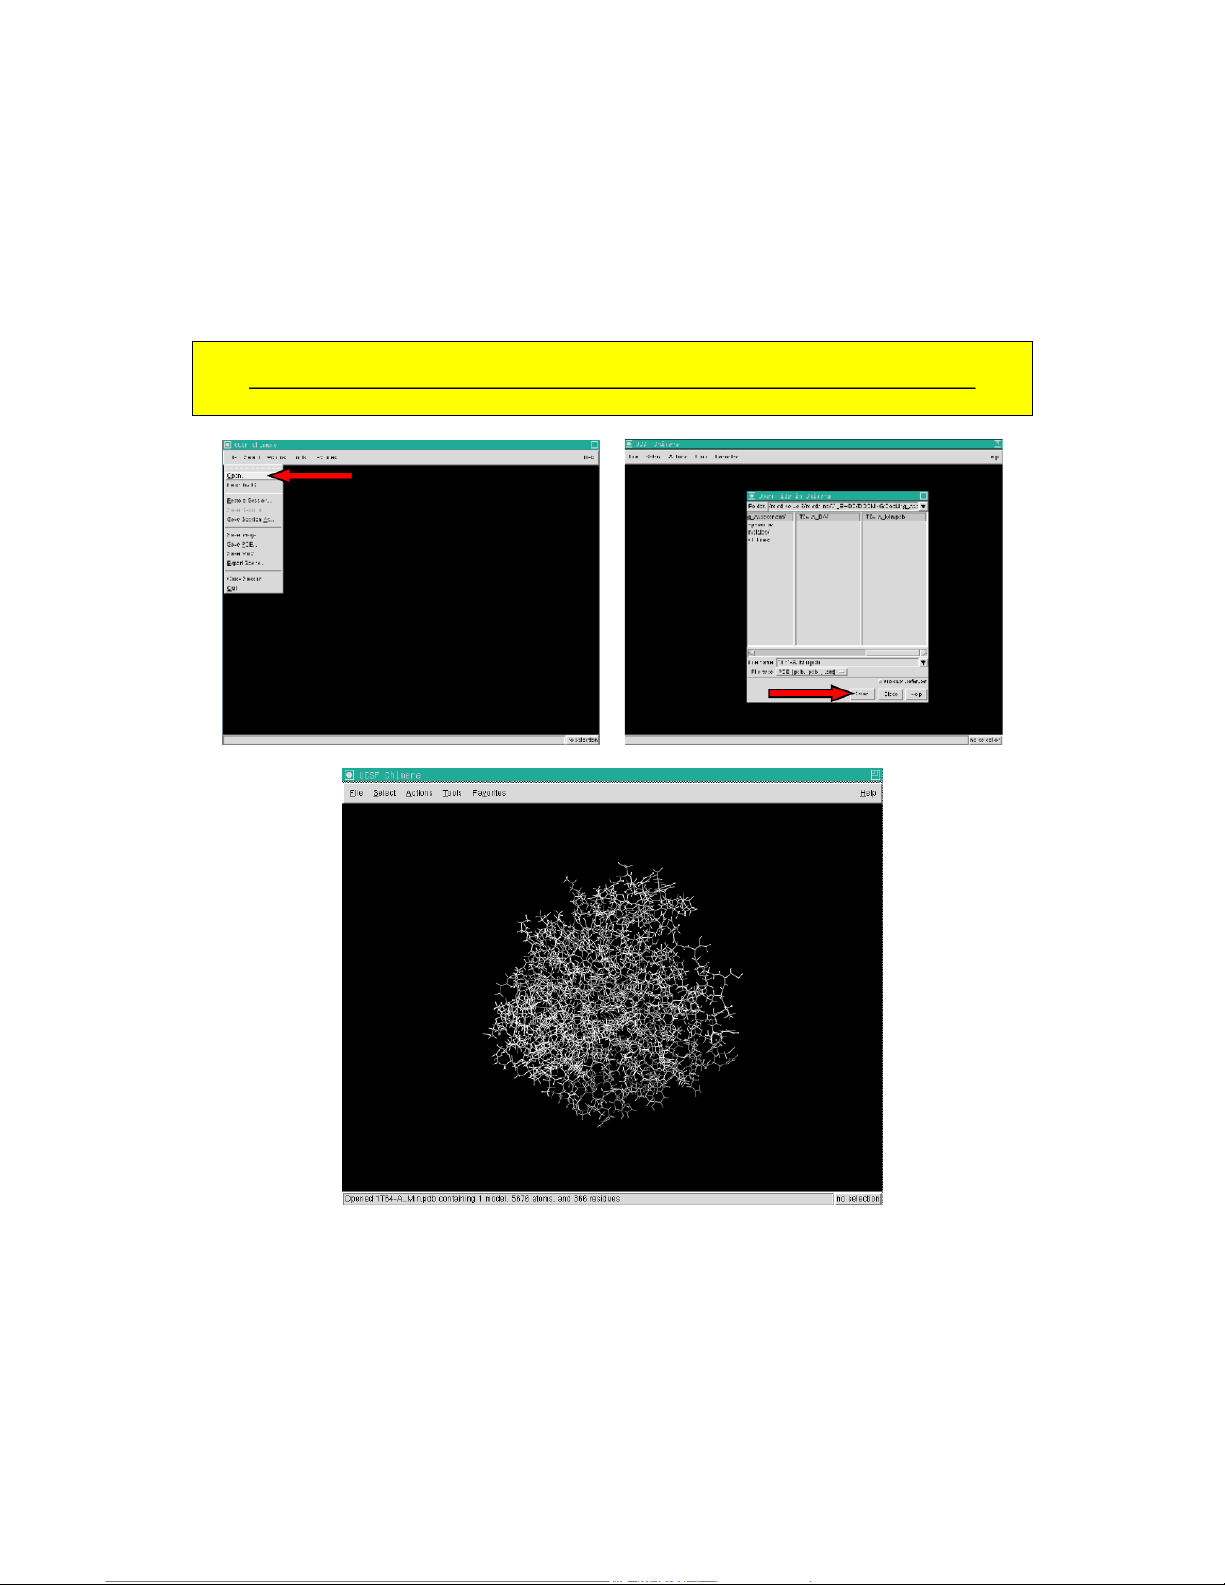
1.1.1 . Mở Chimera bằng cách gõ chimera vào dấu nhắc lệnh của trình shell Unix. Bạn nên luôn luôn làm như vậ
Khởi chạy Chimera trong cùng thư mục với tệp phức hợp. 5 21:30, 08/01/2026
Molecular Docking Tutorial: Using AutoDock & Chimera for HDAC Inhibitors - Studocu
1.1.2 . Trong menu Tệp , chọn Mở và chọn 1T64-A_Min.pdb trong cửa sổ hiện ra. Sau đó
Nhấp chuột vào nút Mở và cấu trúc sẽ xuất hiện trong cửa sổ chính của Chimera.
Không được xoay/dịch chuyển cấu trúc trong cửa sổ chimera trong quá trình chuẩn bị tập tin! 6 21:30, 08/01/2026
Molecular Docking Tutorial: Using AutoDock & Chimera for HDAC Inhibitors - Studocu
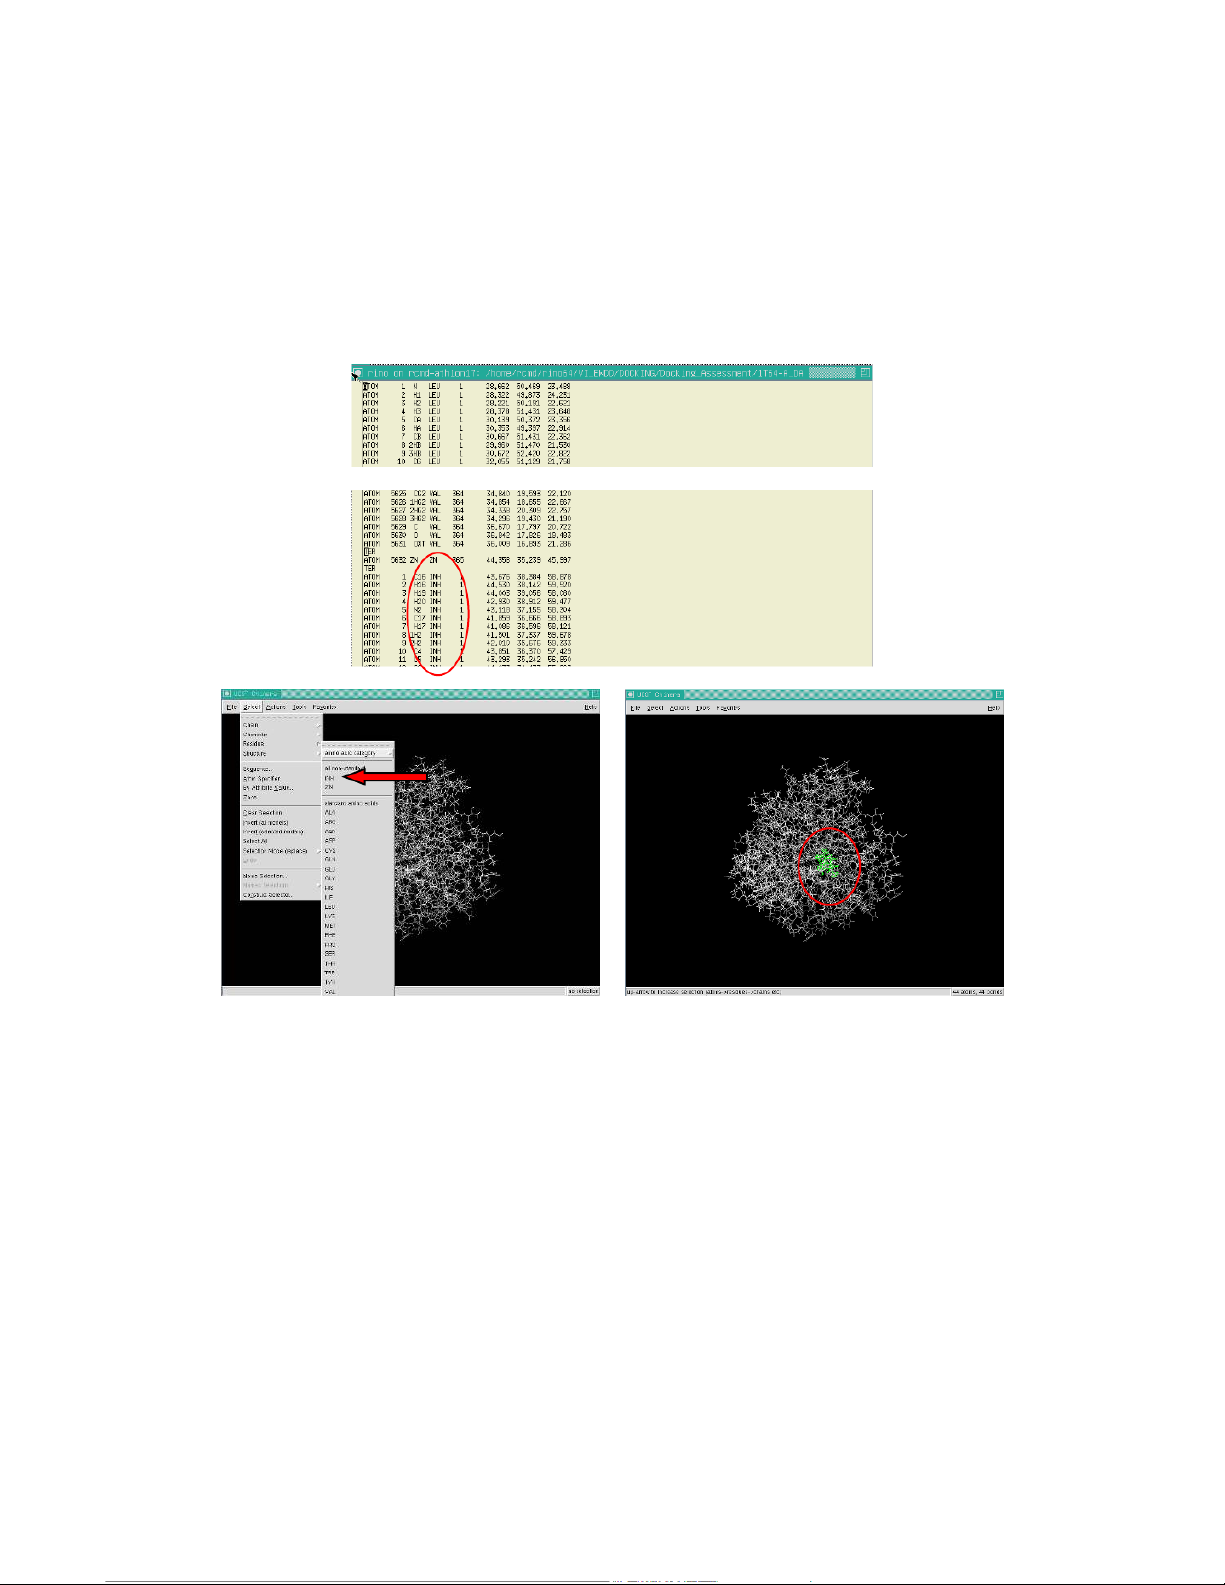
1.1.3 . Kiểm tra tệp 1T64-A_Min.pdb bằng trình soạn thảo văn bản như vi hoặc bất kỳ trình soạn thảo nào bạn th
Kiểm tra tên dư lượng của chất ức chế (ở đây được đặt tên là INH) ở cuối tập tin.ing the Select
Trong menu phụ " Dư lượng" , chọn dư lượng INH. 7 21:30, 08/01/2026
Molecular Docking Tutorial: Using AutoDock & Chimera for HDAC Inhibitors - Studocu
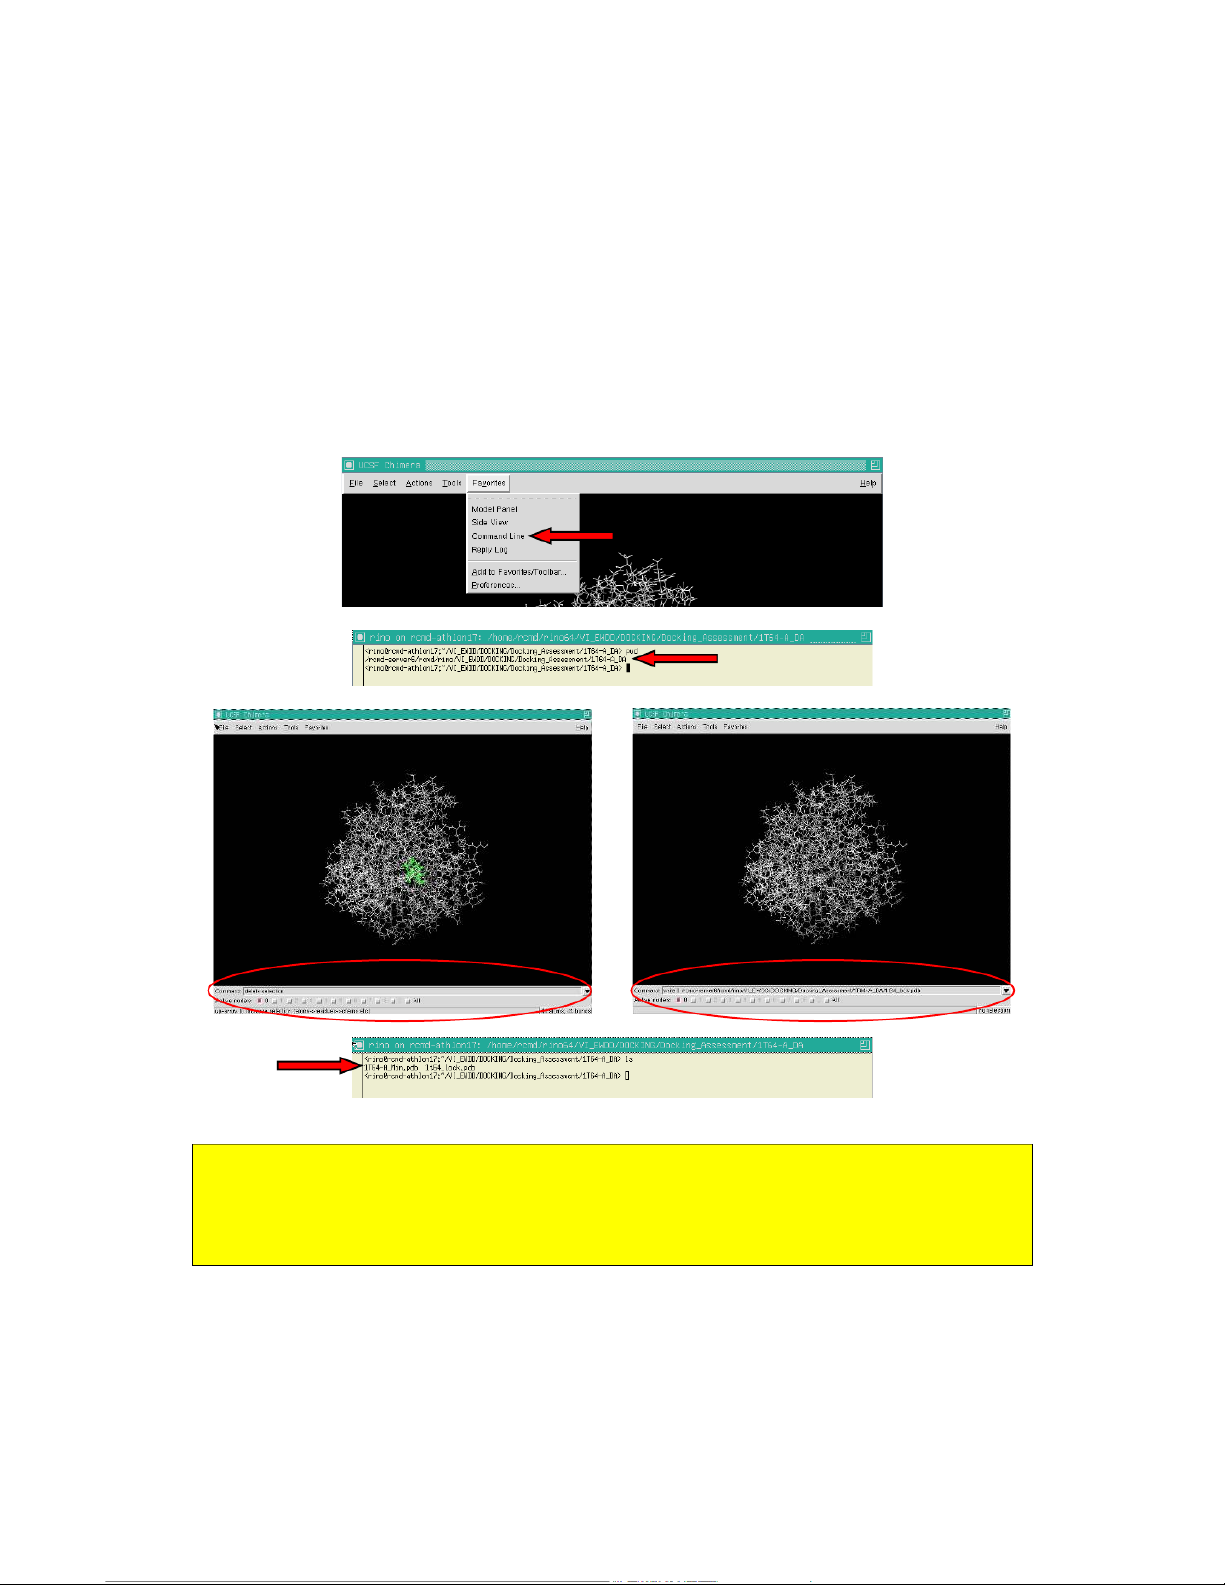
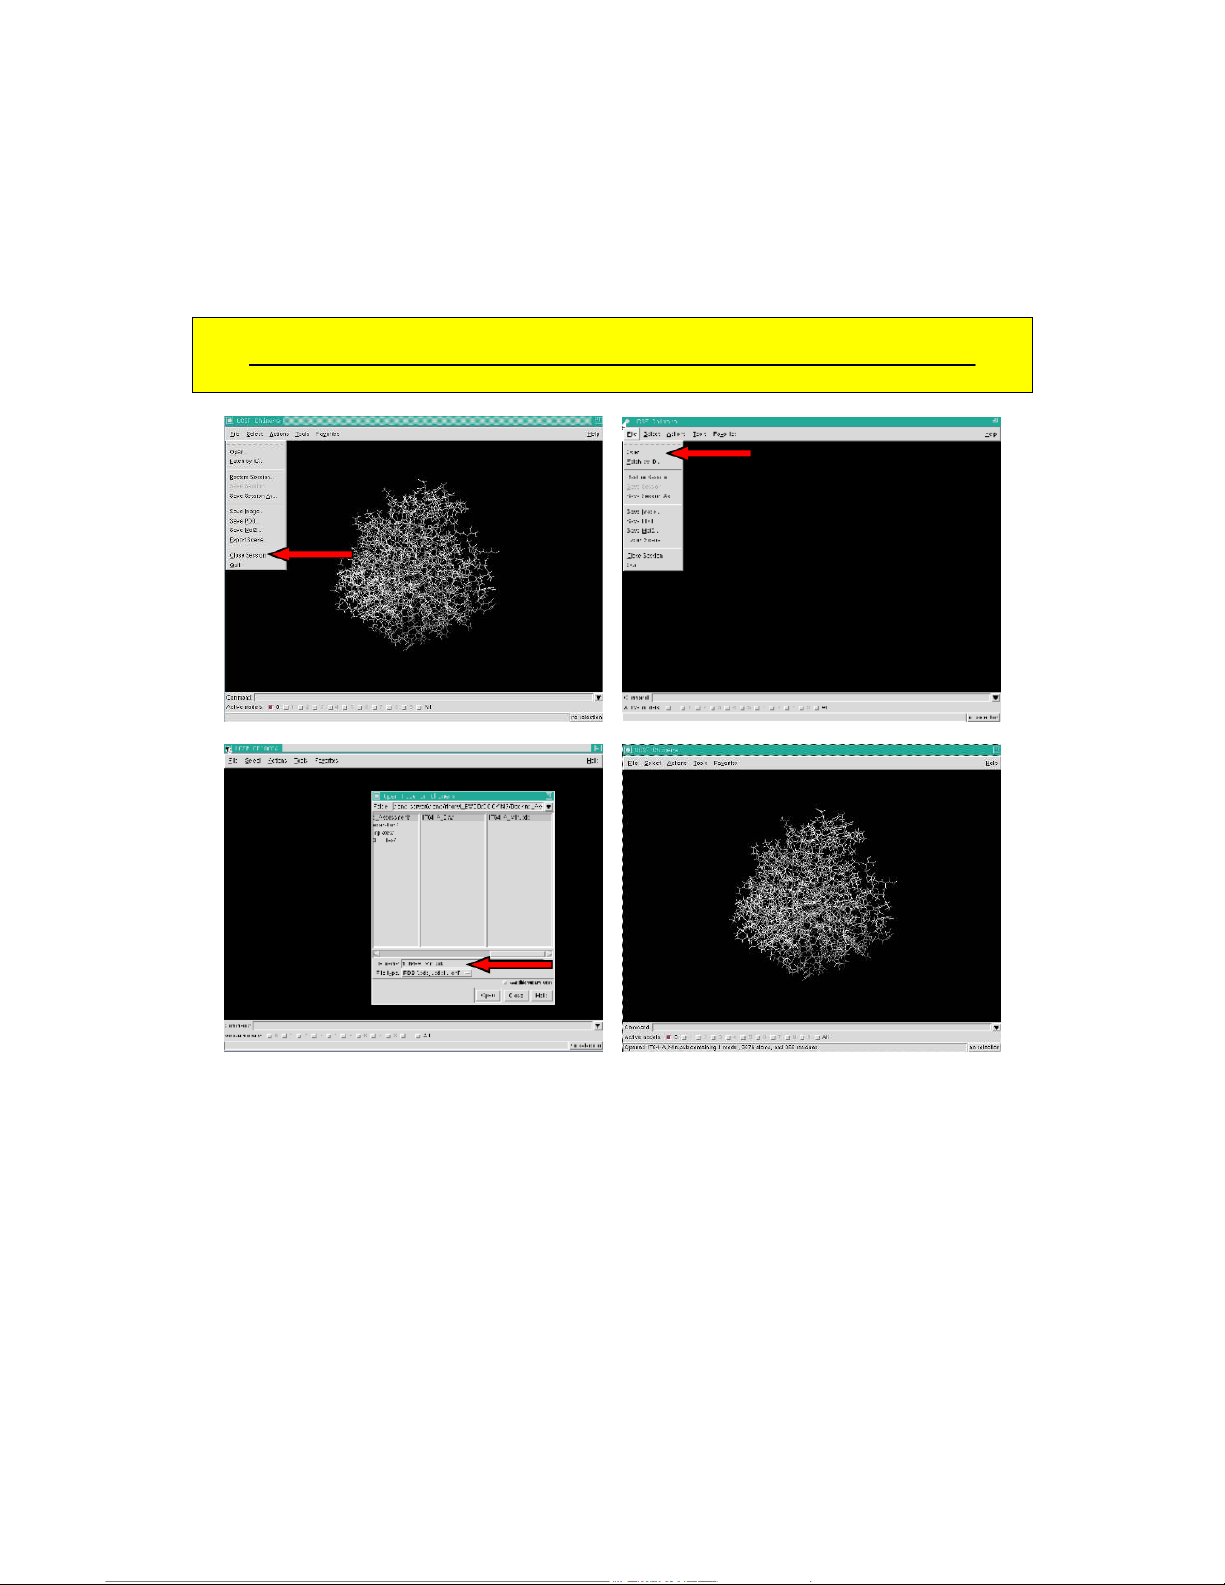
1.1.4. Creation of the macromolecule (lock) file. Open the command line option under the
Favorites menu and delete the selected INH residue by typing delete selection in the command line
box. Then save the enzyme (lock) by entering in the command line box:
Command: write 0 $path/1t64_lock.pdb
($path is the full path where to save the file)
Check the written file by typing the ls command in the unix shell. get the path IMPORTANT!!
If the complex comes directly from the AMBER program also the HIE and HID residue have to be
fixed into HIS, otherwise ADT (next section) will not recognise them correctly.
To see how to fix the histidines go to the end of this section (1.1) in the shortcuts. 8 21:30, 08/01/2026
Molecular Docking Tutorial: Using AutoDock & Chimera for HDAC Inhibitors - Studocu
1.1.5. Creation of the ligand (key) file. Close the session and repeat the 1.1.4 point.
Do not rotate/traslate the structure in the chimera window during the file preparation! 9 21:30, 08/01/2026
Molecular Docking Tutorial: Using AutoDock & Chimera for HDAC Inhibitors - Studocu
1.1.6. Select everything but the inhibitor by entering in the command line box the following command:
Command: Select :inh zr > 0.1
Then delete the selction with:
Command: Delete selection
And save the inhibitor (key) similarly as seen for the macromolecule.
Command: write 0 $path/1t64_key.pdb
($path in the full path where to save the file – same as above)
And check the written files using a unix shell. 10 21:30, 08/01/2026
Molecular Docking Tutorial: Using AutoDock & Chimera for HDAC Inhibitors - Studocu
1.1.7. Check the file by loading them all in a new chimera session.
Now the structure can be rotated and translated! (they are already saved)
You can quit chimera if you want to. 11 21:30, 08/01/2026
Molecular Docking Tutorial: Using AutoDock & Chimera for HDAC Inhibitors - Studocu
Shortcut version of section 1.1:
The lock and key files can be prepare direcly in a unix shell using some simple unix commands:
Once checked out the inhibitor residue name (see 1.3) the lock and key file can be prepared using
the cat and grep unix commands as following:
Prompt> cat cplx_filename.pdb | grep INH > key_filename.pdb
Prompt> cat cplx_filename.pdb | grep -v INH > lock_filename.pdb or
Prompt> cat cplx_filename.pdb | grep -v INH | sed 's/HIE/HIS/' | sed 's/HID/HIS/' > lock_filename.pdb
And use chimera to check them all. 12 21:30, 08/01/2026
Molecular Docking Tutorial: Using AutoDock & Chimera for HDAC Inhibitors - Studocu
1.2. preparing the file for docking using ADT and run the docking.
1.2.1. Some rules from the ADT online tutorial
(http://autodock.scripps.edu/faqs-help/tutorial/using-autodock-4-with-autodocktools)
A) You should always start ADT in the same directory as the macromolecule and ligand
files. You can start ADT from the command line in a Terminal by typing "adt" and pressing or .
B) For both the macromolecule and the ligand, you should always add polar hydrogens,
compute Gasteiger charges and then you must merge the non-polar hydrogens. Polar
hydrogens are hydrogens that are bonded to electronegative atoms like oxygen and
nitrogen. Non-polar hydrogens are hydrogens bonded to carbon atoms.
C) You need one AutoGrid map for every atom type in the ligand plus an electrostatics map.
E.g.: for ethanol, C2H5OH, you would need C, OA and HD maps plus an electrostatics 'e'
map plus a desolvation 'd' map.
D) The grid volume should be large enough to at least allow the ligand to rotate freely, even
when the ligand is in its most fully-extended conformation. 13 21:30, 08/01/2026
Molecular Docking Tutorial: Using AutoDock & Chimera for HDAC Inhibitors - Studocu
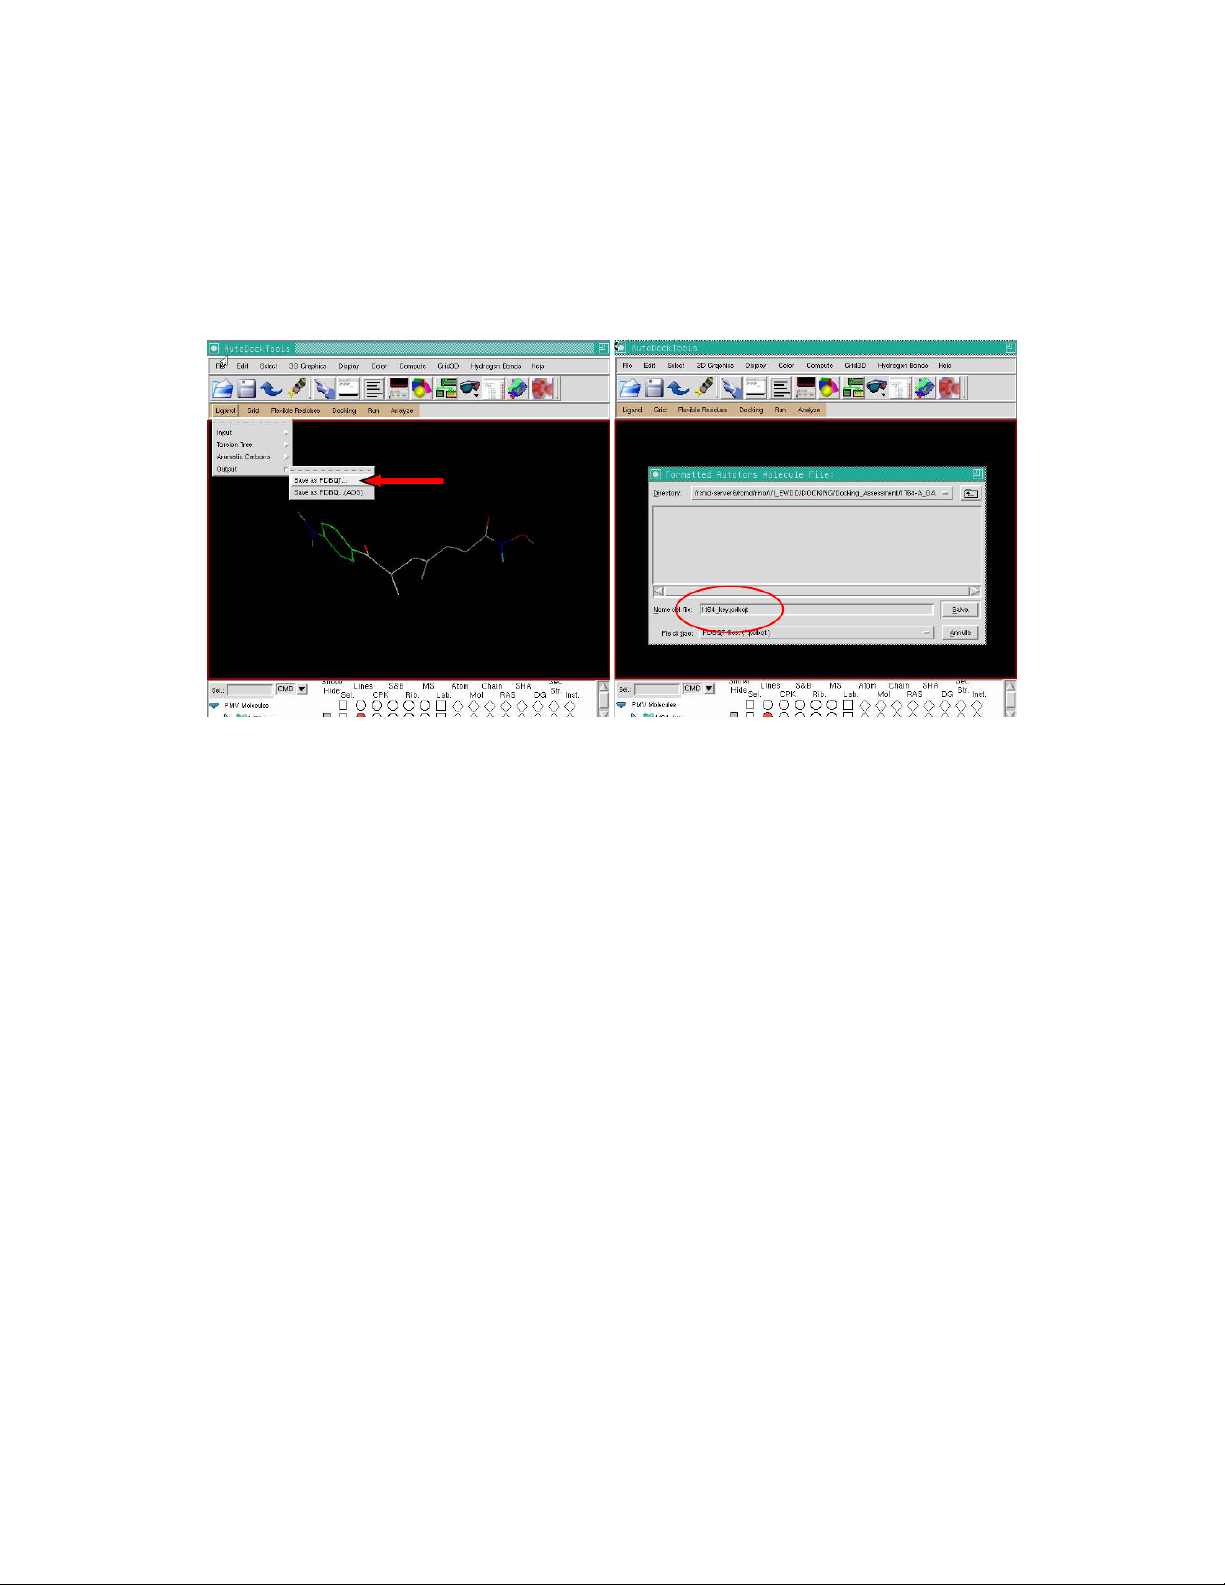
1.2.2. Preparing a ligand file for AutoDock.
Start ADT from a unix shell and open a ligand file using the Ligand Æ Input Æ Open … sequence.
Set the file type to *.pdb and choose the key file (1t64_key.pdb). Click OK in the upcoming window. 14 21:30, 08/01/2026
Molecular Docking Tutorial: Using AutoDock & Chimera for HDAC Inhibitors - Studocu
Save the file as pdbqt (Ligand Æ Output Æ Save as PDBQT…) giving a proper name
(1t64_key.pdbqt) and check the written file.
Example of a pdbqt file for a ligand (1t64_key.pdbqt). REMARK 7 active torsions:
REMARK status: ('A' for Active; 'I' for Inactive)
REMARK 1 A between atoms: C1_2 and C7_16
REMARK 2 A between atoms: C10_3 and C11_4
REMARK 3 A between atoms: C12_5 and C13_6
REMARK I between atoms: C13_6 and N1_20
REMARK 4 A between atoms: C4_13 and N2_21
REMARK 5 A between atoms: C7_16 and C8_17
REMARK 6 A between atoms: C8_17 and C9_18
REMARK 7 A between atoms: N1_20 and O1_22 ROOT
HETATM 1 H11 INH 1 41.930 33.744 45.539 0.00 0.00 0.244 HD
HETATM 2 O1 INH 1 42.652 34.244 46.108 0.00 0.00 -0.287 OA ENDROOT BRANCH 2 3
HETATM 3 N1 INH 1 42.264 33.997 47.418 0.00 0.00 -0.234 N
HETATM 4 C13 INH 1 43.022 34.527 48.351 0.00 0.00 0.264 C
HETATM 5 H1 INH 1 41.843 33.072 47.563 0.00 0.00 0.197 HD
HETATM 6 O2 INH 1 43.738 35.462 48.003 0.00 0.00 -0.266 OA BRANCH 4 7
HETATM 7 C12 INH 1 43.072 33.844 49.643 0.00 0.00 0.076 C
HETATM 8 C11 INH 1 43.861 34.212 50.643 0.00 0.00 0.012 C BRANCH 8 9
HETATM 9 C10 INH 1 44.016 33.580 51.936 0.00 0.00 -0.065 C
HETATM 10 C9 INH 1 45.218 33.640 52.523 0.00 0.00 -0.008 C
HETATM 11 C15 INH 1 42.809 32.883 52.515 0.00 0.00 0.048 C BRANCH 10 12
HETATM 12 C8 INH 1 45.544 32.977 53.846 0.00 0.00 0.079 C
HETATM 13 C14 INH 1 46.492 31.785 53.580 0.00 0.00 0.022 C BRANCH 12 14
HETATM 14 C7 INH 1 46.207 34.026 54.716 0.00 0.00 0.166 C
HETATM 15 O3 INH 1 47.394 34.257 54.604 0.00 0.00 -0.292 OA BRANCH 14 16
HETATM 16 C1 INH 1 45.362 34.812 55.667 0.00 0.00 0.011 A
HETATM 17 C6 INH 1 44.037 34.473 55.967 0.00 0.00 0.017 A
HETATM 18 C2 INH 1 45.914 35.955 56.225 0.00 0.00 0.017 A
HETATM 19 C5 INH 1 43.293 35.242 56.850 0.00 0.00 0.030 A
HETATM 20 C4 INH 1 43.851 36.370 57.429 0.00 0.00 0.029 A
HETATM 21 C3 INH 1 45.155 36.725 57.098 0.00 0.00 0.030 A BRANCH 20 22
HETATM 22 N2 INH 1 43.118 37.155 58.304 0.00 0.00 -0.390 N
HETATM 23 C16 INH 1 43.676 38.384 58.878 0.00 0.00 0.149 C
HETATM 24 C17 INH 1 41.859 36.666 58.893 0.00 0.00 0.149 C ENDBRANCH 20 22 ENDBRANCH 14 16 ENDBRANCH 12 14 ENDBRANCH 10 12 ENDBRANCH 8 9 ENDBRANCH 4 7 ENDBRANCH 2 3 TORSDOF 7 15 21:30, 08/01/2026
Molecular Docking Tutorial: Using AutoDock & Chimera for HDAC Inhibitors - Studocu
1.2.3.Preparing the macromolecule file.
Open a macromolecule file using the Grid Æ Macromolecule Æ Open … sequence.
Set the file type to *.pdb and choose the lock file (1t64_lock.pdb). Click OK in the upcoming
window. Ignore the warning about the charge and save the file with a proper name
(1t64_lock.pdbqt), ignore the Zn zero charge warning and click OK. 16 21:30, 08/01/2026
Molecular Docking Tutorial: Using AutoDock & Chimera for HDAC Inhibitors - Studocu
In a unix shell edit the 1t64_lock.pdbq file and correct the Zn charge into +2.0. 17 21:30, 08/01/2026
Molecular Docking Tutorial: Using AutoDock & Chimera for HDAC Inhibitors - Studocu
1.2.4. Preparing the GRID parameter file and running Autogrid4.
The grid parameter file tells Autogrid4 which receptor to compute the potentials around, the types
of maps to compute and the location and extent of those maps. and may specify a custom library of
pair-wise potential energy parameters.
1.2.4.1. Selecting the map types.
In general, one map is calculated for each atom type in the ligand plus an electrostatics map and a
separate desolvation map. The types of maps depend on the types of atoms in the ligand. Thus one
way to specify the types of maps is by choosing a ligand. If the ligand you formatted in 1.2.2 is still
in the Viewer use this procedure:
Grid Æ Set Map Types Æ Choose Ligand … Æ 1t64_key Æ Select Ligand 18 21:30, 08/01/2026
Molecular Docking Tutorial: Using AutoDock & Chimera for HDAC Inhibitors - Studocu
1.2.4.2. Setting the grid box.
The central position and size of the grid docking box is set using the following procedure: Grid Æ Grid Box …
Set the center of the grid in the center of the ligand (key) and zoom out in the ADT main window
(to zoom out ctrl+middle mouse button or ctrl+c and n keys for the full view) to check the size of
the grid you are making. Turn off the lock molecule display (Display Æ Show/Hide molecule ..)
and re-center the view (ctrl+c and n keys).
As you can see the TSA is almost fully embedded in the grid, but the size is not big enough to allow
a free rotation of the molecule. As a rule of thumb the grid size should be as large as at least twice
the double of the maximum distance you can measure between any two atoms of the co-crystallized
ligand. In the case you do not have any ligand position information the grid should be centered in
the putative binding site and sized to embrace all the residue making the binding pocket.
To set up the grid size you can inspect it visually and adjust the dimension by using the 3
thumbwheel widgets. So for instance the suitable grid size should be 54 x 58 x 74 points using the
default grid spacing of 0.375. Adjust all the values and save the information, save the gpf file and check the written file.
(Grid option): File Æ Close saving current 19 21:30, 08/01/2026
Molecular Docking Tutorial: Using AutoDock & Chimera for HDAC Inhibitors - Studocu
(Autodock Tools): Grid Æ Output Æ Save GPF…
HINT! How to determine grid center and number of points?
In the utilities folder you will find a awk script called pdbbox that helps in calculating the grid
center and the number of points (following the above given rule). This utility also helps in the
building of a PDB file that can be visualized in any molecular visualizer (i.e. chimera). The output
of the pdbbox utility has to be saved to a filename.pdb file as described in the output itself. 20
Tài liệu liên quan:
-

Tóm tắt lý thuyết môn Hoá sinh đại cương | Trường Đại học Y Dược, Đại học Quốc gia Hà Nội
38 19 -
Amphotericin B Nephrotoxicity môn Hóa Dược| Trường Đại học Y Dược, Đại học Quốc gia Hà Nội
41 21 -
Amphetamine - Hóa Dược và Tác Động Tâm Thần Học môn Hóa Dược| Trường Đại học Y Dược, Đại học Quốc gia Hà Nội
26 13 -
Trắc nghiệm có đáp án Phân loại và tác dụng của các vitamin: Nguồn gốc và cách sử dụ môn Hóa Dược| Trường Đại học Y Dược, Đại học Quốc gia Hà Nội
28 14 -
Đề Cương Hóa Dược: Tác dụng Thuốc Trên Hệ TKTW môn Hóa Dược| Trường Đại học Y Dược, Đại học Quốc gia Hà Nội
34 17