Lab 2: Acid-Base Titration Môn Chemistry for BME Laboratory | Trường Đại học Quốc tế, Đại học Quốc gia Thành phố Hồ Chí Minh
Acid-base titrations (neutralization titrations) rely on the analyte’s chemical reaction with a standard reagent. Tài liệu được sưu tầm gồm 6 trang, giúp bạn ôn tập tốt hơn. Mời các bạn đón xem.
Môn: Chemistry for BME Laboratory 10 tài liệu
Trường: Trường Đại học Quốc tế, Đại học Quốc gia Thành phố Hồ Chí Minh 1.9 K tài liệu
Tác giả:


Preview text:
Course of Chemistry for BME (BM098IU) Semester 2, 2024-2025
Instructor: Dr. Truong Phuoc Long
LAB 2: ACID – BASE TITRATION 1. Lab objectives
• Understanding, and performing the acid-base titration.
• Understanding the end point, equivalence point, standard solution, and indicator. 2. Pre-lab
• How to calibrate and reading a burette? Summarize how to handle a burette.
• What is the equivalence point, the end point, standard solution, and indicator?
• When do you stop adding the standard solution?
3. Background information
Acid-base titrations (neutralization titrations) rely on the analyte’s chemical reaction with a standard
reagent. There are various types of acid/base titrations. Titration of a strong acid, such as hydrochloric
or sulfuric acid, with a strong base, such as sodium hydroxide, is one of the most common titration.
Another prevalent form is the titration of a weak acid, such as acetic or lactic acid, with a strong base.
Strong acids can also be used to titrate weak bases like sodium cyanide or sodium salicylate.
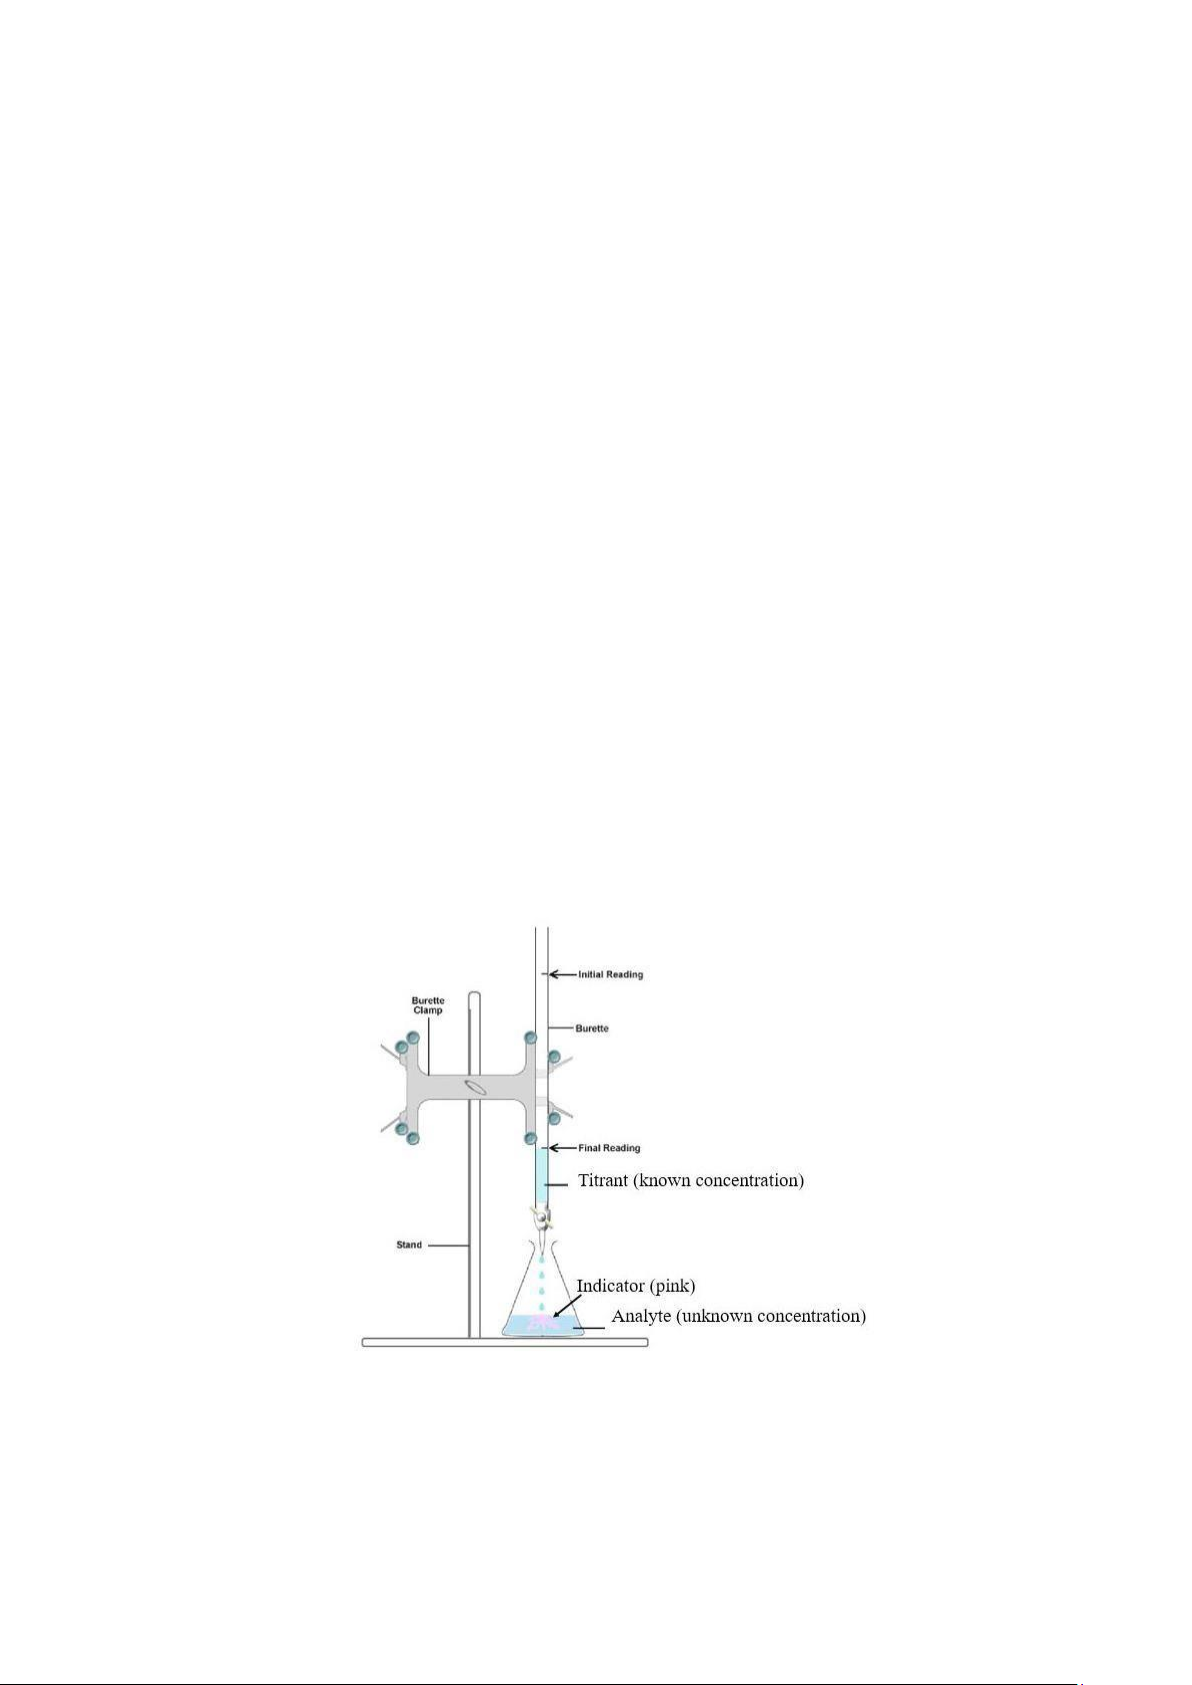
Figure 1 An illustration of a basic titration
Titration is a laboratory technique used to determine the concentration of a solution using another
solution with a known concentration. One of the solutions involved in a titration is used as a standard
solution. A standard solution of titrant in a burette is gradually applied to react with an analyte with an
unknown concentration in an Erlenmeyer flask. The standard solution can be classified as either primary
or secondary. A primary standard solution is prepared by dissolving an accurately weighed pure solid of
a known molar mass in a known volume of distilled water. A primary standard is used to determine the
molarity of the other standard solution, known as a secondary solution.
A standard solution can be prepared by accurate weighing of the solute, followed by precise dilution to
an exactly known volume in a volumetric flask. An acid-base titration is an experimental procedure used
to determine the unknown concentration of an acid or base by precisely neutralizing it with an acid or
base of known concentration. Solutions of sodium hydroxide are commonly used in titration analysis of
samples containing an acidic solute. The NaOH solution used in titration needs to be standardized
because they contain impurities. Solid NaOH is hygroscopic, which means that it absorbs moisture from
the atmosphere. Once it has a little moisture it also absorbs carbon dioxide which is always present in
air. Thus it is difficult to obtain its accurate concentration. The standardized NaOH becomes the
secondary solution and can then be used to determine the concentration of other acids. NaOH solutions
are generally prepared to be approximately a given concentration. By measuring how many volumes of
the approximately prepared NaOH are necessary to react completely with a exact volume of a primary
standard acidic substance with known concentration, the concentration of the NaOH solution can be
calculated. Once prepared, the concentration of a NaOH will change with time. For storage, sodium
hydroxide stock solutions should be stored in plastic containers. Glass containers should be completely
avoided in the preparation and storage of sodium hydroxide solutions. For volumetric NaOH solutions,
it is necessary to protect them from air to avoid formation of carbonate in solution.
When titrating an analyte, we need to take a number of criteria into consideration, including the endpoint
and the equivalence point. The point at which the provided volume of titrant is just sufficient to
completely neutralize the analyte solution is referred to as the equivalence point. The endpoint can be
thought of as an approximation of the equivalence point. The endpoint is utilized in the process of
computing the amount of the analyte or its concentration using the titrant concentration that is already
known. In case of acid-base titrations, when the pH of a solution is reached to the pH equivalence point,
which is the point where the concentration of the acid is equal to the concentration of the base. The
following formula is applied to calculate concentration of analyte: M1V1 = M2V2
Where, M1, is the molarity of solution 1, M2, is the molarity of solution 2, V1 is the volume of solution
1, and V2 is the volume of solution 2.
In titration analysis, a pH indicator is usually added in the analyte solution to indicate the end point of
titration. A pH indicator, also known as an acid-base indicator that indicates the concentration of H+ ions
in a solution via color change. Only a small amount of indicator compound is needed to produce a visible
color change. Normally, the indicator is a weak acid or base that does not take place with the standard
reagent in the main acid-base reaction. When there is an excess of the titrant, it will react with the
indicator, and it will change color. This color change indicates the endpoint of the acid-base reaction.
In an acid-base titration analysis, there should be a sudden change in pH when the reaction is complete.
For example, if the sample being titrated is an acid, then the titrant to be used will be basic. When one
excess drop of titrant is added, the solution being titrated will suddenly become basic. Hence, the end
point is found in a titration by adding trace amounts of a substance, turns color when the equivalence
point is reached. When a strong acid is titrated with a strong base, or vice versa, the pH of the solution
will be about 7.0 at the equivalence point. Phenolphthalein is the indicator used in this experiment.
Phenolphthalein is colorless in acidic solutions and turns pink in alkaline solutions.
Many indicators will change color at certain pH ranges. When choosing an indicator, we must pick one
that will change color at a pH close to the endpoint. Here are some common indicators: Name
Color change (acid to base) pH range Methyl violet Yellow ↔ Blue 0.0-1.6 Methyl orange Red ↔ Yellow 3.2-4.4 Methyl red Red ↔ Yellow 4.8-6.0 Bromothymol blue Yellow ↔ Blue 6.0-7.6 Phenolphthalein Colorless ↔ Pink 8.2-10.0 Thymolphthalein Colorless ↔ Blue 9.4-10.6
Once we have picked our indicator, we will add a few drops of it to our analyte solution. Next, we will
turn the burette open, so drops of the titrant can flow out. When a flash of color appears, we close the
burette slightly to slow down the flow. When the color stays for longer, we swirl it around until it returns
to its original color. Once the indicator has changed color and stayed that way for several seconds, the
titration is finished. We note the final volume of the titrant, then repeat the experiment a few times for
accuracy. Once we have our average volume of titrant used, we can use that to calculate the concentration of the analyte.
4. Materials and equipment 4.1. Materials
• Standardized oxalic acid 0.100N solution • NaOH solution • HCl solution • Na2CO3 solution • Phenolphthalein 1% • Methyl Orange 4.2. Equipment
Each group is provided with the following basic lab tools: • Volumetric pipette 10 mL • Erlenmeyer flask 250 mL • Beaker 100 mL • Beaker 250 mL • Volumetric flask 100mL • Burette 50 mL 5. Safety precautions
Be cautious while working with glassware (volumetric pipette, burette, etc.) Always use two hands while
transporting glasses (position one hand under the glass for support). Glass fragments and other sharp objects are physical risks.
6. Experimental procedure
6.1 Preparation of 0.1 N sodium hydroxide solution
- Weight accurately 4.00 g of sodium hydroxide pellets and put it into a 250 ml beaker.
- Add approximately 150 ml of distilled water in it and stir it to dissolve the pellets. - Pour this
solution to a volumetric flask (1000 ml) and make up the volume. - Shake well to mix properly.
6.2 Preparation of 0.1N HCl solution.
- Pour 100 mL of distilled water into a 1000 mL volumetric flask.
- Add about 8.2 mL of 37% concentrated HCl carefully. - Pour in 700mL of water.
- Allow the solution to cool to room temperature.
- Add the distilled water to increase the volume up to 1000 mL. - Thus, the required 0.1 N HCl is now prepared.
6.3 Standardization NaOH solution using 0.100 N oxalic acid as primary standard
- Rinse and fill the burette with 0.1 N sodium hydroxide solution with the help of funnel.
- Pipette out 10 ml of 0.100 N oxalic acid solution into a clean and dry conical flask and add 1-2 drops
of phenolphthalein indicator to it. - Shake it to mix the contents.
- Titrate the contents of conical flask with NaOH solution until permanent pink colour is obtained. -
Repeat the titration and take three concordant reading.
- Calculate the concentration of sodium hydroxide solution.
6.4. Titration HCl solution by standardized NaOH solution
- Rinse the burette by adding 2-3 mL of the standardized NaOH solution and allow it to run through the burette. Repeat 3 times.
- Fill a burette with the standardized NaOH. Open the stopcock briefly to allow any air bubbles to
pass through. Record the initial volume of NaOH in the burette.
- Take 10.00 mL of unknown HCl solution into a 250 mL Erlenmeyer flask. Add 1-2 drops of
phenolphthalein. Record the initial color of HCl solution.
- Gradually dispense the NaOH solution drop-by-drop from the burette into the solution in the
Erlenmeyer flask. Swirl the flask constantly as the drops are added. Note any color changes observed.
As the equivalence point is approached, a pinkish color will appear and dissipate more slowly as the
titration proceeds. Add the NaOH drop-by drop until the endpoint of the titration is reached (this is the
point at which a very light pink color is obtained after 20 seconds of swirling the flask).
- Record the volume of NaOH required to reach the endpoint of the titration. Repeat the experiment
till you get concordant readings.
- Determine the concentration of HCl solution.
Repeat the process at least three times and calculate the mean value.
6.5 Analysis of Na2CO3 and NaHCO3 in a mixture by double indicator method
- Transfer a 10.00 ml aliquot of supplied solution to a 250 ml Erlenmeyer flask. Add 1-2 drops of phenolphthalein indicator.
- Rinse and fill standardized HCl solution into the burette and record the volume in a lab notebook.
Do not allow any bubbles to present inside the burette.
- Titrate with the hydrochloric acid. The end-point of the titration is when the solution just changes
from pink to colourless. Note the first titre, then add a few drops of methyl orange.
- Continue to titrate with the hydrochloric acid. The end-point of the titration is reached when the
solution just changes from yellow to orange. Note the second titre.
- Repeat steps 1 - 3 until concordance (i.e. until the readings are the same or within 0.1ml).
- Determine the concentration of Na2CO3 and NaHCO3 in the mixture. Repeat the process at least
three times and calculate the mean value. 7. Clean-up
• Each group wipes down your experiment area with alcohol 70o, wash the used labware, and dispose waste in trash can.
• Dispose of HCl and NaOH in the acid waste collector. Remember to wear gloves during washing,
clean-up workstations and return chemical containers to their original locations. The last finished
group is on duty to clean up the laboratory. 8. Lab report
• Lab report (individual) is required for this lab session.
• The introduction section should include brief information about: o Background of the acid-
base titration (definition, principle, purposes, etc.) o Background of indicators
(Phenolphthalein, Methyl Orange) are used in this lab section. o How to calibrate and handle a
burette before doing the experiment.
Note: All calculation must be included in the result section. 9. Manual information
This manual is developed by Dr. Truong Phuoc Long, Instructor
Tài liệu liên quan:
-
Report 1: Exploring Chemical Reactions at CIU | Môn Chemistry for BME Laboratory - Trường Đại học Quốc tế, Đại học Quốc gia Thành phố Hồ Chí Minh
129 65 -
Report 4 - Investigation of Chemical Equilibrium | Môn Chemistry for BME Laboratory - Trường Đại học Quốc tế, Đại học Quốc gia Thành phố Hồ Chí Minh
132 66 -

Quy Định An Toàn Phòng Thí Nghiệm | Môn Chemistry for BME Laboratory - Trường Đại học Quốc tế, Đại học Quốc gia Thành phố Hồ Chí Minh
72 36 -
Hướng dẫn viết báo cáo Môn Chemistry for BME Laboratory | Trường Đại học Quốc tế, Đại học Quốc gia Thành phố Hồ Chí Minh
107 54 -
About the lab Môn Chemistry for BME Laboratory | Trường Đại học Quốc tế, Đại học Quốc gia Thành phố Hồ Chí Minh
91 46