Laboratory Assignment – Lab 4 | Báo cáo thực hành học phần Molecular Genetics | Trường Đại học Quốc tế, Đại học Quốc gia Thành phố Hồ Chí Minh
Using crustacean hyperglycaemic hormone gene (AF372657) as the input CHH, create a restriction map with 3 restriction enzymes: AseI, BsaAI, EcoRI. Note a number of cut site, recognition sequence, positions of cut site, fragment sizes, and types of fragment end. We pasted the GenBank number AF372657 as the input onto nc2.neb.com/NEBcutter2/. The results showed all enzymes that can cut the sequence (Figure 1.1), thereby we would choose “Custom digest” in the “Main options” section to summarize all of these enzymes (Figure 1.2). Tài liệu giúp bạn tham khảo, ôn tập và đạt kết quả cao. Mời bạn đón xem.
Môn: Molecular Genetics 2 tài liệu
Trường: Trường Đại học Quốc tế, Đại học Quốc gia Thành phố Hồ Chí Minh 2 K tài liệu
Tác giả:


Preview text:
VIETNAMESE NATIONAL UNIVERSITY – HCMC INTERNATIONAL UNIVERSITY
SCHOOL OF BIOTECHNOLOGY
MOLECULAR GENETICS
Laboratory Assignment – Lab 4 Group: 02 Group members: Nguyễn Thùy Dương BTBTIU18050 Nguyễn Nguyên Khang BTBTIU18098 Bùi Mỹ Yến Như BTBTIU18444 Nguyễn Việt Tiến BTBTIU18239 Course ID: BTBT18IU11 Instructor: PhD. Nguyen Minh Thanh Date of Submission: Tues. 1 Jun. 2021 I.
RESTRICTION MAPPING
Using crustacean hyperglycaemic hormone gene (AF372657) as the input CHH, create a restriction map
with 3 restriction enzymes: AseI, BsaAI, EcoRI. Note a number of cut site, recognition sequence, positions
of cut site, fragment sizes, and types of fragment end.
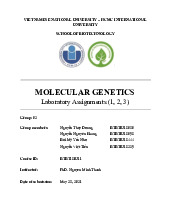
- We pasted the GenBank number AF372657 as the input onto nc2.neb.com/NEBcutter2/
Figure 1.1. The enzymes that can cut the sequence
- The results showed all enzymes that can cut the sequence (Figure 1.1), thereby we would choose
“Custom digest” in the “Main options” section to summarize all of these enzymes (Figure 1.2).
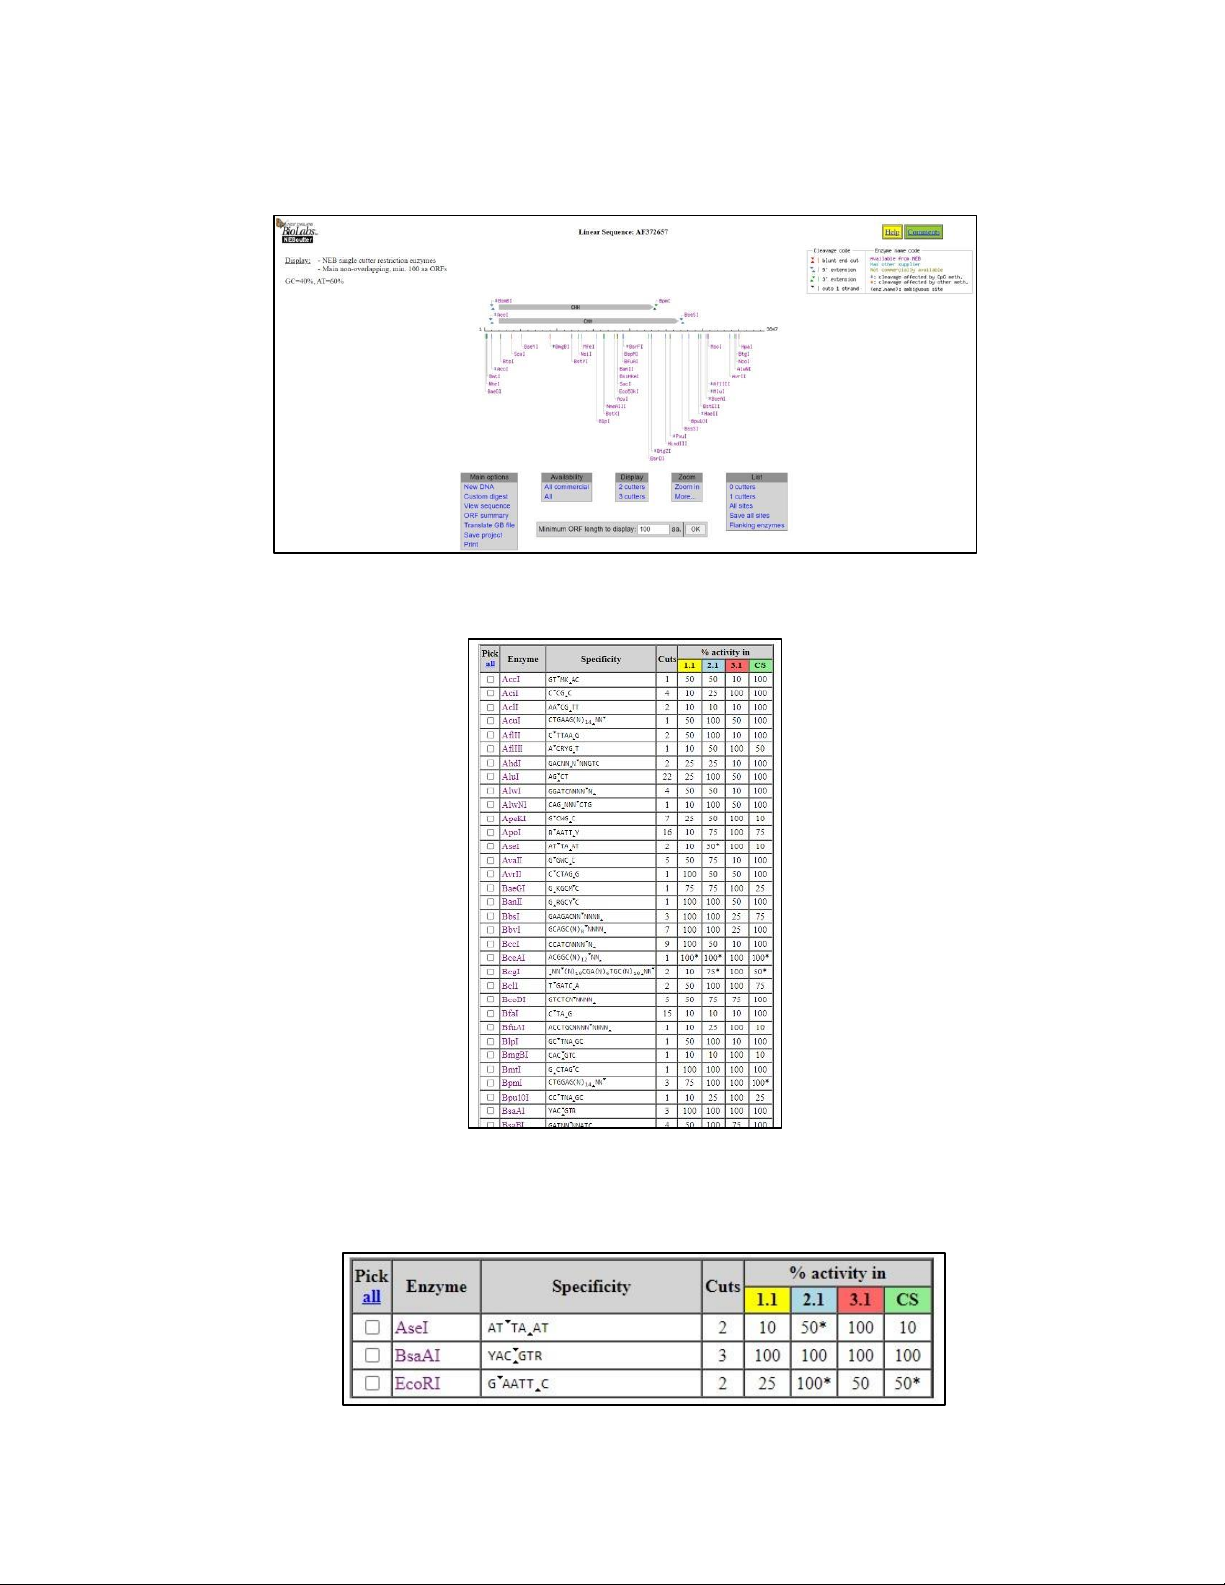
Figure 1.2. The summarized table of all enzymes that can cut the sequence
- Based on the table, we could tell the types of end of each fragments (sticky end, blunt end, within or
outside the recognition sequence) along with their recognition sequences, number of cuts of the
three required enzymes: AseI, BsaAI, EcoRI (Figure 1.3).
Figure 1.3. Number of cuts, recognition sequence along with types of end of AseI, BsaAI, EcoRI - Particularly,
+ BsaAI: enzyme with blunt ends
+ EcoRI: enzyme producing 5’ overhang. In this case of EcoRI, the 5’ overhang is AATT
+ AseI: enzyme producing 5’ overhang. In this case of EcoRI, the 5’ overhang is TA
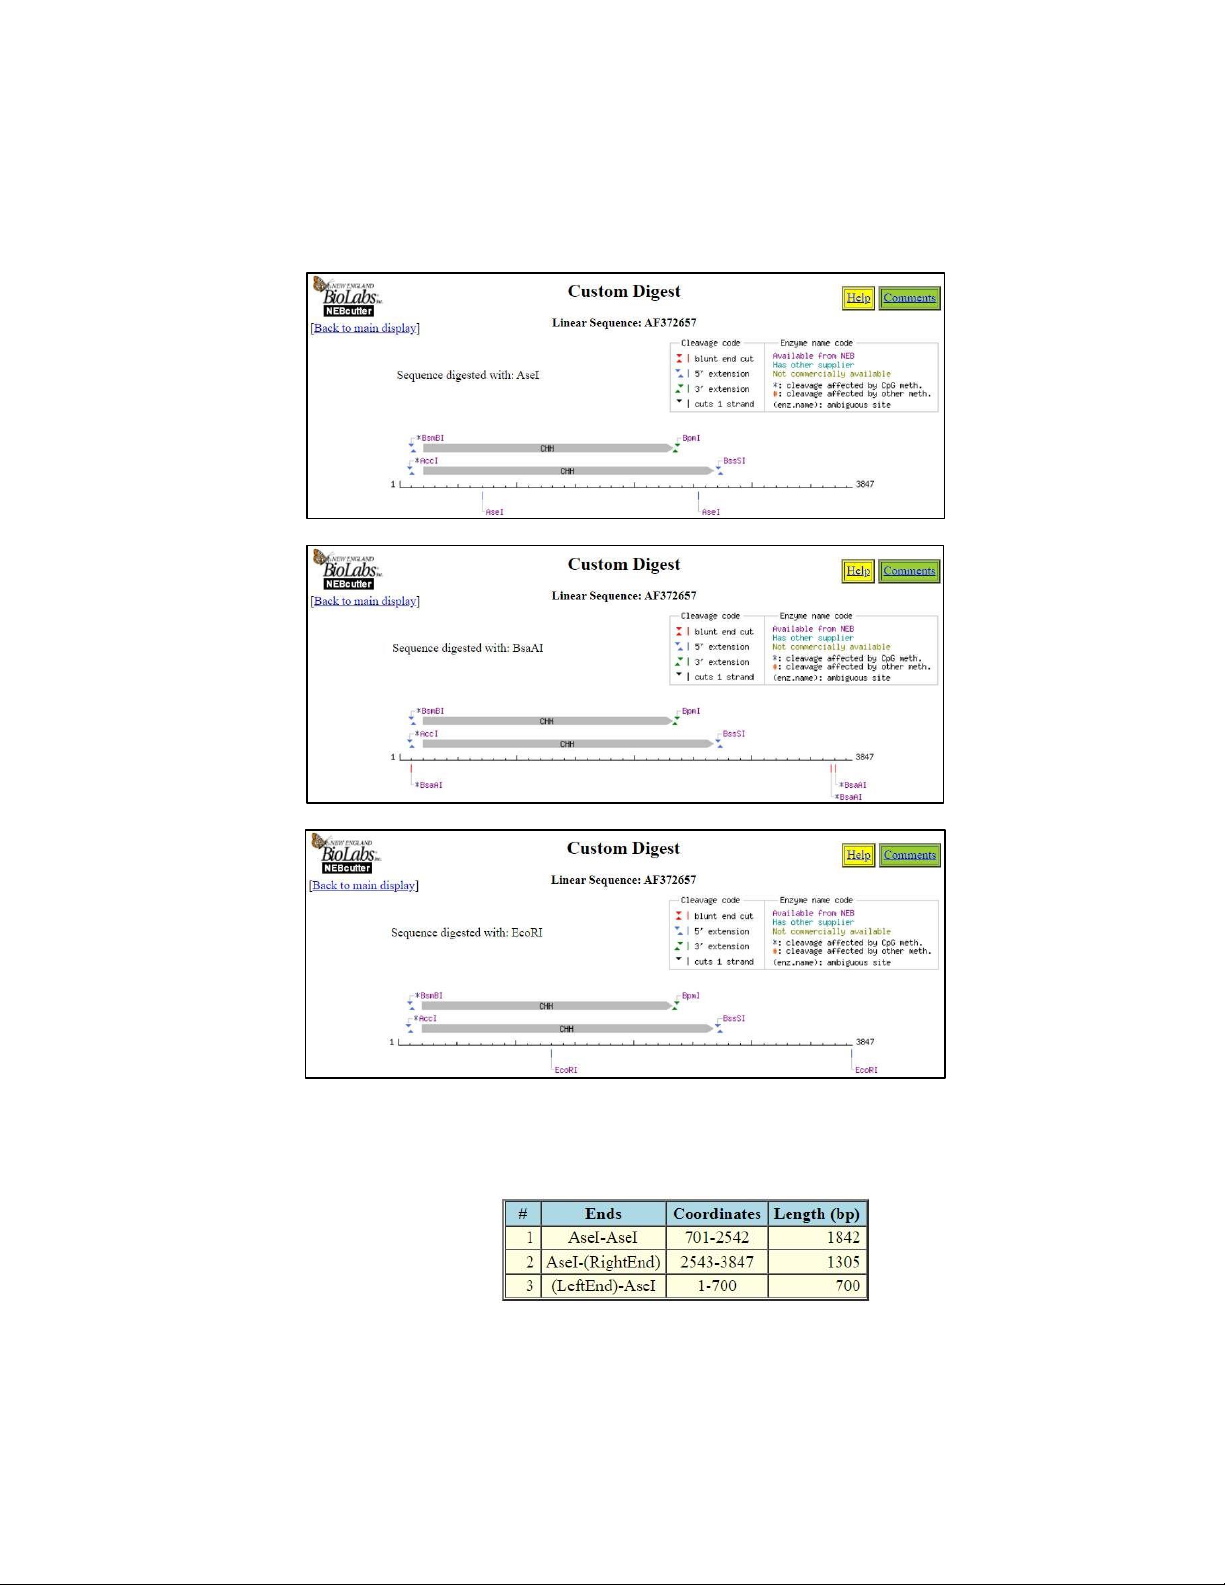
- Then, we digested the three required enzymes: AseI, BsaAI, EcoRI one by one to view the cut sites (Figure 1.4, 1.5, 1.6).
Figure 1.4. AseI enzyme has 2 cut sites
Figure 1.5. BsaAI enzyme has 3 cut sites
Figure 1.6. EcoRI enzyme has 2 cut sites
- Under the “Main options” section, we would choose “View gel” to view the number of fragments
that this cut produced. Based on the number of bands appeared on the gel view, we concluded that:
+ AseI enzyme cut produced 3 fragments along with their corresponding length.
+ BsaAI enzyme cut produced 4 fragments along with their corresponding length.
+ EcoRI enzyme cut produced 3 fragments along with their corresponding length.
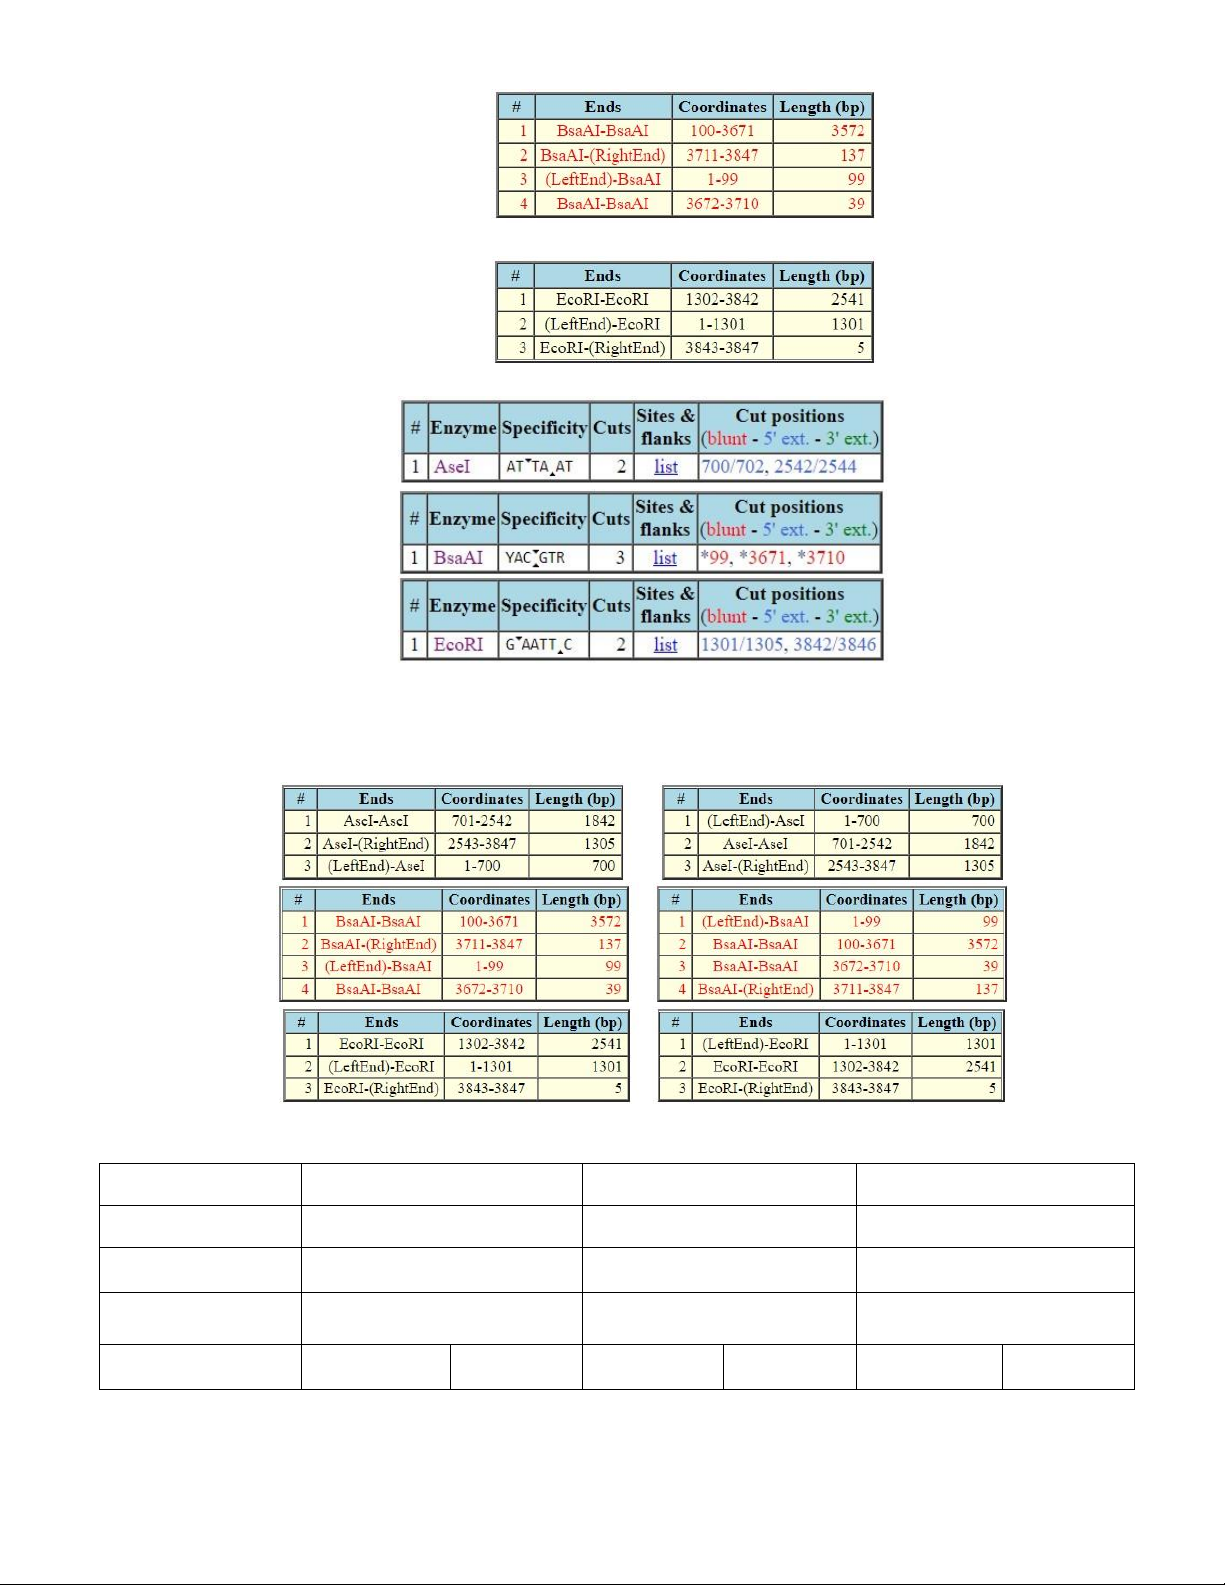
- Under the section “List”, we clicked on “Enzyme & sites” to view the cut positions (Figure 1.7).
Figure 1.7. The cut positions of AseI, BsaAI, EcoRI
- Other than that, the “Fragments” option in the section “List” to view the summary of the fragments
length according to their size and their types of end. The fragments with the larger sizes would go
first, and later on would be the fragments with smaller sizes (Figure 1.8).
Figure 1.8. The fragments length of AseI, BsaAI, EcoRI -
In conclusion, we reported this summarized table below: AseI BsaAI EcoRI Number of cut site 2 3 2 Recognition sequence AT TA AT YAC GTR G AATT C Positions of cut sites 700/702, 2542/2544 *99, *3671, *3710 1301/1305, 3842/3846 (cut positions) AseI-AseI 1842 BsaAI-BsaAI 3572 EcoRI-EcoRI 2541 Fragments & AseI- 1305 BsaAI- 137 (LeftEnd)EcoRI 1301 fragment sizes (RightEnd) (RightEnd) (LeftEnd)AseI 700 (LeftEnd)BsaAI 99 EcoRI- 5 (RightEnd) - - BsaAI-BsaAI 39 - - Types of end 5’ overhang is TA blunt ends 5’ overhang is AATT II. DESIGN PRIMER
Using Humsomi (J00306) as the input, design primers to amplify the exons only. Report: images of
primer setting-up & the pair 1 of primer (including the highlight of primers & target sequence)
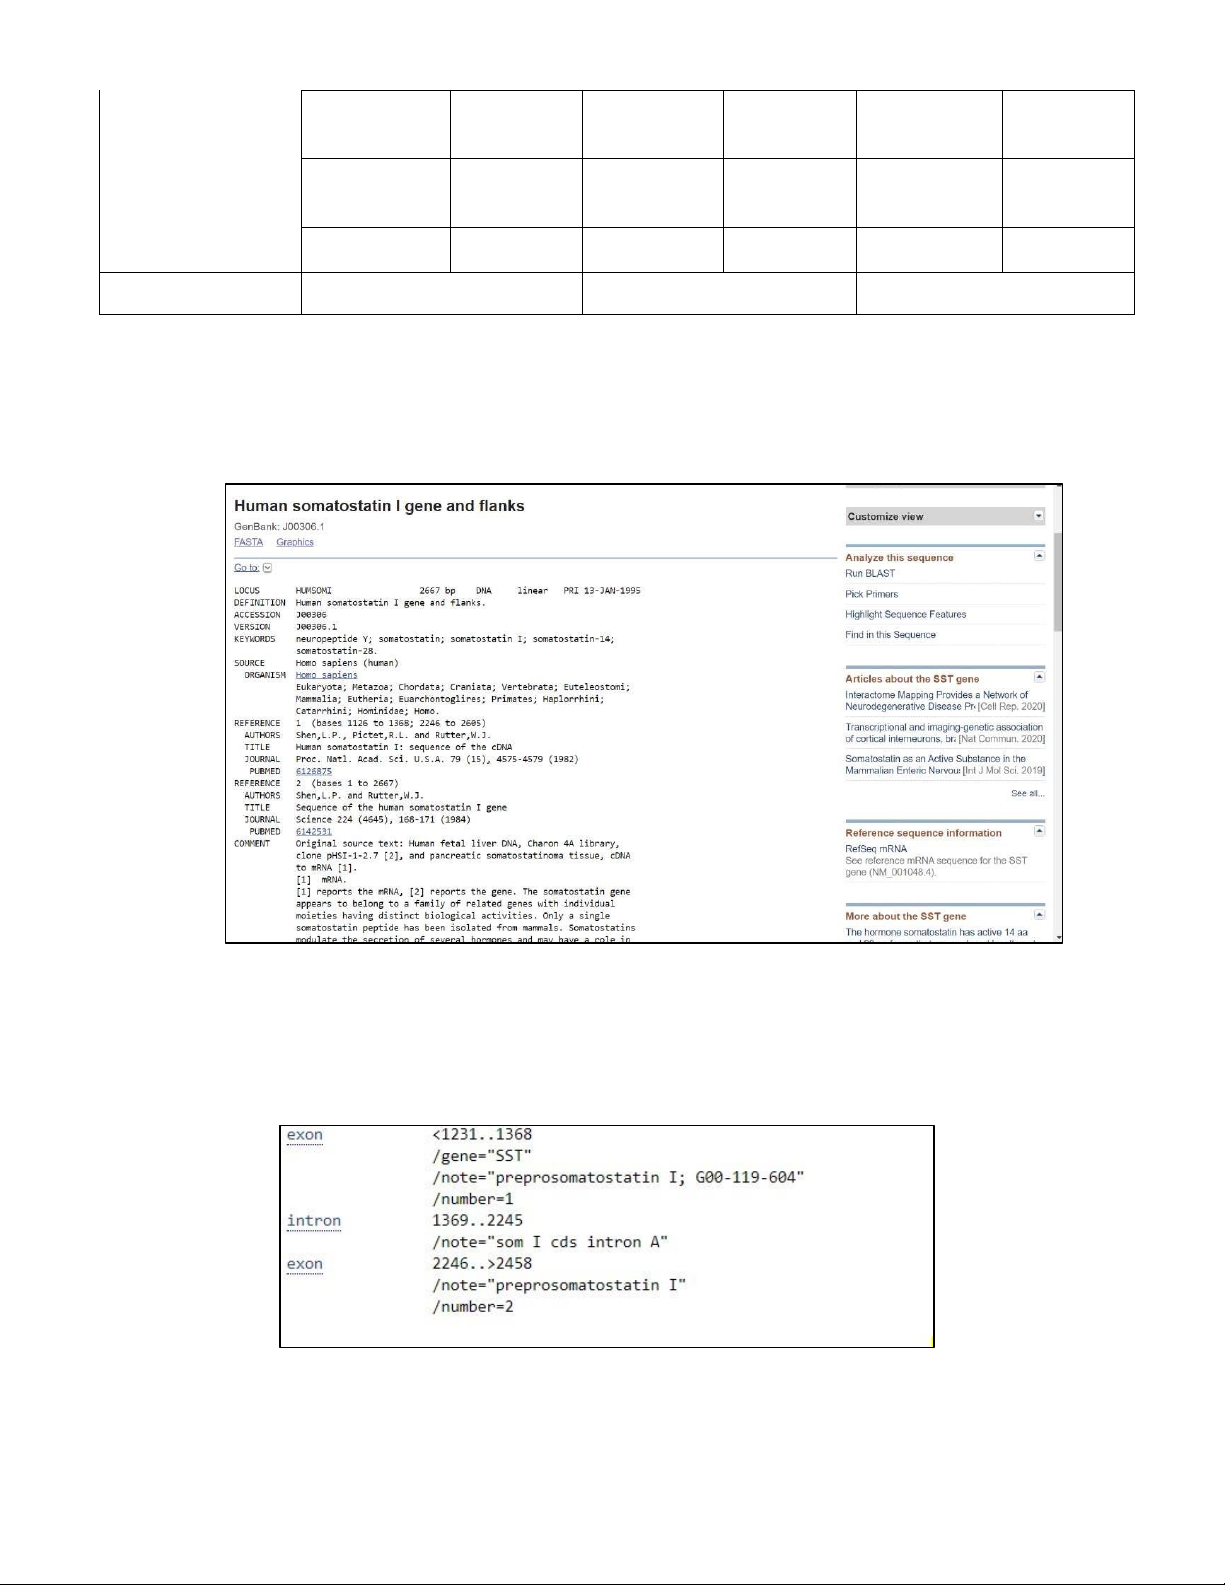
- We pasted the GenBank number J00306 onto NCBI’s Nucleotide database as we’ve done previously
in Exercise 1 Lab 1(Figure 2.1).
Figure 2.1. The searching results of GenBank Humsomi (J00306)
- Then we look for the exons of this sequence since the Question 2 required to design primer to amplify the exons only.
- It can be seen from the search results that the sequence Humsomi (J00306) is reported with two
exons only: exon number 1 is at the position (<1231..1368) and exon number 2 is at the position
(2246..>2458) (Figure 2.2).
Figure 2.2. Exons positions of the sequence Humsomi (J00306)
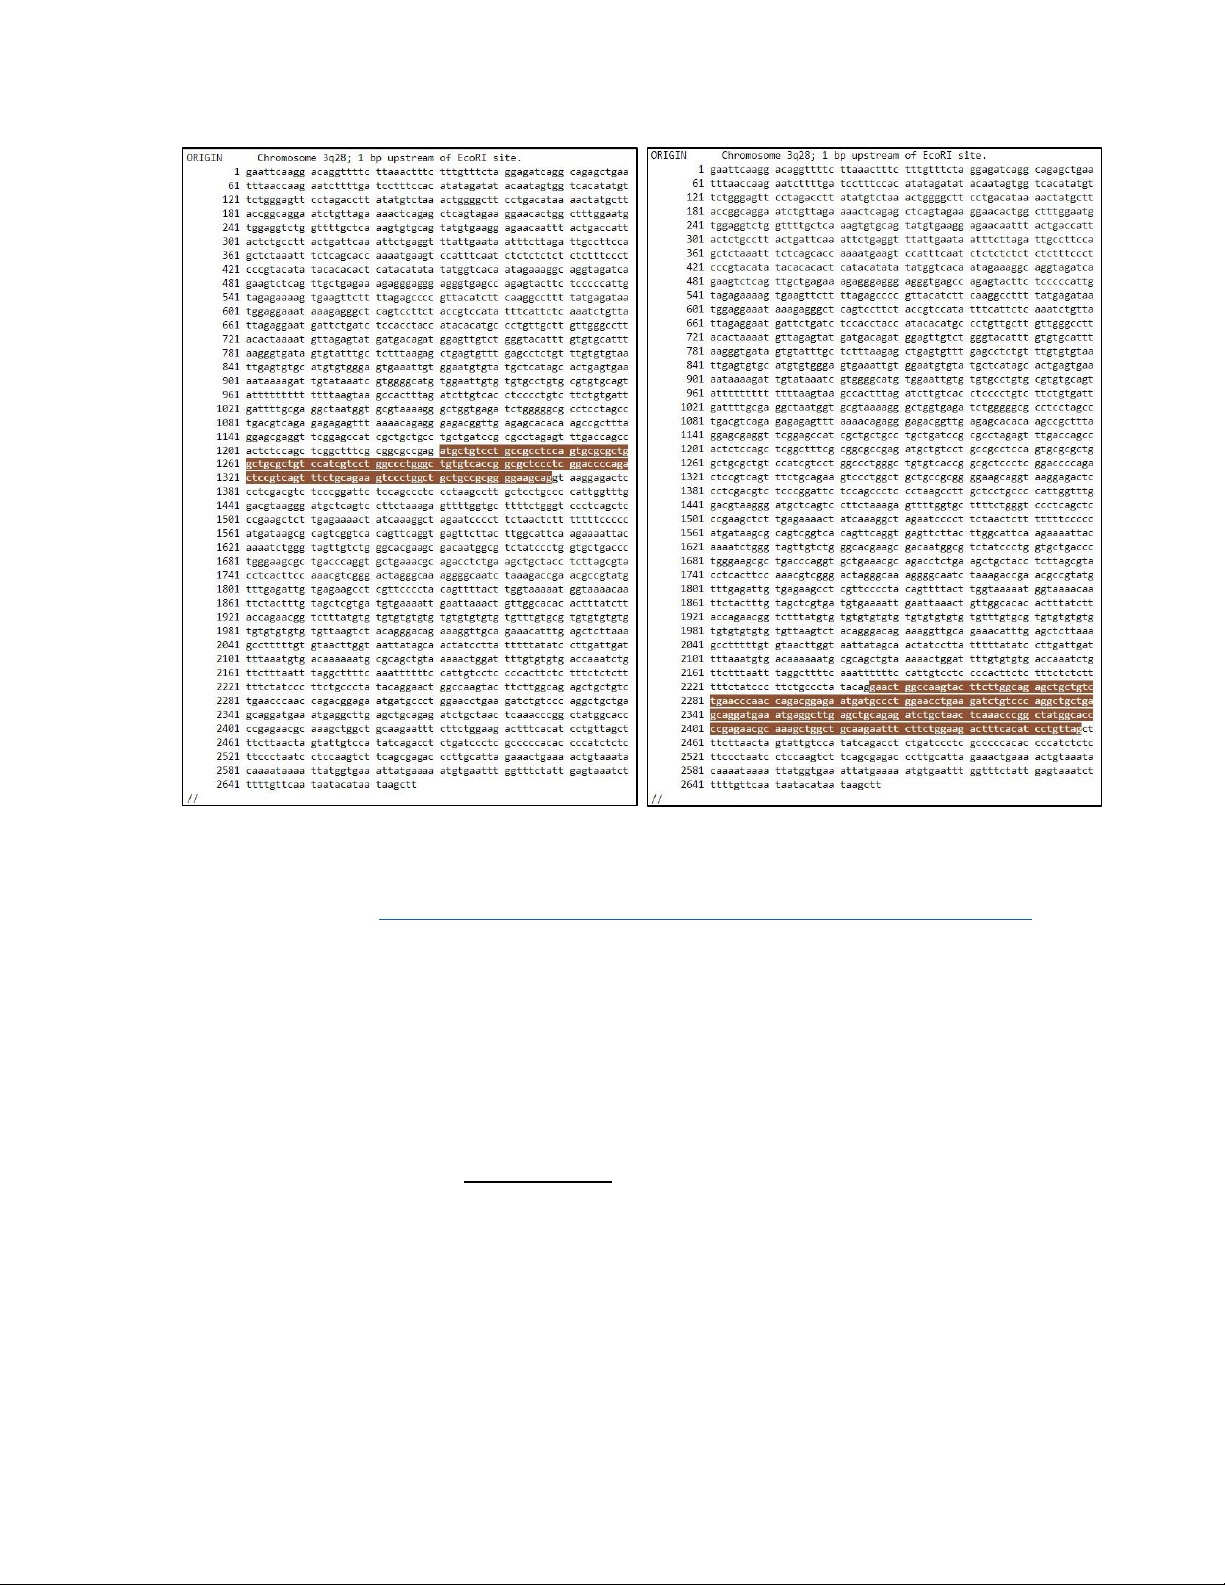
- By clicking onto the word “exon”, subsequently we could find out their sequence and the
corresponding location in the sequence shown in the “Origin” section below (Figure 2.3).
- We could later use these positions and exons sequences to design primers in a more convenient
matter when pasting them as the input of Primer3Plus.
Figure 2.3. Exons positions of the sequence Humsomi (J00306). On the left-side is the position of exon number 1.
On the right-side is the position of exon number 2. - Later on, we copied the sequence on NCBI database onto the
Primer3Plus input https://www.bioinformatics.nl/cgi-bin/primer3plus/primer3plus.cgi
- We could whether use […] to note the target region that we want to design primers for or we could
directly write the position in the “Targets” box (Figure 2.4, 2.5), in both cases the required region will be the exons only.
- To set up the target region, the value in the “Targets” box should be a space-separated list of start,
length pairs. To calculate the length, we used:
The last position of the exon – The first (the starting) position + 1 = The length -
Since Humsomi (J00306) only has 2 exons, we will design primers to amplify 2 exons.
Design primers to amplify Exon number 1: - For Exon number 1, we had: + The first position is 1231
+ The length is: 1368 – 1231 + 1 = 138
So the set up target region would be [1231,138] (do not put comma between the 2 numbers)
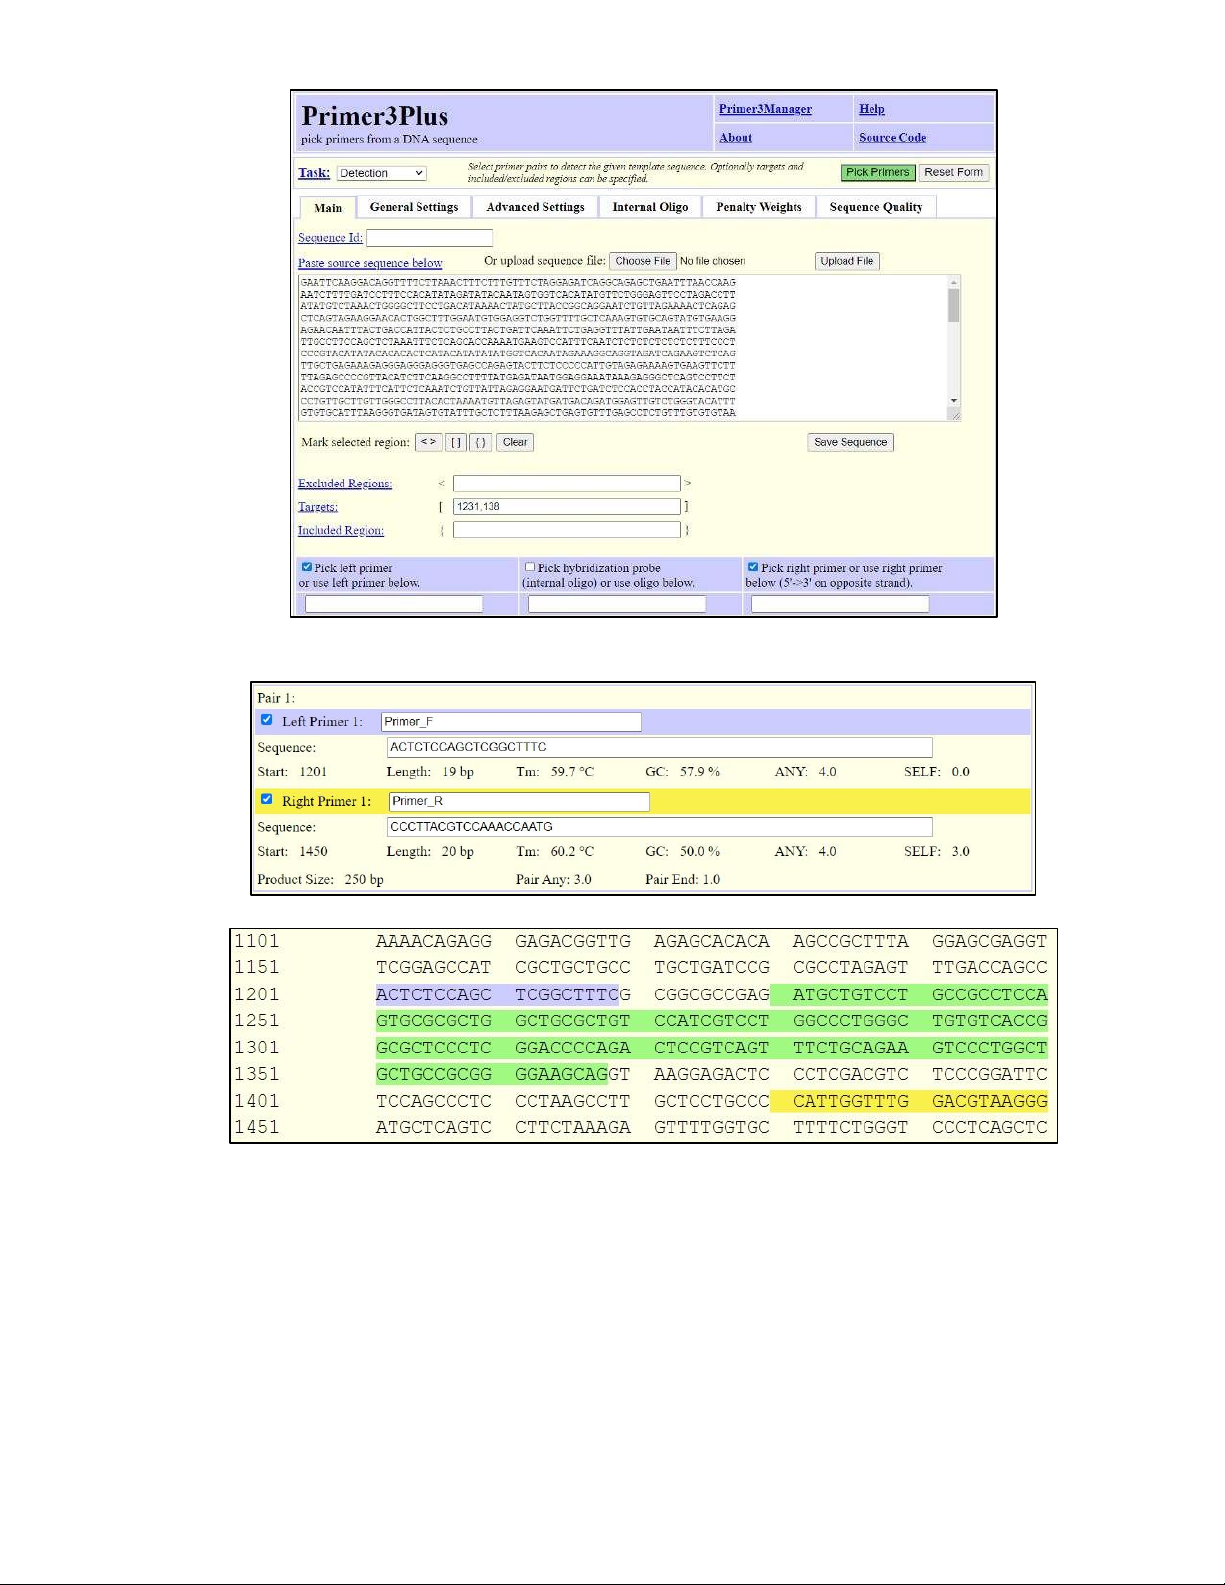
- After finished identifying the target region for Exon number 1, we chose “Pick Primers” on the right corner to run Primer Design.
Figure 2.4. Setting up Target region for designing primers to amplify the exon number 1.
- After running for designed primers, we reported the Pair 1 primer to amplify Exon number 1:
Figure 2.5. Pair 1 primer.
Figure 2.6. The highlight of primers (in blue and yellow color) along with the target sequence (in green colour).
- The blue-highlighted sequence is the forward primer. The yellow-highlighted sequence is the reverse
primer. The sequence highlighted in green is the targeted region (Figure 2.6)
Design primers to amplify Exon number 2: - For Exon number 2, we had: + The first position is 2246
+ The length is: 2458 – 2246 + 1 = 213
So the set up target region would be [2246,213] (do not put comma between the 2 numbers)
- After finished identifying the target region for Exon number 2, we chose “Pick Primers” on the right corner to run Primer Design.
Figure 2.7. Setting up Target region for designing primers to amplify the exon number 2.
- After running for designed primers, we reported the Pair 1 primer to amplify Exon number 2:
Figure 2.8. Pair 1 primer.
Figure 2.9. The highlight of primers (in blue and yellow color) along with the target sequence (in green colour).
- The blue-highlighted sequence is the forward primer. The yellow-highlighted sequence is the reverse
primer. The sequence highlighted in green is the targeted region (Figure 2.9).