Manual 2324: Practical Techniques & Safety Guidelines | Môn Genetics Laboratory - Trường Đại học Quốc tế, Đại học Quốc gia Thành phố Hồ Chí Minh
Manual 2324: Practical Techniques & Safety Guidelines Môn Genetics Laboratory. Tài liệu được sưu tầm gồm 27 trang, giúp bạn ôn tập tốt hơn. Mời các bạn đón xem.
Môn: Genetics Laboratory 3 tài liệu
Trường: Trường Đại học Quốc tế, Đại học Quốc gia Thành phố Hồ Chí Minh 2 K tài liệu
Tác giả:


Preview text:
lOMoAR cPSD| 58562220 Laboratory September, 2023 Manual GENETICS
This practical is designed to give
students an introduction to major organisms used for studying
genetics. Student will have chance to
observe the steps in cell
division, to perform technique in
Name:……………………………………..
culturing fruit flies, and then
distinguish male/female fruit flies, to
ID:………………………………………… understand how the genetic material passed between
generations and how DNA can be
extracted from plant cells.
Prepared by Tong Thi Hang, MSc. HCMC-2023 lOMoAR cPSD| 58562220 CONTENTS
LABORATORY SAFETY GUIDELINES ....................................................... 2
LAB 1: Culturing and Experimental Mating of Drosophila melanogaster .......... 6
LAB 2: Mitosis .................................................................................................... 11
LAB 3: Meiosis ................................................................................................... 14
LAB 4: Extraction of DNA from plant cells ....................................................... 18
LAB 5: Plasmid extraction from E.coli culture …………………………… 21
LAB 6: Gel Electrophoresis ............................................................................... 23
APPENDIX - RECIPES .................................................................................... 25 lOMoAR cPSD| 58562220
School of Biotechnology – IU HCMC-2023
LABORATORY SAFETY GUIDELINES
A. GENERAL LABORATORY SAFETY
1. Work carefully and cautiously in the laboratory, using common sense and good judgment at all times.
2. EATING. DRINKING AND SMOKING ARE PROHIBITED in the laboratory
and in the laboratory space of a combined lecture/laboratory room.
3. Long hair must be tied back during laboratory sessions.
4. Open toed shoes are prohibited.
5. No sleeveless tops are permitted. Lab coats must be worn.
6. Identify the location of all exits from the laboratory and from the building.
7. Be familiar with the location and proper use of fire extinguishers, fire blankets,
first aid kits, spill response kits, and eye wash stations in the laboratory.
8. Report all injuries, spills, breakage of glass or other items, unsafe conditions,
and accidents of any kind, no matter how minor, to the instructor immediately.
9. Keep sinks free of paper or any debris that could interfere with drainage.
10. Lab tables must be clear of all items that are not necessary for the lab exercise.
11. Wash hands and the lab tables with the appropriate cleaning agents before
and after every laboratory session.
B. OPEN FLAMES - FIRE HAZARD
1. Identify and be familiar with the use of dry chemical fire extinguishers that are
located in the hallways and laboratory rooms.
2. Flames are only to be used under the supervision of the instructor.
C. SHARP OBJECTS AND BROKEN GLASS
1. Pointed dissection probes, scalpels, razor blades, scissors, and microtome knives
must be used with great care, and placed in a safe position when not in use. lOMoAR cPSD| 58562220
School of Biotechnology – IU
2. Containers designated for the disposal of sharps (scalpel blades, razor blades,
needles; dissection pins, etc.) and containers designated for broken glass are
present in the laboratory. Never dispose of any sharp object in the regular trash containers.
3. Report all cuts, no matter how minor, to the instructor.
4. All biology labs and the biology preparation room (702) house a first aid kit
containing antiseptics, bandages, Band-Aids and gloves to care for minor cuts.
5. Do not touch broken glass with bare hands. Put on gloves and use a broom
and dustpan to clean up glass. Dispose of ALL broken glass in the specific
container marked for glass. Do not place broken glass in the regular trash.
6. When cutting with a scalpel or other sharp instrument, forceps may be used to
help hold the specimen. Never use fingers to hold a part of the specimen while cutting.
7. Scalpels and other sharp instruments are only to be used to make cuts in the
specimen, never as a probe or a pointer.
D. INSTRUMENTS AND EQUIPMENT
Care must be used when handling any equipment in the laboratory. Students are
responsible for being familiar with and following correct safety practices for all
instruments and equipment used in the laboratory.
Microscope Handling
1. Microscopes must be carried upright, with one hand supporting the arm of the
microscope and the other hand supporting the base. Nothing else should be carried at the same time.
2. Microscope must be positioned safely on the table, NOT near the edge.
3. After plugging the microscope into the electrical outlet, the cord should be
draped carefully up onto the table and never allowed to dangle dangerously to the floor.
4. The coarse adjustment must NEVER be used to focus a specimen when the
40x or oil immersion lens is in place. 3 lOMoAR cPSD| 58562220
School of Biotechnology – IU
5. When finished with the microscope, the cord should be carefully wrapped
around the microscope before returning it to instructor.
6. The microscope must be placed upright and in the table near the cabinet.
7. All prepared microscope glass slides are to be returned to their appropriate
slide trays; wet mount preparations are to be disposed of properly.
8. Malfunctioning microscopes should be reported to the instructor.
Hot Plates and Water Baths
1. The instructor will regulate the temperature of hot plates and water baths with a thermometer.
2. This equipment must be placed in a safe place.
3. Use insulated gloves or tongs to move beakers or test tubes in and out of the water baths.
4. Use care when working near hot plates and water baths, as they may still be
hot even after being turned off.
E. ADDITIONAL LABORATORY SAFETY FOR THE GENETICS LAB
1. The Drosophila melanogaster that are used for the lab experiments are not fit
for the natural environment and are mutations of the wild form of this animal.
They will not be released into the open air but euthanized in mineral oil.
2. Fly nap (triethylamine and ethanol) is to be used only as directed by the
instructor and following the manufacturers recommendations.
3. DNA recombination experiments will only include DNA from the bacteria E.
coli and it's plasmids. These recombinant organisms will be disposed of in biohazard receptacles.
4. E. coli strains used in the laboratory are not pathogenic and cannot survive in the adult large intestine.
5. Protective goggles will be used when viewing gels illuminated with ultraviolet light.
6. Gloves will be worn during molecular experiments and will be changed if there is a tear or spill. lOMoAR cPSD| 58562220
School of Biotechnology – IU
7. When agarose gels are stained with ethidium bromide only the instructor will
handle the gel and the staining solution. Ethidium bromide is a mutagen by the
Ames test and suspected carcinogen. 5 lOMoAR cPSD| 58562220
School of Biotechnology – IU
LAB 1: CULTURING AND EXPERIMENTAL MATING OF
DROSOPHILA MELANOGASTER I. Introduction
Drosophila melanogaster is a cosmopolitan species, which can be found all
over the world, including in your home if you have overripe fruits in the summer.
Fruit fly has been widely used for genetic investigation because it has many
characteristics of a good experimental model, including the short life cycle, the
ease of culturing, the high reproductive rate, and the small chromosome number.
General structure of the adult fruit fly
Drosophila’s body has three main parts: the head, the thorax, and the
abdomen. The major structures of the head are two big compound eyes, two
antennas, a mouth. The thorax has six legs, two wings, and two halteres, which
are small, club-shaped structures behind the wings that ensuring the fly balance
when flying. On the dorsal surface of the thorax, there are a number of long dark bristles.
It is not difficult to distinguish a female from a male fly. The male is usually
smaller than the female. In addition, the female has more pointed abdomen,
which is stripped rather than back-tipped (Fig. 1.1). Other features that can be
used to determine the sex of the adult D. melanogaster is shown in Table 1.1.
Table 1.1 Features for sex determination of fruit fly. Characteristics Male Female Overall size Generally smaller the female Generally larger than male Size of abdomen Smaller than female’s Larger – due to distention with maturing eggs
Shape of abdomen Narrower than female Broader Tip rounded (blunt) Tip is pointed lOMoAR cPSD| 58562220
School of Biotechnology – IU Color of tip of Solid black dorsally Not so abdomen Penis
Small, dark spot on ventral tip of Absent
abdomen. This, with dorsal black area,
makes tip of abdomen appear entirely black Number of 5 7 abdominal segments visible Sex comb#
Present; about 10 dark, short, curved Absent
bristles (tufts) on the front legs
# Sex comb is special bristle found on the front legs of the male fruit fly. It has no sexual
function and can be observed at the 100-fold magnification. Life cycle
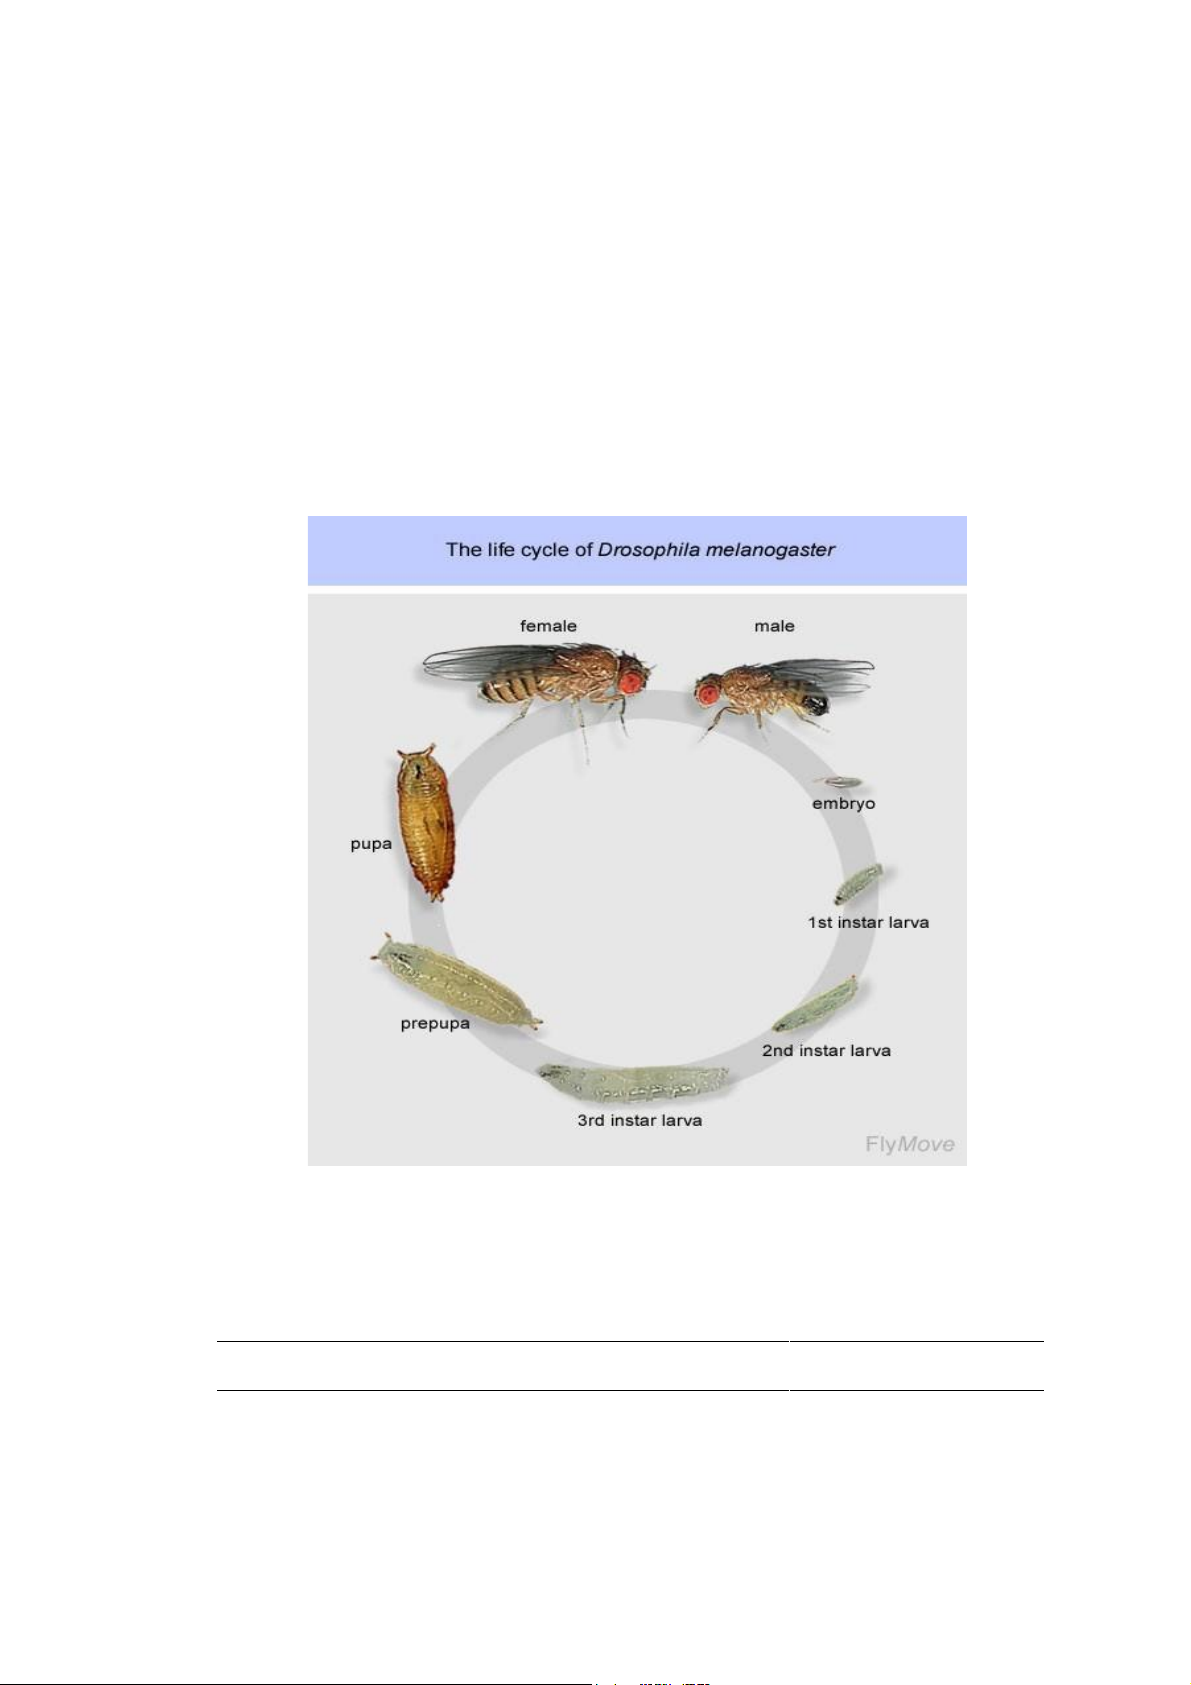
Drosophila life cycle consists of the following four main stages (Fig. 1.1)
• Eggs. Eggs are laid by the mother on the food and take about one day to
hatch. They are small and translucent with two “ears” sticking out.
• Larva. Larvae are maggots, which crawl through the food in jerky motion,
eating as they go. The larvae go through three molts: they are hatched from
the egg as small, “the first instar larvae”. Then after a day they molt to
become larger, “the second instar larvae”. After two days, “the third instar-
larvae” climb up the wall of the vial, glue themselves to the glass, invert
their spiracles (breathing tubes), and settle down as pupae.
• Pupa. Pupae are the cocoons in which the larvae metamorphose into adults.
The larval cuticle becomes a shell, its muscle melt away, and the new adult
exoskeleton as well as musculature form inside. The pupal stage lasts five 7 lOMoAR cPSD| 58562220
School of Biotechnology – IU
days. In the last day, you can see the red eyes and the dark wings forming inside.
• Adult. The adult emerges from the pupal case as a white, elongated fly,
whose wings are stilled folded up. After about an hour, the wings will
expand and the body will take its normal shape and coloration. The adults
become sexually mature after 8-10 hours. After this time, the males chase
the females about in an endless quest for mating. Flies can live up to three
months, but they are pretty decrepit after 6 weeks or so.
Figure 1.1 Life cycle of Drosophila melanogaster The
length of life cycle and each stage vary according to the temperature.
Average lengths of developmental periods are as follows.
Temperature 10oC 15oC 20oC
25oC 28oC 30oC 31oC Egg-Larval 57.0 17.3 8.1 5.0 4.2 4.0 5.0 Pupae-Adult 13.7 13.3 6.5 4.2 3.4 3.4 3.4 lOMoAR cPSD| 58562220
School of Biotechnology – IU Total (days) 70.7 30.6 14.6 9.2 7.6 7.4 8.4 II. Objectives
Upon completion of this investigation, the student should be able to
• Culture fruit flies in vials,
• Distinguish male and female fruit flies, and
• Identify various stages in the life cycle of D. Melanogaster. III. Materials Saccharose Forceps Propionic acid Small pain brushs Dry baking yeast Petri dish Agar Etherizer flask Water Funnel Ether Cotton mesh Culture tube Sterile tissue papers 250 ml beaker Stereo dissecting microscope IV. Procedure
A. Preparing media
Each group of students will prepare 4 medium vials for culturing of the fruit fly
1. Boil 0.75 g agar in 50 ml of water until the agar completely dissolve
2. Add 2.5 g of saccharose and 2.5 g of dry baking yeast, and then boil the
mixture for 1 minute with occasional stirring.
3. Add 250 µl of propionic acid and stir well.
4. Pour the medium into the sterile vials to the depth of about 2 cm. Take care
to prevent the medium from coming into contact with the neck of the vial.
5. Close the vial of the cotton plug, and leave the medium to cool to room temperature.
6. Before put the flies into the tubes for culturing, dry the inner wall of the
tube with sterile tissue papers.
B. Handling flies
1. Put some drops of ether on a piece of cotton mesh inside the funnel that is
put on top of the etherizer flask. 9 lOMoAR cPSD| 58562220
School of Biotechnology – IU
2. Strike the base of the culture tube lightly on the palm of the hand so the
flies will drop to the bottom.
3. Remove the plug and quickly invert the tube over the funnel.
4. Expose the flies to ether for about 1-2 minutes after they stop moving.
Overetherization will kill the flies.
5. Transfer some etherized flies to a dry petri dish.
6. Examine the flies under the dissecting microscope with the light source
shining from above. Use a small paintbrush to move the flies about on the petri dish.
7. Divide the flies in to two groups based on their sex.
8. Open the plug of the culture tube, keep the tube horizontally and gently
transfer three female and three male flies into the tube.
9. Wait until the flies revive before turn the tube vertically otherwise the flies
come into contact with the moist medium, wetting their wings and unable to fly out of the medium.
10. Keep the tubes in cool place for one week or more.
11. Observe the tube to identify different stages in the life cycle of Drosophila.
The third instar larvae will be used for practical 6. V. Report 1.
Record the following morphological characteristic of flies that you observe:
• Body color: .......................................................... •
Eye color: ............................................................ •
Wing shape: ......................................................... •
Presence of antenna: ............................................ 2.
Record morphological states of the Drosophila that you can observe in the tube after one and two weeks. 3.
Record the different characteristics of male and female fruit flies LAB 2: MITOSIS lOMoAR cPSD| 58562220
School of Biotechnology – IU I. Introduction
Mitotic cell division is the type of cell division that results in the formation
of two genetically identical daughter cells from a single mother cell. Before
entering mitotic cell division, cell spends long time in the interphase to acquire
or synthesize materials that are essential for cell division and to replicate its
DNA. Mitotic cell division consists of two consecutive processes: mitosis
(nuclear division) and cytokinesis (cytoplasmic division). During mitosis,
duplicated chromosomes, each consists of two sister chromatids, condense into
visible threadlike structures then equally separated into the opposite end of the
cell. Following mitosis, nucleus is formed in each daughter cell and the
cytoplasm is divided into each daughter cells through the process of cytokinesis.
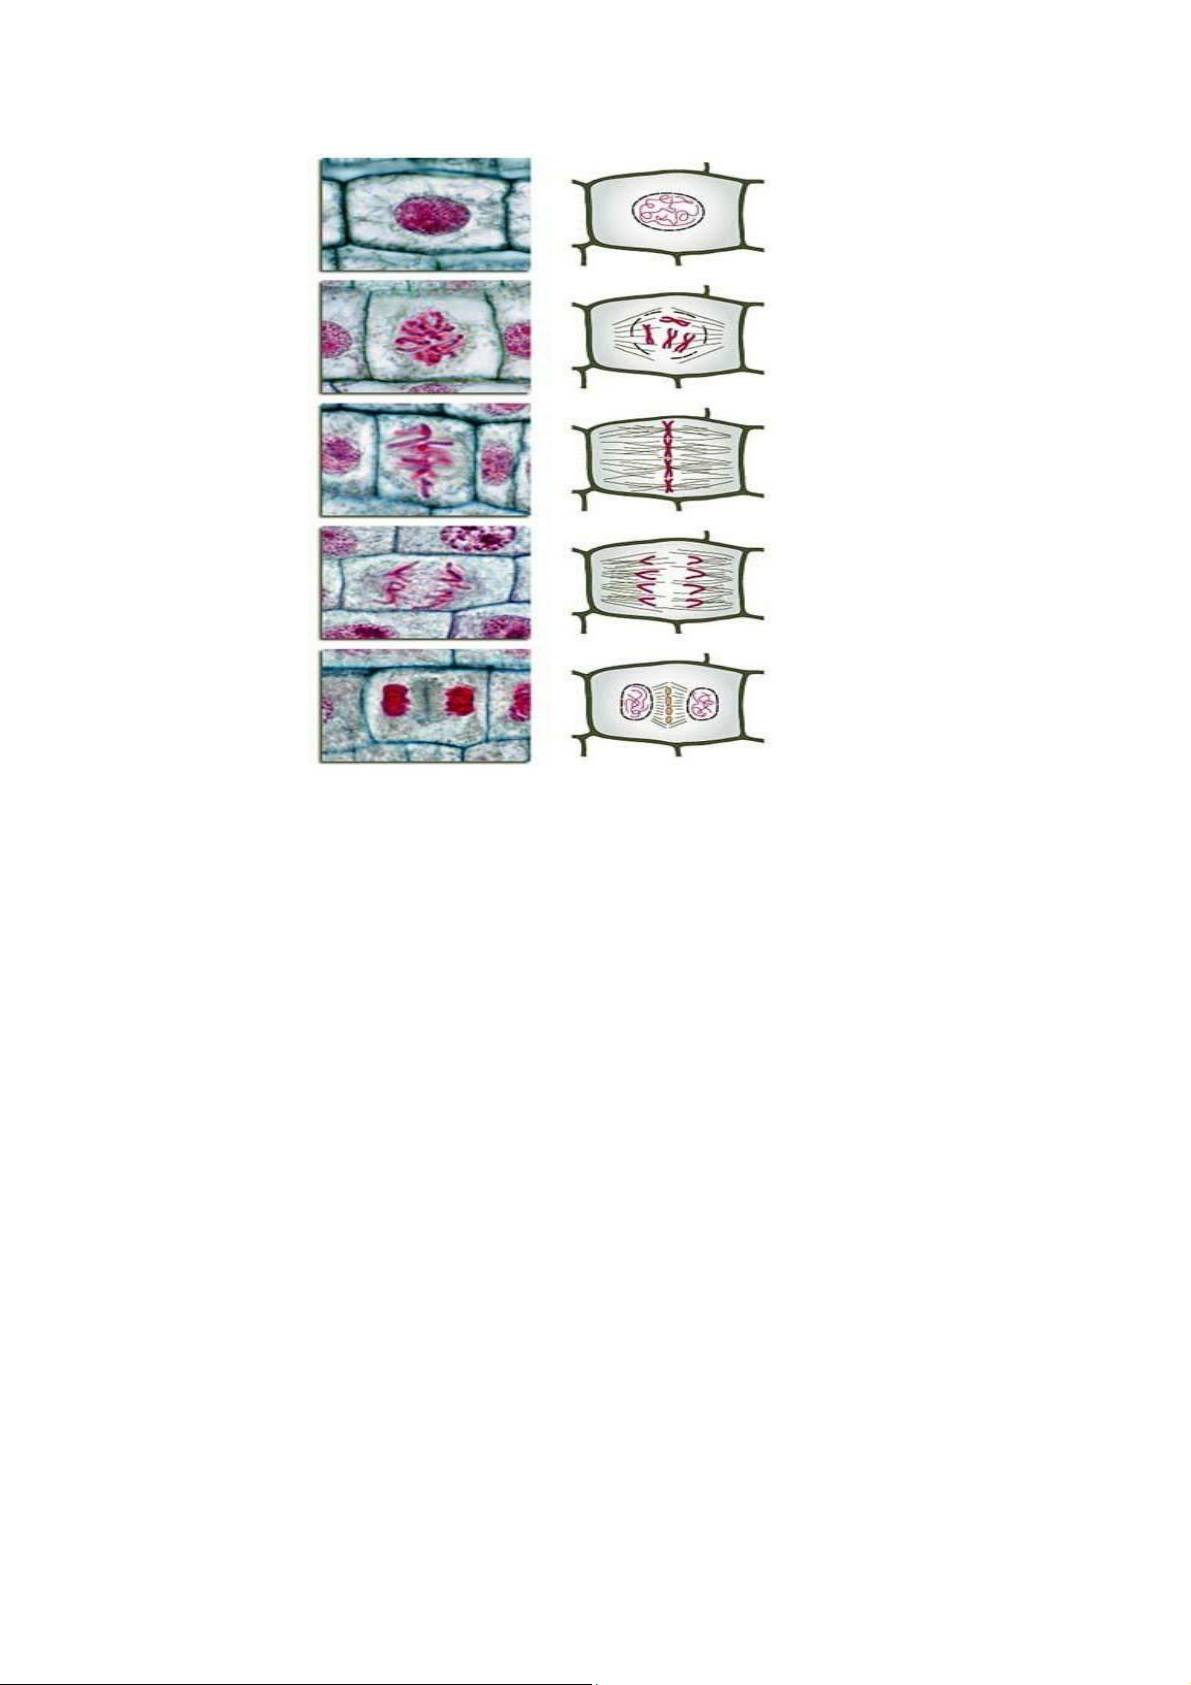
Mitosis can be divided into four phases: prophase, metaphase, anaphase and telophase (Fig. 2.1):
During prophase, the chromosomes condense and the spindle microtubles
form and attach to the chromosomes. The site on chromosome that binds to the
spindle is called kinetochore. Kinetochores of sister chromatids are tethered to
the spindles that are originated from opposite pole of the cell. Nuclear envelope
breaks down and the nucleolus disappears.
During metaphase, the chromosomes line up in a single plane (the
metaphase plate) along the equator of the cell.
During anaphase, chromatids of each chromosome separate and move to
the opposite poles of the cell. The chromatids form V-liked structures with the
centromeres pointing toward the respective poles.
Telophase starts when the chromosomes reach the poles. During this phase,
the chromosomes relax, the nuclear envelope is re-synthesized around both
groups of chromosomes, the spindle apparatus is dismantled, and the nucleoli
reappear. Cytokinesis usually occur during telophase, separating the two nuclei into separate cells. 11 lOMoAR cPSD| 58562220
School of Biotechnology – IU Interphase Prophase Metaphase Anaphase Telophase
Figure 2.1 Chromosomes’ behavior during mitotic cell division II. Objectives
Upon completion of this investigation, the student should be able to
• Outline the procedure to prepare acetocarmin squashes of onion root tips, and
• Describe in chronological order the main events of mitosis in onion root tip. Carnoy’s solution Microscope III. Materials
Microscope slides & coverslips Onion bulbs Watch glasses 1M HCl Forceps Distilled water Scissors 70% & 90% ethanol Sand Acetocarmin stain lOMoAR cPSD| 58562220
School of Biotechnology – IU IV. Procedure
Before the practical, your instructor put the onion bulbs on top on moisten sand
until their roots grow to about 5 cm in length. Approximately 1 cm of the root tip was
collected and soaked in Carnoy’s solution for 12 h. Next the roots were washed twice
with 90% ethanol for 10 minutes each time. They were then stored in 70% ethanol until use.
Each student will prepare acetocarmin-stained squash of onion roots by the following procedure:
1. Use a forceps to transfer some onion roots into a watch glass.
2. Wash the roots with water 2-3 times to remove the ethanol.
3. Remove all water then soak the roots in several drops of 1M HCl for 10-15 minutes
to soften them. After that, wash the roots 2-3 times with water.
4. Soak the roots in acetocarmine stain for 15-20 minutes.
5. Put one drop of water at the middle of a microscopic slide then transfer one stained
onion root into the water drop.
6. Cover the root with a coverslip. Avoid creating bubble under the coverslip.
7. Gently apply pressure with your thumb over the cover glass to squash the root tip into a thin layer.
8. Examine the specimen under low power (10X objective) to identify the meristem
area, where dividing cells are located. Then use higher power objective lens to
carefully examine cells in various mitotic stages. V. Report
Draw and clearly label cells in various mitotic phases that you observe. LAB 3: MEIOSIS I. Introduction
Gametes, cells specialized for sexual reproduction, are haploid, carrying only a single
set of chromosomes and thus, only a single copy of the organism genetic information.
Gametes are formed by the process of cell division called “meiosis”. This division
process results in the reduction of chromosome number from diploid in the mother
cells to haploid in the daughter cells. This reduction in chromosome number is
essential because when two gametes fuse in fertilization, the chromosome number is
restored to diploid in the embryo. Like mitotic process, meiosis is preceded by an lOMoAR cPSD| 58562220
School of Biotechnology – IU
interphase, when genomic DNA of the cell is replicate, doubling the number of
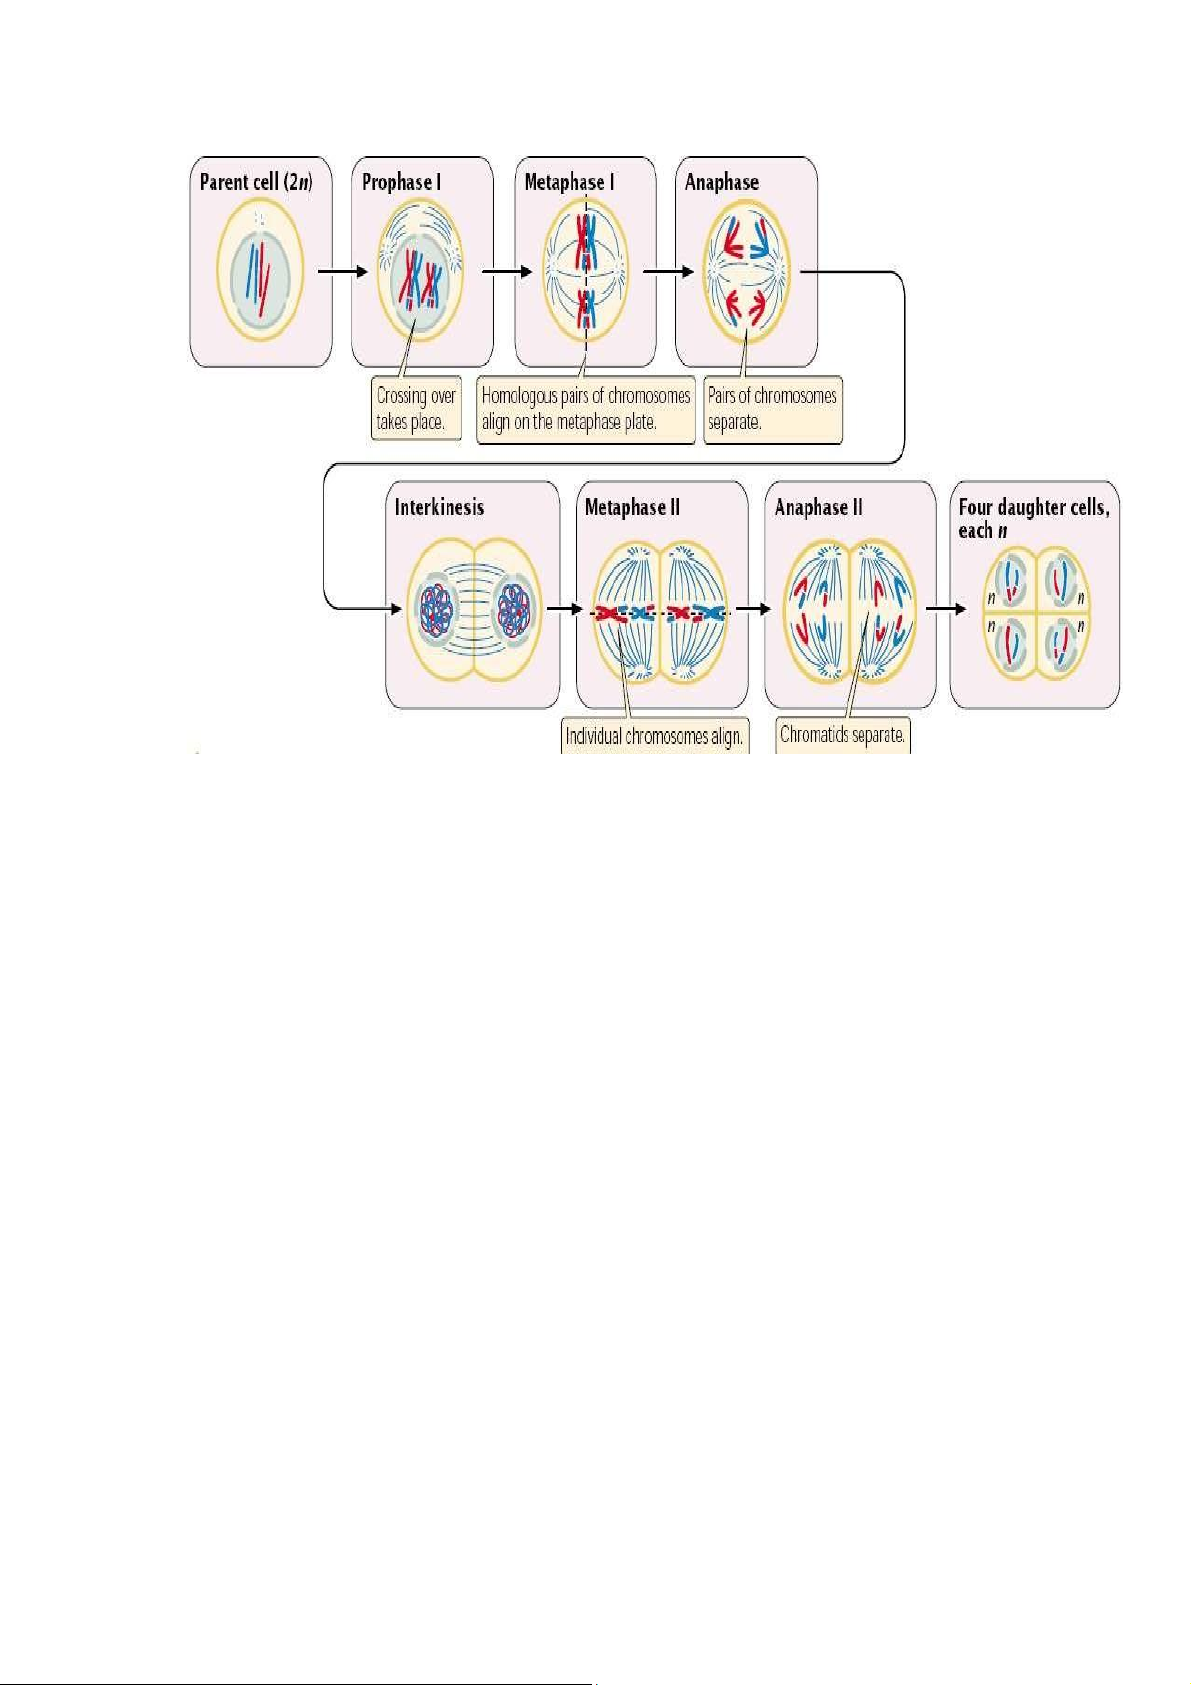
chromosomes. The interphase is followed by two rounds of cell divisions, namely
meiosis I and meiosis II. Each of these divisions is divided into prophase, metaphase,
anaphase, and telophase, which can be differentiated by the roman number following
the name of each phase (Fig. 4.1). The period between meiosis I and meiosis II is
“interkinesis”, in which the nuclear membrane re-forms around the chromosomes
clustered at each pole, the spindle breaks down, and the chromosomes relax. The
behavior of chromosome during meiosis (Fig. 4.1) is summarized as follows:
Prophase I; Prophase I is a lengthy stage, in which chromosomes contract and
become visible; homologous chromosomes begin to pair up forming tetrads or
bivalents; and crossing over (synapsis) take places. Near the end of prophase I, the
nuclear membrane breaks down and the spindle forms.
Metaphase I: The tetrads move toward the center and line up on the metaphase plate.
As tetrads align themselves in the middle of the cell, they attach to spindle fibers in
a unique manner: the centromeres of homologous chromosomes attach to separate
spindles, each from different poles. Nuclear envelope completely disappears.
Anaphase I: The unique even occurring at this phase is the separation of the
homologs. In contrast to mitotic anaphase, the centromeres of a given chromosome
do not divide. As a consequence, chromosomes of each homologous pair move
toward opposite poles, resulting in the halving of chromosome number in the daughter cells.
Telophase I: The chromosomes arrive at the spindle poles and cytoplasm divides. The
chromosomes, however, do not completely uncoil.
Prophase II: The chromosomes recondense; the spindle re-forms; and nuclear envelope once again breaks down.
Metaphase II: Individual chromosomes line up on the metaphase plate with sister
chromatids facing the opposite poles.
Anaphase II: The kinetocores of sister chromatids separate and the chromatids are
pulled to the opposite poles. Each chromatid is now a distinct chromosome.
Telophase II: The chromosomes arrive at the spindle poles; nuclear envelope
reforms around the chromosomes; and cytoplasm divides. The chromosomes relax and are no longer visible. lOMoAR cPSD| 58562220
School of Biotechnology – IU
Figure 4.1 Meiosis process II. Objective
Upon completion of this investigation, the student should be able to
• Describe the main events of meiosis,
• Identify and draw cells in garlic chive flower at different meiotic phases, and
• Compare and contrast between meiosis and mitosis. III. Material Garlic chive flower Microscope
70 % Ethanol & 90% Ethanol
Microscope slide & coverslip Carnoy’s solution Dissecting needle Aceto-orcein stain Forceps 1N HCl Immersion oil 10% glycerol lOMoAR cPSD| 58562220
School of Biotechnology – IU IV. Procedure
Before the practical, the instructor collected garlic chive flowers and soaked
them in carnoy’s solution for 12-20 hours. The flowers were then washed twice
with 90% ethanol (10 minutes each time) and stored in 70% ethanol.
1. Each students use a forceps to transfer some garlic chive flowers into a watch
glass, and use dissecting needles to remove the perianth and petals from the
flowers, only retain the anthers.
2. Wash the anthers with water 3 times.
3. Completely remove water from the watch glass. Be careful, not pour the tiny
anthers down the sink.
4. Add several drop of 1N HCl solution into the watch glass and soak the anthers in this solution for 10 minutes.
5. Wash the anthers with water 3 times.
6. Completely remove water, then add several drops of aceto-orcein stain into the watch glass.
7. Soak the anthers in staining solution for 30 minutes.
8. Transfer four stained anthers to a microscope slide, which is pre-mounted with
one drop of 10% glycerol. Cover with a coverslip.
9. Use the handle of dissecting needle to gently apply pressure over the coverslip.
This should squash the anthers into a thin cell layer.
10. Observe the specimen under low power objective to identify the area with many
dividing cells. Then use higher power objective lens to carefully observe cells
with different meiotic phases. lOMoAR cPSD| 58562220
School of Biotechnology - IU V. Report
1. Draw and clearly label cells at various stages of meiosis that you can observe.
2. Compare the similarities and differences between the mitosis and the meiosis. lOMoAR cPSD| 58562220
School of Biotechnology - IU
LAB 4: EXTRACTION OF DNA FROM PLANT CELLS I. Introduction
DNA is genetic material of the cells and organisms. All genetic information of
cells or organisms is included in DNA.
DNA extraction from plant tissue can vary depending on the material used.
Essentially any mechanical means of breaking down the cell wall and
membranes to allow access to nuclear material, without its degradation is
required. For this, usually an initial grinding stage with liquid nitrogen is
employed to break down cell wall material and allow access to DNA while
harmful cellular enzymes and chemicals remain inactivated. Once the tissue has
been sufficiently ground, it can then be resuspended in a suitable buffer, such as
SDS. In order to purify DNA, cell debris then will be precipitated by
centrifugation. DNA must then be precipitated from the aqueous phase and
washed thoroughly to remove contaminating salts. The purified DNA is then
resuspended and stored in TE buffer or sterile distilled water. This method has
been shown to give intact genomic DNA from plant tissue. To check the quality
of the extracted DNA, a sample is stained with ethidium bromide, and visualised under UV light. II. Objectives
Upon completion of this investigation, the student should be able to
- Extract DNA from plant cells
- Recognize the presence of DNA in the extraction.
III. Tools and Materials: 200mg plant tissue Eppendorf Mortar and Pestle Microcentrifuge Absolute Ethanol (ice cold) 70 % Ethanol (ice cold) 3 M Sodium Acetate, pH5.2 lOMoAR cPSD| 58562220
School of Biotechnology - IU 550 C water bath Water (sterile) GelRed loading buffer SDS buffer IV. Procedure
1. Grind 200 mg of plant tissue to a fine paste in approximately 500μl of SDS buffer.
2. Transfer SDS/plant extract mixture to an eppendorf.
3. Incubate the SDS/plant extract mixture for about 15 min at 550C in a recirculating water bath.
4. After incubation, spin the SDS/plant extract mixture at 12000 g for 5 min
to spin down cell debris. Transfer the supernatant to a clean eppendorf.
5. Add 1 volume of Chloroform: Iso Amyl Alcohol (24:1) to 1 volume of
supernatant and mix the solution by inversion.
6. After mixing, spin the tubes at 13000 rpm for 1 min.
7. Transfer the upper aqueous phase only (contains the DNA) to clean
eppendorfs. Repeat this step if neccessary
8. To each eppendorf add 0.1 volume of sodium acetate 3M pH 5.2 and 2.5
volumes of ice cold absolute ethanol.
9. Invert the tubes slowly for a few times to precipitate the DNA. Generally
the DNA can be seen to precipitate out of solution.
10. The tubes can be placed for 30 minutes to 1 hr at -200C after the addition
of ethanol to precipitate the DNA.
11. Spinning the tube at 13000 rpm for 3 minutes to form a pellet.
12. Remove the supernatant and wash the DNA pellet by adding 500μl ice
cold 70 % ethanol and spinning the tube at 13000 rpm for 3 minute.
13. Remove the supernatant. Wash the precipitate again with ice cold 70% ethanol.
Tài liệu liên quan:
-
Report 2: Culturing & Mating Drosophila Melanogaster | Môn Genetics Laboratory - Trường Đại học Quốc tế, Đại học Quốc gia Thành phố Hồ Chí Minh
124 62 -
A Report - Genetics laboratory week 1&2: Mitosis & Meiosis | Bài báo cáo thực hành học phần Genetics Laboratory | Trường Đại học Quốc tế, Đại học Quốc gia Thành phố Hồ Chí Minh
257 129