Lab Manual: Wet Mount and Gram Staining | Môn Microbiology Lab - Trường Đại học Quốc tế, Đại học Quốc gia Thành phố Hồ Chí Minh
The bright-field light microscope is an instrument that magnifies images using two lens systems. Initial magnification occurs in the objective lens. Tài liệu được sưu tầm gồm 13 trang, giúp bạn ôn tập tốt hơn. Mời các bạn đón xem.
Môn: Microbiology Lab 6 tài liệu
Trường: Trường Đại học Quốc tế, Đại học Quốc gia Thành phố Hồ Chí Minh 2 K tài liệu
Tác giả:


Preview text:
lOMoAR cPSD| 58504431
PRACTICAL 3: PREPARE A WET MOUNT AND A SMEAR GRAM STAIN AIMS OF THE PRACTICAL
Refresh students on operating a light microscope.
Introduce to students procedure of preparing a wet mount for purpose of
bacterial motility observation under microscope.
Introduce to students procedure of making a smear followed by Gram stain. 1. INTRODUCTION 1.1. USE OF THE MICROSCOPE
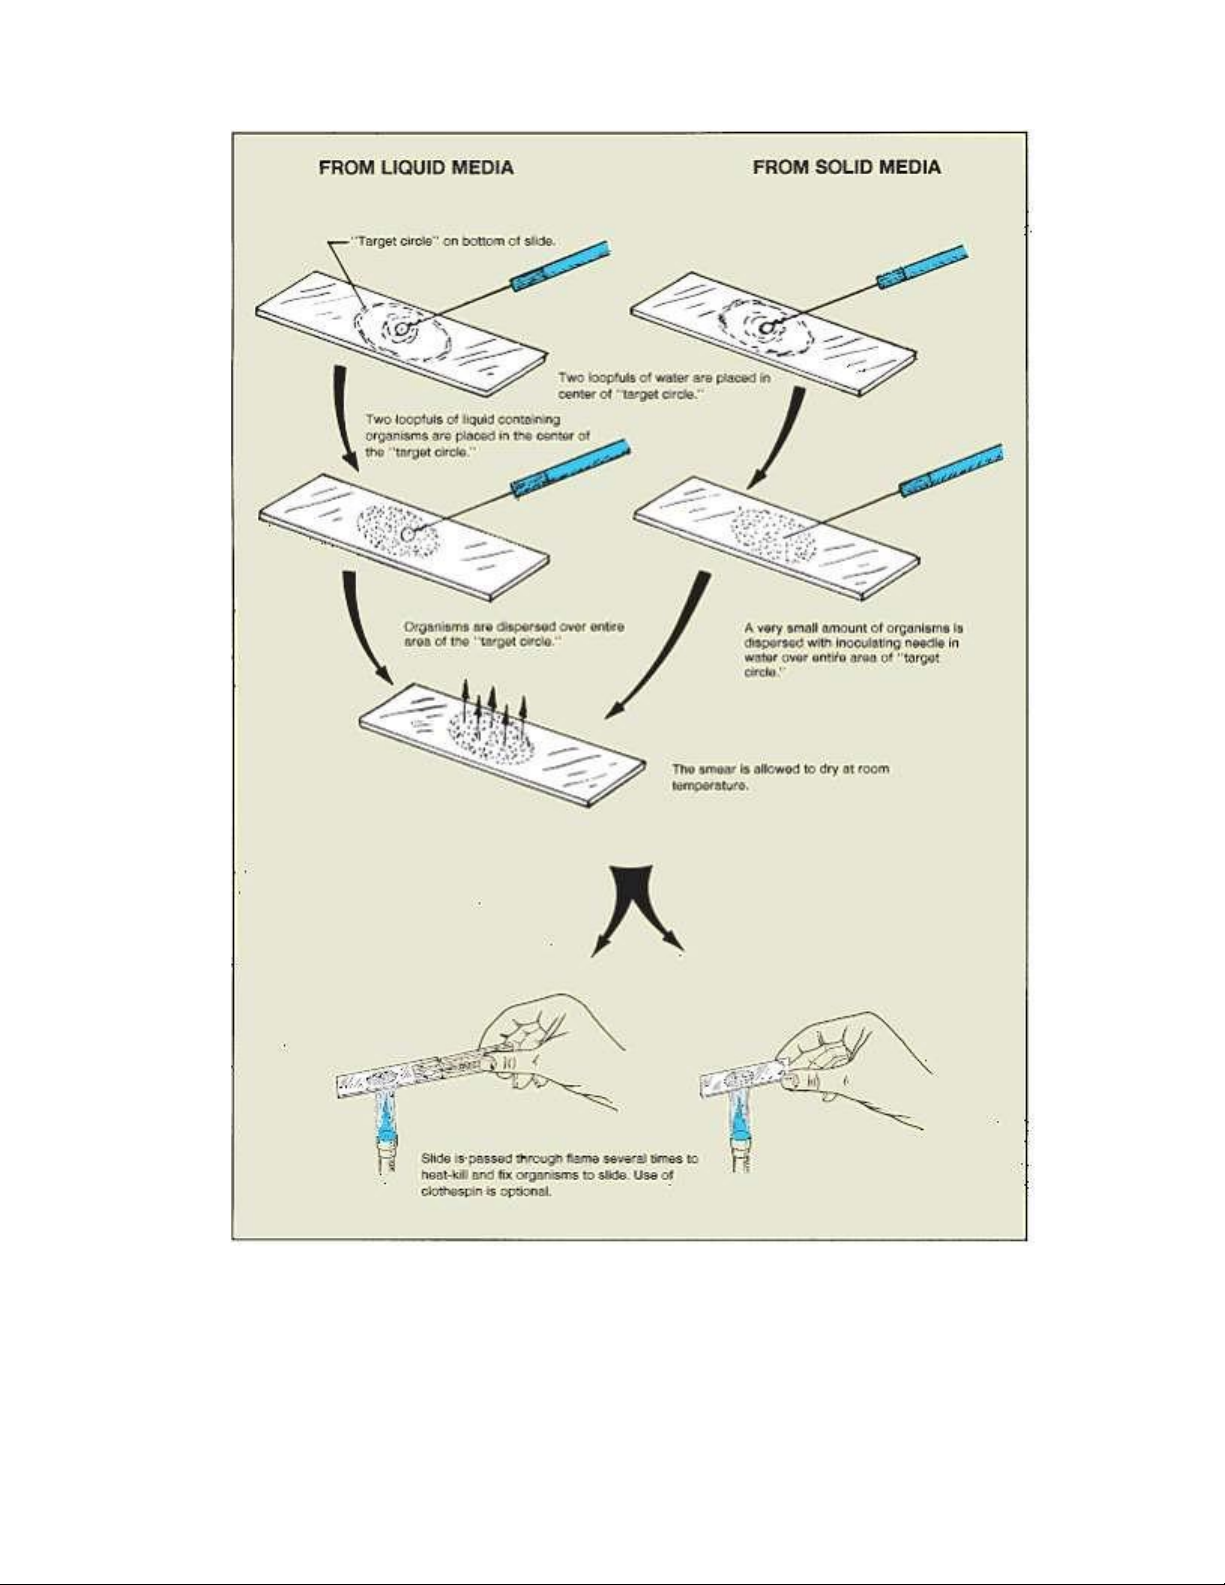
The bright-field light microscope is an instrument that magnifies images using two lens
systems. Initial magnification occurs in the objective lens. Most microscopes have at least three
objective lenses on a rotating base, and each lens may be rotated into alignment with the
eyepiece or ocular lens in which the final magnification occurs. The objective lenses are
identified as the low-power, high-dry, and oil immersion objectives. Each objective is also
designated by other terms. These terms give either the linear magnification or the focal length.
The latter is about equal to or greater than the working distance between the specimens when
in focus and the tip of the objective lens. For example, the low-power objective is also called
the 10x, or 16 millimeter (mm), objective; the high-dry is called the 40x, or 4 mm, objective;
and the oil immersion is called the 90x, 100x, or 1.8 mm objective. As the magnification
increases, the size of the lens at the tip of the objective becomes progressively smaller and
admits less light. This is one of the reasons that changes in position of the substage condenser
and iris diaphragm are required when using different objectives if the specimens viewed are
to be seen distinctly. The condenser focuses the light on a small area above the stage, and the
iris diaphragm controls the amount of light that enters the condenser. When the oil immersion
lens is used, immersion oil fills the space between the objective and the specimen. Because
immersion oil has the same refractive index as glass, the loss of light is minimized. The
eyepiece, or ocular, at the top of the tube magnifies the image formed by the objective lens. As
a result, the total magnification seen by the observer is obtained by multiplying the
magnification of the objective lens by the magnification of the ocular, or eyepiece. For example,
when using the 10x ocular and the 43x objective, total magnification is 10x43 = 430 times.
Use of the light microscope is an essential skill in the study of microorganisms. The size of
organisms and the internal structures to be observed determine the type of microscopy needed. lOMoAR cPSD| 58504431
Use of the oil immersion objective (100x) is required if structures as small as 0.2uk are to be observed.
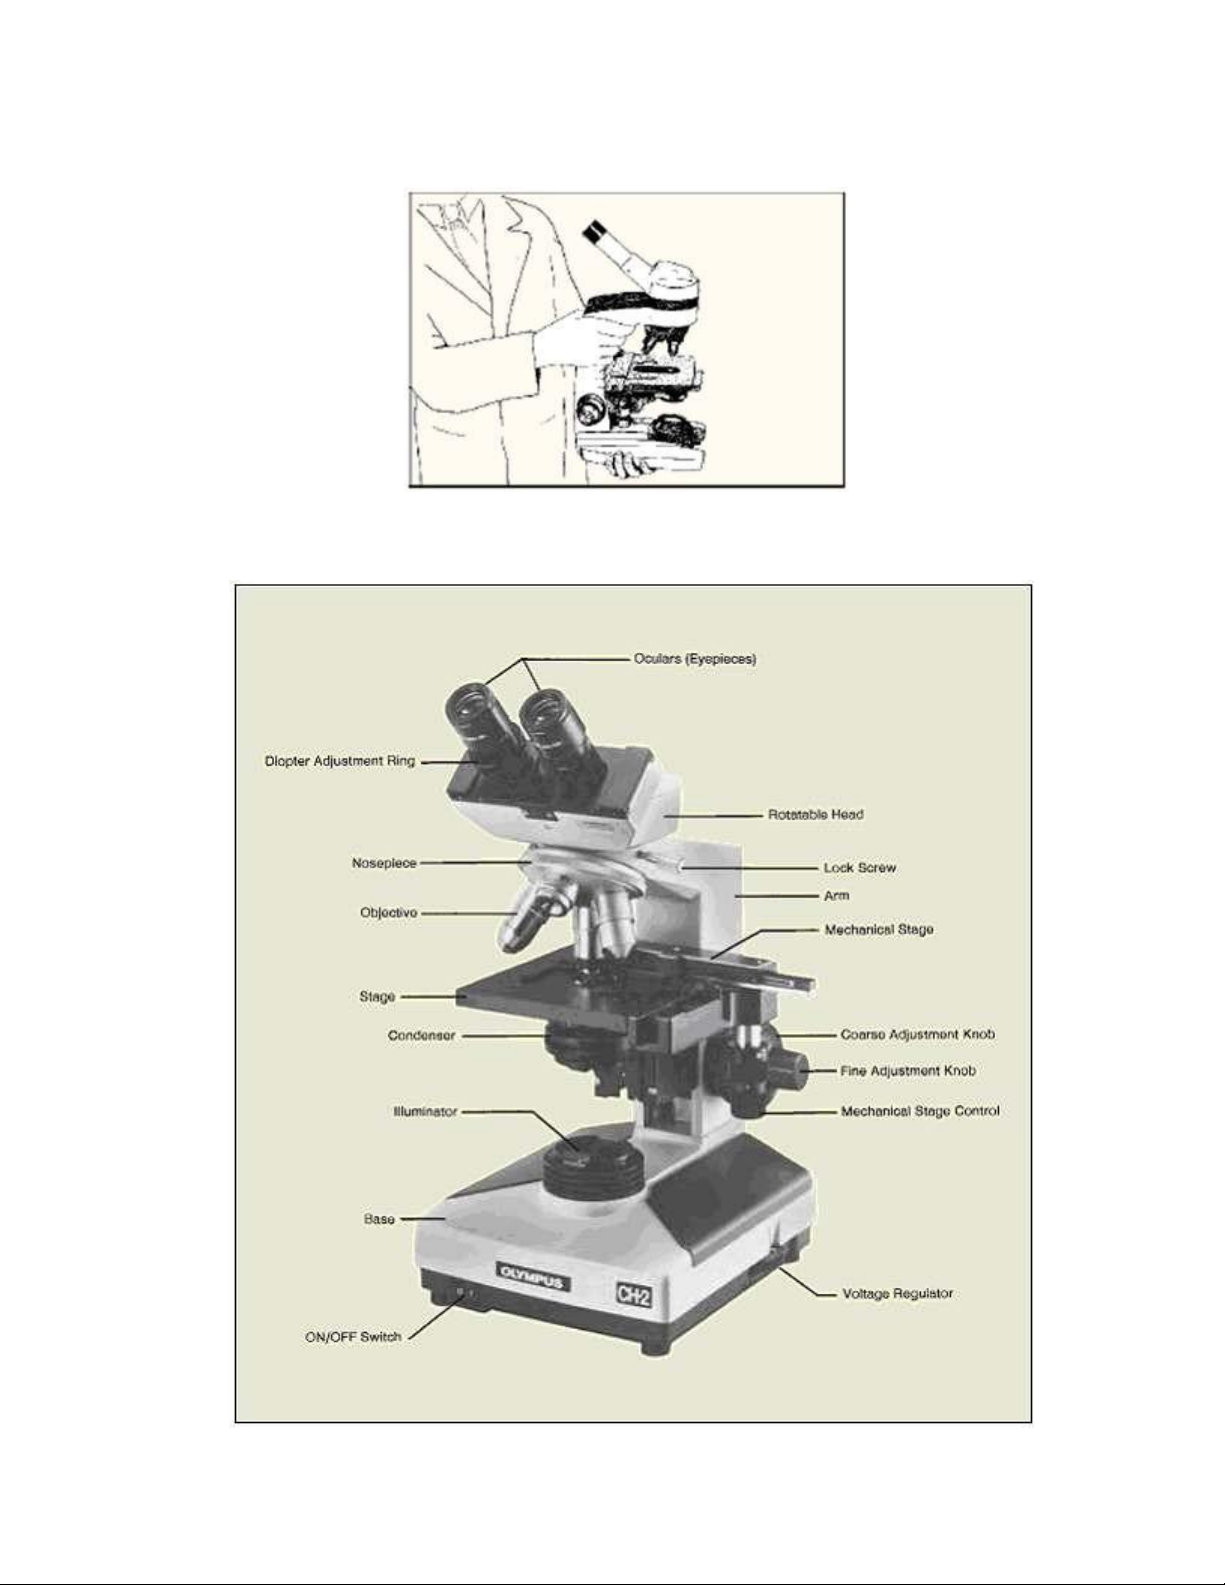
Figure 3.1. The microscope should be held firmly with both hands while carrying it.
Figure 3.2. The compound microscope. lOMoAR cPSD| 58504431 1.2. PREPARE A WET MOUNT
When working with nonpathogens, the simplest way to determine motility is to place a few
loopfuls of the organism on a clean slide and cover it with a cover glass. In addition to being
able to determine the presence or absence of motility, this method is useful in determining
cellular shape (rod, coccus, or spiral) and arrangement (irregular clusters, packets, pairs, or long chains).
A wet mount is especially useful if phase optics are used. Unlike stained slides that are heatfixed
for staining, there is no distortion of cells on a wet mount. One problem for beginners is the
difficulty of being able to see the organisms on the slide. Since bacteria are generally colorless
and very transparent, the novice has to learn how to bring them into focus. 1.3.
PREPARE A SMEAR AND PERFORM GRAM STAIN
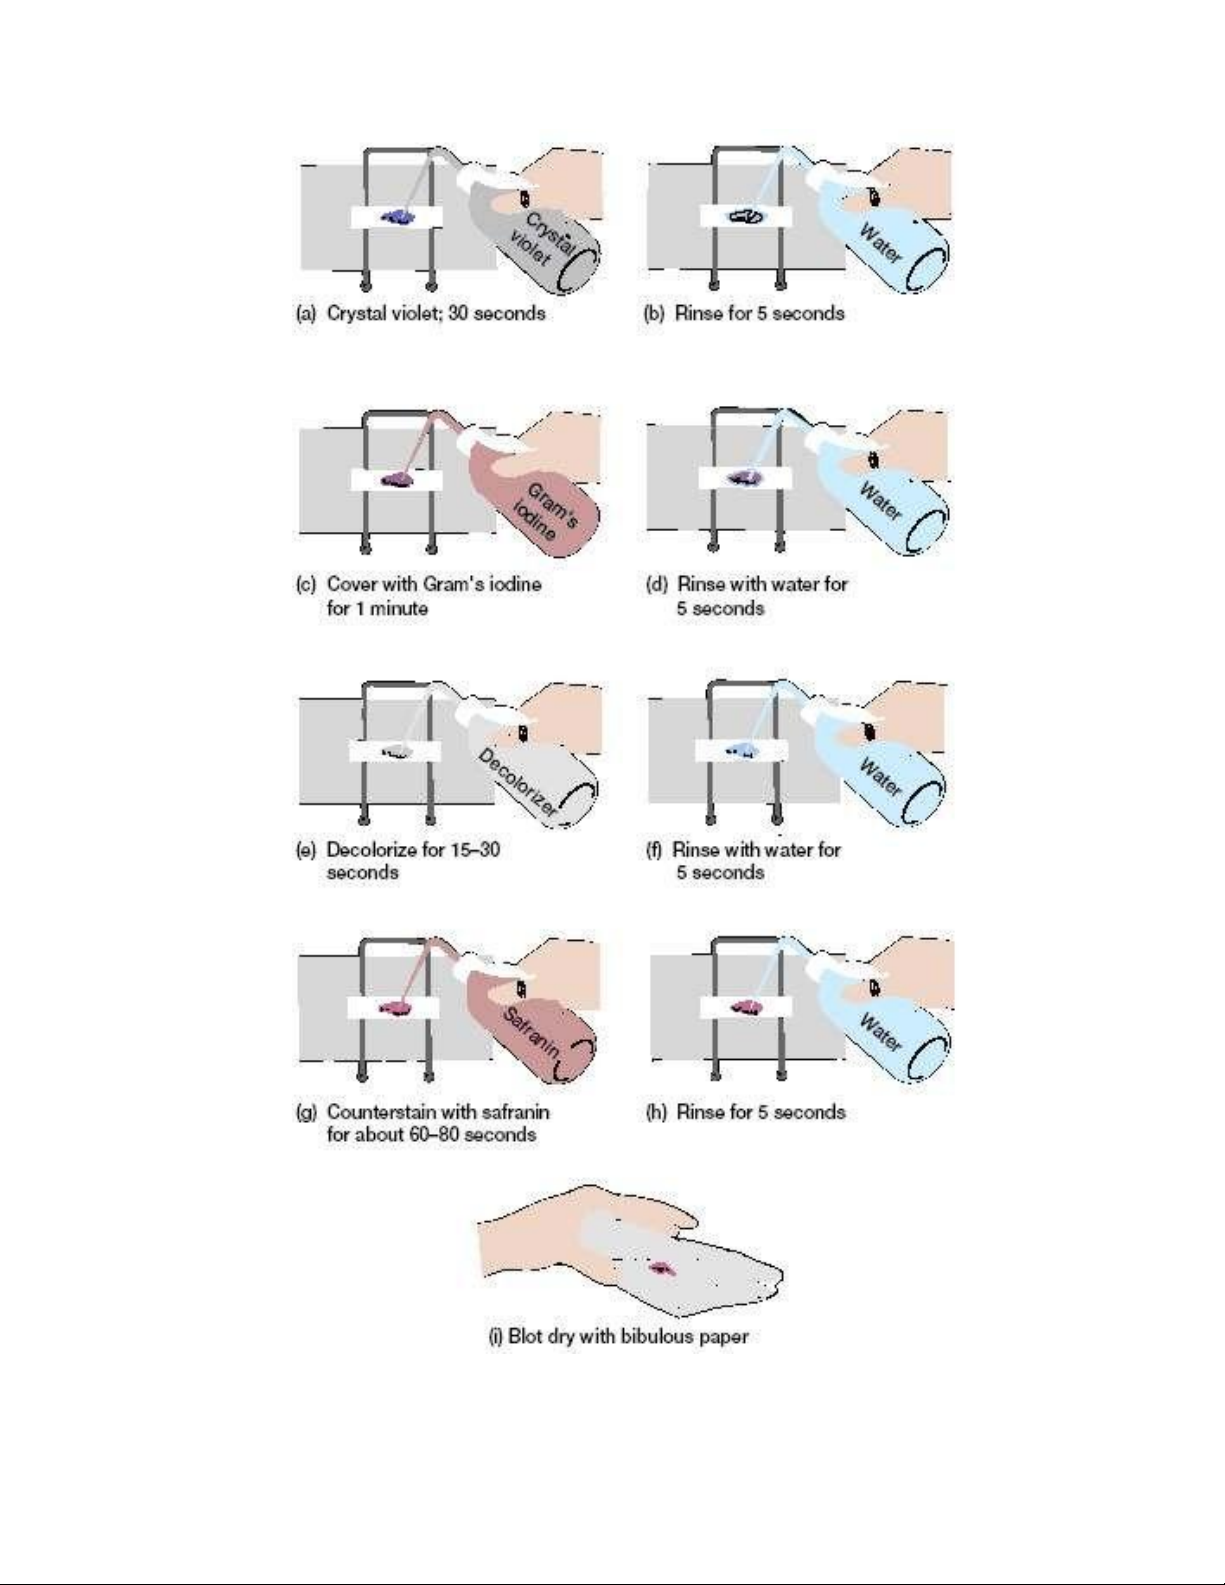
The first step in preparing a bacteriological smear differs according to the source of the
organisms. If the bacteria are growing in a liquid medium (broths, milk, saliva, urine, etc.), one
starts by placing one or two loopfuls of the liquid medium directly on the slide. From solid
media such as nutrient agar, blood agar, or some part of the body, one starts by placing one or
two loopfuls of water on the slide and then uses a straight inoculating wire to disperse the
organisms in the water. Bacteria growing on solid media tend to cling to each other and must
be dispersed sufficiently by dilution in water; unless this is done, the smear will be too thick.
The most difficult concept for students to understand about making slides from solid media is
that it takes only a very small amount of material to make a good smear.
The Gram stain (named after Christian Gram, Danish scientist and physician, 1853–1938) is
the most useful and widely employed differential stain in bacteriology. It divides bacteria into
two groups—gram negative and gram positive. The first step in the procedure involves
staining with the basic dye crystal violet. This is the primary stain. It is followed by treatment
with an iodine solution, which functions as a mordant; that is, it increases the interaction
between the bacterial cell and the dye so that the dye is more tightly bound or the cell is more
strongly stained. The smear is then decolorized by washing with an agent such as 95% ethanol
or isopropanol-acetone. Gram-positive bacteria retain the crystal violet-iodine complex when
washed with the decolorizer, whereas gram-negative bacteria lose their crystal violet-iodine
complex and become colorless. Finally, the smear is counterstained with a basic dye, different
in color than crystal violet. This counterstain is usually safranin. The safranin will stain the
colorless, gram-negative bacteria pink but does not alter the dark purple color of the gram- positive bacteria.
The end result is that gram-positive bacteria are deep purple in color and gram-negative bacteria
are pinkish to red in color (figure 3.3) lOMoAR cPSD| 58504431 .
Figure 3.3. Color change that occurs at each step in the Gram stain. 2. PROCEDURE 2.1. Prepare a wet mount Materials and tools: Sterile Pasteur pipette Slide and cover slip Light microscope E. coli broth culture Procedure:
a. Set up your microscope correctly using the method describe in Appendix 3.
b. Prepare a wet mount of the organism by placing a drop of the culture on a clean dry
slide and adding a coverslip. Avoid trapping air bubbles. lOMoAR cPSD| 58504431
c. Examine the organism using both low power (10x) and high power (40x) objectives.
After focusing on an organism, reduce the condenser diaphragm to the position
where you see the clearest image of this unstained microorganism. Check your
microscope for problems in setting up.
d. Observe the overall appearance of the organism. Make diagrams, noting structures
which can be resolved with the 10x and 40x objectives.
Prepare wet mount slide of the organism, using several loopfuls of the organism
on the slides. Examine under an oil immersion objective. Observe the following guidelines:
• Use only scratch-free, clean slides and cover glasses. This is particularly important when using phase-contrast optics.
• Label each slide with the name of the organism.
• By manipulating the diaphragm and voltage control, reduce the lighting sufficiently to make
the organisms visible. Unstained bacteria are very transparent and difficult to see.
• For proof of true motility, look for directional movement that is several times the long
dimension of the bacterium. The movement will also occur in different directions in the same field.
• Ignore Brownian movement. Brownian movement is vibrational movement caused by
invisible molecules bombarding bacterial cells. If the only movement you see is vibrational
and not directional, the organism is nonmotile.
• If you see only a few cells exhibiting motility, consider the organism to be motile.
Characteristically, only a few of the cells will be motile at a given moment.
• Don’t confuse water current movements with true motility. Water currents are due to capillary
action caused by temperature changes and drying out. All objects move in a straight line in one direction.
• And, finally, always examine a wet mount immediately, once it has been prepared, because
motility decreases with time after preparation.
2.2.Prepare a smear from liquid media
If you are preparing a bacterial smear from liquid media (broth, saliva, milk, etc.), follow this
routine, which is depicted on the left side of figure 3.4. Materials and tools: Microscope slides Bunsen burner and lighter Wire loop Marking pen
Slide holder (clothespin), optional
1. Wash a slide with soap or Bon Ami and hot water, removing all dirt and grease. Handle the clean slide by its edges. lOMoAR cPSD| 58504431
2. Write the initials of the organism or organisms on the left-hand side of the slide with a marking pen.
3. To provide a target on which to place the organisms, make a 1⁄2″ circle on the bottom side of
the slide, centrally located, with a marking pen. Later on, when you become more skilled,
you may wish to omit the use of this “target circle.”
4. Shake the culture vigorously and transfer two loopfuls of organisms to the center of the slide
over the target circle. Be sure to flame the loop after it has touched the slide.
5. Spread the organisms over the area of the target circle.
6. Allow the slide to dry by normal evaporation of the water. Don’t apply heat.
7. After the smear has become completely dry, pass the slide over a Bunsen burner flame to
heat-kill the organisms and fix them to the slide. Note that in this step one has the option of
using or not using a clothespin to hold the slide. Use the option preferred by your instructor.
It is critical to remember that aseptic techniques are part of the slide preparation procedure (figure 3.5).
2.3. Prepare a smear from solid media
When preparing a bacterial smear from solid media, such as nutrient agar or a part of the body,
follow this routine, which is depicted on the right side of figure 3.4. Materials and tools: Microscope slides Inoculating needle and loop Marking pen Water
Slide holder (clothespin), optional Bunsen burner and lighter
1. Wash a slide with soap or Bon Ami and hot water, removing all dirt and grease. Handle the clean slide by its edges.
2. Write the initials of the organism or organisms on the left-hand side of the slide with a marking pen.
3. Mark a “target circle” on the bottom side of the slide with a marking pen. Flame an
inoculating loop, let it cool, and transfer two loopfuls of water to the center of the target circle.
4. Flame an inoculating needle then let it cool. Pick up a very small amount of the
organisms, and mix it into the water on the slide. Disperse the mixture over the area of
the target circle. Be certain that the organisms have been well emulsified in the liquid.
Be sure to flame the inoculating needle before placing it aside.
5. Allow the slide to dry by normal evaporation of the water. Don’t apply heat.
6. Once the smear is completely dry, pass the slide over the flame of a Bunsen burner to
heat-kill the organisms and fix them to the slide. Use a clothespin to hold the slide if it lOMoAR cPSD| 58504431
is preferred by your instructor. Some workers prefer to hold the slide with their fingers
so that they can monitor the temperature of the slide (to prevent overheating).
It is critical to remember that aseptic techniques are part of the slide preparation procedure (figure 3.5). lOMoAR cPSD| 58504431
Figure 3.4. Procedure for making a bacterial smear. lOMoAR cPSD| 58504431
Figure 3.5. Aseptic procedure for organism removal. lOMoAR cPSD| 58504431
2.4. Staining bacteria – Gram stain Materials and tools:
Bacterial smears prepared from 2.2 and 2.3 Glass slides Gram stain kit Tissue paper Immersion oil Microscope Procedure:
a. Make Gram stains of the smear:
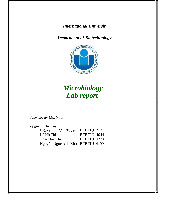
1. Flood the smears with crystal violet and let stand for 30 seconds (figure 3.6a).
2. Rinse with water for 5 seconds (figure 3.6b).
3. Cover with Gram’s iodine mordant and let stand for 1 minute (figure 3.6c).
4. Rinse with water for 5 seconds (figure 3.6d).
5. Decolorize with 95% ethanol for 15 to 30 seconds. Do not decolorize too long. Add
the decolorizer drop by drop until the crystal violet fails to wash from the slide (figure
3.6e). Alternatively, the smears may be decolorized for 30 to 60 seconds with a
mixture of isopropanol-acetone (3:1 v/v).
6. Rinse with water for 5 seconds (figure 3.6f ).
7. Counterstain with safranin for about 60 to 80 seconds (figure 3.6g).
8. Rinse with water for 5 seconds (figure 3.6h).
9. Blot dry with bibulous paper (figure 3.6i).
b. Examine the stained smear using oil immersion microscopy. Gram-positive organisms stain
blue to purple; gram-negative organisms stain pink to red. Record the morphology and
staining reaction of provided microorganisms.
c. Leave your microscope set up and have your staining technique and interpretations checked by your demonstrator. lOMoAR cPSD| 58504431
Figure 3.6. Gram Stain procedure. lOMoAR cPSD| 58504431 3. DISCUSSION
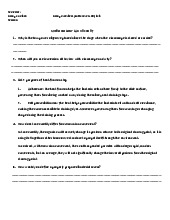
1. Why is the low-power objective placed in position when the microscope is stored or carried?
2. Why is oil necessary when using the 90× to 100× objective?
3. What is the function of the iris diaphragm? The substage condenser?
4. In microbiology, what is the most commonly used objective? Explain your answer.
5. In microbiology, what is the most commonly used ocular? Explain your answer.
6. Why are unstained bacteria more difficult to observe than stained bacteria?
7. Describe the following types of bacterial movement: Brownian movement Flagella motion Gliding motion
8. Which of the bacteria exhibited true motility on the slides?
9. How does true motility differ from Brownian movement?
10. What are the two purposes of heat fixation? a. b.
11. How would you define a properly prepared bacterial smear?
12. Why should you use an inoculating needle when making smears from solid media? An
inoculating loop from liquid media?
13. Name the reagent used and state the purpose of each of the following in the Gram stain: a. mordant b. primary stain c. decolorizer d. counterstain
14. Which step is the most crucial or most likely to cause poor results in the Gram stain? Why?
15. What part of the bacterial cell is most involved with Gram staining, and why?
16. Why must young cultures be used when doing a Gram stain?
17. What is meant by gram variable?
18. Label the compound microscope below lOMoAR cPSD| 58504431
Tài liệu liên quan:
-
Report Môn Microbiology Lab | Trường Đại học Quốc tế, Đại học Quốc gia Thành phố Hồ Chí Minh
133 67 -
Manual 2024 Môn Microbiology Lab | Trường Đại học Quốc tế, Đại học Quốc gia Thành phố Hồ Chí Minh
109 55 -
Lab 3 Report: Key Observations and Questions | Môn Microbiology Lab - Trường Đại học Quốc tế, Đại học Quốc gia Thành phố Hồ Chí Minh
98 49 -
Lab Manual: Practical 5 - Bacterial Population Counts & Identification | Môn Microbiology Lab - Trường Đại học Quốc tế, Đại học Quốc gia Thành phố Hồ Chí Minh
109 55