Manual 2024 Môn Microbiology Lab | Trường Đại học Quốc tế, Đại học Quốc gia Thành phố Hồ Chí Minh
Your demonstrator will outline the laboratory rules, how materials should be discarded and inoculated, and practical assessment to you. Tài liệu được sưu tầm gồm 58 trang, giúp bạn ôn tập tốt hơn. Mời các bạn đón xem.
Môn: Microbiology Lab 6 tài liệu
Trường: Trường Đại học Quốc tế, Đại học Quốc gia Thành phố Hồ Chí Minh 2 K tài liệu
Tác giả:


Preview text:
lOMoAR cPSD| 58504431 HCMC INTERNATIONAL UNIVERSITY
SCHOOL OF BIOTECHNOLOGY MICROBIOLOGY LABORATORY MANUAL
Prepared by: Dr. Ha Mai Dung; MSc. Tong Thi Hang
Revised by: Dr Nguyen Thi Thu Hoai; MSc. Hoang Thi Lan Xuan Ho Chi Minh City, 2023 ` lOMoAR cPSD| 58504431 CONTENTS ******** - Course title:
MICROBIOLOGY LABWORKS - Number of credits: 1 No. Experiment
Page No. Remark 01 PRACTICAL 1:
• Introduction to the course
• Medium preparation 02 PRACTICAL 2: • Aseptic technique • Culture technique • Subculture 03 PRACTICAL 3:
• Prepare a wet mount and a smear • Gram staining 04 PRACTICAL 4:
• Effects of different factors on microbial growth
• Preparation and care of stock cultures 05 PRACTICAL 5:
• Bacterial Population Counts
• Introduction to Bacterial identification process
• Culturing unknown bacterium for subsequent characterization 06 PRACTICAL 6:
• Bacterial Population Counts (continued)
• Bacterial characterization (continued) • Test lOMoAR cPSD| 58504431
PRACTICAL 1: INTRODUCTION TO THE COURSE MEDIUM PREPARTION AIMS OF THE PRACTICAL
Familiarize students with the laboratory where practical class groups will be organized.
Introduce to students different types of medium and how to prepare them for culturing microorganisms of interest. 1. INTRODUCTION 1.1. LABWORK OVERVIEW
Your demonstrator will outline the laboratory rules, how materials should be discarded and
inoculated, and practical assessment to you. Your demonstrator will be also happy to answer
any questions you have about them. You should see Appendix 1 and Appendix 2 to ensure that
all the requirements have been clearly understood. 1.2. MEDIUM PREPARATION
Your tutor will explain the principles of microbiological culture media and guide you to prepare medium.
Microbiological Culture Media
The survival and growth of microorganisms depend on available nutrients and a favorable
growth environment. In the laboratory, the nutrient preparations that are used for culturing
microorganisms are called media (singular, medium). Three physical forms are used: liquid or
broth media; semisolid media; and solid media. The major difference among these media is
that solid and semisolid media contain a solidifying agent (usually agar), whereas a liquid
medium does not. Liquid media, such as nutrient broth, tryptic soy broth, or brain-heart infusion
broth (figure 1.1.a), can be used to propagate large numbers of microorganisms in fermentation
studies and for various biochemical tests. Semisolid media can also be used in fermentation
studies, in determining bacterial motility, and in promoting anaerobic growth. Solid media, such
as nutrient agar or blood agar, are used (1) for the surface growth of microorganisms in order
to observe colony appearance, (2) for pure culture isolations, (3) for storage of cultures, and (4)
to observe specific biochemical reactions.
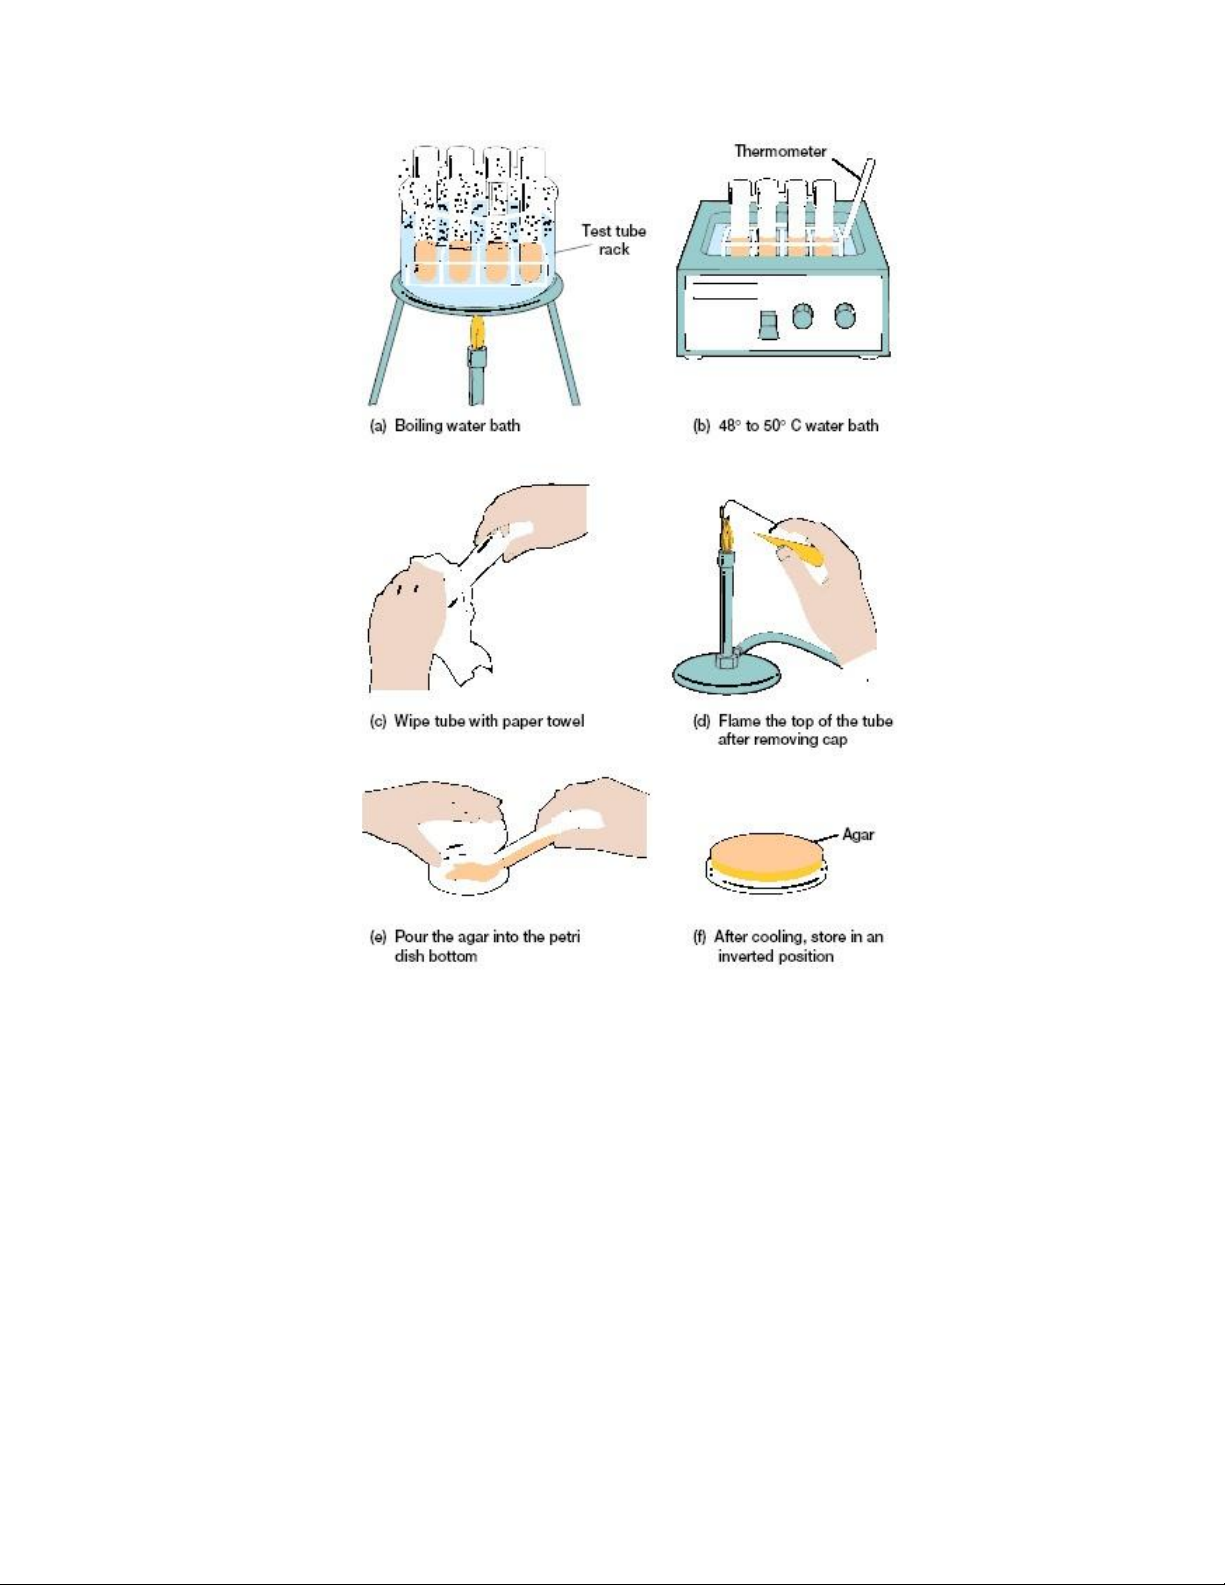
While in the liquefied state, solid media can be poured into either a test tube or Petri plate ` lOMoAR cPSD| 58504431
(dish). If the medium in the test tube is allowed to harden in a slanted position, the tube is
designated an agar slant (figure 1.1.b, c); if the tube is allowed to harden in an upright position,
the tube is designated an agar deep tube (figure 1.1.d); and if the agar is poured into a Petri
plate, the plate is designated an agar plate (figure 1.1.e). Agar pours (the same as Agar deeps)
containing about 15 to 16 ml of media are often used to prepare agar plates. Microorganisms
may be cultured using two different types of media.
Chemically defined, or synthetic, media are composed of known amounts of pure chemicals.
Such media are often used in culturing autotrophic microorganisms such as algae or
nonfastidious heterotrophs. In routine bacteriology laboratory exercises, complex, or
nonsynthetic, media are employed. These are composed of complex materials that are rich in
vitamins and nutrients. Three of the most commonly used components are beef extract, yeast extract, and peptones.
Figure 1.1. Different forms of culture media using appropriate container lOMoAR cPSD| 58504431
Figure 1.2. Pouring agar plates 2. PROCEDURE
In this exercise, students will prepare nutrient agar plates, agar slants and broth medium. The
culturing media have been prepared and sterilized for you. Materials and Tools:
Bulk nutrient broth (containing beef extract, yeast extract, peptone, sodium chloride) or LB broth
Bulk nutrient agar (containing beef extract, yeast extract, peptone, sodium chloride and agar) or
LB-agar in melted form (held in class water bath at 55oC). Sterile tubes and plates Plastic Wrap Making pen ` lOMoAR cPSD| 58504431 Tissue paper Ethanol 70% solution Procedure
a. Label the base of each Petri dish with your group name, medium name and date.
b. Remove agar from water bath. Gently swirl to mix agar. Wipe excess water from outside of bottle.
c. Set out the Petri dishes with lids uppermost, unscrew the cap of the bottle and
cover the bottom of each dish with 15-20ml agar, holding the lid so as to provide
as much protection as possible during the pouring operation. Take care to avoid
contaminating the opening of the bottle during the pouring operation and replace
the lid as each dish is poured. Allow the agar to set before handling.
d. Following the picture to prepare nutrient broth tubes and slant agar tubes
e. Follow your demonstrator’s instruction of how and where to store the medium.
f. Incubate all medium prepared at 370 C in 24 hrs, then put in a fridge. 3. DISCUSSION
1. Tell 10 main rules when working in microbiology Lab?
2. Tell different kinds of medium referring to medium’s liquid status and shapes?
3. Why do we have to incubate medium before storing in a fridge?
PRACTICAL 2: ASEPTIC TECHNIQUE CULTURE TECHNIQUE SUBCULTURE AIMS OF THE PRACTICAL
Familiarize students with aseptic and culture techniques when working with microorganisms.
Introduce to students purposes of microbial subculture. 1. INTRODUCTION 1.1. ASEPTIC TECHNIQUE lOMoAR cPSD| 58504431
This exercise is concerned with those microorganisms which may be deposited on hands,
bottles, etc. through careless manipulations. To be a competent microbiologist, you must be able
to transfer microorganisms from one container to another without contaminating the
surrounding areas and objects.
Aseptic transfer of a culture from one culture vessel to another is successful only if no
contaminating microorganisms are introduced in the process. A transfer may involve the
transport of organisms from an isolated colony on a plate of solid medium to a broth tube, or
inoculating various media (solid or liquid) from a broth culture for various types of tests. The
general procedure is as follows:
Work Area Disinfection. The work area is first treated with a disinfectant to kill any
microorganisms that may be present. This step destroys vegetative cells and viruses;
Endospores, however, are not destroyed in this brief application of disinfectant.
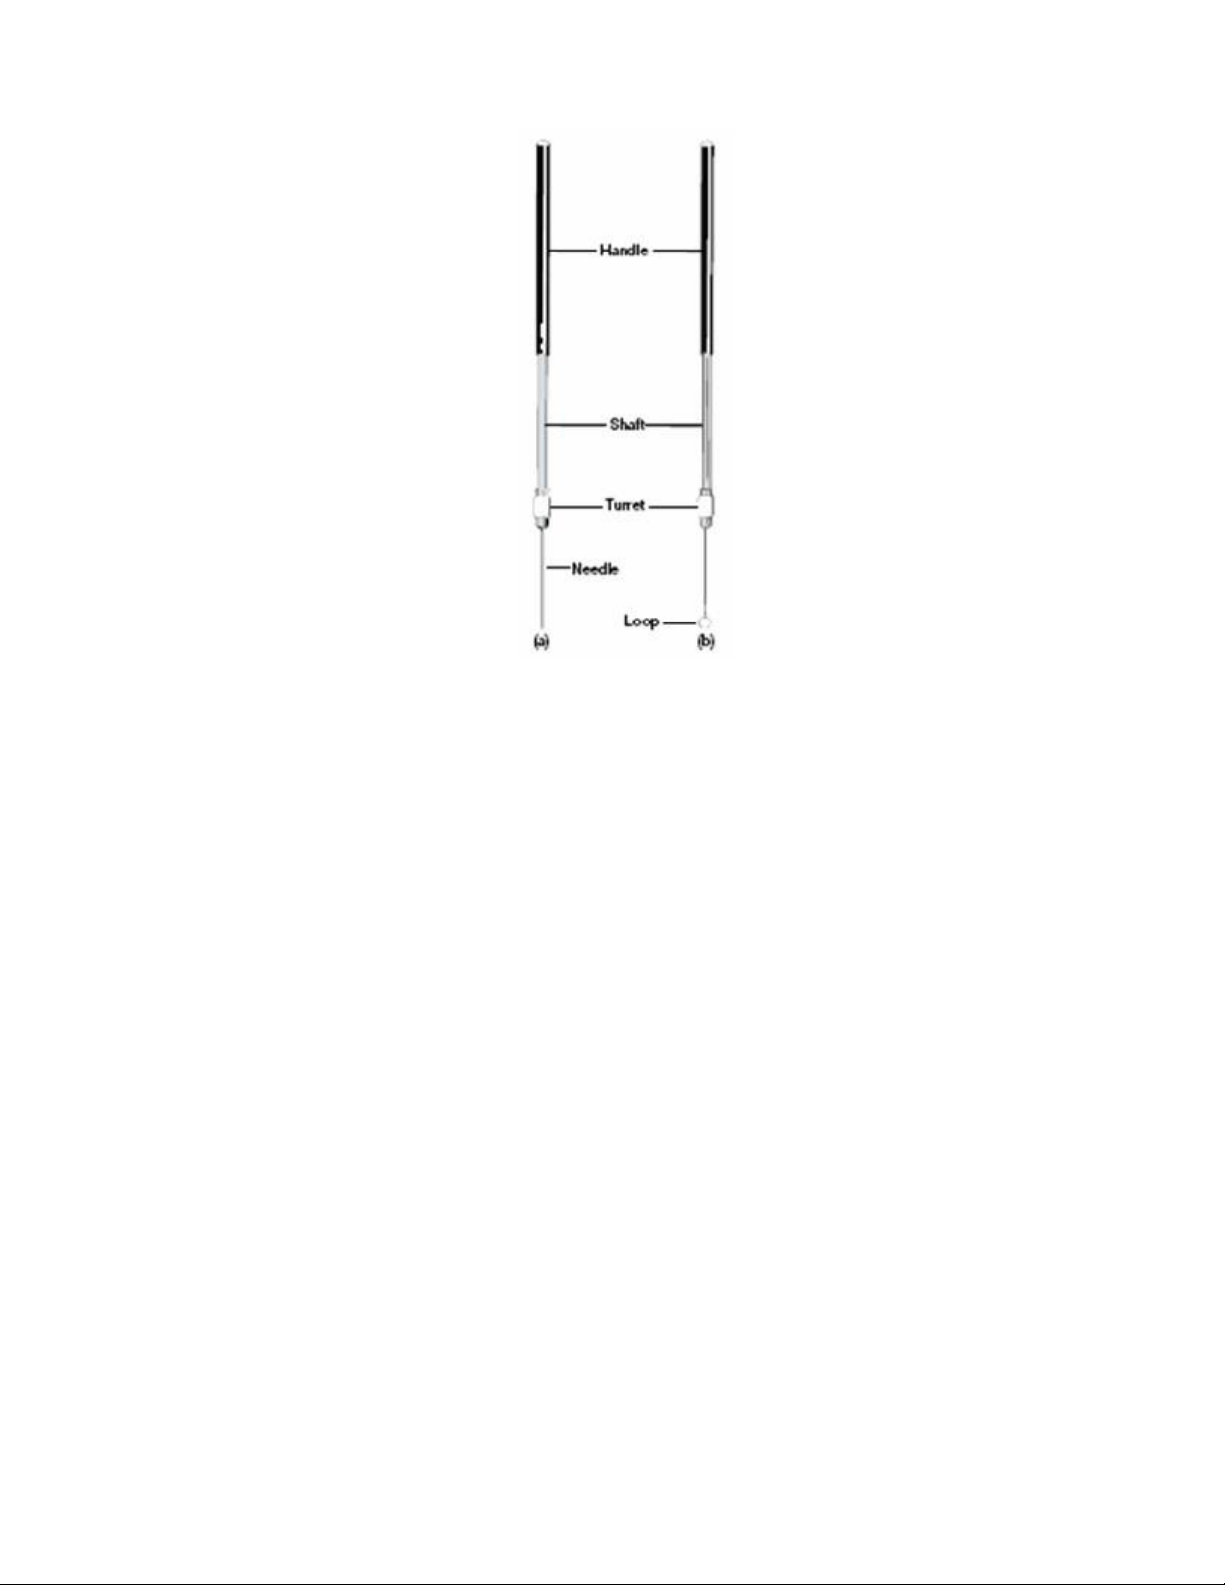
Loops and Needles. The transport of organisms will be performed with an inoculating loop or
needle. To sterilize the loop or needle prior to picking up the organisms, heat must be applied
with a Bunsen burner flame, rendering them glowing red-hot (Figure 2.1).
Culture Tube Flaming. Before inserting the cooled loop or needle into a tube of culture, the
tube cap is removed and the mouth of the culture tube flamed. Once the organisms have been
removed from the tube, the tube mouth must be flamed again before returning the cap to the tube.
Liquid Medium Inoculation. If a tube of liquid medium is to be inoculated, the tube mouth
must be flamed before inserting the loop into the tube. To disperse the organisms on the loop,
the loop should be twisted back and forth in the medium. If an inoculating needle is used for
stabbing a solid medium, the needle is inserted deep into the medium.
Final Flaming. Once the inoculation is completed, the loop or needle is removed from the tube,
flamed as before, and returned to a receptacle. These tools should never be placed on the
tabletop. The inoculated tube is also flamed before placing the cap on the tube.
Petri Plate Inoculation. To inoculate a Petri plate, no heat is applied to the plate and a loop is
used for the transfer. When streaking the surface of the medium, the cover should be held
diagonally over the plate bottom to prevent air contamination of the medium.
Final Disinfection. When all work is finished, the work area is treated with disinfectant to
ensure that any microorganisms deposited during any of the procedures are eliminated. ` lOMoAR cPSD| 58504431
Figure 2.1. Microbiological transfer instruments. (a) Inoculating needle, and (b) inoculating loop.
1.2. CULTURE TECHNIQUE
Loops vs. Needles
When using a liquid culture as the providing source of microorganisms, loop should be used for
transferring (or inoculating). If, however, the donor microorganisms are from a solid culture
medium (such as from agar slant or agar plate), loop or needle can be used as transferring tools.
In this case, when a large inoculum is needed in the transfer, a loop will be used. Meanwhile,
needles will be preferred when making transfers in pure culture isolations and making stab
cultures. In pure culture isolations, a needle is inserted into the center of a colony for the transfer.
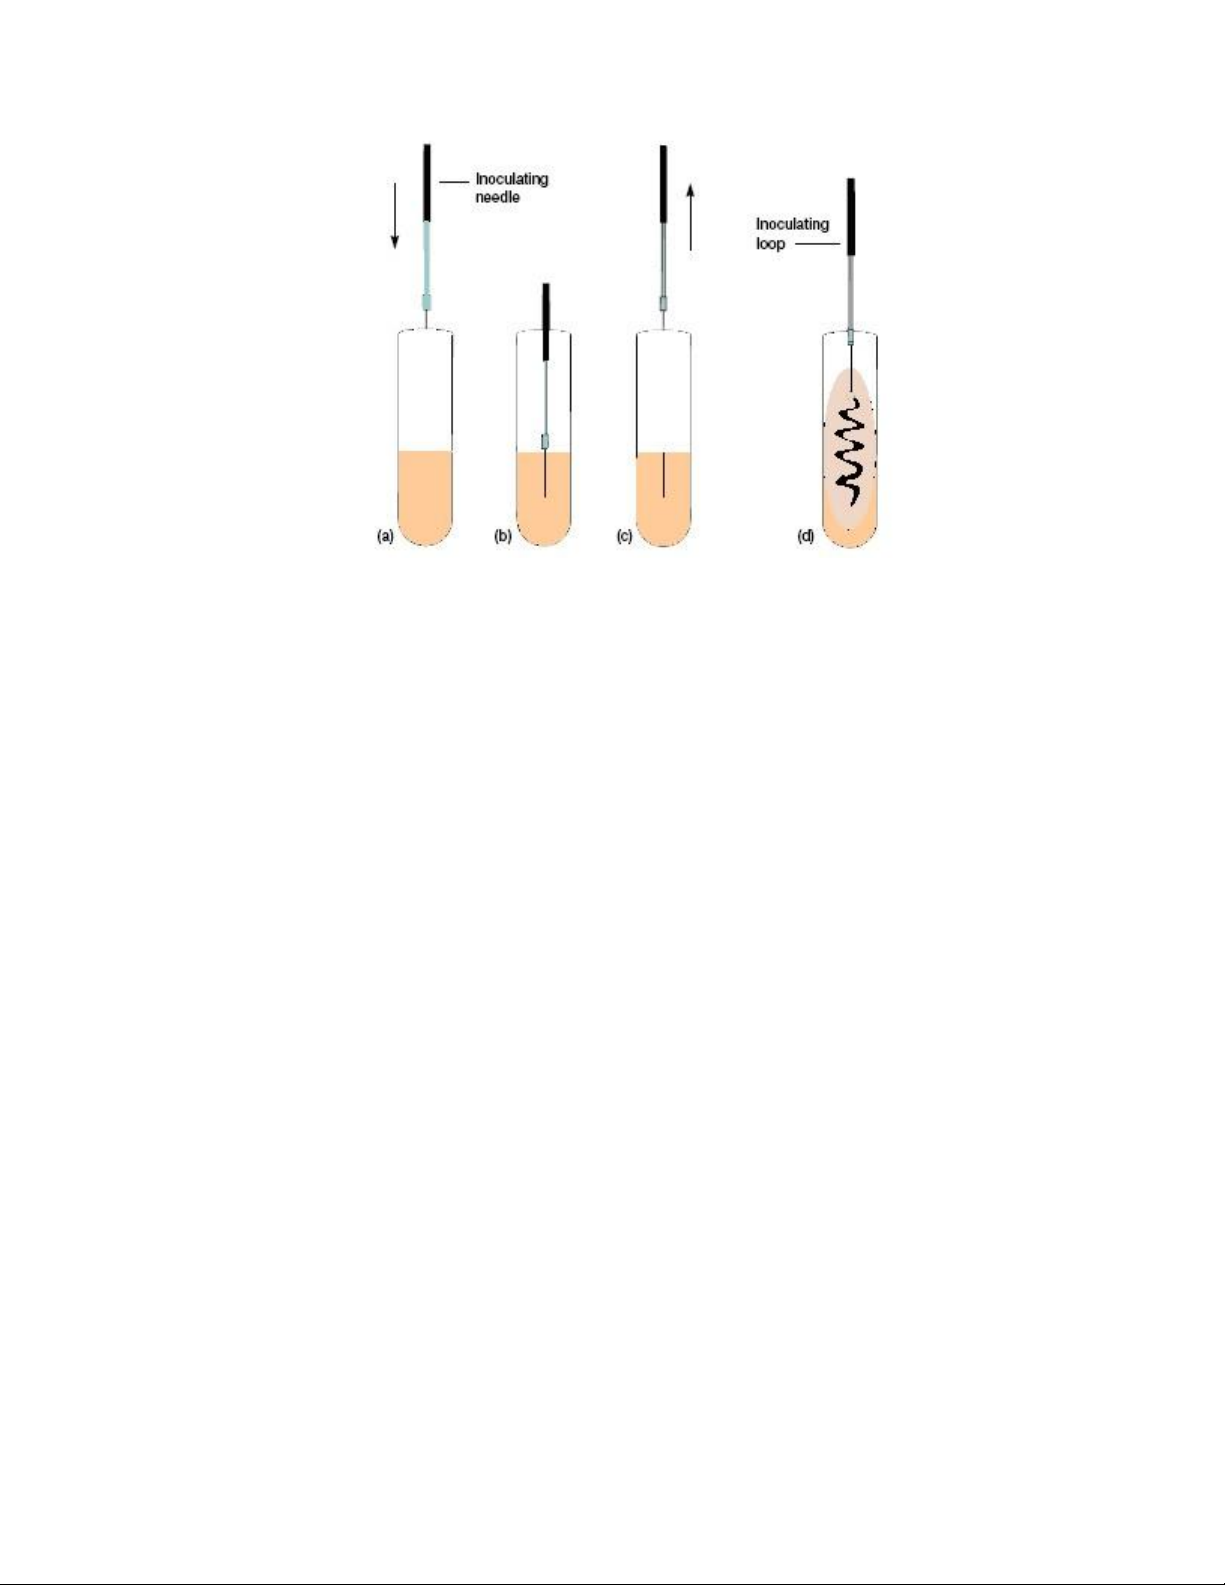
This technique is used, primarily, when working with mixed cultures (Figure 2.2) lOMoAR cPSD| 58504431
Figure 2.2. Transferring techniques. (a)-(c) Stab techniques for culturing bacteria. Notice that the inoculating
needle is moved into the tube without touching the walls of the tube and the needle penetrates medium to 2/3 its
depth. (d) Techniques for streaking the surface of the slant with the loop.
When we try to study the bacterial flora of the body, soil, water, food, or any other part of our
environment, we soon discover that bacteria exist in mixed populations. It is only in very rare
situations that they occur as a single species. To be able to study the cultural, morphological,
and physiological characteristics of an individual species, it is essential, first of all, that the
organism be separated from the other species that are normally found in its habitat; in other
words, we must have a pure culture of the microorganism. Several different methods of getting
a pure culture from a mixed culture are available to us. The two most frequently used methods
involve making a streak plate or a pour plate. Both plate techniques involve thinning the
organisms so that the individual species can be selected from the others. Streak plate method
For economy of materials and time, this method is best. It requires a certain amount of skill,
however, which is forthcoming with experience. A properly executed streak plate will give as
good isolation as is desired for most work. Figure 2.3 illustrates how colonies of a mixed culture
should be spread out on a properly made streak plate. The important thing is to produce good spacing between colonies. ` lOMoAR cPSD| 58504431
Figure 2.3: If your streak reveals well-isolated colonies of three colors (red, white and yellow), you will
have a plate suitable for subculturing. 1.3. SUBCULTURE
The next step in the development of a pure culture is to transfer the organisms from the Petri
plate to a tube of nutrient broth or a slant of nutrient agar. After this subculture has been
incubated for 24 hours, a stained slide of the culture can be made to determine if a pure culture
has been achieved. When transferring the organisms from the plate, an inoculating needle
(straight wire) is used instead of the wire loop. The needle is inserted into the center of the
colony where there is a greater probability of getting only one species of organism. We do
subculture by the technique in the figure 2.2. 2. PROCEDURE
To gain some practice in aseptic transfer of bacterial cultures, three simple transfers will be
performed here in this exercise: (1) broth culture to broth, (2) agar slant culture to agar slant,
(3) agar plate to agar slant, and (4) broth to agar plate. Proceed as follows:
2.1. TRANSFER FROM BROTH CULTURE TO ANOTHER BROTH
Do a broth tube to broth tube inoculation, using the following technique. Figure 2.4 illustrates
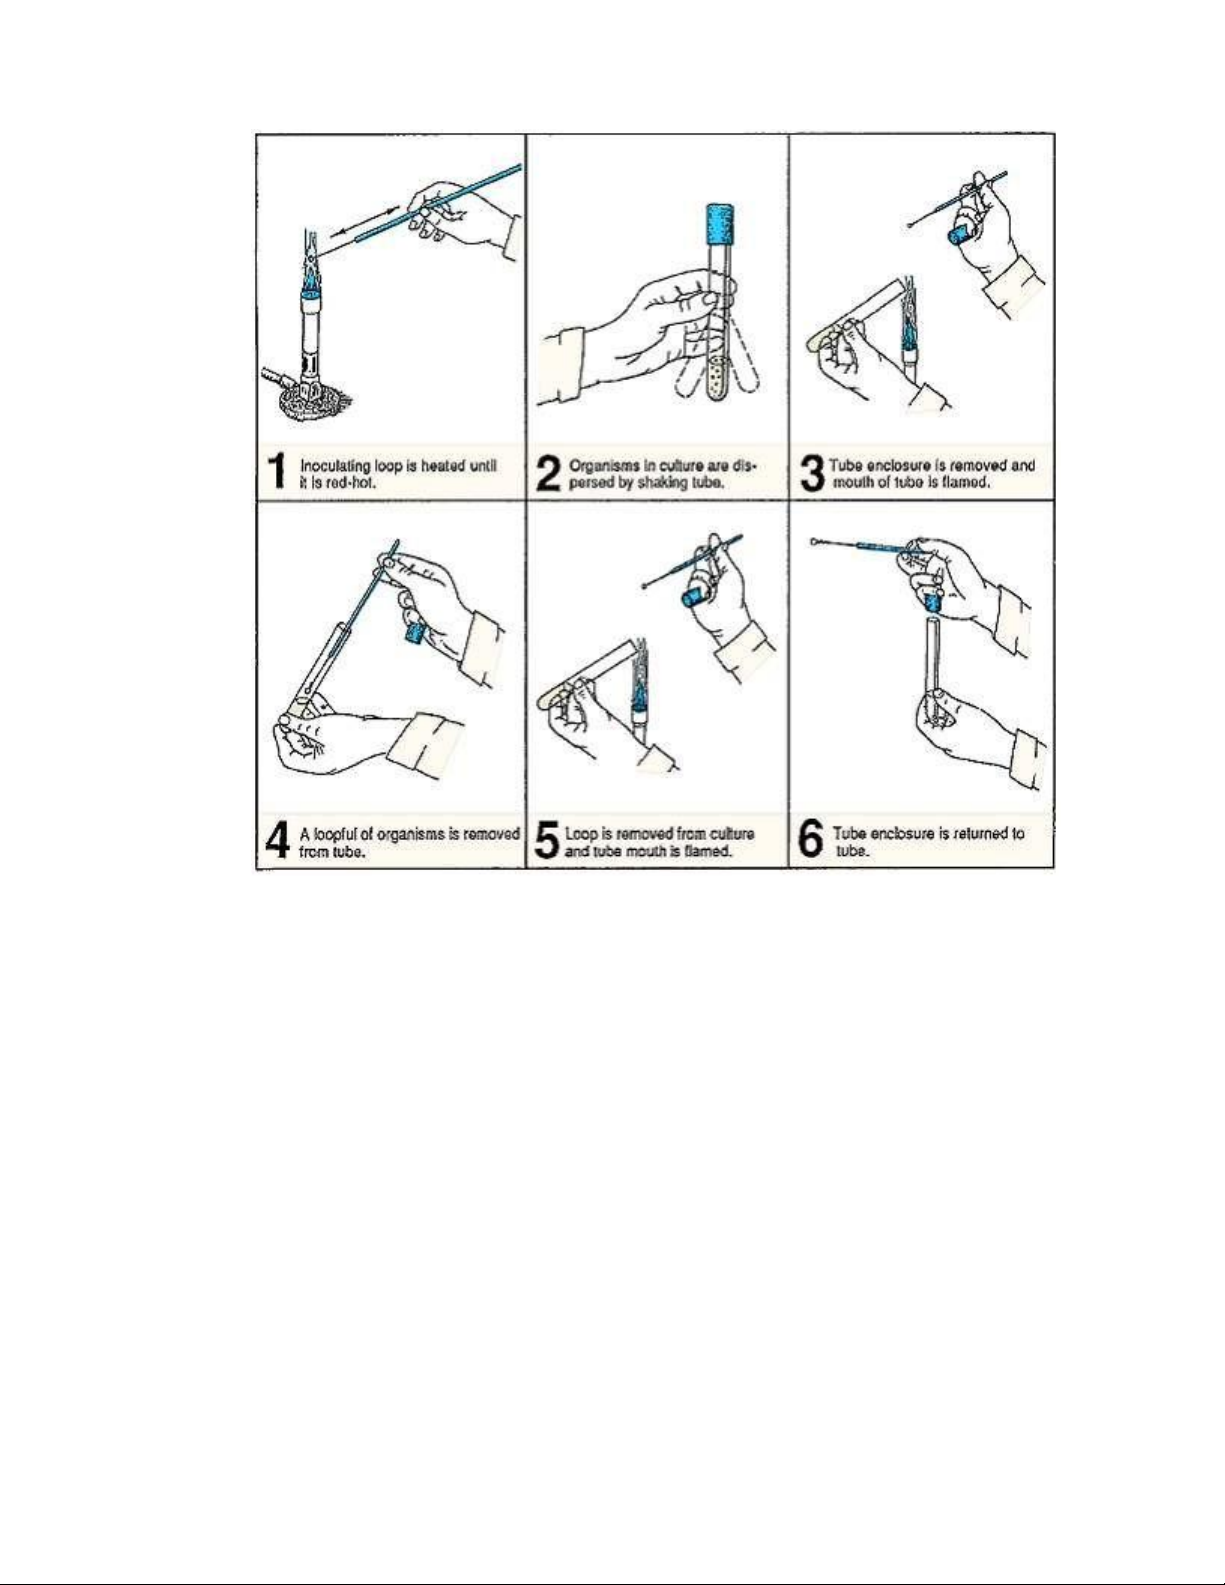
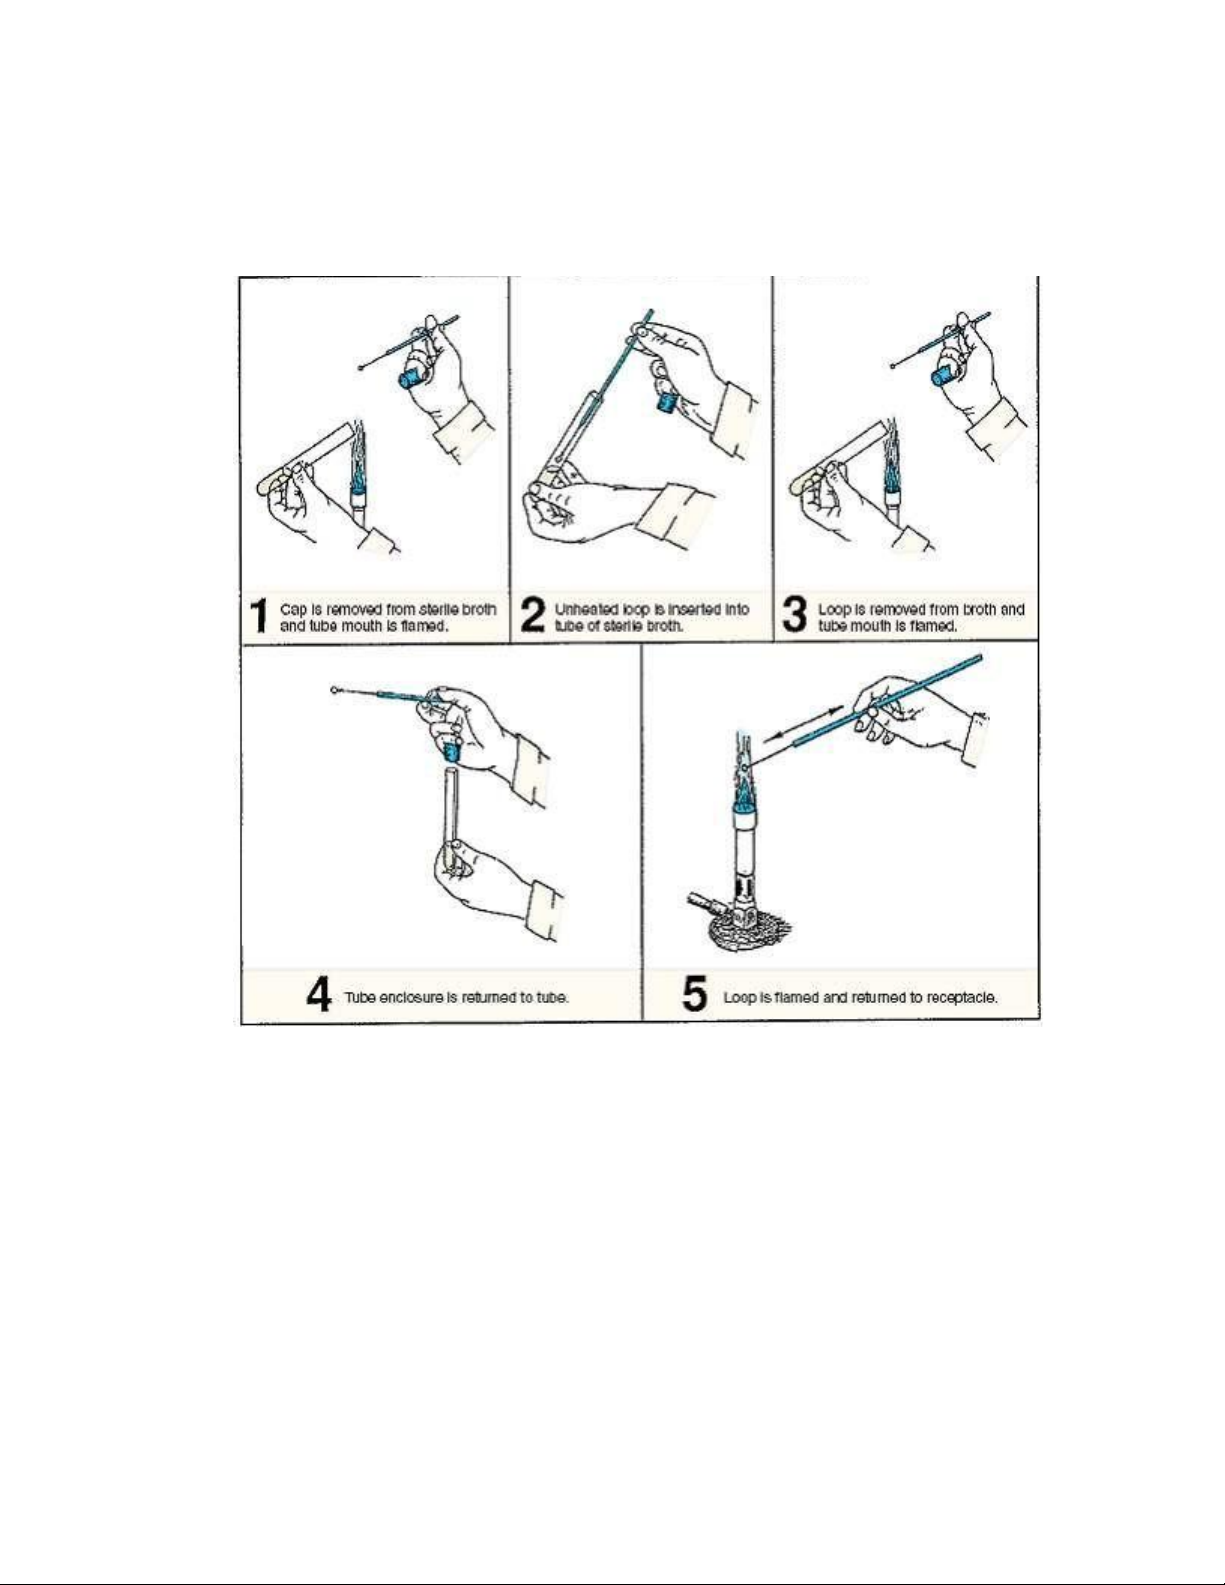
the procedure for removing organisms from a culture, and figure 2.5 shows how to inoculate a tube of sterile broth. lOMoAR cPSD| 58504431
Figure 2.4. Procedure for removing organisms from a broth culture with inoculating loop. Materials and tools:
Broth culture of Escherichia coli
Tubes of sterile nutrient broth or sterile LB Inoculating loop Bunsen burner and lighter Disinfectant and tissue paper Marking pen
1. Prepare your desktop by swabbing down its surface with a disinfectant.
2. Using a marking pen to label a tube of sterile nutrient broth with your initials and E. coli.
3. Sterilize your inoculating loop by holding it over the flame of a Bunsen burner until it
becomes bright red. The entire wire must be heated. See illustration 1, figure 2.4.
4. Using your free hand, gently shake the tube to disperse the culture (illustration 2, figure 2.4). ` lOMoAR cPSD| 58504431
5. Grasp the tube cap with the little finger of your hand holding the inoculating loop and
remove it from the tube. Flame the mouth of the tube as shown in illustration 3, figure 2.4.
6. Insert the inoculating loop into the culture (illustration 4, figure 2.4).
Figure 2.5. Procedure for inoculating a nutrient broth.
7. Remove the loop containing the culture, flame the mouth of the tube again (illustration
5, figure 2.4), and recap the tube (illustration 6). Place the culture tube back on the test-tube rack.
8. Grasp a tube of sterile nutrient broth with your free hand, carefully remove the cap
with your little finger, and flame the mouth of this tube (illustration 1, figure 2.5).
9. Without flaming the loop, insert it into the sterile broth, inoculating it (illustration 2,
figure 2.5). To disperse the organisms into the medium, move the loop back and forth in the tube.
10. Remove the loop from the tube and flame the mouth (illustration 3, figure 2.5).
Replace the cap on the tube (illustration 4, figure 2.5).
11. Sterilize the loop by flaming it (illustration 5, figure 2.5). Return the loop to its container. lOMoAR cPSD| 58504431
12. Incubate the culture you just inoculated at 37°C for 24–48 hours.
2.2. TRANSFER OF BACTERIA FROM SLANT TO SLANT
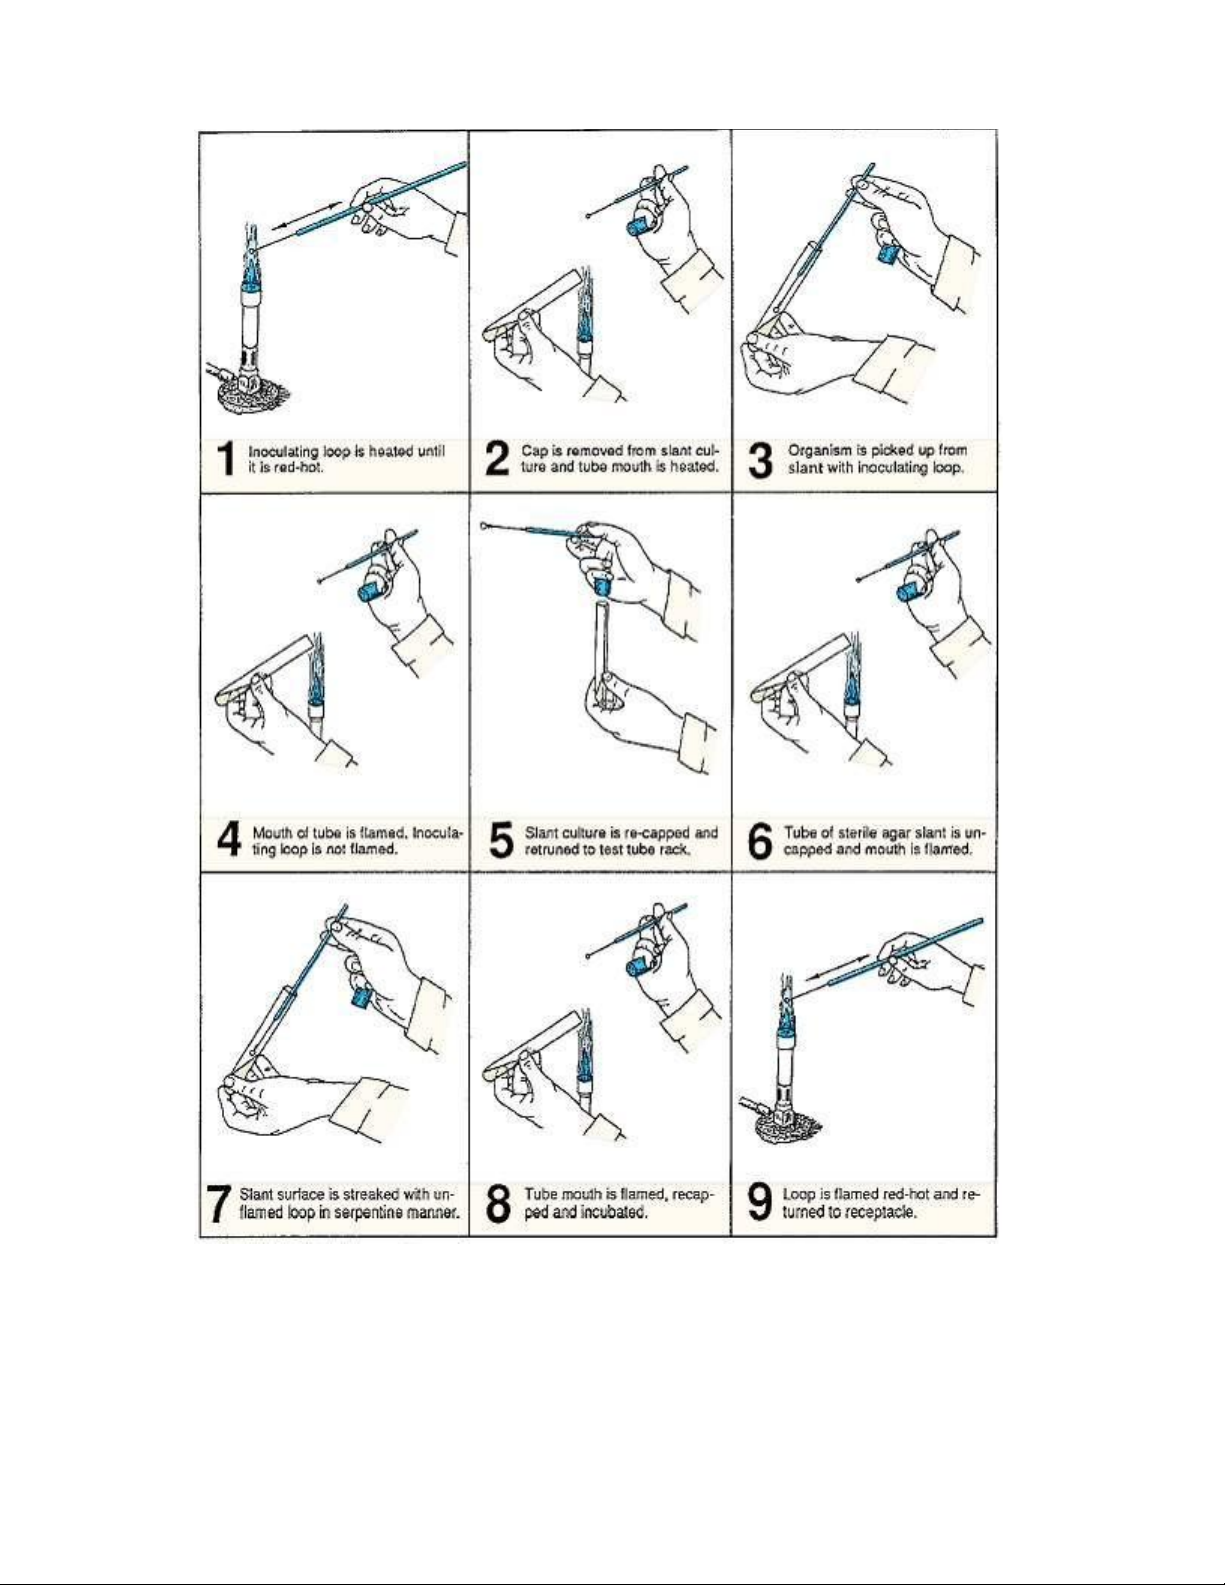
To inoculate a sterile nutrient agar slant from an agar slant culture, use the following procedure.
Figure 2.6 illustrates the entire process. Materials and tools:
Agar slant culture of E. coli
Sterile nutrient agar slant or LB agar slant Inoculating loop Bunsen burner and lighter Disinfectant and tissue paper Marking pen
1. Prepare your desktop by swabbing down its surface with a disinfectant.
2. With a marking pen label a tube of nutrient agar slant with your initials and E. coli.
3. Sterilize your inoculating loop by holding it over the flame of a Bunsen burner until it
becomes bright red (illustration 1, figure 2.6). The entire wire must be heated. Allow the loop to cool completely.
4. Using your free hand, pick up the slant culture of E. coli and remove the cap using the
little finger of the hand that is holding the loop (illustration 2, figure 2.6).
5. Flame the mouth of the tube and insert the cooled loop into the tube. Pick up some of
the culture on the loop (illustration 3, figure 2.6) and remove the loop from the tube
6. Flame the mouth of the tube (illustrations 4 and 5, figure 2.6) and replace the cap,
being careful not to burn your hand. Return tube to rack.
7. Pick up a sterile nutrient agar slant with your free hand, remove the cap with your little
finger as before, and flame the mouth of the tube (illustration 6, figure 2.6).
8. Without flaming the loop containing the culture, insert the loop into the tube and
gently inoculate the surface of the slant by moving the loop back and forth over the
agar surface, while moving up the surface of the slant (illustration 7, figure 2.6). This
should involve a type of serpentine motion.
9. Remove the loop, flame the mouth of the tube, and recap the tube (illustration 8, figure
2.6). Replace the tube in the rack.
10. Flame the loop, heating the entire wire to red-hot (illustration 9, figure 2.6), allow to
cool, and place the loop in its container.
11. Incubate the inoculated agar slant at 37° C for 24–48 hours. ` lOMoAR cPSD| 58504431 Figure
2.6. Procedure for inoculating a nutrient agar slant from a slant culture. lOMoAR cPSD| 58504431
2.3. TRANSFER BACTERIA FROM AGAR PLATE TO AGAR SLANT
The transfer of organisms from colonies on agar plates to slants or broth tubes is very similar to
the procedures used in the last two transfers (broth to broth and slant to slant). The following rules should be observed.
Plate Handling Media in plates must always be protected against contamination. To prevent
exposure to air contamination, covers should always be left closed. When organisms are
removed from a plate culture, the cover should be only partially opened as shown in illustration 2, figure 2.7.
Flaming Procedures Inoculating loops or needles must be flamed in the same manner that you
used when working with previous tubes. One difference when working with plates is that plates are never flamed!
Plate Labeling Petri plates with media in them are always labeled on the bottom. Inoculated
plates are preferably stored upside down. To transfer organisms from a Petri plate to an agar
slant, use the following procedure: Materials and tools:
Nutrient agar plate with bacterial colonies Sterile nutrient agar slant Inoculating loop Marking pen Bunsen burner and lighter Disinfectant and tissue paper ` lOMoAR cPSD| 58504431
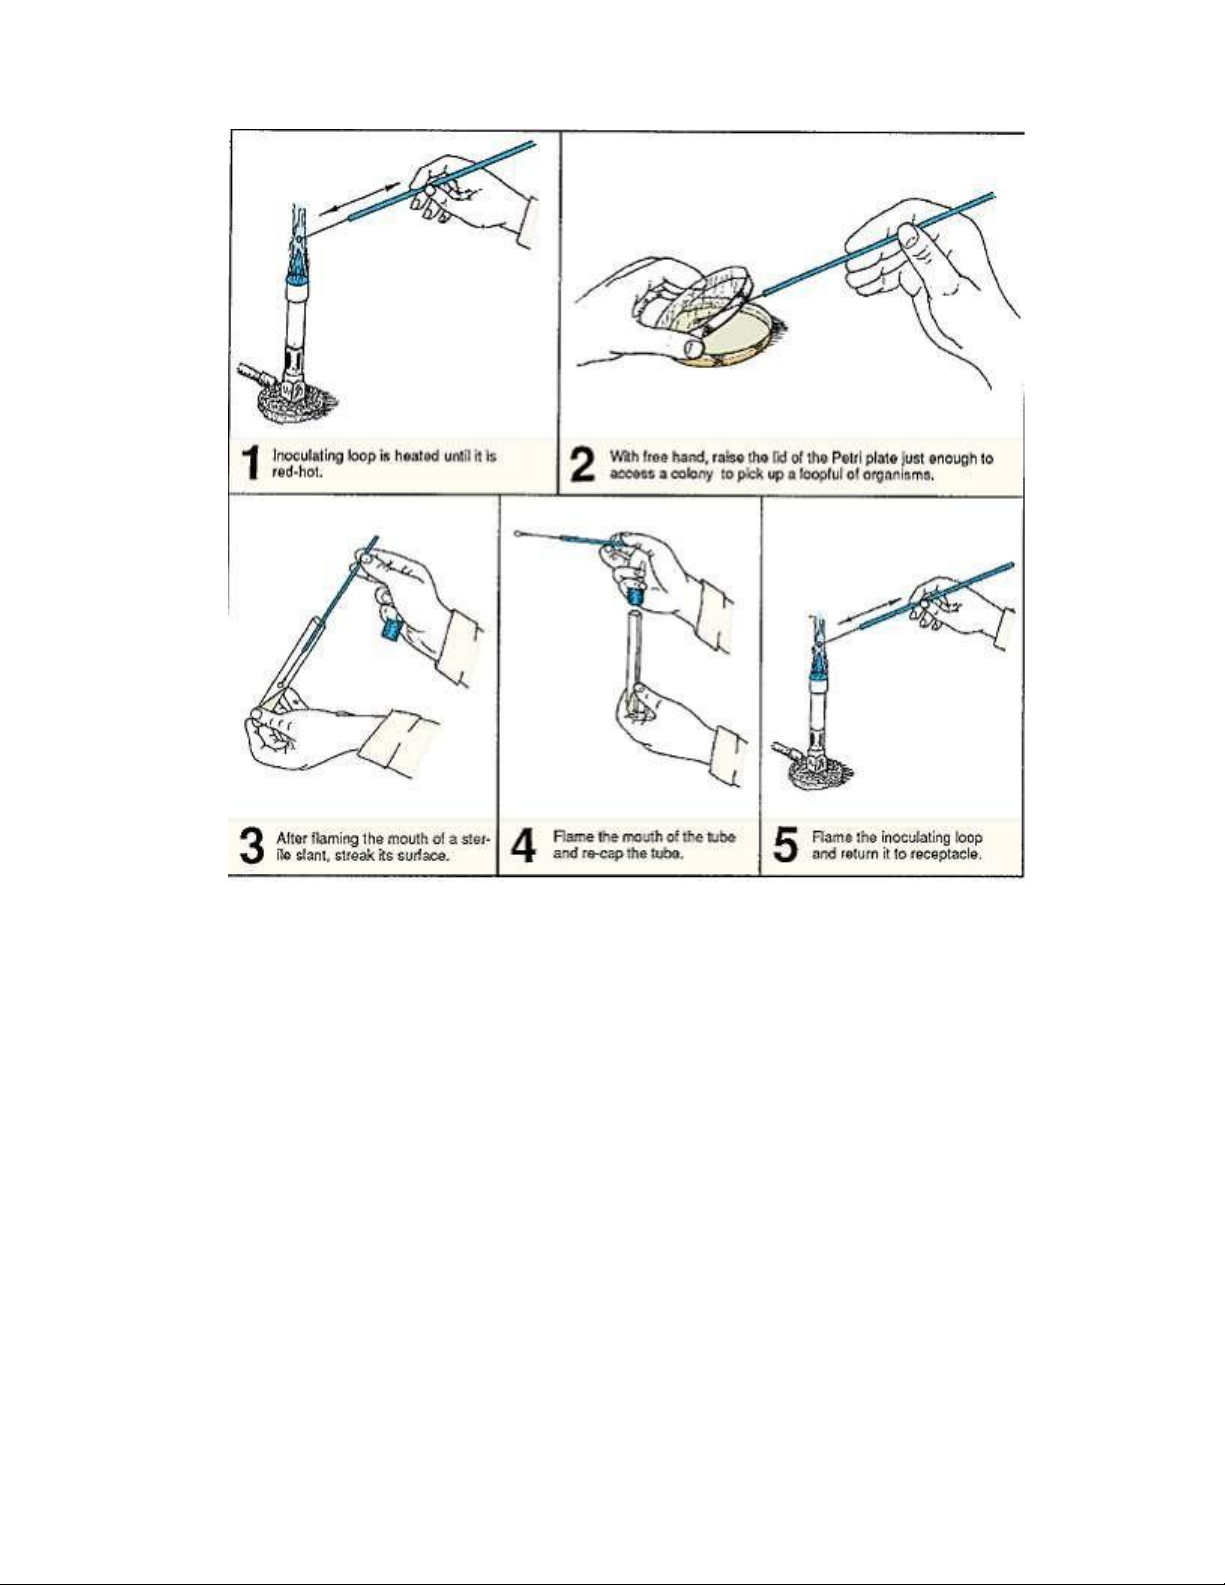
Figure 2.7. Procedure for inoculating the nutrient agar slant from an agar plate. Procedure:
1. If you have not done so, swab your work area with disinfectant. Allow area to dry.
2. Label a sterile nutrient agar slant with your name and organism to be transferred.
3. Flame an inoculating loop until it is red-hot (illustration 1, figure 2.7). Allow the loop to cool.
4. As shown in illustration 2, figure 2.7, raise the lid of a Petri plate sufficiently to access
a colony with your sterile loop. Do not gouge into the agar with your loop as you pick
up organisms, and do not completely remove the lid, exposing the surface to the air.
Close the lid once you have picked up the organisms.
5. With your free hand, pick up the sterile nutrient agar slant tube. Remove the cap by
grasping the cap with the little finger of the hand that is holding the loop.
6. Flame the mouth of the tube and insert the loop into the tube to inoculate the surface
of the slant, using a serpentine motion (illustration 3, figure 2.7). Avoid disrupting the agar surface with the loop. lOMoAR cPSD| 58504431
7. Remove the loop from the tube and flame the mouth of the tube. Replace the cap on
the tube (illustration 4, figure 2.7).
8. Flame the loop (illustration 5, figure 2.7) and place it in its container.
9. Incubate the nutrient agar slant at 37° C for 24–48 hours. 2.4.
TRANSFERING CULTURE FROM BROTH TO AGAR PLATE Materials and tools: Wire loop (Inoculating loop) Marking pen
1 nutrient agar sterile Petri plate or LB agar plate
1 broth culture of Escherichia coli Lighter and Bunsen burner Disinfectant and tissue paper
1. Prepare your tabletop by disinfecting its surface with the disinfectant that is available in
the laboratory. Use a tissue paper or cotton to scrub it clean.
2. Label the bottom surface of an agar sterile Petri plate with your name and date. Use a marking pen.
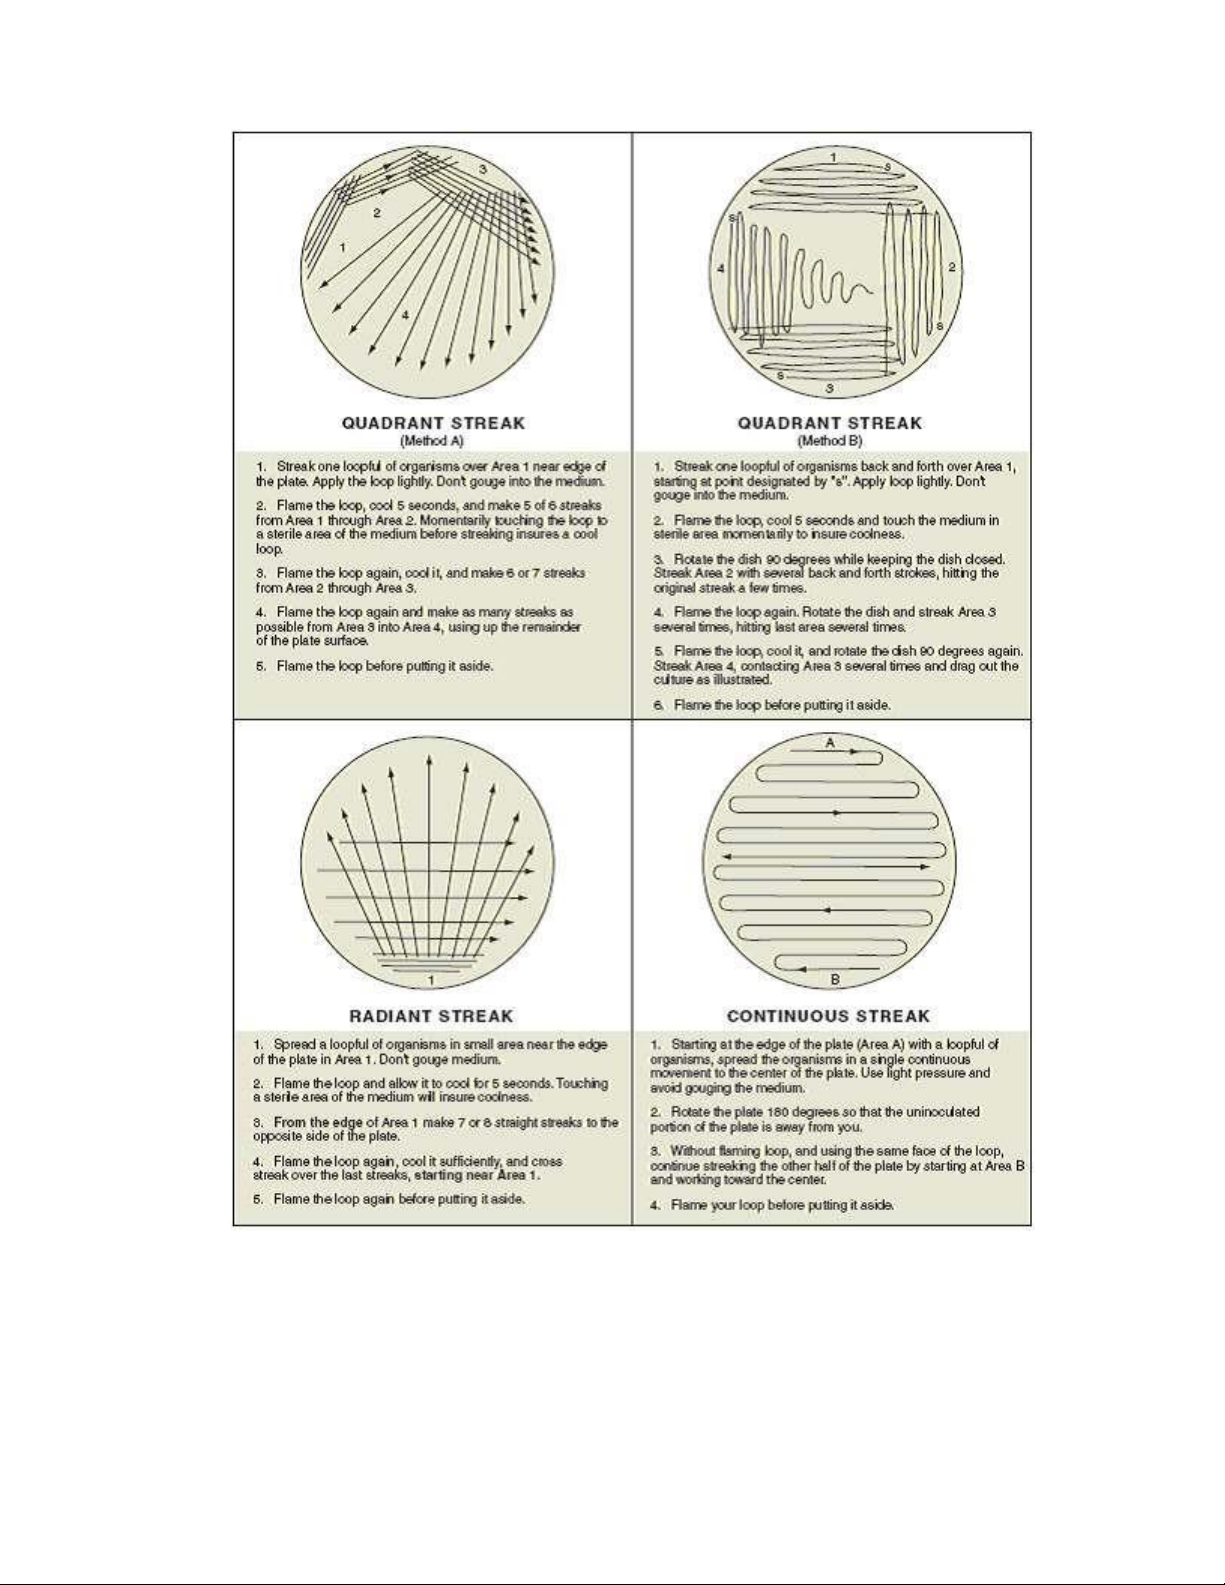
3. Streak the plate by one of the methods shown in figure 2.9. Your instructor will indicate
which technique you should use.
Caution: Be sure to follow the routine in figure 2.8 and 2.10 for getting the organism out of culture.
4. Incubate the plate in an inverted position at 25° C for 24–48 hours. By incubating plates
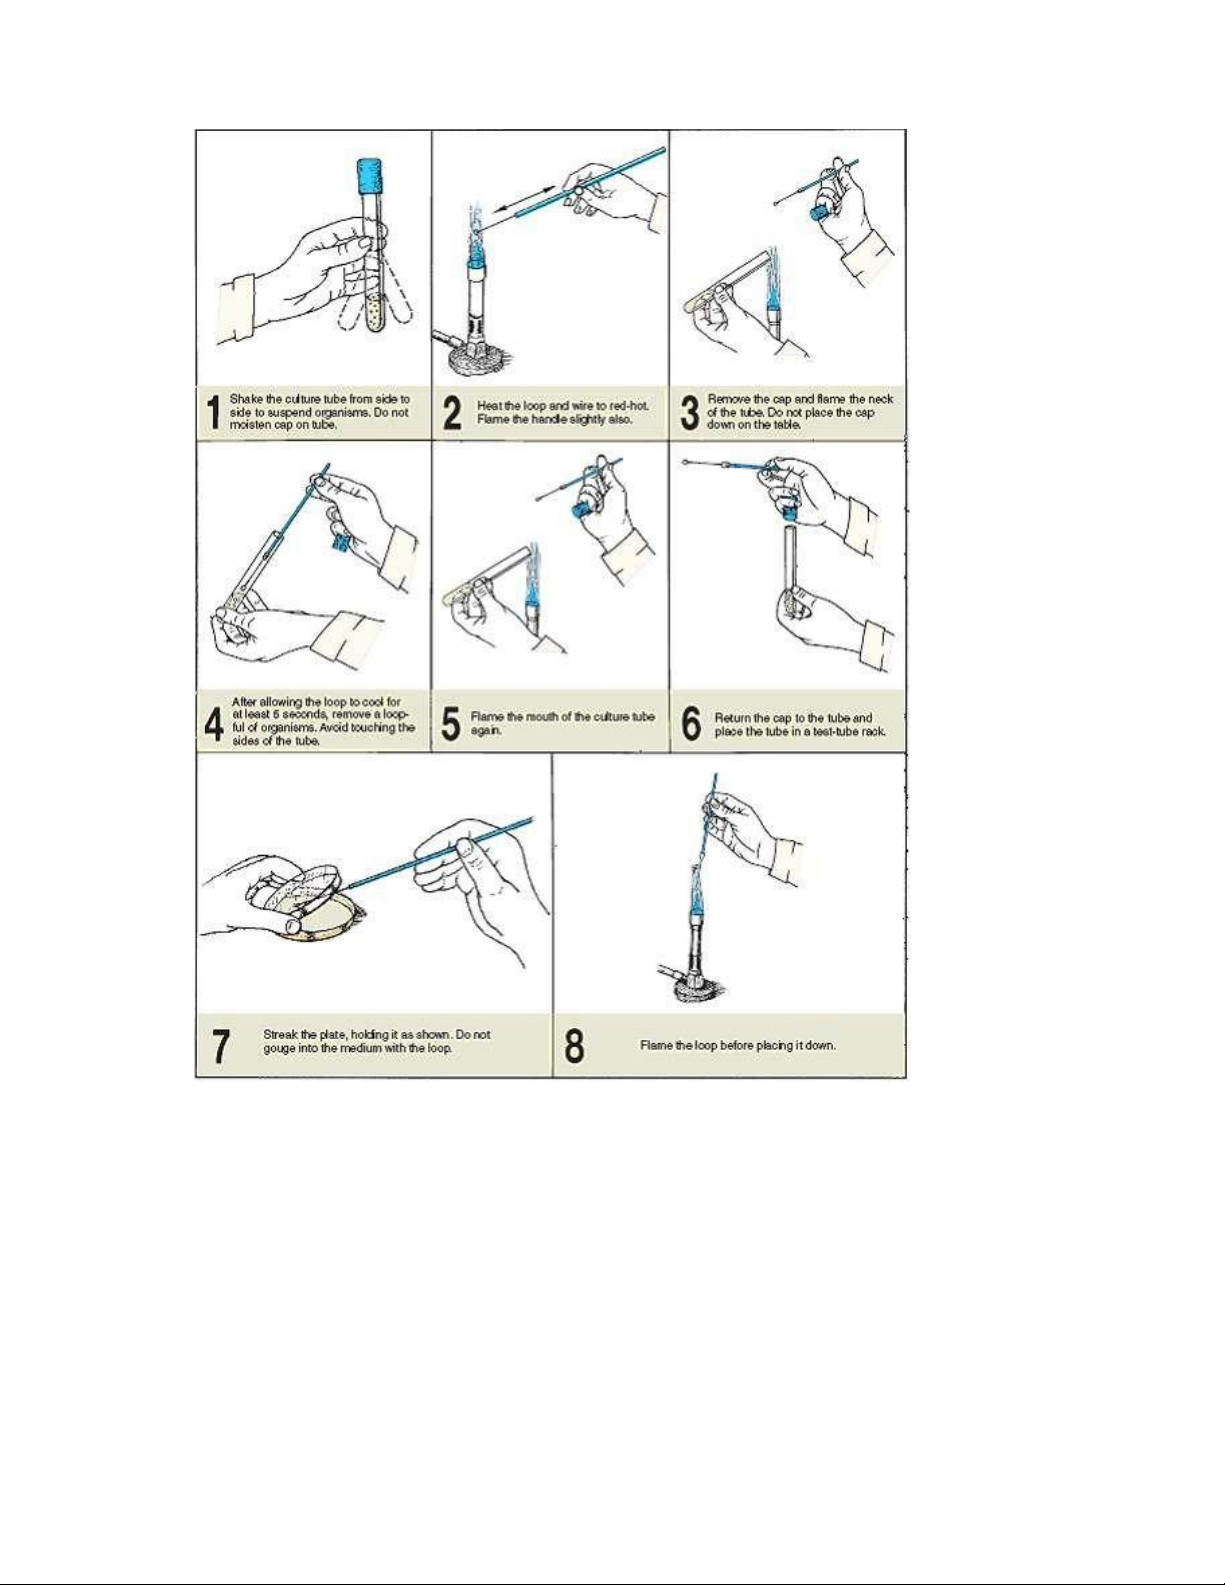
upside down, the problem of moisture on the cover is minimized. ` lOMoAR cPSD| 58504431 Figure 2.8.
Routine for inoculating a petri plate. lOMoAR cPSD| 58504431
Figure 2.9. Four different streak techniques. ` lOMoAR cPSD| 58504431
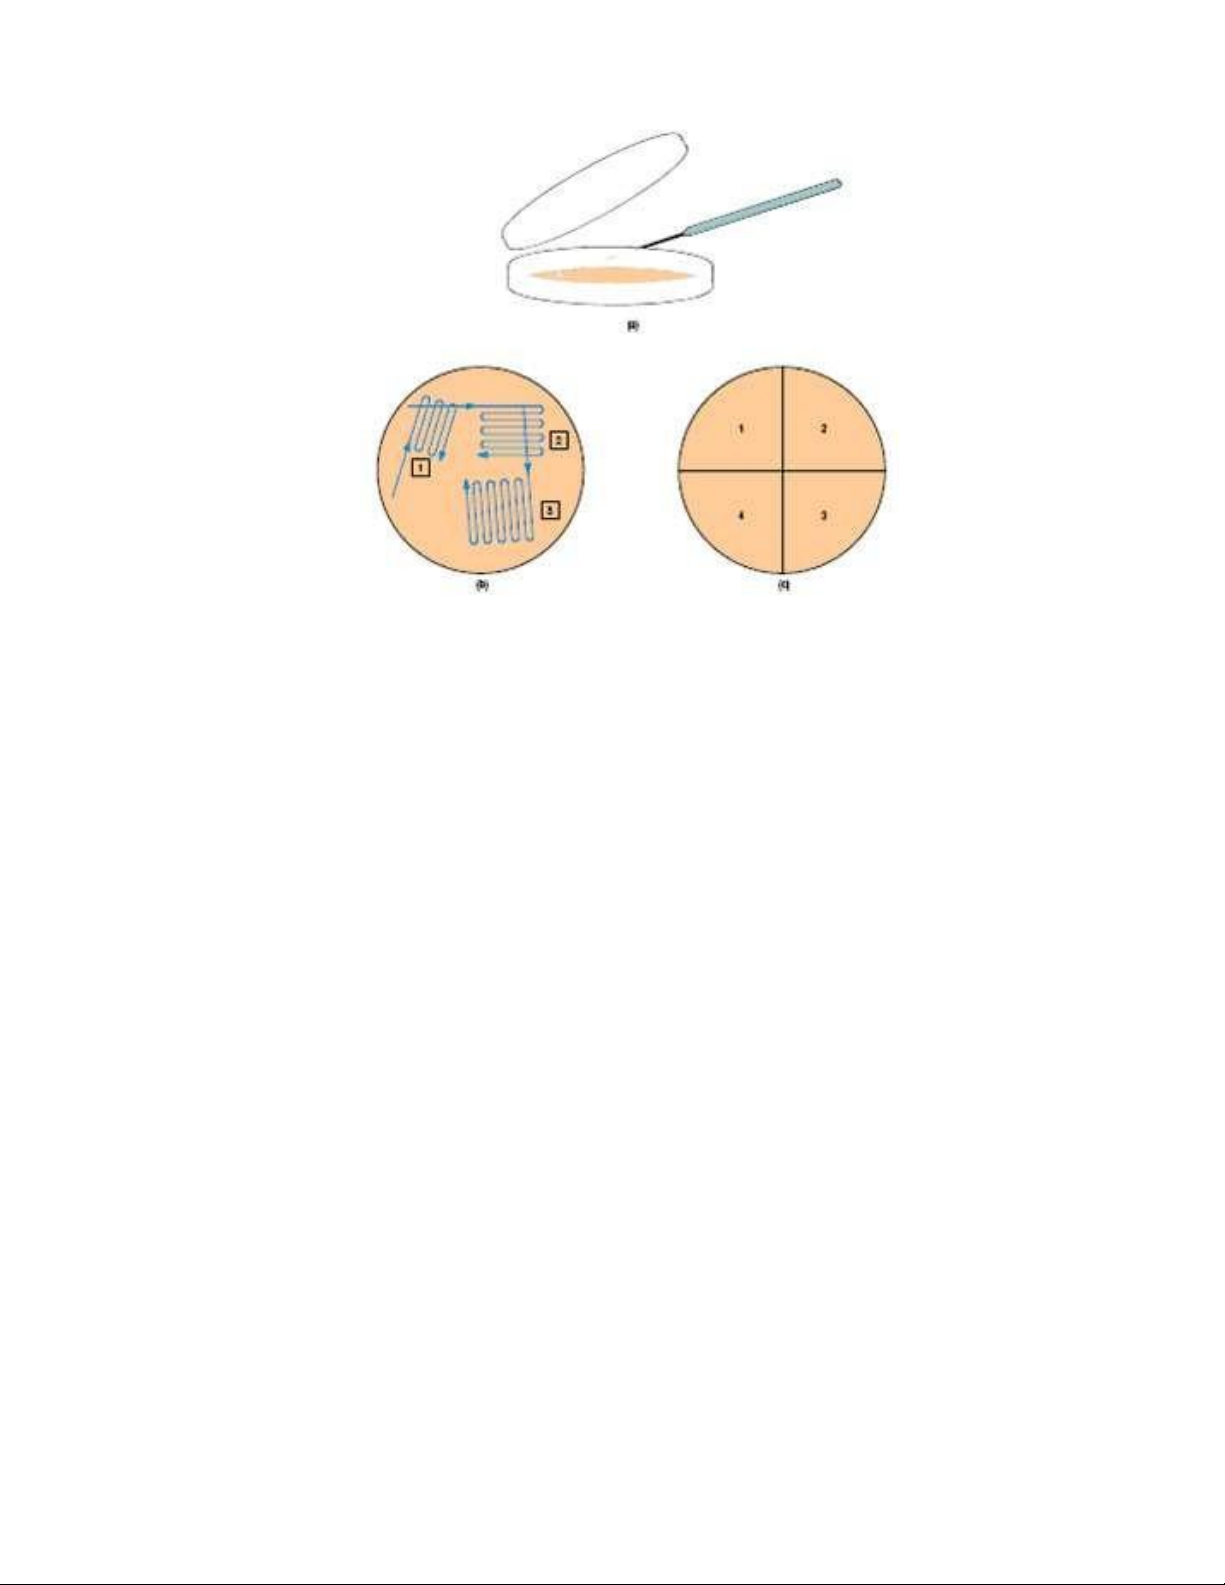
Figure 2.10. Techniques when inoculating a petri plate. (a) Way to open lid when performing streaking, (b)
Streaking pattern, and (c) Dividing the plate into quarters for efficient streaking. 3. DISCUSSION
1. What is the purpose of flaming in the aseptic technique?
2. In all routine laboratory work, petri plates are labeled on the bottom. Why?
3. In the streak-plate technique, how are microorganisms diluted and spread out to form individual colonies?
4. Which area of a streak plate will contain the greatest amount of growth? The least
amount of growth? Explain your answers.
5. Draw your streaking patterns. Did you obtain isolated colonies? If not, what went wrong?
6. Does each discrete colony represent the growth of one cell? Explain your answer.
Why can a single colony on a plate be used to start a pure culture?
7. How can a streak plate become contaminated?
8. What is the purpose of sub-culturing?
9. In sub-culturing, when do you use the inoculating loop?
10. How is it possible to contaminate a subculture?
11. How would you determine whether culture media given to you by the laboratory
instructor are sterile before you use them?
Tài liệu liên quan:
-
Report Môn Microbiology Lab | Trường Đại học Quốc tế, Đại học Quốc gia Thành phố Hồ Chí Minh
133 67 -
Lab 3 Report: Key Observations and Questions | Môn Microbiology Lab - Trường Đại học Quốc tế, Đại học Quốc gia Thành phố Hồ Chí Minh
99 50 -
Lab Manual: Wet Mount and Gram Staining | Môn Microbiology Lab - Trường Đại học Quốc tế, Đại học Quốc gia Thành phố Hồ Chí Minh
102 51 -
Lab Manual: Practical 5 - Bacterial Population Counts & Identification | Môn Microbiology Lab - Trường Đại học Quốc tế, Đại học Quốc gia Thành phố Hồ Chí Minh
110 55